


How to Make a Miniature Polish Tiled Stove: A Little Hearth in Bloom

My Vision for This Small World
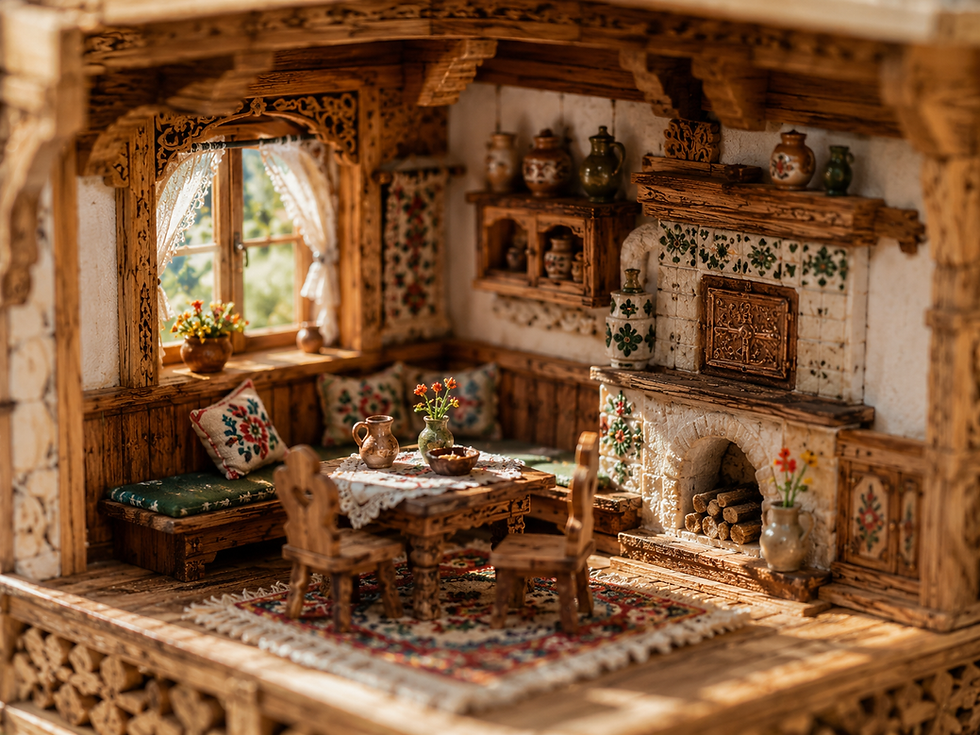
I wanted to give the miniature Polish tiled stove from my Zakopane cottage its own moment in the sunlight. Creamy tiles, red flowers, cobalt-blue petals and leafy green stems turn a practical-looking little structure into the room’s most cheerful resident. For this guide, I’m focusing on the details that create that effect: a stepped silhouette, softly rounded tile edges, a dark firebox and a ceramic-looking finish. There is plenty of room here for your own floral flourishes.
Some links earn me a commission from qualifying purchases and help keep this tiny world growing. As an Amazon Associate I earn from qualifying purchases.
For another tiny world full of decorative detail, Anavrin’s Midnight In Venezia Book Nook Kit brings balconies, flower boxes and a little canal together. As an Anavrin Associate I earn from qualifying purchases. Enter code EOUFQ5ZWKCSNGM for 10% off select products.

A Small Stove with a Big Personality
The inspiration began with the stove in my miniature Zakopane cottage interior. A complete cottage is a lovely undertaking, but one beautifully detailed stove can bring that same warmth to a room box, a shelf vignette or an existing dollhouse. You can concentrate your patience on one little object and give every flower its own tiny patch of sunshine.
There is a real architectural connection behind the idea. Zakopane’s official account of Villa Koliba, designed by Stanisław Witkiewicz and built in 1892–93, describes its specially designed tiled stoves alongside coordinated furnishings and fittings. Our miniature takes inspiration from that richly considered approach to an interior. The painted flowers and proportions here are a creative interpretation, rather than a measured reproduction of a particular historic stove.
Look closely at the concept image and three features do most of the work. The base feels solid. The body steps inward as it rises. Broad cream surfaces give the flowers breathing room, while the blackened-metal effect around the firebox adds a useful dark contrast. Keep those relationships and your stove will feel convincing even if you simplify every petal.
Plan Your Miniature Polish Tiled Stove
A suggested starting scale is 1:12, where one model inch represents one real-world foot. For a compact room-box version, try an overall height of about 150 mm, a base around 75 mm wide and 55 mm deep, and an upper body narrower than the lower one. These are proposed design dimensions, not measurements taken from the illustration or an antique.
If a tiny hearth is your favorite part of a scene, Rolife Fireside Music Night pairs its little fireplace with three musical bears. It is a cheerful kit to explore alongside your own handmade room-box details.

Make a paper silhouette and stand it in your room before cutting anything sturdy. Check the ceiling, nearby furniture and the space needed for the projecting trim. A stove can be delightfully grand without borrowing half the dining table’s floor space.
Choose your surface method now. The easiest version uses individual pieces of smooth card, painted and varnished to suggest ceramic. The more textured version uses small air-dry-clay tiles, dried separately before assembly. Both follow the same construction sequence. Card is lighter and more predictable; clay offers gently irregular edges and a satisfying handmade surface.
This is an indoor decorative model. The glowing fire in the illustration is visual inspiration only. Never add a candle, flame, incense, heating element or burning fuel. A painted ember scene works beautifully; optional illumination should use a ready-made low-voltage miniature LED kit installed according to its manufacturer’s instructions.
Artist Tips — Make Your Own Magic
The imagery is AI-assisted and illustrates the design direction. The methods below offer practical ways to interpret its details with familiar miniature-making materials. Your finished stove can have its own proportions, brushwork and personality.
This is a beginner-friendly construction project with more demanding detail painting if you choose the elaborate finish. You will make a simple hollow shell, add shallow tile relief, paint a repeating floral pattern and suggest cast iron with layered card. Work in separate drying stages rather than trying to assemble everything in one sitting.

Supplies for a Tiny Tiled Hearth
Structure: Start with clean, flat packaging card for a paper mock-up and small trim pieces. For the lasting shell, use rigid bookboard or mountboard around 1.5–2 mm thick. A flat scrap of thin plywood makes a useful base if you already have one. Avoid greasy food packaging, curled scraps and anything too weak to support your chosen tile finish.
Tile surfaces: Use smooth card for the simple version, or a clearly labeled air-dry modeling clay for raised tiles. Keep a scrap for testing paint and varnish. Air-dry clay and oven-bake polymer clay have different handling and curing requirements; this guide uses the air-dry route without heating it.
Color and finish: Gather cream, warm brown, red, blue, green and charcoal acrylic paint, plus a compatible water-based satin or gloss varnish. A tiny amount of ochre can soften a cold white. Follow the actual paint and varnish instructions, including ventilation and curing, and test the complete finish on a spare tile.
Assembly and detail: Choose PVA or another craft adhesive labeled for your materials. Clean thin packaging card provides door layers and decorative strips. A few short pieces of dry twig can become display logs. Tiny beads or dots of dimensional craft paint can suggest rivets, provided they suit your scale.
For neat paper mock-ups and folded card experiments, the Scor-Buddy Eighths Mini Scoring Board is a useful addition to a papercraft workbench. Use the scored practice pieces to settle your silhouette before cutting the rigid shell.

Tools: Use a cutting mat, a sharp craft knife, a metal straightedge, pencil, tweezers, fine paintbrushes and a small flat brush. A blunt sculpting tool helps round clay edges. Keep fingers behind the cutting edge, make several light passes and cap the knife between jobs. Optional lighting needs its own accessible battery compartment.
1. Draw the Silhouette and Tile Map
Sketch a front view at the model’s finished size. Divide it into a broad plinth, lower firebox body, narrower upper section and a shallow crown. Mark the ledges between them. Keep this drawing beside your work so that extra trim does not gradually turn your elegant stove into a wedding cake.
Add a provisional tile grid. Tiles around 10–15 mm across can be a manageable starting point at the suggested scale, with selected larger panels for the central floral design. These are decorative planning choices. Adjust them to suit your own stove rather than squeezing tiny slivers around the door.
Mark the firebox before designing surrounding flowers. Leave room for its frame and a small lower ash-door detail. Carry horizontal tile lines around the sides so the pattern feels constructed rather than pasted onto the front.
For the easiest finish, plan a few large decorated tiles with plain cream neighbors. More detailed versions can repeat a little flower or leaf on every tile. Keep a paper copy of the map for painting practice and label the backs of removable pieces lightly in pencil.

2. Build the Hollow Body and Broad Base
Cut the lower shell from rigid board, allowing for material thickness at every joint. For example, if a finished box must be 60 mm wide and its side panels fit between front and back panels, calculate their dimensions from that arrangement rather than cutting four identical rectangles. Dry-fit everything first.
Glue the lower shell square, supporting it while the adhesive dries as directed. Add an internal brace if a broad face flexes. Build the upper shell separately and test its position before attaching it. For the three-tier version in the teaching panels, divide that upper silhouette into two successively narrower boxes. Keep the back open or removable if you plan lighting; a trapped battery is an unwelcome surprise in any scale.
Set the assembled shell on a slightly wider base. A narrow projection around its edges gives the piece visual weight and protects the lowest tile row. Check the model from the front and side while the glue can still be adjusted.
The beginner option is one tall rectangular body with a single projecting crown. It keeps the tiled-stove character while reducing measuring and assembly. Let the structure dry firmly before coating or tiling it, and apply wet products sparingly to avoid warping the board.
3. Make Tiles with Soft Ceramic Edges
For card tiles, cut strips first, then divide them into consistent rectangles using your drawn grid. Lightly soften sharp corners with fine abrasive paper if the card permits it. Brush on a thin acrylic base coat and let the pieces dry flat. Heavy paint puddles can curl small pieces and swallow their edges.
Julie Warren’s Creating Dolls’ House Kitchens in 1/12th Scale is a companion reading choice for furniture enthusiasts. The banner artwork is illustrative.

For clay tiles, roll a small amount to an even thickness of roughly 1.5–2 mm, using matching scrap strips as guides if helpful. Cut a test tile and round its top edges gently with a blunt tool. Dry it according to the specific clay instructions before committing to a whole batch; shrinkage and handling vary between products.
Make the remaining pieces with the same method, plus a few spares. Dry them separately on a suitable flat surface rather than applying wet clay directly over the card shell. For more small clay projects, explore my miniature ceramics and pottery guide. Check the manufacturer’s guidance for turning, drying and sanding. Avoid creating airborne dust; do not sand a product unless its instructions support the method and precautions.
Aim for subtle variation, not deep dents. At miniature scale, a tiny rounded edge catches enough light to suggest ceramic. Keep each tile’s back reasonably flat so it can attach securely later.
4. Fit the Tiles and Build the Ledges
Lay out the dry pieces against your paper map. Test an entire row across the front before attaching it. Distribute small adjustments across several joints instead of leaving one conspicuously wide gap at the corner.

Paint the shell a muted warm gray or cream first; this color will show in the joints. Apply adhesive sparingly and place the tiles from the base upward, checking the horizontal lines as you go. Leave narrow, consistent gaps. Avoid packing real masonry grout into a lightweight card model; the painted backing already provides a clean joint effect.
At outside corners, keep the edges tidy and repeat the same overlap arrangement. You can hide an awkward join beneath a deliberately wider corner strip. Allow the adhesive to set before handling the next face so gravity does not rearrange yesterday’s careful work.
Create the plinth, middle ledges and crown from stacked card strips. Soften their front edges with thin curved card trim or separately dried clay molding. Keep the projections modest and level. Once assembled, these little shelves catch highlights that make the whole stove feel substantial.
5. Paint a Folk-Inspired Garden
Give the finished surfaces a warm cream base, building coverage with thin coats rather than one thick layer. Let each coat dry according to the paint directions. Preserve the tile joints and rounded edges; those tiny shadows are doing useful architectural work.
Practice your flower on spare card first. A simple motif needs only a central dot, several rounded petals and two leaves. For a tulip-like shape, paint a narrow stem, a cup-shaped flower and two upward points. Repeat the same few shapes with varied placement rather than inventing a new botanical species for every tile.
A floral stove can start a lovely conversation with a little cushion or curtain. Hanjunzhao Spring Floral Cotton Squares offer another place to look for gentle color combinations; compare the motif size and fabric weight with your intended miniature scale.

Use the concept’s red, cobalt blue and leafy green as a small, confident palette. Leave cream around each motif. Place the most elaborate arrangement on one broad central panel and let smaller flowers echo it along the sides and base.
My miniature hand-painted floral patterns guide offers more ways to develop your little garden. Turn the model or paint removable tiles flat if that gives your hand better support. Rest your forearm on the table, use a small amount of paint and pause before correcting a wet mistake. Once dry, an unwanted petal can disappear beneath a careful cream touch-up. A slightly lopsided flower often has more charm than a crowded, repeatedly repaired one.
6. Create the Dark Firebox and Optional Glow
Layer thin card to make an arched outer frame, an inner door and a small lower panel. A simple closed door is the easiest option. Add narrow strips for hinges and a small raised handle, keeping the details shallow enough to survive an accidental brush of a sleeve.
Paint the assembly charcoal rather than pure black. When dry, skim the raised edges with a nearly dry brush carrying a little gray or muted metallic paint. Concentrate the highlights on the handle, hinges and relief. This suggests worn metal without turning the door into sparkling jewelry.
For an open-looking firebox, place a dark painted recess behind the frame. A small ember illustration and a couple of painted twig offcuts can provide depth. Any apparent flame remains painted or illuminated scenery, never real heat.

If you add a ready-made LED, test it before closing the shell. Follow its specified voltage and installation instructions, keep the battery pack accessible and avoid pinching wires beneath tiles. Keep batteries and small parts away from children and pets. A convincing unlit stove is a completely finished project, too.
7. Add the Ceramic Finish and Gentle Age
Test the varnish over a fully dried painted sample before touching the model. Check that it dries clear, stays compatible with the paint and gives the sheen you want. A satin surface suggests softly glazed ceramic; selective gloss can make a few tiles catch the window light.
Brush on thin coats according to the product instructions, avoiding pools in flower details and joints. Keep the metal door comparatively matte. That contrast helps the eye read two different materials even though both may begin as card.
For clay versions, remember that sealing does not automatically make air-dry clay waterproof. Crayola’s sealing guidance advises indoor display and compatibility testing for varnished air-dry clay. Follow the guidance for the exact clay you use rather than borrowing another brand’s drying schedule.
Add restrained age only after the base finish is ready. A little warm gray along selected joints or a faint brown shadow beneath a ledge can suggest time. Keep the flower faces bright and the effect delicate. Let all coatings cure as directed before setting the stove against textiles or packing it away.

8. Set the Scene and Photograph the Details
Place the stove beside a timber-textured wall or a small window vignette. Repeat one flower color in a cushion, rug or pottery piece, then give the decorated tiles some uncluttered space. A tiny kettle or wood basket can suggest daily life without covering the work you have just finished.
Photograph from approximately miniature eye level, with the camera facing a little across the front so one side remains visible. This reveals the stepped body and tile thickness. Keep vertical edges upright and use a simple background that does not compete with the flowers.
Try soft window light from one side and a white card opposite to lift the shadows. Move the lamp or model if the glossy tiles show a large distracting reflection. Use a cool-running photographic light according to its instructions; avoid heating the model to chase a cozy color.
Take one complete view, one close-up of the painted tiles and one of the firebox. If your camera struggles to focus, step back slightly and crop rather than pressing the lens against the stove. A stable support and a gentle shutter release help keep those tiny leaves crisp.

When the Little Details Misbehave
The body leans: Check the shell before tiling. Correct loose joints while the adhesive allows adjustment, or rebuild a seriously distorted section before adding finish. Tile decoration cannot straighten the structure underneath.
Tiles curl or crack: Reduce wet coating on card. For clay, follow its drying guidance and test thickness before making replacements. Attach only fully dried pieces and avoid forcing curved tiles flat.
The flowers look crowded: Paint over selected motifs in cream and leave more plain tiles. A repeated small flower and one generous central design usually read better than dense detail everywhere.
The finish turns cloudy or sticky: Stop adding coats. Check compatibility, temperature and curing instructions for the actual products. Test a fresh sample before attempting a repair; more varnish can make the problem harder to undo.
The stove looks too new: Add subtle joint shadows and vary the sheen, keeping the decoration readable. Save heavy distressing for a deliberately neglected scene.
For a gift that could become the setting for many tiny handmade details, the Greenleaf Beacon Hill Dollhouse Kit offers an inviting larger project. It is an unassembled kit, so plan the paint, furnishings and finishing as their own creative choices.

A Warm Little Corner, Your Way
You can keep this stove creamy and floral, turn it deep green with quieter decoration, or give it a simpler cottage palette. Preserve the stepped shape, believable tile edges and contrast around the firebox, and the character will follow.
I love how a project this focused can influence an entire miniature room. One painted leaf suggests a cushion, one blue flower invites a pottery jug, and suddenly the corner seems ready for company. Begin with your paper silhouette and one practice tile. The rest of the tiny garden can grow from there.
Another gift idea for an architecture lover is LEGO Architecture Neuschwanstein Castle 21063. Its layered silhouette makes a delightful larger-scale companion interest to the stepped forms and patient detail work of miniature making.










Comments