


A Wind in the Willows Miniature: Mr Badger’s Home Beneath the Roots
First Impressions in Miniature
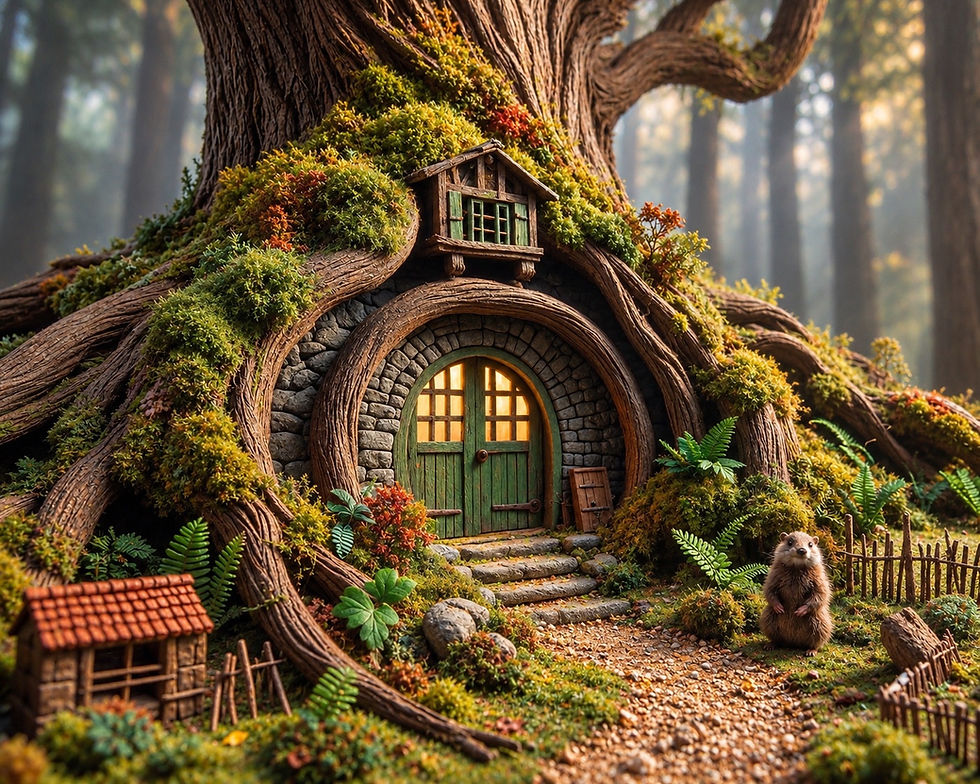
This Wind in the Willows miniature has the sort of front door that makes a cold woodland walk feel worth taking. Green double doors glow beneath a deep stone arch, while enormous roots curl around the entrance as though the tree has decided to keep the house warm. I loved The Wind in the Willows as a kid, and it kickstarted my love of miniature worlds. That feeling of discovering a complete life tucked somewhere small still gets me.
Here, the roof is largely a tree, the garden is enthusiastically mossy, and the resident has the expression of someone who values a quiet afternoon. I particularly love the tiny timber window above the entrance. A sensible person might build a bigger house; a miniature enthusiast immediately wonders whether that little window needs curtains.
This post contains affiliate links. As an Amazon Associate, I earn from qualifying purchases, at no additional cost to you.
If you prefer a ready-made starting point, a fairy door and window set can inspire a simpler tree-base scene. Check its dimensions and materials first; it is an alternative to the hand-built entrance below, not the exact green door in this image.

The guide translates the scene into a lightweight indoor display with a hollow trunk, modeled bark and separate architectural details. You can keep the warmth and wonderful sheltered feeling without building an entire underground residence. Badger has declined to release the basement plans.
Miniature Backstory: The Tiny Tale

A Guided Tour of the Build
The green door and stone embrace
The entrance gives the whole composition its center of gravity. Small blocks gather in concentric bands around the arch, their cool gray surfaces setting off the warm glazing. The lower doors have a weathered, vertical-plank appearance, with dark hinges and a modest round handle. Three shallow steps make the threshold feel reachable. I like the way that tidy geometry sits inside the much less obedient roots.

The little window in the roots
Look above the arch and the timber dormer becomes a second, smaller destination. Its projecting sill, pitched roof and green window divisions feel carefully fitted into a space the tree reluctantly provided. Moss follows the shoulders of the roots rather than hiding every inch of bark. That contrast is important: the bare grain shows where the structure travels, while the green patches suggest softer, sheltered pockets.

The path, shelter and woodland boundary
The gravel path bends toward us between ferns and low planting. A tiny red-tiled shelter anchors the lower left corner; twig fencing and the small resident balance it on the right. Nothing forms a perfect matching pair. The foreground feels comfortably used, with irregular stones and a clear route through the greenery. For a broader arrangement around roots, the site's miniature fairy garden under the trees explores a whole village rather than a single doorway.

For your own boundary, a few scenic grass tufts can break up the path edges. They represent grasses, not the velvety moss on the trunk, so keep the textures distinct. A low tuft near a fence post reads more convincingly than a uniform grassy collar around every root.

Inspirations: From the Big World to the Small
Reading a Wind in the Willows miniature
Kenneth Grahame gives Badger's home a wonderfully protective atmosphere. In the chapter devoted to him, passages lead to a warm kitchen and a substantial underground dwelling. This tree-front interpretation is imaginative rather than a claim to reproduce an exact passage, original illustration or screen set. The important connection is emotional: the woods may be unsettling, but the door promises shelter. You can read the original chapter in The Wind in the Willows for that contrast.
The smaller timber details also recall rural buildings whose construction remains visible. Grange Barn in Essex, a medieval timber-framed barn, offers useful study material for the rhythm of posts and beams. Here, that idea shrinks into the dormer frame and shelter. I would borrow the sense of assembled wood.

Another useful comparison is the sheltered doorway of a hobbit-like hillside home. The LEGO Icons Shire set offers a separate, brick-built take on that storybook relationship between landscape and front door. It belongs to Tolkien's world, not Grahame's, and is optional architectural inspiration rather than a Badger kit or a supply for this build.

The William Morris-inspired miniature cottage on the site takes a more decorative approach to timber, plants and amber windows. For Badger, I would simplify the ornament and let the bark do most of the talking. A physical inspiration board helps: brown grain, gray stone, moss greens, amber film and one small terracotta note already describe the scene's color story.
Artist Tips: Make Your Own Magic
The supporting illustrations are AI-generated, and this is an inspired construction guide rather than an exact, tested reproduction of the pictured model. Your materials and results will vary. Give yourself permission to simplify a root; the tree is unlikely to file a complaint.
Treat this as an intermediate indoor-display project because curved surfaces meet small architectural parts. A suggested 1:24 planning scale keeps the doors and shelter manageable, but the showcase's actual scale is unknown. Choose one scale, then size every purchased accessory against your doorway before committing.
Supplies
Structure: reuse clean corrugated packaging and plain cereal-box card for patterns and light skins. A rigid, flat scrap board makes a better base than thin packaging. Craft chipboard and basswood strips are useful purchased equivalents for the shell and small framing; keep paperboard distinct from wood particleboard.
Surface and bonding: save clean crumpled paper for bulk, then use air-drying paper clay for the bark and stone facing. PVA craft glue bonds suitable paper and wood parts; check your particular adhesive's instructions. Paper clay is different from oven-cured polymer clay. This method uses no baking.

Color and landscape: use existing water-based acrylics in dark brown, gray, muted green, ochre and terracotta. Reuse colored paper for fern leaves and clean, dry, fine gravel for the path. Purchased scenic flock and preserved craft moss offer different textures; preserved moss is decorative material, not a living planting system.
Details and tools: use a clean, flat piece of clear packaging for glazing, or clear acetate sheets. Add thin card, small wood offcuts, scissors, sculpting tools, brushes and craft tweezers. A sharp hobby knife needs a suitable protective cutting surface and controlled cuts away from your body. Optional lighting is a ready-made low-voltage miniature kit with accessible power; follow its maker's instructions.
1. Plan the doorway before the tree
Draw a front elevation and a simple footprint on scrap paper. As a suggested starting point, give the double door an opening about 80 mm high at 1:24; choose a base wide enough for the roots, left shelter and right-hand figure without crowding the route. These are design choices, not measurements taken from the image.
Cut a plain paper door template, three step shapes and a curved path strip. Arrange them together before adding the trunk outline. Leave visible ground beside the entrance so the arch does not swallow the whole garden. Mark an opening at the back for lighting access even if you initially choose unlit glazing. Dry-fit everything. Nothing needs paint or scenery at this stage, and a flat cardboard mock-up is a perfectly good first version.

2. Build a hollow trunk and strong roots
Glue corrugated-card ribs to the rigid base, keeping the grain of adjacent ribs crossed where practical. Join them with strips of card to form a short, broad trunk that rises behind the door opening. Build the largest roots as tapered bundles of crumpled paper wrapped in plain paper and fixed to the base. Their ends should flatten into the ground rather than perch on top of it.
Leave the entrance clear and make the rear panel removable. Add three stacked card step cores, each shallower than the one below. Allow the adhesive to dry fully under the conditions on its label before covering the framework. If a root flexes when lightly touched, add another internal brace now. A stable paper skeleton prevents a surprising amount of later miniature heartbreak.

For a small fallen branch or landscape edge, bark-covered craft wood pieces provide an optional natural-looking accent. Select pieces that suit the scale and have sound, clean surfaces. They are irregular decorative material, not a substitute for the braced trunk or uniform timber needed around the door.

3. Model bark, stone and the threshold
Cover the dry trunk in thin sections of paper clay, following the product's guidance for adhesion and thickness. Draw long, irregular grooves with a blunt sculpting point; curve them around the entrance and along the roots. Leave some smoother ridges so the surface has places to catch light. Avoid evenly spaced parallel scoring, which can make bark resemble corduroy.
Face the doorway surround with separate small clay blocks, tapering those around the arch so their joints radiate outward. Add thin clay caps to the three step cores. Let all layers dry completely before painting. Creative Paperclay's manufacturer notes that thickness and humidity affect drying, so use the actual material's instructions rather than a universal overnight promise. Build bulky shapes with the armature, not solid clay. For a simpler version, use torn textured paper over the roots and cut-card stone blocks.

4. Assemble the door and upper dormer
Make the double door as two fixed leaves on a card backing. Cut open the upper panes, then add narrow basswood strips or layered card for the frame and glazing bars. Leave the windows empty for now. Score only shallow grain into the lower panels, and test the whole unit in the arch before gluing it permanently.
Build the dormer separately as a shallow box with a pitched card roof, projecting sill and simple timber divisions. Keep it small enough that the main doorway remains dominant. Attach it above the arch once its glue has dried and the trunk can support it without shifting. Fixed doors are the easier choice here: convincing paint and a dark center seam provide plenty of detail without tiny working hinges.

5. Bring out the grain and worn color
Paint the bark a deep brown, letting the coating dry before brushing a lighter brown across the raised ridges. Keep the brush relatively dry and build the highlights gradually. Use cool gray on the stone, then vary individual blocks with a touch of ochre or brown. A small amount of dark paint in the joints gives depth without outlining every stone in black.
Paint the door muted green and the dormer framing brown, with green window divisions. Suggest wear along selected lower edges rather than scratching every surface. Test any protective matte finish on an offcut first and follow its curing instructions. Do not trap damp clay beneath a coating. At this point the model should read clearly in brown, gray and green, with bare ground and empty glazing openings still visible.

6. Add amber glazing and accessible light
Cut glazing slightly larger than each opening and attach it from behind, keeping glue at the concealed edges. Clean packaging can work if it lies flat and has no distracting embossed marks; choose an adhesive compatible with that plastic. A separate amber film layer behind clear glazing gives a warm appearance even without electrical lighting. Leave the upper dormer darker, as in the reference.
For a lit version, install a ready-made warm-white, low-voltage miniature light behind the main door, with a diffuser and the clearances its maker specifies. Keep the power supply and switch reachable through the rear access. Test the light before closing anything, and let all glue dry fully first. Never improvise mains wiring. Move the lamp back or adjust the diffuser if one bright dot overwhelms the little panes.

7. Lay the path and plant in pockets
Brush adhesive over the planned path and press in a shallow layer of fine, clean gravel. Avoid oversized stones that make the doorstep look inaccessible. Once the glue has dried, remove loose grit gently. Paint or cover the exposed ground around it before adding greenery, so accidental gaps look like soil rather than packaging.
Apply scenic flock in small patches, then tuck sparse pieces of preserved craft moss into root junctions. Keep the door, stone bands and step fronts readable. Cut fern fronds from green paper, snipping paired leaflets along a narrow central strip; fold them gently and glue the bases into sheltered groups. Let each planting group set before adding its neighbor. Leave a clear corridor for the resident. An exuberant garden still needs somewhere to put a foot.

8. Finish the shelter, fence and quiet resident
Build the little left-hand shelter from wood offcuts or layered card, with an open front and simple rail. Cover its pitched roof with overlapping card tiles painted terracotta. Make short fence sections from slender wood pieces, attaching the cross rails on a flat surface before planting each section beside the path. Allow their glue to set before moving them.
Position a suitably scaled badger figure on the right, or leave that space open if you prefer an architectural display. A bought animal needs its actual dimensions checked; a vague “miniature” label is not a scale. A plain wood panel beside the door can add a modest, weathered detail to this imagined exterior. Keep everything removable until you like the balance, then secure the details with a suitable adhesive and let them cure.

If you extend the scene into a cutaway reading nook later, miniature books could give Badger a very convincing reason to stay indoors. They are an optional addition to your own design. The advertised 1:12 books suit a larger-scale variation rather than a direct fit for this suggested 1:24 plan.

Photograph the welcome
Set the model against a matte woodland-colored backdrop and lower the camera toward the doorway. Use a large, diffused light from one side and a white card opposite to open the shadows under the roots. Keep the lamp outside the scene rather than aiming a bare light directly into the glazing. Adjust its angle until distracting reflections move away from the panes.
Support the camera or phone steadily, focus on the door and take another frame for the upper dormer. Photograph the path at a lower angle for a third detail view. Reduce the miniature light if it turns the amber panes featureless white. A wider setup picture is useful for remembering the light positions; record the arrangement before clearing the table.

Small problems, sensible fixes
• Cracked clay: let the underlying layer finish drying, then patch small cracks with compatible fresh material and dry again before repainting.
• Warped door: rebuild the backing with balanced layers and less moisture; dry it flat before fitting the decorative strips.
• Bark disappearing under moss: remove excess while the adhesive still permits it, preserving long bare ridges and the stone outline.
• Milky glazing: test a different plastic-compatible adhesive on scrap and keep it outside the visible pane area.
• Floating fence: seat the posts securely and add a little ground texture around their bases after the glue sets.
For a more cultivated variation, miniature flowers and vases can sit beside the shelter rather than replacing the wild fern planting. These advertised 1:12 accessories suit a larger-scale variation. Keep the arrangement small and choose colors that leave the green doorway as the main attraction. Badger might tolerate one vase, provided nobody calls it a garden party.

Closing: Until Next Time in the Small World
I keep returning to that sheltered green entrance. The roots feel immense, yet the little steps make the whole place approachable. Which detail would you build first: the stone arch, the dormer or the woodland path? Share your own woodland creations with #smallworldminiatures. You can also visit the online shop and join the newsletter through the Small World Miniatures website. I hope your next tiny world has room for a quiet afternoon, even if the planning takes rather longer.





Comments