
Moss, Lantern Light, and Wallpaper Dreams: A William Morris Arts & Crafts Cottage in Miniature
- Feb 4
- 11 min read

First Impressions in Miniature
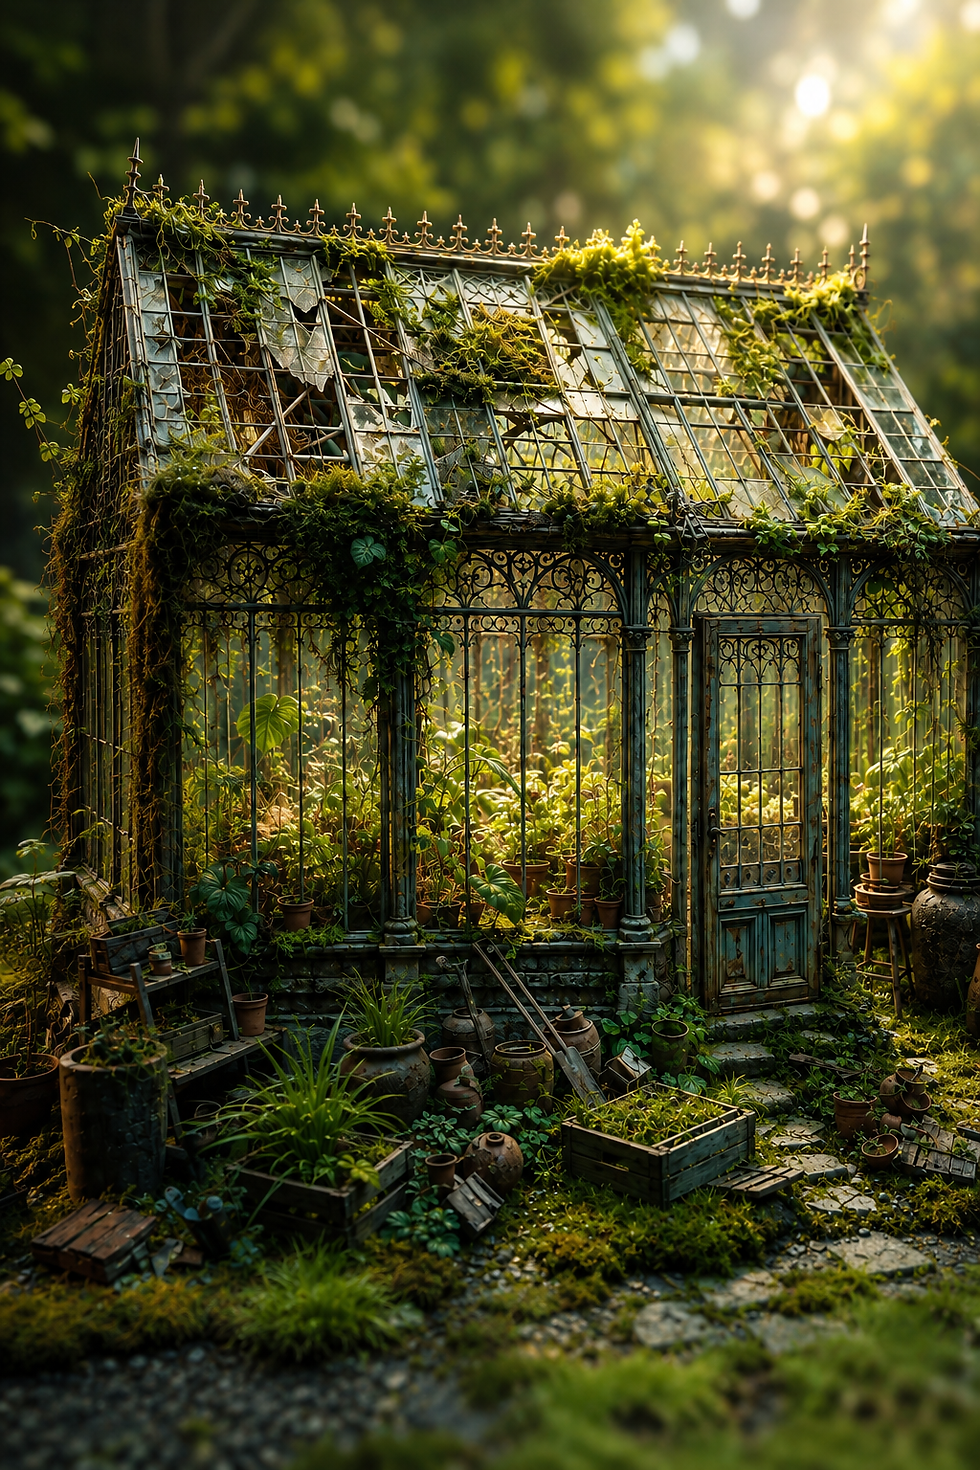
The first time I saw this little house, my brain did that Windows-95 startup sound it does when it’s trying to process too much joy at once.
You’ve got that steep gabled roof with moss creeping between the shingles, glowing windows with lacey leaded panes, William-Morris-ish vines curling up the walls, and more terracotta pots than a very organized garden witch could ever need. It’s like a fantasy version of an Arts and Crafts cottage where someone said, “What if we made the wallpaper the main character?” and then absolutely committed.
I love this miniature because it feels lived in. The porch is crowded with plants and gardening tools. The side yards are full-on tiny jungles. Warm amber light spills out of every window like somebody just put the kettle on. It’s equal parts cozy cottagecore and “please let me move in and never pay rent again.”
And yes, before you ask: keep reading, because later in this post I’ll walk you through how to build your own Arts and Crafts-inspired miniature cottage—minus the headache of drafting architectural drawings from scratch. Think of this as a friendly guided tour first, build-along inspiration second.

Why This Photo Needs VIP Treatment
Quick behind-the-curtain moment: the photo you’re seeing here is optimized for behaving nicely on the internet—loading quickly, looking good on phones, not making anyone’s browser burst into flames. That means it’s not the ultra-crisp, zoom-in-and-count-the-brush-strokes file you’d want for a big wall art print and it ships FREE in the U.S.—because I’d rather you spend money on more miniatures than on postage.

So: this blog version = perfect for scrolling, sharing, and zooming in a little. The canvas print = the “shrine to tiny cottages” edition for your studio wall, living room, or that one corner of your house that’s slowly turning into a miniature museum.https://www.smallworldminiatures.com/product-page/fantasy-william-morris-arts-and-crafts-cottage-miniature-diorama-canvas-print

Miniature Backstory – The Tiny Tale
Every good model needs lore, so let me introduce you to Brackenmore Cottage.
Brackenmore was “built” in 1893 (in tiny-world years) by eccentric textile designer Elsbeth Willowfen, a devoted fan of William Morris who firmly believed that no flat surface should be left unpatterned. She moved out of London when people started gently suggesting that maybe not every window frame needed hand-painted acanthus scrolls.
In our tiny timeline, Elsbeth bought an overgrown plot at the edge of a mythic forest, hired a local carpenter who had the patience of a saint, and designed a cottage where the outside would look like one of her wallpapers turned inside out. The walls are covered in stylized flowers and vines. The eaves are carved with repeating leaf motifs. Even the porch columns secretly hide her favorite pattern if you look closely enough.

Current residents:
Pip Mossley, caretaker, part-time herbalist, and full-time plant negotiator.
Crumb, the cat who believes every flower pot is actually a throne.
A rotating cast of neighborhood hedgehogs, pixies, and that one crow who keeps stealing copper watering cans.
Rumor has it Elsbeth hid a tiny framed portrait of her favorite wombat friend somewhere under the porch—painted so small you’d miss it on first glance.

A Guided Tour of the Build
Step through the stone path and it’s instant sensory overload, in the best way.
To your left, there’s a little potting corner tucked into an alcove: shelves stacked with terracotta pots, seed packets, and a saucer that’s probably either a birdbath or a slug rave. Moss and low groundcover spill over the path stones, softening every edge.

The front façade is a patchwork of textures: half-timbered panels painted with repeating botanical motifs, carved wooden brackets, and those glowing leaded windows that look like someone turned warm honey into glass.

The entry arch is deep and welcoming, with a bench under the porch lamp and just enough clutter—mugs, a book, a basket—to scream “someone just stepped out to check the tomatoes.”

Look up and you’ll see the roof slowly being claimed by nature: shingles in blues and browns, streaked with age and dotted with tufts of moss. A little dormer juts out like it’s craning its neck to hear gossip from the garden. The trees on either side frame the cottage like a stage set—one side neat and manicured, the other wild and curly, with topiary clouds of foliage.

Around the right you’ll find an entire ecosystem of tools: coiled hoses, stacked pots, gardening implements, and a hint of alchemical equipment that suggests Pip might be brewing more than just compost tea. Tiny flowers in pinks, purples, yellows, and whites dot the beds like confetti. If you squint, under the porch lamp you can just imagine that absurdly tiny wombat portrait winking back at you.

The whole scene feels like late afternoon in early autumn: golden light, just a bit of chill, and the sense that something magical is about to happen as soon as you look away.

Inspirations – From the Big World to the Small
This miniature lives firmly in the family tree of real-world Arts and Crafts architecture and design.
You can see the spirit of Red House in the steep roofs, tall chimneys, and honest brick-and-timber look—a house that feels handcrafted rather than machine-made. The lavish botanical decoration owes its soul to Morris wallpapers like Strawberry Thief and Willow Bough, but here those patterns crawl right onto the building’s skin instead of staying indoors.
There’s also a whisper of Blackwell in the way the windows glow and the garden feels like an extension of the living space—no hard line between “inside” and “outside,” just one continuous story of pattern, texture, and plants plotting to take over.

In miniature, all of that gets distilled and exaggerated. Window mullions are thick enough to read clearly at small scale. Patterns are simplified, with bolder shapes and slightly higher contrast so they register from arm’s length. Colors lean a touch more saturated than the weathered originals to keep the cottage from turning into a mushy brown blob in photos.
Think of this model as a love letter to the Arts and Crafts movement: same ideals of craftsmanship and nature-inspired beauty, just shrunk down until a single flower pot is the size of your thumbnail.

Artist Tips – Make Your Own Magic
Here’s the fun part: let’s talk about how you can build your own fantasy Arts and Crafts cottage miniature.
We’re not here to clone Brackenmore Cottage molecule by molecule. Think of this guide like a well-loved recipe card: a little smudged, a lot flexible, and guaranteed to turn out differently in every kitchen. I sketch the ideas; then my slightly chaotic digital art helpers dream up illustrations that sometimes sneak in an extra chimney or move a tree three inches to the left. That’s the vibe—playful, experimental, and very OK with “results may vary.”
Use this as a loose roadmap for your own build, not a strict blueprint. Your cottage might be taller, your garden might be wilder, your wallpaper may feature frogs instead of vines. Perfect. That’s the point.

Shopping List: Raid Your House First
Start by hunting through your recycling and junk drawers before you buy anything. You’ll be amazed how much “trash” wants to be tiny architecture.

Everyday items to repurpose
Corrugated cardboard or sturdy cereal boxes – great for base layers, interior walls, and roof structure.
Wooden coffee stirrers & popsicle sticks – instant beams, floorboards, and trim.
Thick packing foam or XPS insulation off-cuts – carveable stone, stairs, and chunks of landscaping.
Plastic blister packaging – cut into windows, glass cloches, or lantern panels.
Toothpicks & skewers – columns, porch railings, plant stakes.
Old toothbrush – for splatter, texture, and scrubbing paint into cracks.
Craft & hobby basics
Craft knife with plenty of fresh blades
Metal ruler and cutting mat
PVA/white glue and a faster-grab tacky glue
Acrylic paints in earthy greens, teals, umbers, and warm creams
Fine brushes for detail, cheap larger brushes for drybrushing
Air-dry clay or polymer clay for pots, stones, and details
Static grass, turf, or ground foam for foliage
Nice-to-have upgrades
XPS foam sheets for the main structure if you want to carve more detail
Pre-made dollhouse windows and doors to save time
USB-powered mini LED string lights or chip LEDs
Matte spray varnish (test on scrap foam first—more on that below)

Deep Dive: Step-by-Step Build
1. Safety First
Sharp blades, hot tools, and tiny dust are part of the hobby, but your fingers and lungs are worth more than any model. Work on a stable surface with good light and decent ventilation. When cutting, always slice away from your body, keep blades sharp (dull ones slip), and use a metal ruler as a guide. If you sand foam or spray varnish, wear a simple dust mask or respirator. Your future self will thank you.
2. Plan Your Scale & Sketch
Pick a scale that matches the minis you love—1:12 if you’re into dollhouse furniture, 1:24 if you want a more compact piece, or even 1:48 for a bookshelf-friendly version. Rough-sketch your cottage front and side elevation at that scale on paper. Don’t stress about perfection; you’re just deciding big shapes: roof angles, number of windows, where the porch sits, and how much garden you want. Architectural model-making guides often recommend drawing at actual model size—it really helps.
3. Build the Bones (Base Structure)
Cut your walls, floor, and main roof pieces from foam board, heavy card, or XPS foam. Dry-fit everything with pins or toothpicks before gluing. Aim for simple strong geometry: a main rectangular volume, a slightly lower side wing, then a steep roof with one or two dormers. Use PVA for porous materials and a contact adhesive or hot glue for faster joins (careful with heat near foam). Reinforce long edges with coffee stirrers glued inside like studs.

4. Windows & Doors
Decide which openings are your “story windows” (the ones people peer through) and which are more decorative. Cut window openings before assembly if your material is thick. For leaded Arts and Crafts windows, sandwich a pane of clear plastic between two frames made from thin card strips. Score faint diamond patterns into the “glass” with a blunt tool and hit it with a smoky glaze (a wash of brown/black thinned 1:5 with water) for aged glass vibes. Pre-made dollhouse windows can also be trimmed and built into thicker walls with a little surround made from stripwood.

Doors can be layered: one rectangle for the door, thin strips for boards, and a tiny scrap of wire for a handle. Make the front door a bit chunkier and more ornate than any back door—this is your main character entrance.

5. Wall Finishes, Base Color & Materials
For the plastered sections, brush on a mix of PVA, a touch of water, and lightweight filler to give a slightly rough, stucco texture. When it’s dry, basecoat with a warm cream or pale ochre. For half-timbering, glue on thin wood strips in your chosen pattern, then paint them a rich umber or muted red-brown.

The decorative “William Morris” panels can be painted or printed. For hand-painting, block in a mid-tone green base, sketch vine shapes in a slightly darker green, then add simple flower shapes in dusty reds, blues, and mustard. Think shapes, not exact botanical species. Finish with a thinned sepia wash to sink everything together.

6. Roof & Weather Stack
Cut roof pieces, glue them on, then cover with strips of card or pre-made shingles, overlapping from bottom to top. Mix a few roof colors—say, 2 parts slate grey, 1 part muted teal, 1 part burnt umber—and randomly alternate them for that patchwork feel.

The weather stack (chimneys and vents) is your chance to add silhouette drama. Build a chunky chimney from foam or stacked card, add a simple corbel detail near the top with extra strips, and cap it with tiny clay or card chimney pots. A little drybrushing with a lighter stone color across edges instantly ages it.
7. Hero Piece (Focal Point)
Every diorama needs a “look here first” element. For Brackenmore-style cottages, that’s usually the front porch. Emphasize it with a deeper overhang, carved brackets, a bench, or an oversized lamp. Use slightly warmer, more saturated colors here—a deeper wood tone, a brighter plant, a glowing lantern—to pull the eye.

If you want a secret story beat, tuck an Easter egg in your hero area: a microscopic portrait on the wall, a familiar book on the bench, or a tiny fox sculpture. People love discovering these things on their third or fourth look.
8. Utilities & Greebles
“Greebles” are all the small nubbly bits that make something feel real: pipes, tools, spare tiles, buckets, coiled hose, mysterious boxes. Use wire, toothpicks, scrap card, and beads to create your own. A bent paperclip with a bit of shrink tube can be a downspout; thin solder wire makes great hoses. Keep them clustered—little utility zones feel intentional and keep the eye from bouncing all over.

9. Furniture & Soft Goods
If you’re including interior glimpses, hint at furniture rather than fully furnishing every room. A table near a window, a chair silhouette, some cushions—enough to tell a story. Scrap fabric becomes cushions and curtains; tea-stained paper can become a cozy table runner. Stiffen thin fabrics with diluted PVA so they drape but hold a shape. Dollhouse magazines and artisan references are brilliant for style inspiration.

10. Lighting (Temps, Diffusion, Basics)
To get that warm glow, look for LEDs labeled “warm white” (around 2700–3000K). Cold white will make your cottage feel like a dentist’s office. String lights are easiest: hide the battery pack behind the scene, then snake the tiny bulbs into rooms and behind windows. Diffuse harsh pinpoints by bouncing them off ceilings or walls, or by placing a bit of parchment paper or frosted plastic in front of the bulb.
Keep wiring simple: one circuit for the whole house is fine. Secure wires with hot glue channels or tape before you close anything up so they don’t rattle around later.
11. Story Clutter & Easter Eggs
Now the fun chaos: fill the garden with life. Scatter terracotta pots (polymer clay or beads), add clumps of static grass, plant tiny flowers made from punched paper or clay, and lean a forgotten rake against a wall. Place clutter where people actually dump stuff in real life: near doors, under windows, beside workbenches.

Hide one or two Easter eggs: a miniature mug with your initials, a teeny familiar pet, or yes, a portrait of a wombat. This is where your diorama stops being “a cottage” and starts being your cottage.
12. Unifying Glaze & Final Finish
At the very end, tie the whole scene together with a unifying “filter.” Mix a very thin wash of warm brown (about 1:10 paint to water with a drop of matte medium) and gently brush it into recesses across the whole model. This faux grime settles details, knocks back any overly bright colors, and makes everything feel like it’s been living outdoors for years.
Seal with a brush-on matte varnish; if you use spray varnish over foam, always test on a scrap first, since some propellants can melt XPS.

13. Photo Tips & Backdrop Ideas
When it’s time for glamour shots, think like a movie director. Use two desk lamps with daylight bulbs: one as your “sun,” the other as softer fill. Diffuse with baking parchment or a white T-shirt stretched over a frame.
For backdrops, try:
A printed tapestry or wallpaper pattern taped behind to echo the Arts and Crafts vibe.
A simple gradient (dark at top, light at bottom) to mimic sky.
A blurred photo of real foliage printed large for instant depth.
Shoot from miniature eye-level, not from human “ceiling fan” height. A phone camera is totally fine—just tap to focus on the doorway or main window and lower your exposure slightly so the glowing windows don’t blow out.

14. Troubleshooting: Tiny Problems, Tiny Fixes
Problem: Foam edges are ragged and fuzzy.Fix: Use a new sharp blade and make several light passes instead of one heavy cut. Lightly sand with fine sandpaper if needed.
Problem: Paint looks chalky or streaky.Fix: Thin your acrylics slightly and build up color in layers. Finish with a gentle glaze to smooth transitions.
Problem: Building feels “too new.”Fix: Add subtle weathering—thin dark washes in corners, drybrushed lighter tones on edges, a little green in damp areas, and some pigment around chimneys and paths.
Problem: Plants look flat or plasticky.Fix: Mix multiple greens with a hint of yellow for new growth and a touch of blue or brown for older leaves. Vary heights and lean some plants over the path. Polymer clay flowers or paper petals add extra realism.
Problem: Composition feels messy.Fix: Choose one hero area (like the porch) and subtly dim everything else—less clutter, slightly duller colors, fewer bright highlights outside that focal zone.
If you want to go even deeper into sculpting figures, building architecture, or painting techniques, there’s a whole universe of classic guides and magazines out there that I keep raiding for ideas.
Closing – Until Next Time in the Small World
Brackenmore Cottage is exactly the kind of place I’d like to disappear to on a Friday night: make tea, feed Crumb some imaginary snacks, and politely ask the hedgehogs not to sit on the seed trays.
Until I figure out how to move into a 1:24-scale house full-time, building scenes like this is the next best thing. I hope this little tour and build guide nudged your imagination into gear—whether you’re sketching your own patterned façade right now, or just mentally redecorating your future miniature cottage.
I’d love to hear what your favorite detail is in this piece. Is it the moss on the roof? The porch clutter? The jungle of potted plants? Drop a comment, send a photo of your own builds, or tag your creations with #smallworldminiatures so I can cheer you on.
See you in the next tiny world.– Brandon
#smallworldminiatures#miniaturecottage#artsandcraftsminiature#williammorrisinspired#dollhouseminiatures#miniaturediorama#fantasycottage#miniaturegarden#miniaturepainting#scalemodelbuilding#xpsfoamterrain#miniaturearchitecture#tinyhouseart#miniaturelandscape#handmademiniatures#miniatureartist#miniatureinterior#dollhouseinspo#tabletopterrain#cozycottagecore#gardenminiatures#miniatureflowers#dioramabuilders#hobbycrafting#miniaturephotography


Comments