
A Miniature Fairy Garden Under the Trees: How to Build an Outdoor Yard Fairy Village
- May 31
- 11 min read

First Impressions in Miniature
There is a specific kind of joy that happens when a regular old tree suddenly looks like it has a mortgage, a bakery, and at least three neighbors arguing about acorn parking permits.
That is why I love this outdoor miniature fairy garden scene. It has everything my childhood brain still wants: glowing windows tucked into bark, red-and-white mushrooms doing their best forest-lantern impression, rustic tiny furniture ready for tea, and a whole little village that seems to have grown out of the roots after a rainy Tuesday.

I started my miniature journey outside, building little cities in my parents’ backyard, in fields, and in the woods. Nature was never just the backdrop. It was the co-designer. A twig became a beam, a rock became a cottage wall, and a patch of moss became “prime real estate.” So yes, this one hits me right in the muddy-kneed nostalgia.

Keep reading, because after the tour and the tiny town gossip, I’ll walk you through how to create your own outdoor fairy garden village using fairy doors for trees, glow-in-the-dark mini mushrooms, rustic fairy garden furniture, small-scale plants, responsible solar lighting, and weather-smart materials.
Why This Outdoor Fairy Garden Deserves the Full Yard Treatment
A fairy garden works best when it feels discovered, not installed. The finished scene has that wonderful “wait, has this always been here?” quality. The tree becomes architecture. The roots become streets. The moss becomes lawn. The mushrooms become neighborhood streetlights, which is much better than the HOA-approved black lanterns of suburbia. No offense to black lanterns. Some of my best lanterns are black.

For this build, the three big accessories are the magic-makers: the Glow-in-the-Dark Mini Mushrooms, the Outdoor Fairy Doors & Windows for Trees, and the Fairy Garden Furniture Set. Some links in this post are Amazon affiliate links, which means Small World Miniatures may earn a small commission at no extra cost to you. It helps fund the tiny world, tiny tea service, and the occasional emergency purchase of “just one more” miniature bench. Very official business.

The Tiny Tale: Welcome to Rootwhistle Hollow
The village is called Rootwhistle Hollow, founded in 1887 after a committee of fairies, beetles, and one deeply opinionated field mouse voted to stop commuting from the fern district.
The founding charter was written on a curled birch leaf and included three laws: never build higher than the lowest owl branch, never serve cold tea after dusk, and never trust a mushroom that hums show tunes. Naturally, the mushrooms started humming immediately and were promoted to public works.
The main tree is known as Old Barlow, a wise, creaky giant whose bark has more wrinkles than a wizard’s laundry basket. The residents insist Old Barlow is not a tree but a retired hotel. That explains the glowing windows, the tiny front door, and the fact that somebody keeps leaving slippers on the root steps.

The village mayor is Maribelle Thistlebutton, a fairy with excellent posture and absolutely no patience for crooked pathways. Her assistant, Barnaby Crumb, runs the outdoor café and once tried to invent acorn espresso. It was described by locals as “energetic gravel.”
The red mushrooms mark the official village lanes. By day they are cheerful garden ornaments. By night they glow softly, helping late-returning fairies find their way home after book club, moonbeam rehearsals, or whatever it is moths do in conference rooms.
Reader Easter egg: when you build your own Rootwhistle-style village, hide one tiny blue bead somewhere near the café table. In village lore, it is the missing sapphire from Maribelle’s ceremonial teaspoon. Do not ask why a teaspoon had a sapphire. Government is complicated.
A Guided Tour of the Finished Fairy Garden
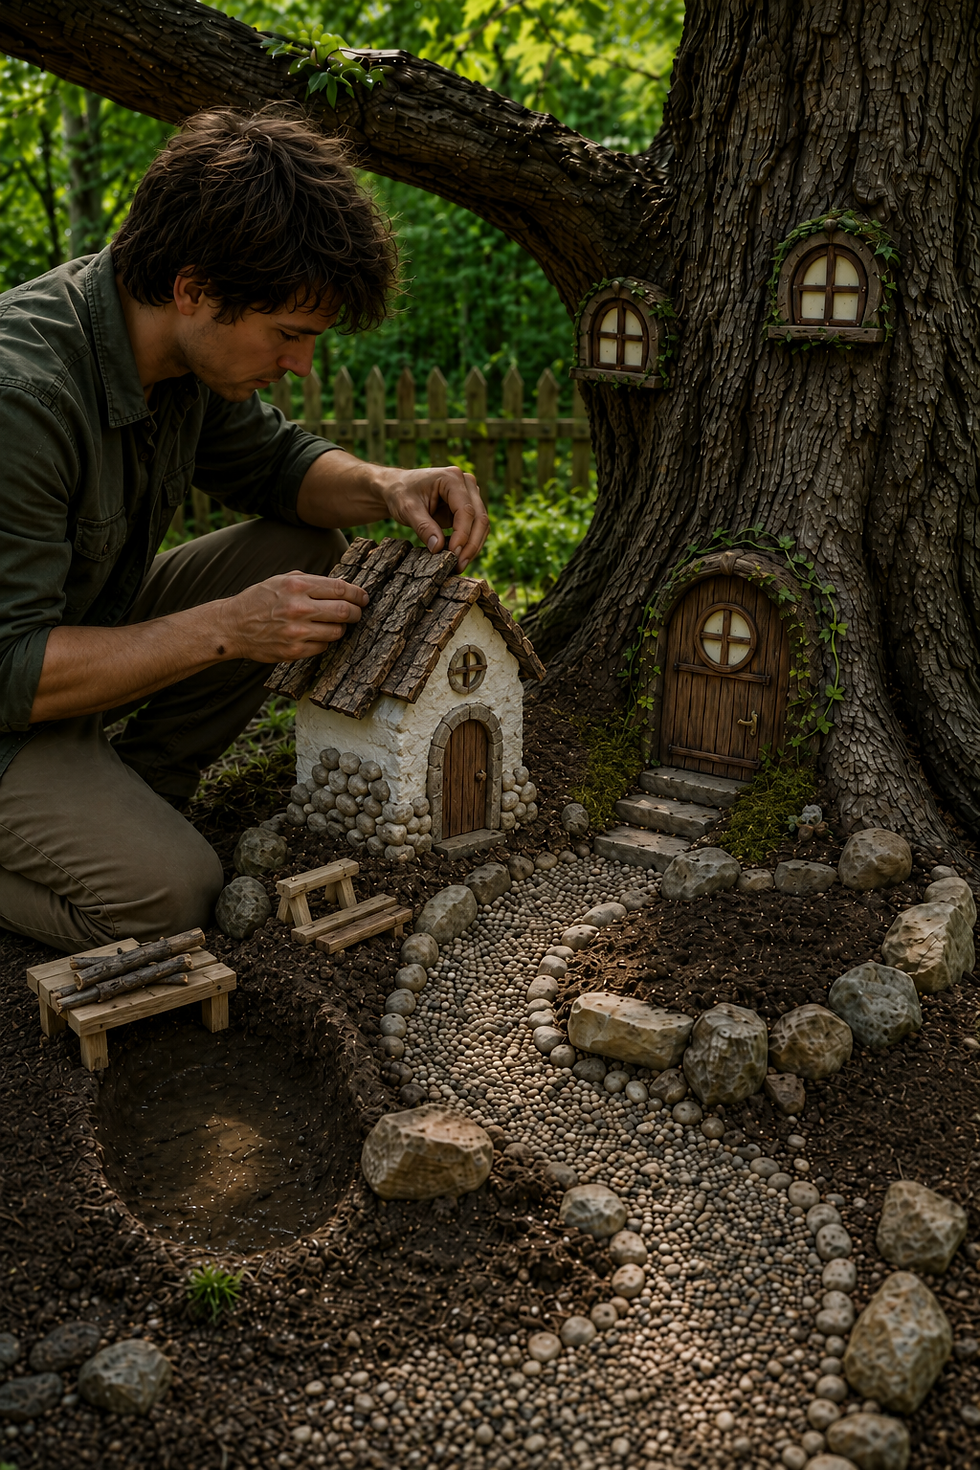
At the base of the tree, the main fairy door sits like it has always belonged there. The round window glows warm against the bark, and the little stone step makes the whole thing feel charmingly official, like a town hall for people who can ride dragonflies.

Above the doorway, small fairy windows peek from the trunk. They are tucked into the bark like lantern-lit secrets. This is the part of the scene that sells the illusion: the tree is not decorated, it is occupied.
The paths curl through the village in soft, uneven lines. Pebbles become cobblestones. Moss becomes lawn. Low plants crowd the edges like nosy neighbors leaning over the fence to discuss who moved the thimble.

The glow-in-the-dark mushrooms act like tiny forest beacons. Their red caps bring color during the day, and their nighttime glow adds that “I should probably whisper now” mood after sunset.

Near the café area, the fairy garden furniture set turns the scene from pretty display into a place with a schedule. Benches, chairs, and tables suggest tea, gossip, planning meetings, and at least one fairy dramatically quitting the flower-arranging committee.

In the finished scene, small cottages and glowing accents spread outward from the tree. That is the trick: the tree is the village center, but the life of the scene happens in the little pockets around it.

Inspirations: From the Big World to the Small
This kind of outdoor fairy garden has roots in several big-world design traditions. The first is the organic architecture of Antoni Gaudí, especially Park Güell in Barcelona. Gaudí’s work feels grown rather than assembled, with curves, tile, stone, and color working together like architecture decided to become a plant.
There is also a strong Art Nouveau thread here, which I am always a sucker for. Victor Horta and Hector Guimard understood how a line could behave like a vine. Fairy doors wrapped in bark, windows nestled into tree curves, and little lanterns glowing through leaves all share that same botanical drama.

And then, of course, there is the cozy-earthy fantasy language of places like Hobbiton. Round doors, garden paths, low roofs, and domestic comfort tucked into nature: it all says, “Come in, remove your muddy boots, and please do not insult the soup.”
In miniature, these influences shrink beautifully because the scale lets you exaggerate. A root becomes a cliff. A pebble becomes a boulder. A mushroom becomes a lamp post. The real garden does half the work for you, then takes credit for all of it. Typical garden.
Artist Tips: Make Your Own Outdoor Fairy Garden Magic
Before we march into the shrubbery with tiny chairs, one important note: this guide is for inspiration, not an exact reproduction decree from the Fairy Zoning Office. Your tree, climate, plants, tools, budget, and local squirrel population will all have opinions. Results will vary, and that is part of the charm. I also use AI image generation for some blog illustrations, and every now and then the tiny world gets a little… enthusiastic. Extra windows, suspicious mushrooms, impossible staircases. The digital gremlins mean well.
Shopping List
Featured accessories
Use the Glow-in-the-Dark Mini Mushrooms, for color, nighttime charm, and easy path markers. Add the Outdoor Fairy Doors & Windows for Trees to turn a tree into the village center. Finish the social areas with the Fairy Garden Furniture Set, because even fairies need somewhere to sit while judging your pebble placement.

Found objects from around the house and yard
Look for smooth pebbles, bark flakes, acorn caps, twigs, seed pods, broken terracotta pieces, old saucers, jar lids, wine corks, seashells, and scrap wood. A broken pot shard can become a retaining wall. A cork can become a barrel. A twig can become a railing. A seed pod can become… well, possibly a seed pod, but a very important one.
Build materials and purchasable equivalents
For cottages and props, use twigs and bark first, or grab basswood strips and sheets, miniature lumber packs, or XPS foam board. For doors, trim, and tiny architectural pieces, try pre-made miniature windows/doors, laser-cut details, and dollhouse accessories.
Textures, plants, and ground cover
Real plants are best outdoors, but for extra scene dressing you can use preserved moss, scenic foliage, flower flocking, and texture sand. For sculpted mushrooms, pots, stones, or signs, keep air-dry or baked polymer clay handy.
Glues, paints, sealers, and finish
Use exterior-rated glue when possible. For general crafting, hot glue, PVA/wood glue, and super glue are useful, but outdoors you will want to test everything. Add acrylic paints and matte varnish, UV resin or gloss varnish, and modeling paste/lightweight spackle for cottage walls, stone texture, and weathering.
Lighting
For outdoor use, choose warm white solar lights with a timer or automatic dusk setting. The mini LEDs and string lights link is useful for protected displays, covered patios, and removable seasonal setups, but anything left outside needs to be rated for outdoor conditions.

Build Guide: Creating the Fairy Garden Village
1. Choose the right spot
Start under a tree if you can. A tree gives instant architecture, natural shade, roots, bark texture, and the perfect place for the fairy door. Choose a spot you can see from a patio, path, kitchen window, or favorite sitting area. Fairy gardens are best when they surprise you during normal life, like when you are taking out the trash and suddenly remember you are the landlord of a miniature woodland hamlet.

Look for dappled light rather than brutal afternoon sun. Many tiny plants prefer part shade, and resin accessories last longer when they are not being roasted like tiny garden marshmallows.
Do not attach anything to a living tree with nails or screws. Use removable methods: garden twine, soft wire with padding, outdoor-safe removable mounting, or a small freestanding backing tucked gently at the base. Let the bark breathe. Trees are living neighbors, not lumber with leaves.
2. Plan the village layout
Use a garden hose, string, or a line of pebbles to sketch your village footprint. A good starter size is about 2 feet by 3 feet, but it can be smaller if you are building in a pot or raised bed.

Place the fairy door first. That is your town center. Then create three zones: the tree house entry, the café or gathering area with furniture, and the mushroom-lit path. Keep paths about 2 to 3 inches wide so they read clearly at miniature scale.
Step back often. Squint. Mutter. Move one pebble three times. This is the ancient ritual.

3. Shape the landscape
Outdoor fairy gardens look better when the land has little rises and dips. Add a low berm with soil behind the tree roots, then press in pebbles to create a path. Use small flat stones as steps. Tuck larger rocks near the edges to create the feeling of cliffs or garden walls.

Drainage matters. Do not create a tiny swamp unless your fairies are amphibious and emotionally prepared. Slope paths slightly so water runs away from cottages and furniture. A thin layer of gravel under the main village area helps keep things from sitting in mud.
4. Install the fairy doors and windows
Place the fairy door at the base of the tree, ideally where bark texture already creates a little arch or shadow. Use moss, small stones, and miniature vines to blend the edges. The goal is to make the door look discovered, not slapped on like a refrigerator magnet.

Add windows higher on the trunk, but keep them reachable for maintenance. A glowing window tucked into bark is magical. A glowing window twelve feet up is a ladder incident wearing a cute hat.

5. Build cottages and props
For simple outdoor cottages, start with a small sealed stone, a chunk of bark, or a foam block. XPS foam is great for shaping walls and roofs, but seal it well before painting. Avoid solvent spray paints directly on foam because they can melt it into a tragic little crater.

For a quick cottage: cut a foam block roughly 4 inches wide, 3 inches deep, and 4 inches tall. Carve a crooked roofline. Coat with a mix of PVA glue and acrylic paint, then add modeling paste for stucco or stone texture. Press tiny pebbles into the paste for a cottage wall. Add a bark roof, sealed twigs for beams, and a painted door.
Paint cottage walls in warm gray, mossy beige, mushroom cream, or weathered brown. Use a 3:1 mix of base color to dark brown wash for age. Dry-brush with pale tan after it dries to catch the texture.
6. Add the mushroom path markers
Set the glow-in-the-dark mushrooms along the path like tiny village lamps. Group them in odd numbers: three near the entrance, one near the café, five along a curve. Odd groupings look more natural, and they also make it seem like the mushrooms are having separate conversations.

Give them enough sun during the day so they can glow at night. In shadier yards, place them where they catch morning or late afternoon light, or move them seasonally.

7. Create the café with fairy furniture
The rustic furniture set gives your village its social life. Put one table on a flat stone patio, two chairs nearby, and a bench slightly off to the side. This makes the scene feel active instead of arranged.
Add tiny cups, acorn-cap bowls, seed-pod baskets, or a bead “teapot.” Use a dab of museum putty or removable outdoor adhesive to keep lightweight pieces from joining the squirrel economy.

For scale, the furniture should feel small compared to the tree but big enough to read from a few feet away. Outdoor miniatures need stronger shapes than indoor dollhouse scenes because leaves, shadows, and soil visually compete with them.
8. Choose size-appropriate plants
Plants make or break the illusion. Look for small leaves, low growth, and slow spread. Good options include creeping thyme, Irish moss or Scotch moss, sedum, baby tears in mild climates, miniature mondo grass, dwarf ferns, hens-and-chicks, and tiny-leaf ground covers suited to your region.

Use real plants near the edges and in clumps, not everywhere. Leave open “streets” so the village does not vanish by July. Avoid invasive plants, and check your local garden center for climate-friendly choices. Bonus points for native plants that support pollinators.
9. Light it responsibly
Use warm white solar lights, not harsh blue-white ones. Keep lights low, shielded, and pointed down when possible. Wildlife, insects, neighbors, and your own eyeballs will thank you.

A few soft glows are better than turning the fairy garden into a tiny airport runway. Use the glowing mushrooms, one or two solar lanterns, and perhaps a warm window light in a protected cottage. Put lights on timers or choose solar units that fade after a few hours.
10. Weatherproof everything
Outdoor miniatures live a rough life. Sun, rain, frost, sprinklers, birds, and one raccoon with theatrical ambitions can all take a toll.
Seal painted pieces with exterior varnish. Lift wood slightly off the soil with pebbles. Use resin, stone, sealed concrete, plastic, metal, or well-protected wood. Avoid untreated paper, cardboard, and bare balsa outdoors unless you enjoy watching your work become compost with windows.
Check pieces after heavy rain. If water pools under furniture or cottages, add gravel or raise the area.
11. Winter care
In mild regions, resin pieces and sealed accessories may stay out year-round. In freezing climates, bring delicate furniture, cottages, and anything with electronics indoors before hard frost. The mushrooms may be frost-proof depending on product specs, but I still like to inspect them and store any questionable pieces in a bin.
Leave the tree door if it is secure and weather-rated, or remove it and let the village “close for winter.” Add a tiny sign that says “Gone to Florida” if you are feeling dramatic.
12. Maintenance rhythm
Once a week, brush soil off paths, trim plants, reset tipped furniture, and clear leaves. Once a month, refresh mulch or gravel, check seals, clean solar panels, and inspect for fading.
A fairy garden is not a set-it-and-forget-it object. It is more like a tiny outdoor pet that does not need feeding but does demand curb appeal.
Troubleshooting
Problem: The village disappears into the plants.Fix: Trim hard, open the paths, and add larger stones behind key pieces for contrast.
Problem: Furniture keeps tipping over.Fix: Set pieces on flat stones and use removable outdoor putty beneath the feet.
Problem: The scene looks scattered.Fix: Repeat materials. Use the same pebble color for paths, the same moss in several spots, and the same warm brown on signs and furniture.
Problem: Paint fades quickly.Fix: Use exterior acrylics, add UV-resistant varnish, and place delicate pieces in partial shade.
Problem: Water pools after rain.Fix: Add gravel under paths, raise cottages, and create a slight slope away from the tree.
Problem: The fairy door looks too “new.”Fix: Add brown wash, green mossy dry-brushing, small stones at the base, and a few vines around the frame.
Until Next Time in the Small World
Rootwhistle Hollow may be tiny, but it has big “I know the mayor personally” energy. That is what I love about outdoor fairy gardens. They are part craft project, part garden design, part childhood memory, and part excuse to put furniture under a tree without explaining yourself to the neighbors.
Try the mushrooms, doors, windows, and furniture as your starting cast, then let your yard write the rest. Comment with your favorite detail, tell me what you would name your fairy village, and share your builds with #smallworldminiatures so I can come admire them like a proud miniature city inspector.
And yes, keep an eye out for Maribelle Thistlebutton’s missing blue bead. She is still bringing it up at council meetings.
#smallworldminiatures #miniaturegarden #fairygarden #outdoorfairygarden #miniaturefairygarden #fairygardendiy #miniaturevillage #miniatureworld #fairydoor #fairydoors #glowinthedarkmushrooms #miniaturemushrooms #dollhouseminiatures #miniaturefurniture #gardenminiatures #miniaturelandscape #tinyworld #miniatureartist #miniatureart #yarddecor #gardeninspiration #gardencrafts #diygarden #fairycore #cottagecore #whimsicalgarden #miniaturephotography #smallscaleart


Comments