
The Miniature Maker’s Concrete Bible: Molds, Textures, and 15 Projects to Cast Today
- Sep 17, 2025
- 9 min read

I’ve been in love with concrete since I was a kid—equal parts sandbox engineer and mad scientist—because it does two things miniatures crave: it’s flexible while you’re making it and gloriously permanent once it sets. If you build for the outdoors (garden railroads, fairy villages, weathered dioramas), miniature concrete is a powerhouse: sun? rain? dog tail? It shrugs and carries on.

Today I’m giving you a definitive guide to casting miniature concrete with balsa, foam, and other easy-to-shape mold materials, plus practical techniques for wood-grain board-formed finishes, stone textures, smooth architectural surfaces, and more. And because I know you’re here for the goods, there’s a 15-project build guide you can use right away—from foundations and stairs to bridge arches, culverts, and fences. No tiny tale, no inspiration detour—just the real stuff you can pour, tap, and demold.

Why Concrete Works So Well in Miniature
It scales beautifully. Real concrete already has fine aggregates and surface pores; at small scales they read as believable texture rather than noise.
It’s durable outdoors. Paint and styrene fade; sealed cement laughs at the weather.
It loves molds. Balsa and foam capture grain and tool marks that become instant realism in the cast.

Quick SEO breadcrumb trail for the robots: miniature concrete molds, board-formed concrete texture, model cement casting, HO scale concrete, 1:12 garden railroad concrete.
Safety + Core Materials (Shopping List)
Your results may (and should!) vary—this is a guide for inspiration, not a one-size-fits-all recipe. Concrete is forgiving, but treat it with respect:
Safety
Gloves (nitrile) & eye protection
Dust mask/respirator (N95) while mixing dry powder
Apron or “sacrificial” shirt
Drop cloth for your work surface
Bucket for rinse water (don’t pour cement slurry down drains)

Cement & Aggregates
Fast-setting cement or patching mortar (fine aggregate is best for detail)
Optional: white cement for brighter tints
Play sand (fine), micro ballast, or sieved sand for special textures

Additives & Color
Pigment powders (iron oxide, carbon black)
A few drops of dish soap (acts as a mild surfactant to reduce bubbles)
Acrylic craft paint or ink for tinting wash water
Optional: plasticizer or flow improver (if you have it)

Mold-Making (everyday swaps first)
Balsa wood (board-formed texture straight from the grain)
Foam board / insulation foam (shapes fast; seal with Mod Podge or PVA)
Packing tape (great mold liner)
Hot glue or low-temp glue (tack + seal seams)
Masking tape & pins (jigs)
Vegetable oil, petroleum jelly, or PVA as mold release
Styrene sheet (crisper edges than foam)
3D-printed molds (for repeatability)
Silicone caulk (quick flexible liners)

Reinforcement & Hardware
Floral wire or hardware cloth (tiny rebar)
Paperclips (straighten for pins)
Toothpicks / bamboo skewers
Small magnets (embed for modular scenery)

Finishing + Tools
Acrylic matte varnish or penetrating concrete sealer (non-gloss)
India ink / acrylic washes
Old toothbrush, stippling brush
Electric toothbrush or palm sander (for vibration)
Putty knife, popsicle sticks, small syringes for precise pours

Concrete Basics (Fast, Friendly Chemistry)
Mix ratio: Start near 1 part water : 4–5 parts dry mix by volume. Adjust for yogurt-like flow for fine molds; thicker for blocky pieces.
Bubble control: One drop of dish soap per cup of water helps. Tap the mold walls or press an electric toothbrush against the side to vibrate out air.
Tinting: Pre-tint the mix water with a few drops of acrylic paint or ink. Go lighter than you think; washes deepen color later.
Curing: Demold gently after ~30–90 minutes (fast set), but let it cure 24–48 hours before sanding or sealing.
Sealing: For outdoor minis, brush on a matte penetrating sealer or thin matte varnish. It enriches color and blocks stains.
Note on scale: In 1:12, pores are fine. In HO (1:87) or N (1:160), use the smoothest mix you can make and consider a slurry coat to fill pinholes.

Mold-Making 101: Balsa, Foam, and Friends
Balsa molds (board-formed magic): Lay strips like planks, lightly wire-brush with a brass brush to raise grain, and press in a few “knot” divots with a ball stylus. Brush on PVA, let dry, then a smear of vegetable oil as release. When cast, you get crisp wood-grain concrete.
Foam molds: Foam carves fast for stairs, arches, and curved forms. Seal with PVA or Mod Podge so water doesn’t eat the foam. Line wet areas with packing tape.
Hybrid molds: Foam bulk + balsa face. Get curves + grain in one.
Vents & sprues: For deep or thin parts, add a tiny vent hole at high points so air escapes as you pour.
Tight seams: Hot glue is your friend; run a bead on the outside seam so the inside stays crisp.
Release agents: Light coat of oil, petroleum jelly wiped almost dry, or PVA + soap. Test on scrap first.

Texture Library: Wood Grain & Other Finishes
Board-Formed Wood Grain
Mold face: balsa strips with raised grain.
Add tiny nail head impressions (pin tip).
Make a silicone mold to copy mold face. Cast concrete into mold.
After curing, tone with a burnt umber wash, then a cold gray filter.

Smooth Architectural
Mold face: styrene or packing-tape-lined foam for glassy surfaces.
Cast concrete into mold.
Light sanding pass after cure for that precast vibe.

Split Stone / Ashlar
Score foam with a hobby knife, chip edges with a hard brush.
Make a silicone mold to copy mold face. Cast concrete into mold.
Rub in graphite after curing for stone sparkle.


Pitted & Weather-Worn
Sprinkle coarse salt in the mold; after demold, brush away for micro-voids.
Great for sea walls, WWII bunkers, or ancient ruins.

Exposed Aggregate
Press micro ballast into mold face, then cast.
After cure, lightly sand to reveal speckles.

Form Tie & Panel Lines
Glue short bits of toothpick into the mold where you want tie holes.
Score faint panel lines between “pours” with a scriber post-cure.

Make Your Own Magic: The Concrete Casting Deep-Dive
Sketch the piece (scale, thickness, join lines). Thin sections under ~3–4 mm can be fragile—plan discreet ribs or reinforcement.
Build the mold box from foam, balsa, or styrene. Keep 90° corners true; tape or pin to a base.
Texture the face (grain, board seams, stone scoring). Seal porous faces with PVA; dry.
Add reinforcement (floral wire grid or paperclip pins) if the piece is long or thin. Keep it mid-thickness, not touching surfaces.
Release coat (thin, even).
Mix concrete to a pourable consistency. Add dish-soap drop to water first, then dry mix, then pigment.
Fill the mold in layers, tapping or vibrating each lift. Use a syringe for narrow cavities.
Screed and smooth. For stairs or sharp geometry, use a popsicle stick like a tiny bull float.
Initial set: when the surface loses sheen and resists a fingernail, you can gently demold or shave edges with a blade.
Full cure 24–48 hours.
Finish: washes, dry-brush highlights, and matte sealer.
Install: pin with wire, CA glue, or epoxy. For outdoors, bed parts in thin mortar or exterior adhesive.
15 Concrete Miniature Projects (Practical Build Guide)
Each idea is a template—use your own dimensions and scale.
1) Building Foundations & Footings
Mold: Foam box with balsa plank face for board-formed texture.
Steps: (1) Build a simple rectangular mold. (2) Add form-tie holes with toothpick stubs. (3) Pour, vibrate, and screed.
Finish: Cool gray wash; mossy green in crevices.
Scale note: In HO, keep visible pores tiny—use a smooth mix.

2) Retaining Wall (Board-Formed)
Mold: Long balsa face panel with plank seams every 8–12 scale inches.
Steps: (1) Texture grain. (2) Insert wire “rebar.” (3) Pour in two lifts.
Finish: Faint rust streaks below tie holes with burnt sienna.

3) Square Pillars & Pilasters
Mold: Four styrene faces taped into a tube; foam cap at one end.
Steps: (1) Add a paperclip core for strength. (2) Pour from the top. (3) Rotate while tapping to center the core.
Finish: Subtle dry-brush on edges for crisp geometry.

4) Round Columns
Mold: Empty marker barrels or any tubular plastic (varied diameters).
Steps: (1) Plug one end with tape. (2) Grease interior lightly. (3) Fill with syringe; vibrate against table.
Finish: Wrap a thin paper capital if you want classical flair.

5) Straight Stairs
Mold: Foam block carved into risers; seal with PVA.
Steps: (1) Carve steps; keep tread uniform. (2) Line with packing tape. (3) Pour and scrape each riser clean with a stick as it sets.
Finish: Dark wash in step nosings for depth.

6) Curved or Fan Stairs
Mold: Stack thin foam arcs; sand to smooth curve.
Steps: (1) Build radial risers. (2) Seal, release. (3) Pour slowly; vibrate around the curve with a toothbrush.
Finish: Micro-speckle with a toothbrush flick for stone flecking.

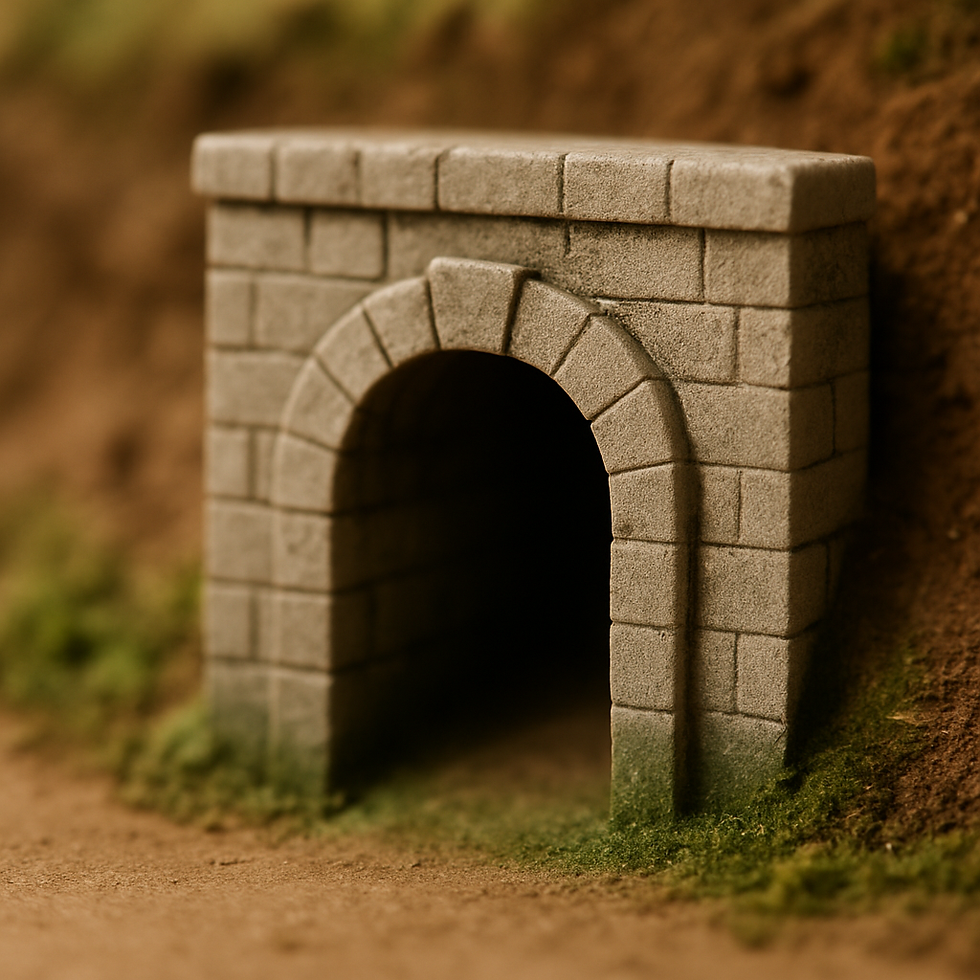
7) Bridge Arch / Culvert
Mold: Half-circle foam arch with keystone block carved in.
Steps: (1) Add a flat base slab. (2) Embed wire across the span. (3) Pour arch first, then backfill.
Finish: Sooty weathering on intrados; algae green at waterline.

8) Fence Posts & Panels
Mold: Multi-cavity styrene tray (think ice-cube tray you make yourself).
Steps: (1) Add wire eyes or holes for later stringers. (2) Cast a batch. (3) Thread with basswood rails or wire after cure.
Finish: Lime streaks down posts; dry soil pigments at base.

9) Garden Path Pavers / Cobblestones
Mold: Press pebbles into plasticine, then cast a negative silicone or PVA skin; use it to stamp a shallow tray.
Steps: (1) Make the stamp. (2) Cast thin sheets. (3) Snap into irregular shapes.
Finish: Multiple cool-gray washes; moss powder in joints.

10) Seawall Blocks & Bollards
Mold: Short cylinders (caps from glue sticks) and chunky foam boxes.
Steps: (1) Embed a bent paperclip loop on top as a ring. (2) Cast. (3) Sand the chamfer on edges post-cure.
Finish: Salt-pitted technique; dark, wet gloss in patches.

11) Jersey Barriers / K-Rails
Mold: Cut the profile in foam, then create two mirror faces and a base.
Steps: (1) Pin the faces to maintain taper. (2) Cast. (3) Add reflector dots (pin heads) after sealing.
Finish: Scuffs with graphite pencil; grime streaks.

12) Modern Bench & Plinths
Mold: Simple styrene U-shapes.
Steps: (1) Cast three modules. (2) Sandwich a wood or styrene seat between two concrete supports. (3) Pin with wire.
Finish: Soft warm gray; edge highlights for design-gallery vibes.

13) Utility Vault / Transformer Pad
Mold: Shallow rectangle with a slightly raised perimeter curb.
Steps: (1) Cast slab. (2) Scribe panel lines post-cure. (3) Add greebles: miniature conduit from floral wire.
Finish: Oil stain washes; dusty overspray near edges.

14) Tunnel Portal
Mold: Arch opening cut from foam; face scored as ashlar blocks.
Steps: (1) Scribe stones. (2) Cast; backfill with sand while curing to keep it flat. (3) Add wing walls as separate casts.
Finish: Soot above crown; damp tide marks at base.
15) Bridge Abutments with Wing Walls
Mold: Foam stair-step mass with board-formed balsa face.
Steps: (1) Build two mirrored molds. (2) Embed wire dowels so the deck can pin in later. (3) Cast; keep the bearing shelf crisp by scraping as it sets.
Finish: Rust streaks where imaginary rails would leak; plant a tuft of static grass at cracks.

Planning & Scale Notes
Edge thickness: In 1:12 you can go 6–12 mm thick; in HO aim for 2–4 mm slabs with occasional ribs hidden behind.
Panel seams: Board widths of 6–8 scale inches look right in most scales.
Form ties: Space roughly 3–4 board heights apart in a grid—instantly sells “real.”
Lighting & Install (Keep It Simple)
Concrete looks great with warm LEDs (2700–3000K). If you want under-stair or culvert lights, tuck USB fairy lights behind a lip or run a channel in the mold and feed the strand through. Diffuse hot spots with tissue or frosted plastic. For outdoor runs, keep connections inside a weather-protected box.

Story Clutter & Easter Eggs
Concrete sings when it’s lived-in: add a forgotten bucket, a chalk line, tiny graffiti, or a rusted rebar stub. Press a coin date, dog paw, or your initials into a back corner while the cast is green. It’s your world—leave your thumbprint.

Unifying Glaze / Finish
When all parts are in, mix a thin gray-brown glaze (ink + matte varnish + water) and feather it across edges and recesses. This ties tones together, adds age, and knocks down any patchiness. Final pass: matte sealer to lock it.
Troubleshooting (Problem → Fix)
Crumbly edges → Mix was too dry or demolded too early. Add a touch more water next time and give it more cure time.
Big bubbles/voids → Pour in layers and vibrate; add one drop dish soap to the water.
Surface stuck to mold → More release; seal porous balsa with PVA first; allow full dry before casting.
Hairline cracks → Too thin or dried too fast. Reinforce with wire, or mist-cure under plastic for the first hour.
Color blotches → Pigment not dispersed. Pre-mix color into the water; apply unifying glaze after cure.
Edges not crisp → Mold seam gaps. Use hot glue on exterior seams and a packing-tape liner for glassy faces.

Closing
Concrete and I go way back—childhood me discovered that when you pour a little patience into a mold, you get a tiny piece of forever. I hope this guide nudges you to try your own miniature concrete molds, from board-formed walls to bridge arches. When you cast something you’re proud of (or hilariously proud of), tag it #smallworldminiatures so I can cheer you on. Drop questions below—especially if you’ve invented a new texture. I’m always hunting for the next trick.
Hashtags
#miniature #miniatures #miniatureart #miniaturemodel #diorama #modelmaking #concrete #cement #boardformed #modelrailroad #gardendiorama #dioramaterrain #wargamingterrain #hoScale #oneTwelveScale #foamcraft #balsa #scaleModel #hobbycraft #terrainbuilding #kitbashing #scratchbuild #modelarchitecture #bridge #stairs #retainingwall #culvert #weathering #tinyworld #smallworldminiatures


Comments