
Miniature Halloween Decorations: 9 Spooky-Cute DIYs for Dollhouses (Mostly From Household Stuff)
- Oct 31, 2025
- 7 min read
Updated: Jan 18

Hey friends—Brandon here. I don’t know who first decided October should smell like cinnamon brooms and acrylic paint water, but I salute them. Today, we’re skipping the usual tour-and-tale and diving straight into a Make Your Own Magic masterclass: nine unique, spooky-cute miniature Halloween decorations you can craft for dollhouses (or any small-scale scene). We’ll lean hard on household materials you already have… and I’ll point to simple craft-store equivalents if you want a more “kit-ready” route.
You’ll get a smart shopping list, planning and scale notes, safety reminders, numbered build steps, finishing tricks, lighting ideas, and photo tips—plus a fast troubleshooting section. Use this as a launchpad; your results will vary in the best way possible. Ready? Let’s haunt in 1:12 (or whatever scale you love).
Make Your Own Magic 🎃
Quick Planning & Scale Notes
Default scale: I reference 1:12 (1 inch = 1 foot). For 1:24, halve dimensions; for 1:48, quarter them.
Dry fits first: Nothing earns you “pumpkin spice chaos” faster than gluing too soon. Test placement, especially with lights.
Color plan: Choose a palette before you start (e.g., charcoal, bone, pumpkin, moss) so all ten pieces feel related.
Safety First: Ventilate for sprays/CA glue; keep fingers away from hobby knives (fresh blades are safer than dull ones). Hot tools melt foam and brain cells—use in ventilated spaces. Keep magnets, pins, and tiny LEDs away from pets/kids.
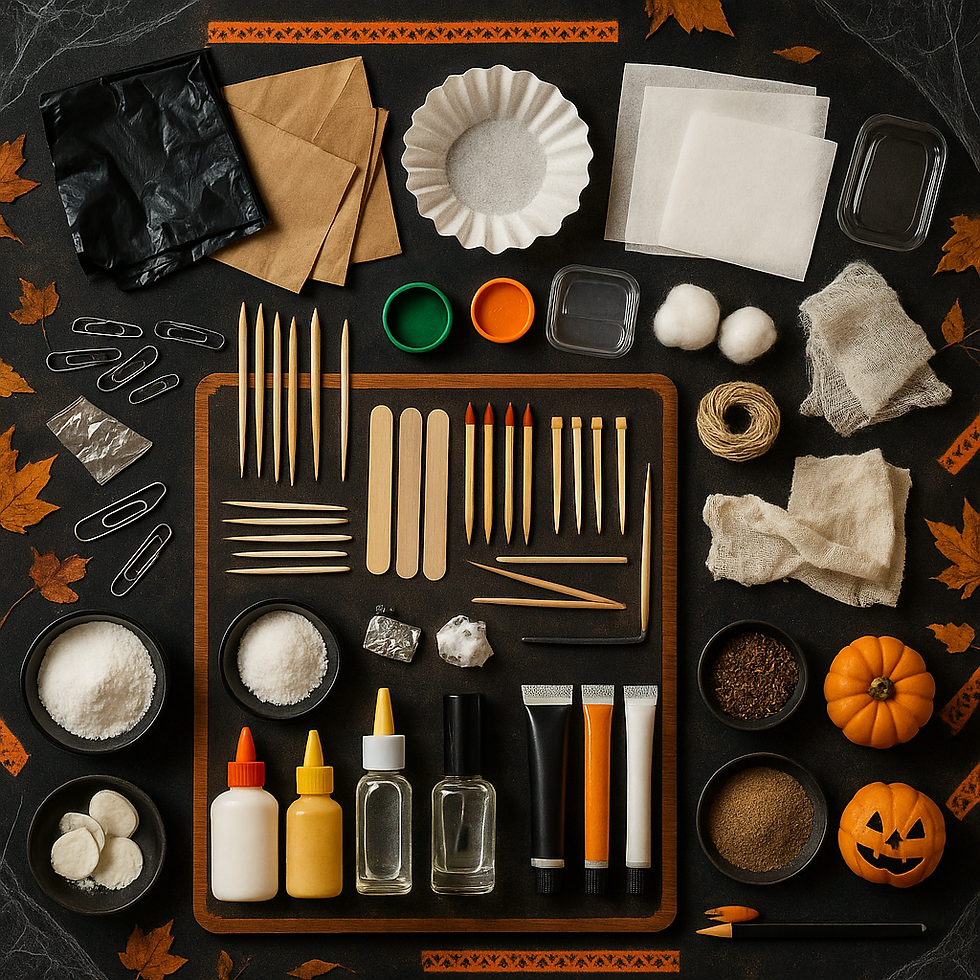
Shopping List (with clever swaps)
From Around the House
Cardboard & paper: cereal boxes, paper bags, junk mail, tissue, coffee filters, black trash bags
Plastic bits: bottle caps, drinking straws, blister packaging, clear takeout lids
Wood: toothpicks, coffee stirrers, skewers, matchsticks
Metal odds: paper clips, foil, wire twist ties
Fabrics & fibers: old t-shirt scraps, cheesecloth, lint (yep), cotton balls, twine
Adhesives & finishes: PVA/white glue, wood glue, clear nail polish, floor polish, acrylic paints, graphite pencil
Fillers: baking soda, cornstarch, spackle (if you’ve got it), fine sand, tea leaves (for dirt/leaves)
Craft-Store Equivalents (if the kitchen drawer fails you)
Foam & clay: XPS or EVA foam sheets, air-dry clay (Crayola), polymer clay (Sculpey)
Detail bits: tiny chain, seed beads, bead caps, jewelry findings, microbeads
Lighting: USB micro LED string or fairy lights, 3V LED tea lights
Adhesives: gel CA glue, UV resin + UV torch, matte Mod Podge, spray primer for plastics
Paints/mediums: craft acrylics, transparent inks, gloss varnish, matte varnish, pigment powders
Where to look: Michaels, Joann, Blick, Amazon, Etsy (search “dollhouse 1:12 accessories”)

The 10 Builds (DIY steps for each)
1) Window Witches & Bats (trash-bag silhouettes)
You’ll use: Black trash bags, printed bat/witch silhouettes, glue stick, clear tape, tissue paper (yellow/orange), LED strip.Steps:
Print silhouettes to size; tape them over the trash bag plastic.
Cut cleanly with sharp scissors; save tiny offcuts for cat shapes.
Back your window openings with yellow/orange tissue for a warm “interior” glow.
Layer silhouettes atop tissue; fix edges with glue stick.
Edge window mullions with a black fineliner for crispness.
Light from inside with a short LED strip or a tea light placed safely away from paper.
Photo trick: Mist the “glass” with matte clear for light diffusion.

2) Mini Spell Books (matchboxes to tomes)
You’ll use: Empty matchboxes, scrap paper, twine, coffee/tea, PVA, acrylics, gel pen, tiny beads.Steps:
Stain pages: Dip scrap paper in coffee; dry and crinkle.
Wrap the matchbox sleeve in painted scrap (brown + a touch of red/green for leathery tones).
Score spine lines with a blunt needle; dry-brush lighter brown.
Glue stained “pages” around the tray’s edges; add a tiny bookmark ribbon.
Title with a gold gel pen (“Hexes Vol. II”).
Hardware: Seed beads or flat-back microbrads as clasps.
Age with a dark wash in creases; matte seal. Stack in a haunted study.

3) Haunted Portraits (blister-pack glass + crackle)
You’ll use: Printed miniature portraits, blister-pack clear plastic, matte Mod Podge, black paint, white pencil.Steps:
Print 2–3 portraits (Victorian looks are extra spooky).
Cut frames from cereal card; bevel edges with a knife; paint black.
Glaze the portrait with Mod Podge; press blister plastic on top for fake glass.
Crackle look: Gently score spider-web micro-lines in the plastic with a hobby blade tip.
Highlight edges with a white pencil for “chipped enamel.”
Mount on the wall; tilt one slightly askew.
Easter egg: Under low light, the crack lines photograph like spectral faces.

4) Dripping “Wax” Candles (drinking straws + LEDs)
You’ll use: White straw segments, hot glue or PVA + baking soda paste, toothpicks, LED tea light guts.Steps:
Cut straws into candle heights (tallest = ~1.25" in 1:12).
Drips: Ring the straw tops with hot glue drips (or PVA + baking soda paste).
Paint bone/off-white; shade recesses with tan wash.
Wick: Trim a toothpick nub, paint black, insert a millimeter into the top.
Hollow base if needed and set over tea light emitter (remove bulky case).
Group in threes on a mantle; add a mirror behind for drama.
Seal matte; dot gloss only on fresh drips.
Safety: Don’t use real flame near plastics/paper. LEDs only.

5) Wrought-Iron Fence (coffee stirrers + wire)
You’ll use: Coffee stirrers, toothpicks, thin wire/paper clips, black paint, superglue gel.Steps:
Cut posts from stirrers; notch rails with a needle file for toothpicks.
Shape spear-tips by sharpening toothpicks lightly and snipping flat.
Assemble rails-to-posts with PVA; spear pickets into the rails with drops of gel CA.
Add wire scrolls (bend around a paintbrush handle).
Texture with stippled baking soda in matte Mod Podge for cast-iron grain.
Paint satin black; dry-brush graphite for metal sheen.
Rust touches: orange-brown stipples at joints, then a darker brown pin-wash.

6) Tiny Tombstones (cereal card or foam)
You’ll use: Cereal card or 3–5mm craft foam, pencil, acrylics, fine sand, PVA.Steps:
Cut classic shapes (arched, rounded, Celtic cross).
Engrave names with a dull pencil (“A. Goner,” “B. Ware”).
Texture: Press fine sand into wet PVA for stone grit.
Paint neutral gray; blot with a natural sponge using lighter/darker grays.
Moss: Dab green wash in crevices; sprinkle tea leaves while tacky.
Base into a small soil mound (PVA + real dirt/tea).
Seal matte; dust edges with pigment for age.
Note: Solvent sprays melt XPS; brush-on primers are your friend.

7) Floating Sheet Ghosts (tissue + PVA shell)
You’ll use: Tissue or coffee filter, foil armature, PVA, water, fishing line, tiny bead eyes.Steps:
Ball foil into a marble for the “head”; add a bit of foil cone for shoulders.
Mix PVA:water ~1:1. Dip tissue; drape over armature.
Shape ripples with a brush handle; let dry (overnight = crisp folds).
Add bead eyes with a pinpoint of PVA.
Wash very light gray into recesses for volume.
Suspend with fishing line from a ceiling beam.
Bonus glow: Tuck a microlight underneath for an ethereal float.

8) Witch’s Cauldron & Bubbling Brew (bead cap + UV resin)
You’ll use: Black metal bead cap or painted wood bead, wire handle, UV resin (or 5-minute epoxy), green ink, microbeads.Steps:
Choose a bead cap that looks like a pot; paint matte black if needed.
Handle: Bend thin wire in a U; poke side holes; secure with gel CA.
Brew: Tint UV resin or epoxy with a drop of green ink/paint; pour shallow.
Bubbles: Sprinkle microbeads; cure under UV light (or let epoxy set).
Steam: Pull wisps from a cotton ball; glue to rim.
Soot: Dust graphite around base; dry-brush gray highlights.
Set over a “fire” made from painted rice grains (coals) with an LED below.

9) Autumn Pumpkins & Leaf Piles (paper + clay mix)
You’ll use: Orange paper, hole punch (various sizes), brown pencil, PVA; plus polymer clay or air-dry clay for pumpkins.Steps:
Leaves: Punch circles from orange/brown/green paper; snip into leaf shapes; vein with a brown pencil.
Pile: Brush PVA where you want a heap; layer leaves; sprinkle tea-leaf “crumbs.”
Pumpkins (fast clay): Roll small balls; press grooves with toothpick; add a twig stem.
Color with thinned oranges/yellows; shade grooves with sienna wash; add a speckle of green.
Finish stems matte; a single gloss dot on the surface sells the waxy skin.
Stack pumpkins near the fence; tuck leaves into corners for realism.
Micro vignette: One carved jack-o’-lantern using a bead + cutouts + interior LED.

Finishes, Filters, and a Unifying “Magic Hour”
To make these ten pieces look like they belong in the same world:
Unifying glaze: Mix a very thin raw umber + black acrylic wash (think tea, not coffee). Wick it into recesses across all props to harmonize shadows.
Edge lights: Dry-brush a shared “moonlight” color (desaturated pale blue-gray) on upper edges for continuity.
Matte first, then selective gloss: Seal everything matte; add small gloss hits to the cauldron brew, pumpkin highlights, and candle drips.

Utilities & Greebles (little bits that sell the scene)
Chains & locks: Old necklace chain + a paperclip padlock on the fence.
Street detritus: Rolled “candy wrappers” from foil; a bent bottle cap as a lid on the cauldron’s log pile.
Paper ephemera: Mini “Missing Cat” flyer on the fence; micro thumbtacks from painted pin-head shavings.

Furniture/Soft Goods Tie-ins
Mantle runner: Black t-shirt scrap with pinked edges; chalk a white spiderweb.
Throw pillow: 1" square scrap with a felt bat appliqué.
Doormat: Burlap snippet stenciled “BOO.”

Lighting (simple + safe)
USB micro LEDs are the MVP: easy power, low heat. Hide the power bank behind your scene.
Color temperature: For cozy-haunt vibes, use warm white (2700–3000K) for windows/candles; cool white (5000K) for moonlight accents.
Diffusion: Tissue, tracing paper, or frosted tape behind windows softens hotspots.
Story Clutter & Easter Eggs
Tiny muddy boot-prints (toothpick + dark brown) leading to the tombstones.
A dropped match near the candles (painted sliver of toothpick).
Micro candy corn (triangles of orange/white/yellow clay) peeking from the leaf pile.

Photo Tips (make your minis look monumental)
Backdrops: A simple charcoal poster board with a hand-brushed lighter center = instant foggy night.
Low angle: Camera at dollhouse eye level sells scale.
One big, one small light: Key light (softbox or window) + a tiny bounce card from white cardstock.
Atmosphere: A whisper of canned air across the scene moves cotton “steam” for live motion in video clips.
Lock exposure: On phones, tap-hold to lock; then slide exposure slightly down for mood.
Troubleshooting (gremlins → fixes)
Paint beads on plastic → Lightly scuff with 1000–1500 grit, then brush-on primer.
LED hotspots in windows → Add a second tissue layer or move LED farther back.
Warping card tombstones → Laminate two layers cross-grain; seal both sides before paint.
Glue fog (CA frosting) on “glass” portraits → Switch to PVA for clear parts; polish with a dab of clear nail polish once dry.
Foam melts with spray → Brush-prime first (PVA + black acrylic), then use water-based paints.
Wrap-Up
And there we go—nine little haunts that add up to a big atmosphere. Mix them into your porch, parlor, or graveyard nook, and you’ll have a scene that feels cohesive, cozy, and just a little cursed. If you try any of these, I’d love to see—drop pics in the comments and tag #smallworldminiatures so I can share your spooky brilliance. Got a favorite build from the list? Tell me which one and why—you might influence next year’s batch.
Happy haunting and happy making,—Brandon
Hashtags
#smallworldminiatures #miniaturehalloween #dollhousehalloween #minimaker #dollhouseminiatures #miniatures #diorama #tabletopterrain #1to12scale #scratchbuilt #crafting #dollhouseDIY #miniatureprops #spookyszn #dollhousedecor #halloweenminiatures #minicrafts #kitbashing #tinyart #miniaturephotography #modelmaking #foambuilds #airdryclay #polymerclay #usbLED #scalecreep #miniaturepainting #hauntedhouse #OctoberCrafts


Comments