


Pastel Sanrio Cottage: Building a Whimsical Miniature Home & Garden Diorama
- Jan 23
- 11 min read

First Impressions in Miniature
The first time I saw this little pastel palace, my brain did a happy squeal.
We’ve got a multi-story cottage with a turret, balcony, and glass-walled conservatory, all wrapped in heart-shaped windows, candy colors, and more flowers than my real-world yard could ever handle. The garden is a full scene: stone path, bridge, pond with ducks, comfy sofa, balloons, and a tiny tea setup that frankly looks more relaxing than my full-size living room.
This post is your guided tour and your build roadmap. We’ll break down how you could recreate a similar Sanrio-inspired miniature home and garden—textures, architecture, landscape, and all the little accessories—so definitely stick around to the end for the full step-by-step “Make Your Own Magic” section.
Why This Photo Gets VIP Treatment
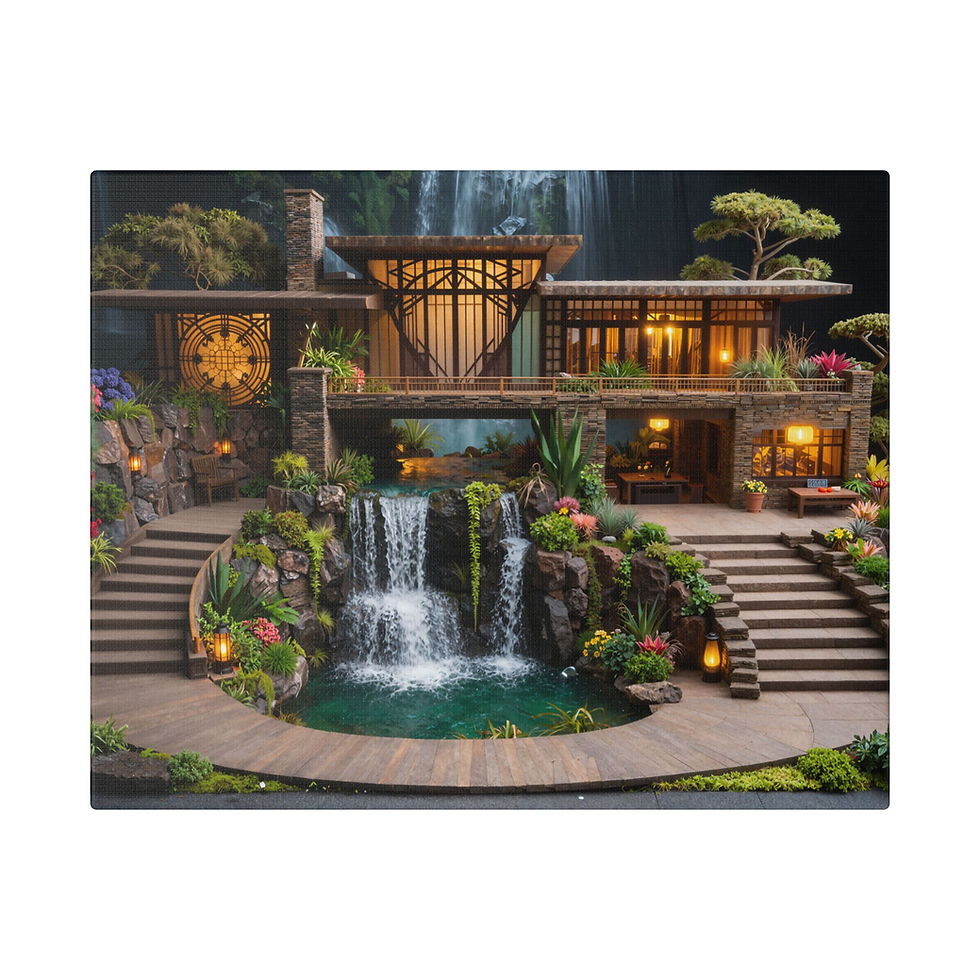
This image is optimized for the web, so it loads fast and looks lovely on screens—but imagine this scene as a big, glossy canvas hanging in your studio or craft room. The pastel roof tiles, tiny balcony railings, sparkly trees, and calm blue pond? They look incredible as a statement piece.
So if you fall in love with this cottage (I mean, same), you can absolutely treat it like fine-art photography of a miniature world: a large canvas print with crisp detail, ready to hang, FREE U.S. shipping, and zero risk of real ducks moving in and demanding rent. https://www.smallworldminiatures.com/product-page/sanrio-inspired-miniature-cottage-and-garden-canvas-print

Miniature Backstory – The Tiny Tale
Welcome to Marshmallow Lane, a cozy corner of the tiny town of Sugarvale.
This particular house is known locally as Rainbow Gate Cottage. Legend says it was built by a soft-spoken sweets designer named Momo, who wanted a place where her friends could drop by for pastel pastries and cloud-fluffy cushions any time of day.
The turret? That’s where Momo experiments with new dessert recipes and keeps a secret stash of rainbow sprinkles.
The conservatory is her “Sunlight Studio,” crammed with sugar-rose topiaries and plants that only bloom when you compliment them.
The pond out front is home to a family of ducks who think they’re security guards. They’re terrible at it, but they try.

If you look closely at the scene, you might spot a suspiciously croissant-shaped snail lurking near the bridge—locals swear it moves a little every time someone says “Just one more miniature…” Keep that croissant snail in mind; we’ll sneak it into the build later as an Easter egg.
A Guided Tour of the Build
Let’s walk the scene as if we’re shooting it for a cinematic miniature film.
You start on the stone path, each stepping stone slightly rounded and irregular, with tiny mossy tufts in the gaps. The path leads to a soft pink front door framed by two columns and gentle steps, the stone chipped just enough to feel lived-in.

Above, the balcony brims with flower boxes: miniature roses in sherbet oranges, blush pinks, and creams, every petal just a hint of color variation. The balcony balusters are delicately spaced, giving strong “don’t lean on this if you’re taller than two inches” energy.

To the right, the glass conservatory glows with warm sunlight. Clear panes show rows of potted plants and pastel blooms inside, with reflections hinting at an invisible sky overhead.
The garden sprawls around the house like a plush quilt: rounded shrubs in pink, blue, and mint, fluffy trees with sugary foliage, and a sea of tiny flowers dotting the grass. Everything feels soft and huggable, even the rocks.

By the pond, a little arched bridge spans glittering water, speckled with lily pads and floating shapes. A couple of yellow ducklings patrol the shore. On the far side, a candy-colored seating area waits: a cushy sofa, parasol, and heart balloons bobbing gently, as if a breeze just passed through.

Everything feels handcrafted and intentional. No single hero piece—just a whole cast of tiny set pieces working together.
Inspirations – From the Big World to the Small
Stylistically, this cottage lives somewhere between:
Victorian & Storybook RevivalThink turret, gables, cornices, and fancy trim—like a softened, toy-box version of painted-lady houses in San Francisco or the fairy-tale cottages of Carmel-by-the-Sea.
Greenhouse & Conservatory ArchitectureThe glass sunroom echoes classic iron-and-glass conservatories such as the Palm House at Kew Gardens, simplified into chunky frames and bright panes.
Sanrio & Kawaii Design LanguageRounded corners, low contrast shading, pastel palettes, and “soft” shapes. Nothing is sharp or aggressive. Even the stones and trees look like they’d squeak if you hugged them.

In miniature form, those inspirations get dialed up:
Rooflines become thicker and more toy-like.
Handrails and frames use over-scaled parts so they’re sturdy but still cute.
Details are simplified into iconic shapes: hearts, stars, bows, clouds.
We’re basically shrinking a whimsical villa into dollhouse scale and then painting it like cotton candy.
Artist Tips – Make Your Own Magic
Here’s where you step in. You’re not building this exact cottage; you’re creating your own version in this universe. So treat what follows as a gentle roadmap, not an architectural contract. Your balcony might be bigger, your trees fluffier, your ducks dramatically more chaotic.
Also, fair warning: some of the reference sketches and concepts I use for planning are summoned from a very enthusiastic digital imagination. Occasionally a chair grows an extra leg or a teacup fuses with a cupcake. If that happens to your planning art, just laugh and keep the ideas you like—your actual build is where the real magic happens.
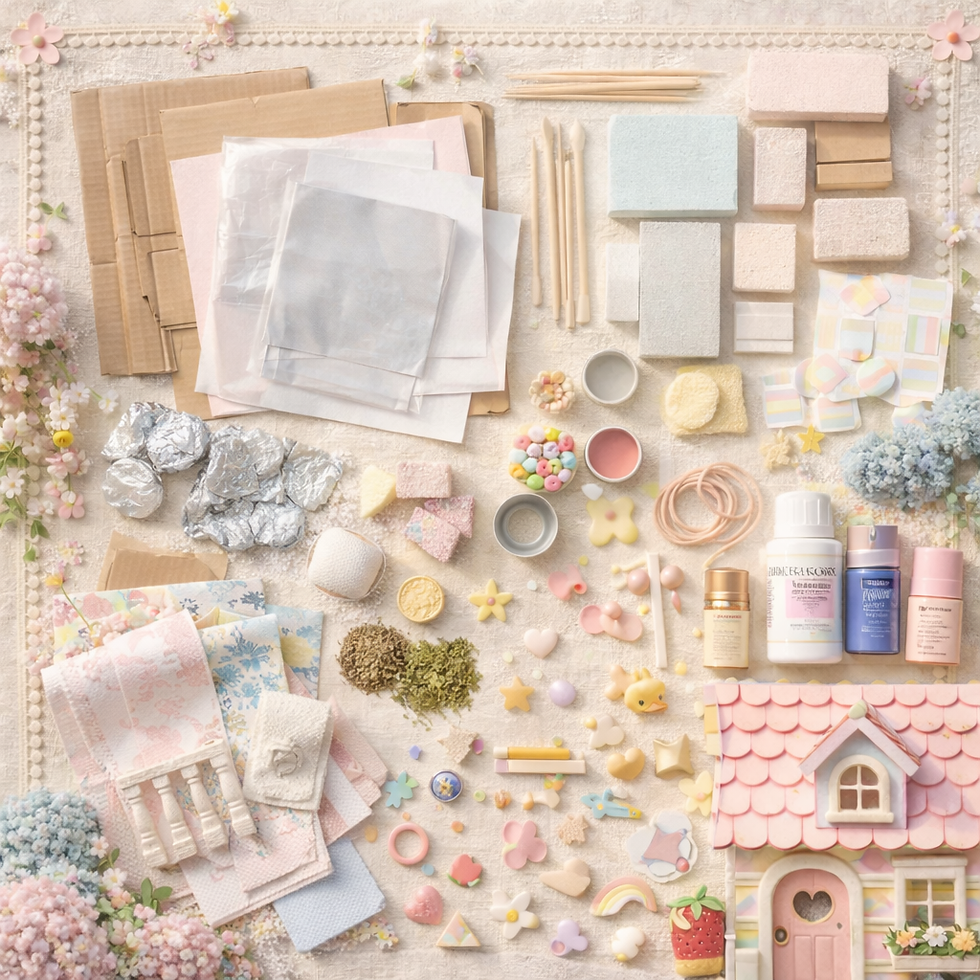
Shopping List – Pastel Palace Edition
Focus first on things you might already have, then we’ll layer in hobby-store options.
From Around the House
Base & structure
Thick cardboard, old picture frames, or wooden cutting boards for the base
Cereal boxes or shipping boxes for mockups and wall layers
Clear plastic from food packaging for conservatory “glass”
Toothpicks, skewers, and coffee stirrers for railings and beams
Texturing bits
Aluminum foil for pressing stone textures
Old makeup sponges for stippling paint and foliage
Scrap fabric or cotton rounds for cushions and curtains
Dried tea leaves or herbs for soil and mulch
Detail parts
Bottle caps and pen caps for planters
Beads and buttons for flowers, doorknobs, and lamp housings
Thin wire or twist ties for tree armatures and balloon strings
Leftover ribbon for bows and sofa trim
From Craft & Hobby Stores
(Think art chains like Michaels, or online mini supplies and wargaming shops.)
Structural materials
XPS foam or foamboard sheets (for walls, roof, and base terrain)
Balsa wood or basswood strips (balcony rails, beams, furniture)
Styrene strips (great for the conservatory frames)
Modeling & texture
Air-dry clay or polymer clay (tiles, stones, flowers, ducks)
Acrylic modeling paste or lightweight spackle (stucco and ground texture)
Sand, flock, static grass, and foam foliage scatter
Paint & finishes
Acrylic paints in pastel pinks, blues, mints, yellows, warm whites
Matte and satin varnish
Pearl or iridescent medium for that candy sheen
Lighting (optional but delightful)
USB-powered mini LED strings or warm-white fairy lights
A couple of small battery tea lights you can hide behind the house
Grab some PVA/white glue, super glue, and a sharp hobby knife, and you’re ready.
Deep Dive: Build Steps for Your Sanrio Cottage
1. Plan Your Pastel Palace (Safety & Scale)
Decide your scale: common options are 1:24 (half-scale dollhouse) or “whatever looks cute on my shelf.” For a scene like this, a base around the size of a sheet of printer paper works nicely.

Sketch a quick front view and top view: placement of house, conservatory, pond, path, and seating area.
Safety check: Cut away from your body with sharp blades. Wear a dust mask if sanding foam or carving a lot. Ventilate if you ever use spray primer or sealant.
You’re essentially directing a tiny movie set—story first, measurements second.
2. Build the Base & Landscape Bones
2.1 Glue your base layer (foamboard or wood) onto something rigid if needed.2.2 Rough in the terrain with layers of foam: slightly raised area for the house, lower depression for the pond.2.3 Carve gentle slopes; avoid cliffs. This world is made of marshmallows, not mountains.2.4 Coat ground with a mix of PVA glue and a bit of lightweight spackle to smooth transitions.

While the paste is still soft, press in the path route and pond outline so you remember where everything goes.
3. Block in the House Shell
3.1 Cut wall panels from foamboard or XPS foam: front, back, sides, and tower pieces.3.2 Dry-fit everything before gluing—check that the roof angles make sense and the conservatory will have room.3.3 Cut out window and door openings now, while the walls are flat.3.4 Assemble the box with PVA or foam-safe glue, using pins or toothpicks as temporary “rebar” while it dries.

You want a clean, slightly exaggerated silhouette: tall turret, friendly front porch, and plenty of roofline.
4. Rooflines, Turret & Balcony
4.1 Cut roof pieces from foam or card and test-fit them at playful angles.4.2 For the turret, roll a strip of card into a cylinder and cap it with a cone roof, then attach to one corner of the house.4.3 Build the balcony:
Floor: a simple rectangle of foam or balsa.
Front wall: a short parapet made from foam with carved panel lines.
Posts & rails: toothpicks, skewers, or balsa strips spaced evenly.

Make everything slightly chunkier than real life—Sanrio-style architecture is unapologetically chubby.
5. Carving Textures: Shingles, Stone & Siding
5.1 Roof shingles
Score lines in the foam roof to suggest overlapping scalloped tiles.
Use a rounded tool (even the back of a brush) to curve each tile edge, so they look like candy wafers.

5.2 Stone foundation & path
Around the base of the house and across the walkway, press irregular stone shapes using a pencil or rolled aluminum foil.
Vary the size a bit; think smooth river stones, not bricks.
5.3 Walls
Carve faint vertical grooves for siding or block out sections as stucco panels.
Add simple trim around windows and doors with thin strips of card or styrene.
This is where the miniature stops looking like a box and starts looking like a home.

6. Windows, Doors & Conservatory
6.1 Windows
Frames: thin strips of balsa or card arranged into grids.
Glazing: clear plastic behind the frame.
Extra charm: add a tiny curve or heart cutout in the top sections.

6.2 Door
A simple rectangle of foam or card, rounded at the top.
Add a heart-shaped window by cutting a heart in thin card and backing it with clear plastic.
Glue on a tiny bead as the doorknob.
6.3 Conservatory
Build a box from card or styrene strips, leaving most panels open.
Glue clear plastic into each “window” section.
Add a simple pitched roof of clear plastic panels with thin strips as rafters.

Inside, glue a few tiny planters and flowers—you’ll get rewarding glimpses through the glass later.
7. Prime & Paint: Candy Color Palette
7.1 Prime the whole piece with a brush-on acrylic gesso or craft primer (foam-safe).7.2 Block in main colors:
House walls: warm creamy white or whisper-soft beige
Roof: bubblegum pink
Trim: pale mint or sky blue
Door: a richer pink to stand out
7.3 Add gentle shading:
Thin a bit of darker tone with water and brush it into recesses (under shingles, around stones).
Wipe back the excess so it just whispers in the cracks.

7.4 Highlight edges with lighter pastel dry-brushing, especially on shingles and stone, to give that sun-kissed, cinematic look.
Think of it as frosting a cake: smooth, soft, and absolutely allowed to be slightly unrealistic.
8. Garden: Trees, Bushes & Flowers
8.1 Grass & ground cover
Paint the ground a mid-green base.
While still a bit tacky, sprinkle in a mix of fine turf and flock.
Add patches of lighter and darker greens for variation.

8.2 Shrubs & bushes
Roll small balls of air-dry clay, press lightly into place, and let dry.
Paint them pastel blue, pink, and mint, then dab on texture with a sponge and a slightly lighter color.
Top with a dusting of fine foam foliage while the last layer is wet.
8.3 Trees
Twist wire into trunks and branches, coat with a thin layer of clay or glue-and-tissue to bulk them up.
Paint trunks a warm light brown.
For foliage, glue on clusters of foam foliage or sponge-painted clay blobs in cotton-candy colors.

8.4 Flowers
Use tiny slices of polymer clay canes, seed beads, or dotted paint.
Cluster them in window boxes, balcony planters, and around the path.
This is where the scene jumps from “nice house” to “magical Sanrio postcard.”
9. Water, Bridge & Path Details
9.1 Pond
Paint the pond bed with layered blues and teals, adding lighter swirls to suggest depth.
Once dry, fill with clear gloss medium or a thin two-part resin, in shallow layers.
Drop in a few tiny lily pads or floating confetti shapes.
9.2 Bridge
Build a simple arched bridge from balsa: two curved sides and plank pieces across.
Paint in pastel pink and blue, then dry-brush the edges lighter.

9.3 Path
Paint each stone a slightly different warm grey or beige.
Wash with thinned green/brown in the gaps to suggest moss.
Don’t forget to hide that croissant snail somewhere near the waterline.
10. Furniture & Soft Goods
10.1 Patio table & chairs
Cut round table top from card, mount on a sturdy central post.
Chairs can be balsa or wire frames with solid seats; keep the backs decorative but chunky.
Paint them white or pale cream, with pastel seat cushions.

10.2 Sofa & cushions
Carve or sculpt a small couch from foam or clay.
Cover with a thin layer of fabric or paint a simple striped pattern.
Tiny fabric scraps or clay rectangles become pillows.
10.3 Tea set & treats
Sculpt cups, teapot, and pastries from polymer clay; bake according to instructions.
Paint frosting details and add a glossy varnish to make them look sugary.

You’re basically furnishing the world’s most wholesome dollhouse patio.
11. Balloons, Ducks & Story Clutter
11.1 Balloons
Small beads or sculpted hearts on fine wire or fishing line.
Paint them gloss pastel and plant them in the ground near the sofa.
11.2 Ducks
Sculpt simple duck shapes from clay: sphere for body, smaller ball for head, tiny wedge beak.
Paint bright yellow with orange beaks and a dot for eyes.

11.3 Story clutter & utilities/greebles
Add watering cans, lanterns, tiny mailboxes, plant pots, and maybe a tiny book on the sofa.
These little “life crumbs” sell the idea that someone actually lives here.
The more tiny objects (within reason), the more the viewer wants to explore.
12. Lighting & Photo Tips
12.1 Lighting the diorama
Tuck a short USB LED strand inside the house, taping bulbs near key windows so they glow.
Hide a battery tea light behind the conservatory for a warm backlight in photos.
12.2 Photographing your tiny world
Shoot at eye level with the house—pretend you’re two inches tall.
Use a soft, pastel backdrop (blue poster board, gradient paper, or even a printed sky with a rainbow).
Indirect daylight or a diffused lamp will give you that cinematic softness; avoid harsh overhead light.
Try a slightly shallow depth of field so the front is crisp and the background gently blurs.

Your goal is to make the viewer forget for a moment that it’s miniature.
13. Troubleshooting – Tiny Problems, Tiny Fixes
Problem: Foam edges look ragged or fuzzy.→ Fix: Lightly sand with fine sandpaper and seal with a thin layer of PVA before painting.
Problem: Pastel colors look chalky or flat.→ Fix: Add gentle shading with thinned darker tones in recesses, then highlight with a slightly lighter pastel on edges.
Problem: Pond resin pulled away from the edges.→ Fix: Brush a layer of clear gloss medium over the whole surface to even out the shine and disguise gaps.
Problem: Balcony railings keep snapping off.→ Fix: Use pins or toothpicks as hidden dowels into the balcony floor, and switch to a stronger glue like super glue for those joints.
Problem: Scene feels cluttered or noisy.→ Fix: Group accessories into clusters (tea zone, pond zone, conservatory zone) and leave a few calm patches of grass for the eye to rest.
Until Next Time in the Small World
And that’s Rainbow Gate Cottage—part cozy home, part dessert, part dream.
Whether you follow this guide step by step or just borrow pieces (maybe you only want the conservatory, or just the duck pond and bridge), I hope it nudges you to build your own pastel corner of the world. If you do, please share it—I’d love to see your version of Marshmallow Lane, croissant snails and all.
Drop a comment with your favorite detail from this diorama, or tell me what you’d add to your own Sanrio-inspired cottage. Tag your creations with #smallworldminiatures so I can come visit your tiny neighborhood too.
#smallworldminiatures, #miniatureart, #miniaturehouse, #diorama, #dioramabuild, #miniaturegarden, #dollhouseminiatures, #miniaturepainting, #tabletopterrain, #pastelminiatures, #kawaiiart, #sanrioinspired, #miniaturearchitecture, #modelmaking, #handmademiniatures, #craftblog, #miniaturetutorial, #scalemodeling, #fantasycottage, #whimsicalart, #resinwater, #xpsfoam, #polymerclayart, #miniaturefurniture, #pastelpalette


Comments