
Dutch Rowhouse Miniature Garden: A Tiny Amsterdam You Can Almost Smell
- Feb 2
- 10 min read

First Impressions in Miniature
The first time I saw this miniature row of Dutch homes, my brain did that happy little Windows-95 startup sound.
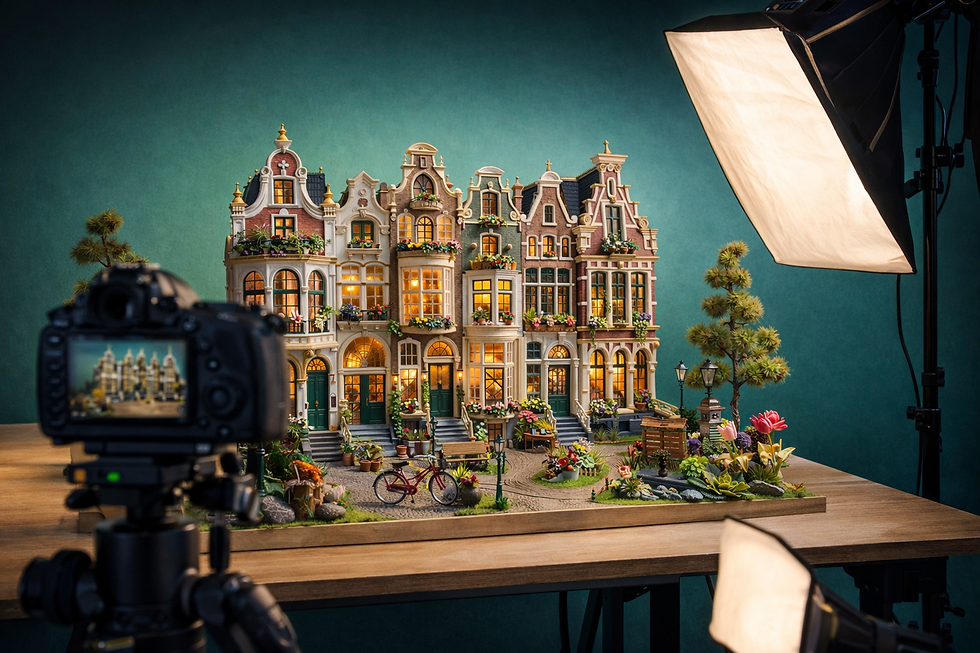
You’ve got these tall, skinny façades lined up like they’re gossiping over the canal, every window glowing, every balcony overflowing with flowers, and then—because the universe is kind—there’s a bright red bike parked casually in the courtyard like someone just dashed inside for more stroopwafels.

A few years ago I visited Amsterdam in late April for the tulip festival, and it honestly rewired my brain.
Whole fields of color, and then you walk into the city and the canal houses are just there—leaning a little, stacked with history, wearing window boxes like jewelry.

This diorama brings that exact feeling into miniature: romantic, slightly chaotic, and absolutely drowning in plants.
In a minute, we’ll walk through a full “build your own magic” guide so you can create your own Amsterdam-inspired street (no passport required).
But first, let’s talk about why this particular photo deserves serious VIP treatment.
Why This Photo Gets VIP Treatment
What you’re seeing here on the screen is the “internet in sweatpants” version of this piece: web-optimized, compressed, and politely downsized so it loads fast and doesn’t set your router on fire.
That’s why I offer this as a professionally printed canvas:
High-resolution source (way sharper than the blog image)
Printed on gallery-wrapped canvas with rich, true-to-color detail
Comes ready to hang, hardware included
FREE U.S. shipping, because more money should go to mini supplies, obviously

If you want this little Amsterdam courtyard to be your new warm focal point above a desk, sofa, or crafting nook, the canvas print is where the real magic shows up.https://www.smallworldminiatures.com/product-page/dutch-rowhouse-miniature-garden-canvas-print
Miniature Backstory – The Tiny Tale
Welcome to Tulpenhof Row, a perfectly respectable little street that somehow manages to be perpetually in the middle of a neighborhood festival.
Tulpenhof started life in 1683, when a canal merchant named Pieter van der Vliet decided he was tired of hauling cheese and herring and wanted to retire somewhere “peaceful.” He commissioned a set of row houses on a quiet side canal, far enough from the bustle but close enough to hear the church bells and boat horns.
Fast-forward to today, and Tulpenhof Row has become:
The unofficial headquarters of an annual “Who Grew the Tallest Tulip?” contest
Home to De Kleine Fiets, a tiny bike repair stall that insists every good tune-up comes with a cookie
The base of operations for Oma Lotte, who runs an underground (but very polite) club dedicated to rating every stroopwafel in the city

The residents swear the little red bicycle in the courtyard has never actually moved—it just appears in different spots whenever someone needs a meet-cute.
Easter egg for you: there’s a tiny red bike and a candy-stripe post tucked into the scene.
A Guided Tour of the Build
Start at the left side and your eyes land in a garden that’s gone delightfully overboard: fat tulips, bright daisies, and a rainbow of blooms spilling out of pots, shelves, and planter boxes. The grass is lush and tidy, but just irregular enough that it feels real, not like a green carpet.

Follow the stone path and it curves invitingly through the courtyard, splitting around a central bench that practically begs for a tiny person with a sketchbook. Street lamps frame the path—classic, slightly ornate, like they’ve seen centuries of fog and late-night bicycle shortcuts.

Look up and the façades start a little architectural parade:
Ornate Dutch gables that swoop, step, and curl
Tall, deep-green doors with brass hardware
Big bay windows with gridded panes, glowing like warm honey

Every balcony and windowsill is stuffed with plants. Little bursts of pink, red, and purple flowers spill over railings. Creeping vines climb the columns. There’s barely a windowsill that
isn’t doing the most.

On either side of the rowhouses, tall trees frame the scene, soft and textured, with foliage that looks like you could run a fingertip over it and feel the individual tufts. The background is a simple gradient—calm teal fading softly—which quietly turns all that architectural chaos into a focused, cinematic shot.

It feels like early evening: lights on, sky still pale, neighbors out watering plants and swapping recipes. You can almost hear the clink of teacups and the creak of bicycle pedals.
Inspirations – From the Big World to the Small
Tulpenhof Row is basically a love letter to Amsterdam’s canal belt.
If you’ve ever walked along Herengracht or Prinsengracht, you’ll recognize the DNA right away: tall, narrow houses with decorative gables, stacked windows, and a million flower boxes fighting for attention. The miniature steals those silhouettes—the neck gables, bell gables, and stepped profiles—and exaggerates them just enough to feel storybook instead of strictly historical.
The garden is pure Keukenhof energy: big saturated tulips, overflowing beds, and a sense that someone has been quietly gardening here for decades and refuses to stop.

There’s also a hint of Anton Pieck in the mix—that slightly whimsical, romanticized old-world vibe where everything feels a little softer than reality. And if you’ve ever visited Madurodam, the Dutch miniature park, you’ll know how much joy there is in seeing familiar streets miniaturized. This diorama leans into that same joy: the compression of a whole neighborhood into one tiny, walkable scene.
All of that big-world inspiration gets adapted here by:
Pushing color saturation higher than real life
Gently “squishing” depth so the courtyard and buildings all stay in view
Over-scaling the flowers just a bit so they read clearly even from a distance
Now let’s talk about how you can make your own enchanted little Dutch street.
Artist Tips – Make Your Own Magic
You don’t have to build this exact scene. In fact, please don’t. Your version should look like your favorite street—whether that’s Amsterdam, your own hometown, or some completely imaginary city that smells like waffles and acrylic paint.
Think of this as a friendly guide rather than a strict recipe. Your pieces, materials, and scale will vary, your hand will do weird little things (in a good way), and that’s where all the charm lives. The concept sketches I use to plan these posts come from a very enthusiastic digital helper who occasionally decides chimneys belong sideways, so if any illustration looks slightly unhinged… just go with it.
Use what works for you, ignore what doesn’t, and let your own style sneak in around the edges like ivy.
Shopping List: Everyday Finds + Hobby Staples

Base & Structure
Everyday hacks:
Cereal boxes and cracker boxes for walls
Corrugated cardboard for stepped gables
Old cutting boards or cabinet samples for a sturdy base
Hobby equivalents:
XPS or foam board sheets (https://www.michaels.com, https://www.micromark.com)
Pre-cut MDF bases (https://www.litko.net)
Streets & Masonry
Everyday hacks:
Sandpaper for gritty sidewalks
Thin cardboard scored for bricks
Dried coffee grounds mixed into paint for textured soil
Hobby equivalents:
Embossed brick sheets (https://www.juweela.de)
Texture pastes and scenic sands (https://geekgamingscenics.com)
Windows, Doors & Glass
Everyday hacks:
Clear blister packaging for window glazing
Toothpicks and coffee stirrers for muntins and frames
Hobby equivalents:
Laser-cut windows and doors (https://www.dollhouseminiatures.com)
Pre-made acrylic window sheets (https://www.evergreenscalemodels.com)
Flowers & Greenery
Everyday hacks:
Tissue paper and napkins twisted into petals
Dried herbs for ground cover
Old makeup brushes sacrificed for grass tufts
Hobby equivalents:
Paper flower kits (https://www.anniethingminiature.com)
Static grass, tufts, and foliage clumps (https://woodlandscenics.com)
Lighting & Electronics
Everyday hacks:
Battery-powered fairy lights from the holiday bin
USB tea lights hidden inside buildings
Hobby equivalents:
Warm-white LED strings and micro LEDs (https://www.evandesigns.com)
Heat-shrink tubing and tiny wire connectors
Details, Greebles & Clutter
Everyday hacks:
Beads as flower pots and lanterns
Jewelry findings as tiny hardware and signs
Paperclips bent into bike racks and railings
Hobby equivalents:
1:12 or 1:24 street furniture (https://www.miniatures.com)
3D-printed bikes and mailboxes from Etsy makers
Use what you already have first, then fill in the gaps with purchased goodies.
Deep Dive: Step-By-Step Amsterdam-Inspired Row
1. Safety, Planning & Scale
You start by choosing a scale (1:12 and 1:24 both work well for tall rowhouses). Sketch your street on paper: how many houses, how much courtyard, where the trees go. Work in pencil so you can change your mind without drama.

Safety talk: you cut away from your fingers, you wear a dust mask when sanding foam or MDF, and you open a window when you spray primer or varnish. Your lungs are not a sacrifice to the hobby gods.
2. Lay the Bones – Base & Walls
You cut your base to size and mark the footprint of each building with light pencil lines. Walls are foam or cardboard panels, glued upright with PVA or tacky glue. Internal bracing (scrap strips) keeps everything square. You stagger the façades a little in depth so the street doesn’t feel flat.

3. Streets, Steps & Courtyard
You texture the ground before you add too many fragile details. For cobbles, you press a rounded pencil into foam or score imperfect rectangles into card. A thin wash of gray-brown paint (something like 2 parts neutral gray, 1 part burnt umber, lots of water) settles into the grooves. Steps to each door are simple stacked rectangles, slightly worn at the edges with a bit of dry-brushed lighter gray.

4. Windows & Doors
Openings are cut now, before painting. You measure once, cut twice, swear quietly, and then sand the openings until everything fits. Pre-made windows slide in with a dab of glue; scratch-built ones use layered strips for frames and muntins. Clear plastic slides behind. Doors get deeper colors—forest green, navy, or oxblood—with a tiny dot of metallic paint for handles.

5. Brick, Plaster & Paint
You give each house its own personality but keep them in a shared palette: warm brick reds, muted sage green, cream, and soft terracotta. One trick: you basecoat everything a mid-tone warm gray first. Then brick colors go on in thin layers so the gray peeks through.
For brick texture, you either:
score the bricks right into foam, or
glue on thin card strips and break them up into “courses.”

A diluted brown wash (about coffee-colored) settles into the textures and ties the colors together. Upper stories can be lighter—cream or pale ochre—to draw the eye upward. Chimneys and that “weather stack” of roof pipes get slightly dirtier tones.
6. Hero Piece – Choose Your Focal Point
Before you vanish into a thousand details, you decide what the hero is. In this scene, it’s the courtyard with the red bicycle and flower riot. For your build, maybe it’s:
A corner flower stall
A glowing café door
A balcony overloaded with plants
You give that zone the strongest contrast and warmest lighting so it becomes the natural focal point.

7. Utilities & Greebles
Now you sprinkle in all the “this is a real street” bits: drainpipes, mail slots, tiny doorbells, maybe a fire hydrant. You cut thin strips of card for gutters and pipes, and use tiny beads or nail-art studs as knobs and caps. Keep the colors slightly duller here so they support, not steal, attention.

8. Furniture & Soft Goods
Benches are simple: two side pieces and a slatted top from coffee stirrers. You paint them a warm wood tone, then dry-brush a hint of pale gray to suggest wear. If your scale allows, you add:
A little cushion made from scrap fabric
Curtains or lace behind windows
A table with a single mug or flower vase
These soft goods make the scene feel lived-in without cluttering every inch.

9. Lights, Temps & Diffusion
You test your LEDs before you commit. Warm white (around 2700–3000K) gives that cozy evening glow. Cool white tends to feel like a dentist’s office, so you skip it unless you’re going full cyberpunk.

You hide wires in wall cavities or behind removable back panels. For diffusion, you tape a scrap of baking parchment or tracing paper behind each window so the bulbs don’t look like tiny interrogations. Once the lights work, you glue things down for good.
10. Story Clutter & Easter Eggs
Now the fun chaos. You add:
A stack of flower pots waiting to be planted
A tiny crate of tulip bulbs
Maybe a miniature book or tiny coffee cup on the bench
This is where you tuck in your own Easter egg—something that references your life. A tiny painted dog that looks like yours, a favorite book spine, or a micro sign with an inside joke. You know it’s there; viewers get a little mystery.
11. Unifying Glaze & Finish
At the end, everything can look a bit patchwork. You fix that with a very light unifying wash: something like 1 part burnt umber, 1 part matte medium, 10 parts water. You brush it over brick, stone, doors—avoiding the brightest flowers—and immediately blot with a paper towel. It settles into crevices, tones down any shouty colors, and makes the whole scene feel like it lives under the same sky.
You seal with a matte varnish so nothing stays shiny except glass and maybe a damp stone step or two.
12. Photo Backdrop & Shooting Tips
You keep the backdrop simple so the architecture can strut. A gradient cardstock sheet, a painted foam board in teal or muted blue, or even a softly lit curtain works. You set your camera or phone at “tiny human height”—down low, not looking from above—and shoot along the street, not straight down on it.
Use indirect window light or a softbox, and if the highlights blow out, you diffuse with a white pillowcase or parchment taped in front of the lamp. Take a few close-ups of your favorite tiny corners; those are the photos you’ll actually stare at later.
Troubleshooting: Tiny Problems, Tiny Fixes
Problem: Buildings look like a wall of sameness.Fix: Vary rooflines, window shapes, and one or two bold accent colors. Even a single bay window breaks the monotony.
Problem: Bricks feel flat and toy-like.Fix: Add a darker wash into the mortar lines, then dry-brush a lighter brick tone across the surface to pop edges.
Problem: Lights are harsh or “spotty.”Fix: Add another layer of diffusion (tracing paper, vellum) and pull LEDs a little farther from the windows.
Problem: Plants look like green blobs.Fix: Mix at least three greens (dark, mid, highlight) and pick out a few individual leaves or petals with brighter colors.
Problem: Whole scene feels too clean and new.Fix: Add subtle weathering—dirt on steps, a bit of moss where walls meet the ground, faint streaks under window sills.
Until Next Time in the Small World
Whenever I look at this diorama, I’m back on that late-April evening in Amsterdam, standing on a canal bridge while tulips and bicycles and crooked houses all crowd into one perfect view.
Tulpenhof Row feels like the miniaturized version of that memory: lights warming up for the night, someone wheeling a bike across the courtyard, Oma Lotte probably judging someone’s stroopwafel from behind a lace curtain.

I’d love to know: what’s your favorite tiny detail in this scene? The gables? The trees? The overachieving flower boxes? Drop a comment and tell me—and if you build your own Amsterdam-inspired street, please share photos with the tag #smallworldminiatures so I can properly lose my mind over them.
If you want more tiny tours, build guides, and behind-the-scenes chaos from the Small World, hop onto the newsletter—there’s always room for one more miniaturist on the canal.
#smallworldminiatures #miniatureart #miniaturediorama #dollhouseminiatures #miniaturehouses #miniaturearchitecture #amsterdamminiature #dutchrowhouse #tulipfestivalart #miniaturegarden #modelmaking #scale_model #miniaturepainting #dollhouseinspiration #miniaturestreet #miniatureworlds #fantasyminiatures #architecturelovers #canalhouse #miniatureflowers #handmademiniatures #tabletopterrain #modelvillage #tinyhomes #miniscenes #creativehobbies


Comments