


Petals, Pastels and a Perfectly Impractical Teapot: A Miniature Kitchenware Shop

My Vision for This Small World
My miniature kitchenware shop brings pastel cabinets and floral crockery into a boutique with a decidedly generous approach to display. Mint frames organize the crowded shelves, while a flower-shaped window carries that decorative spirit up the façade. The pink-brick path curves around a round counter, giving the little shop a clear route through all its treasures. I’ve combined those details in an imagined vintage setting where even choosing a sugar bowl could become the afternoon’s main event.
Some links earn me a commission from qualifying purchases and help keep this tiny world growing. As an Amazon Associate I earn from qualifying purchases.
For a miniature collection with room for something sweet, Rolife Becka’s Baking House is an inviting little bakery project. It would make a delightful gift for someone who loves both tiny worlds and beautiful shop displays.

Miniature Backstory — The Tiny Tale
Mabel's last customer was Arthur, carrying the lid from a sugar bowl. He wanted a replacement bowl in precisely the same pink.
Mabel set four candidates on the round counter. Arthur rejected one as too peach and another because it reminded him of his aunt's bathroom. The prettiest bowl fitted almost perfectly, but his lid sat crookedly.
“Perhaps the lid is waiting for a different bowl,” Mabel suggested, and made tea.
Arthur eventually left with a complete pink set, plus his old lid wrapped as a spare for something he did not own. Mabel placed a fresh cup on the counter. There should always be room for the next indecision. The little pink covered pot beside the path looks certain to bring him back.

A Guided Tour of the Build
The flower-window crown
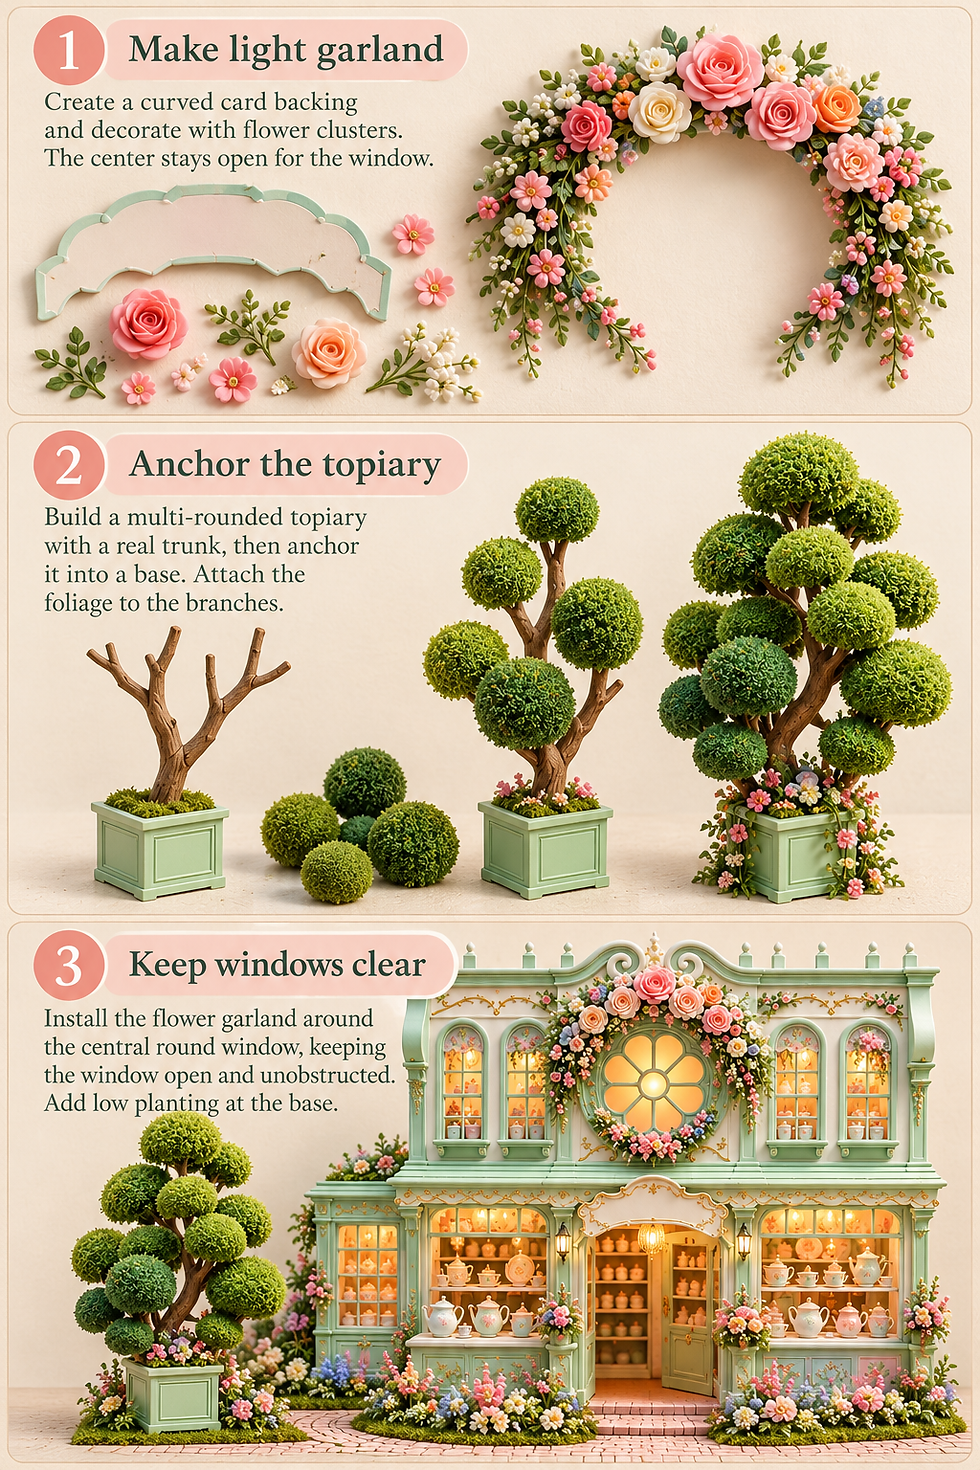
The upper storey is the most theatrical part. A round window, divided into petal-like segments, glows through the middle of a garland that swells into large roses at its crown. Tall arched windows repeat on either side. Slim mint trim links them together, while the ivory wall gives the flowers breathing space. Small finials along the parapet make the roofline feel finished without hiding the central scroll.

Cabinets full of little possibilities
At street level, the wide display windows hold rows of cups, pots and covered dishes against a warm interior. Notice how each shelf makes a firm horizontal pause beneath all that curling ornament. Mint cabinetry and soft pink floral panels continue outside, so the counters seem related to the building. The display pieces remain legible because there is a little space around their handles and lids.

A garden path around the stock
The central round counter sits on its own grassy island. Brick paths curve around it toward the doorway, while the right-hand dresser and narrow glazed cabinet create a second display area beneath clipped topiary. Pots, low flowers and taller stems soften the edges. I particularly like the contrast between the disciplined, rounded tree shapes and the cheerfully unruly planting below them.

Inspirations — From the Big World to the Small
Colorful vintage kitchenware provides a lovely starting point for our pastel shelves. The Corning Museum of Glass records Gooseberry-pattern Pyrex nesting casseroles in opalware glass, including pink-and-white examples, and dates the pattern to 1957–1966. That gives us a genuine historical connection for pale grounds, contrasting plant motifs and coordinated collections. For this fantasy shop, let that color-and-pattern relationship inspire a little collection of your own.
The museum's pattern library also shows how changing the relationship between pattern and ground changes the effect: white ornament against pink feels different from pink ornament against white. At miniature scale, that is an excellent exercise. Repeat one simple leaf-and-dot motif across several shapes, reversing the colors on just one piece so the shelf feels collected rather than factory-uniform.
Historic New England's collection includes a four-piece set of Pyrex primary-color mixing bowls with white glass and blue, red, green and yellow exteriors. Our shop uses a softer palette, but the underlying design lesson still works: a small group of clearly related colors can make everyday objects feel like a collection. Here, mint cabinetry serves as the calm background for pink, cream and blue stock.

Artist Tips — Make Your Own Magic
AI-assisted imagination stocked this little kitchenware shop. Choose your favorite shapes and let the roses grow around them. The imaginary shop may employ a full-time flower arranger, but your workbench can take things one blossom at a time.
For a manageable first attempt, build a shallow façade with a suggestion of a shop behind the windows, not a fully furnished two-storey building. A proposed base around 30 × 24 cm and a façade around 28 cm high suits a compact display. Treat those as starting dimensions, not measurements taken from the image or a strict scale plan. The two storeys are deliberately compressed display proportions, not a 1:12 architectural plan. Use 1:12 only as a starting point for accessory shopping, and check actual item dimensions before committing.
Supplies: Home, Store-bought and Tools
Home: Clean cereal-box card can become templates, drawer fronts and slim decorative overlays. Smooth scrap packaging card works for test walls; straight coffee stirrers can become shelf boards after trimming. Save clear, unscratched packaging plastic for glazing, provided it cuts cleanly. Use clean paper for mockups, a small foil-lined tray for clay work and dry tea leaves only as optional scenic texture—not as the main structural material.
Store-bought: Choose basswood or sturdy model board for the base and main façade, plus thin stripwood for braces and trim. Add wood glue suited to the chosen wood, tacky craft glue for paper details and a clear adhesive specifically compatible with your glazing plastic. Useful finishes include water-based acrylic paints, a suitable clear coating tested on scraps and fine-grain scenic ground cover. For the stock, choose oven-bake polymer clay or ready-made miniature kitchenware; they are alternatives, not interchangeable materials.

Tools: Gather a sharp craft knife, cutting surface, small square, pencil, fine saw if your wood requires one, fine abrasive paper, tweezers, rounded clay tools and small paintbrushes. A small pin vise helps with neat mounting holes. If you choose polymer clay, use an oven thermometer and an oven-safe curing surface. A ready-made low-voltage light set with its supplied power source is optional; keep the switch and battery compartment accessible.
Build a miniature kitchenware shop
1. Plan a shallow shopfront
Sketch the façade at your intended size before cutting the good material. Divide it into a lower shopfront, upper window band and decorative roofline. Start with a central arched doorway, two broad lower display windows and a round upper window. Add narrow upper windows only when the main proportions feel comfortable. Fewer well-spaced openings are easier to finish than many crowded ones.
On a paper base plan, mark the building footprint, round counter, right-hand dresser and two paths around the central display. Leave a visible approach to the door. Put paper rectangles where the furniture will stand and view the arrangement from slightly above; overlapping outlines reveal cramped corners before you build them.
Make a quick scrap-card mockup, including the depth of the display area behind the windows. A shallow shelf bay of roughly 4–6 cm is a workable starting suggestion for this compressed scene, but fit it to your chosen dishes. Check the tallest vessel against shelf spacing and the widest handle against cabinet depth.

Bring a fresh little burst of pattern to your fabric collection with Hanjunzhao Spring Floral Cotton Squares. They are lovely inspiration for miniature curtains, cushions and the next tiny room you are dreaming up.

2. Brace the shell and openings
Transfer the approved outline to model board or thin wood. Cut openings while the panel lies flat, using several controlled passes rather than forcing the blade. Keep your supporting hand outside the cutting path. Where curved cuts feel awkward, use a rectangular opening and add an arched trim layer over it later.
Add short side returns and a rear cross-brace so the façade stands securely. Reinforce inside corners with stripwood. Dry-fit everything on the base, check that the front is upright, then glue with the adhesive appropriate to your materials. Leave the assembly supported until the glue has reached its stated handling strength.
Keep the upper wall and roofline lightweight. The ornate silhouette can be built from stacked card profiles rather than heavy solid carving. Leave the back open or removable so you can install glazing, shelves and lighting without reaching through the door. A plain painted backing several centimeters behind the windows is enough to suggest interior depth.

3. Layer mint-and-ivory trim
Build the architectural character from simple repeated parts. Thin stripwood makes pilasters, window dividers, cornice bands and cabinet rails. Laminate two or three card layers for the curved upper parapet, pressing them flat while the glue dries. Small beads or shaped clay pieces can suggest finials, but attach them only after their material is fully cured or dry.
Seal and paint a scrap first. Aim for warm ivory walls with muted mint trim, allowing each coat to dry before the next. Paint separate trim pieces before installation when that keeps the edges cleaner. Add fine gold-colored accents with a nearly unloaded brush; a small highlight on a raised curl is more convincing than a thick metallic outline everywhere.
For the pink lower panels, use a pale base color and a few fine green stems with tiny flower dots. My miniature hand-painted floral patterns guide explores that small-scale decorative approach. Keep the motifs smaller and quieter than the large garland above. If painting individual sprigs feels ambitious, a carefully chosen small-scale floral paper can fill the panel recesses instead. Test the print against a miniature cup before gluing it down.

A little glow makes a display feel especially welcoming. iLAND Battery-Operated Light Strings bring a warm finishing touch to miniature arrangements and cozy shelf scenes.

4. Make glazing and warm light
Cut clear glazing slightly larger than each opening and fit it from behind. Keep protective film on suitable sheet material until the last practical moment. Test the adhesive on an offcut: some glues can haze clear plastic or leave visible marks. Apply a minimal amount to the hidden border, then let the piece rest flat while it sets.
The central flower window can be suggested with a clear circle behind a thin card ring. Add petal divisions as separate painted strips resting against that glazing. You do not need to carve a delicate one-piece wheel. A softly translucent backing can hide the interior light points while retaining the warm window shape.
If lighting, use a ready-made low-voltage set according to its instructions. Mount the light behind a cornice or shelf where the bulb itself is concealed, but do not bury or tightly wrap components. Plan a clear wire route and accessible switch. Test the complete system before closing anything, and disconnect it while handling wet glue or paint. An unlit model with warm interior paint remains a perfectly good alternative.

Add a beautifully furnished kitchen to your miniature collection with the iLAND Luxury Kitchen 1:12 Furniture Set. It is a lovely setting for tiny crockery, favorite accessories and all those little domestic stories.

5. Build counters and shelves
Make the straight display cabinets as small open-front boxes with shelves fitted inside. Begin with one shelf bay, load it with a few sample pieces, then copy that spacing. Use card overlays for drawer fronts and small beads for handles. The right-hand dresser can be a simple box with applied fronts; working drawers would add complexity without changing the view much.
For the central round counter, use two matching circles for top and base, joined by a short internal cylinder or several vertical ribs. Wrap the outside with thin card, then add narrow upright strips to suggest paneled doors. Ensure the top is genuinely supported all around.
Before gluing anything to the base, place the cabinets and counter on the plan again. Check the paths, doorway and sightlines through the glass.

Give your tiny café a few details worth lingering over with Boutigem Miniature Resin Coffee Accessories. These little decorative coffee tools bring plenty of character to a counter or kitchen shelf.

6. Shape and paint the kitchenware
Choose a small vocabulary of forms: shallow bowls, cylindrical jars, rounded pots and simple cups. For more options, my miniature ceramics and pottery guide compares ways to create tiny vessels. Repeating these shapes in several colors makes a convincing stocked shop without requiring dozens of unique sculptures. Keep fragile handles slightly sturdier than perfect scale would suggest, and make flat bases so every piece can stand without leaning against its neighbor.
For polymer-clay pieces, condition the material and shape it on a protected work surface. Form bowls around a rounded tool, removing the tool before curing unless its manufacturer explicitly permits oven use. Support delicate parts with an appropriate oven-safe support. Follow the clay's current package instructions for temperature and curing time, checking the oven with a thermometer; do not shorten the schedule simply because the dishes are tiny. Never use a microwave.
Allow the pieces to cool fully before painting. Sculpey recommends water-based acrylics on cured work and a compatibility test on a sample. Paint cream interiors, pastel exteriors and a few simple leaf-and-dot motifs. Use thin coats and let them dry. If adding a clear finish, test the complete clay-paint-finish combination first and follow its drying instructions. These are decorative miniatures, not food-contact utensils, even when they look wonderfully convincing.

Let a few roses climb into your miniature collection. Aorvoras Miniature Rose Flower Vines add floral charm to porch posts, garden walls and those little corners that deserve a bloom.

7. Plant the floral arch and topiary
Build the upper garland on a separate lightweight backing that follows the round window, leaving the glowing center clear. Begin with a sparse layer of fine foliage, then place the largest flowers near the top. Add smaller blossoms outward and downward so the arrangement thins naturally. A few carefully placed roses will read better than a continuous wall of oversized flowers.
For topiary, attach small foliage-covered forms to a branching armature fixed securely into the base. Keep the crowns at different heights, and leave gaps between them so the branches remain readable. If making the armature from wire, cover sharp ends and check that each joint carries its foliage without sagging. Ready-made model trees offer an easier alternative.
Use low plants around the shopfront and taller stems toward the outside edges. Hold loose pieces in position before gluing to check that they do not block the cabinet windows or doorway. Let the planting adhesive set with the model flat and supported. Add delicate trailing flowers last, after the larger tree and garland are stable.
Bring a little garden indoors with Rolife Dreamy Garden House DIY Miniature Kit. Its plant-filled setting makes a lovely display for anyone who can never resist one more miniature pot.

8. Lay the paths and arrange the stock
Cut the curving paths from thin card, then add separate small rectangles or lightly score a suitable surface to suggest brickwork. Paint in several close pink-and-clay tones rather than alternating obvious colors. Fit the paths around the counter's grassy island, keeping the edges tidy where visitors would approach the shop. Dry-fit the route before gluing it permanently.
Add thin scenic ground cover to the garden areas without burying the furniture feet. Place taller vessels at the back of shelves and smaller cups toward the front. Leave some clear shelf surface between groups. In the window displays, a repeated color on different levels helps the eye follow the arrangement through the glass.
Secure each final object with a small amount of compatible adhesive where permanence is desired. Keep removable display pieces in a separate tray during transport. Finish with a few carefully chosen clues: a cup waiting on the round counter, one pink covered pot near the path and a tiny framed display board. Step back before adding more. Mabel may have unlimited stock, but your composition benefits from a little restraint.

Tiny flowers deserve a place in everyday life, too. These Miniature Vase Magnets bring a cheerful little arrangement to your fridge or another favorite magnetic surface.

Photograph the tiny storefront
Set the finished model on a stable table with a quiet backdrop beyond its edges. Use a soft light from one side and a white card opposite to open the shadows. Start with a slightly elevated three-quarter view that shows the base edge, counter and shopfront together. Keep the camera outside the model so its handmade scale remains readable.
For the glazing, move the light or camera a little until the strongest reflection clears the shelves. Keep the warm interior lights subtle enough that the window divisions remain visible. Use a tripod or other secure camera support, focus carefully on the main façade, and avoid extreme blur that turns the little stock into colored spots.

Small problems, practical fixes
The front wall leans. Check the base and side returns before adding decoration. A hidden brace is easier to install now than after the garland covers the joint.
The windows look cloudy. Stop and test the adhesive on fresh scrap glazing. Replace the affected piece rather than trying an unknown solvent near painted trim.
The shelves look crowded. Remove a third of the stock temporarily, then rebuild small groups with visible gaps. Reserve the busiest display for one focal window.
The garden hides the shop. Lower the planting directly beneath windows and pull taller stems toward the side edges. Preserve a clear doorway and a readable path.
Closing — Until Next Time in the Small World
I would happily spend an afternoon choosing a cup from this miniature kitchenware shop, then leave with something entirely different. That feels faithful to Mabel's business model. The charm comes from a few repeated shapes, a restrained pastel palette and the sense that somebody has made room for every little pot.
Would you fill your version with cheerful mixing bowls, floral teapots or a carefully mismatched tea service? Share your own interpretation with #smallworldminiatures. You can explore more small-world ideas through the newsletter signup on the homepage and browse the online shop for your next miniature project. Just leave a space on the shelf: Arthur may be back with another lid.








Comments