



Biedermeier Miniature Living Room: Warm Wood and a New Beginning

First Impressions in Miniature
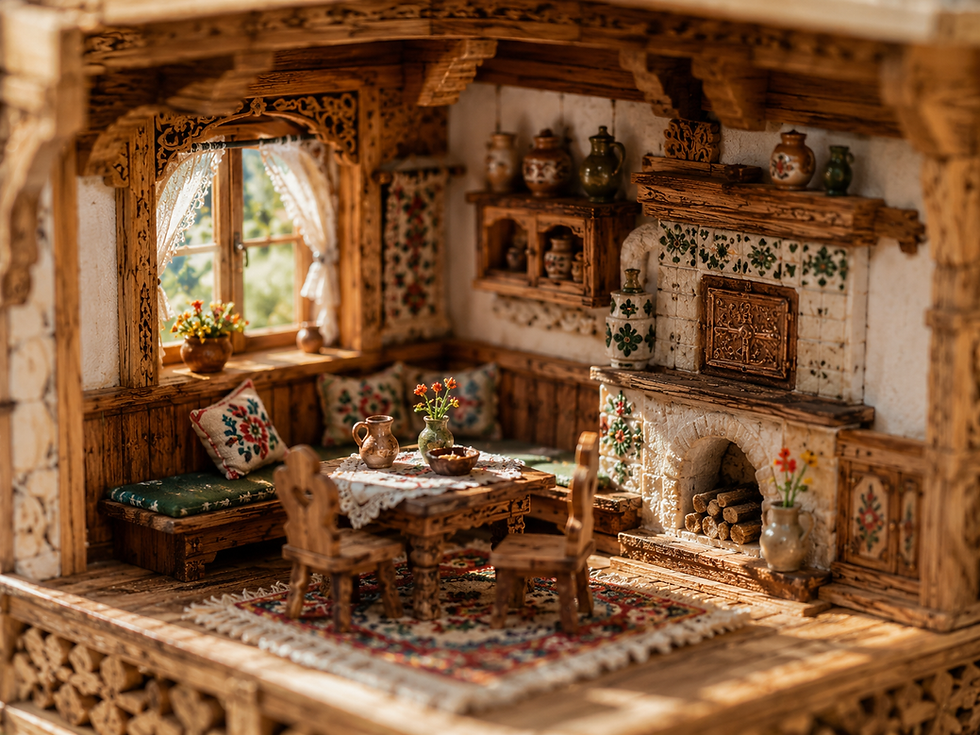
This is a room that makes a very persuasive argument for sitting down. Honey-colored wood frames tall windows, pale curtains soften the sunlight, and a curved sofa curls around the back corner as though it has been waiting for company. This Biedermeier miniature living room has plenty of detail, but none of it seems to be demanding a meeting.
I particularly like the round table. It gives all those upright window bars and wall panels somewhere to relax. The woven sofa back, soft cushions and little plants keep the room from becoming an exhibition of excellent joinery with nowhere comfortable to sit. We'll look closely at those textures, then plan an eight-stage inspired build with an open front, removable furniture and daylight doing most of the decorating.
Some links in this post are affiliate links. As an Amazon Associate, I earn from qualifying purchases. Your purchases may help support Small World Miniatures and keep these little worlds growing.

A purchased miniature seating set can help you test the footprint before committing to handmade furniture. The Victorian set above is an optional starting point for a different interpretation, not a claim that it matches this room's design or historical period. Keep the warm wood and generous breathing space as the important ideas.
Miniature Backstory: The Tiny Tale

The room’s welcoming seating, generous windows and useful little drawers make their world possible. A tiny appointment book beside the visible white flowers would be an optional detail to add to your own version.
A Guided Tour of the Build
The Curved Sofa and Its Woven Back
At the rear left, the sofa's curved wooden frame gathers the sitting area around the round table. The cane-like back is a different sort of detail from the heavier wall panels: small, repeated openings rather than broad solid surfaces. Ivory and muted green cushions keep the pattern quiet. I would resist adding another strong fabric print here; the weave is already doing the interesting work.

A Window That Does the Decorating
The rear window has a deep sill, several small pots and curtains tied away from the glass. The radiator beneath is a useful reminder that this is a freely interpreted, cozy room rather than a strict museum reconstruction. Sunlight picks out the wood edges and leaves the window recesses darker, giving the otherwise restrained palette its depth.

The Table, Rug and Open Floor
The round table sits over a rectangular geometric rug, with a little white flowering plant as its focal point. An open-backed chair balances the sofa on the right. Low drawer cabinets along the sides provide busy texture below the eye line, while the clear foreground gives the room somewhere to breathe. That empty patch of floor is doing a proper job, not waiting for more accessories.

The combination of plants, open windows and warm timber could easily move toward a conservatory. A greenhouse-style kit is a separate project rather than a supply pack for this build, but it offers another way to explore the relationship between structural framing and greenery.

Inspirations: From the Big World to the Small
Reading the Biedermeier miniature living room
Biedermeier is generally associated with the period from 1815 to 1848 in German-speaking Europe. The Couven Museum's room emphasizes the domestic sitting room, organized around a sofa, table and chairs. That arrangement offers a useful starting point here: comfort comes from how the objects relate, not from filling every wall with ornament.
The history is more complicated than “plain furniture for modest homes.” The Vienna Furniture Museum traces the style's origins to less formal aristocratic interiors and points to elegant seating, precious woods and confident color. Our pale, plant-filled scene is an interpretation of domestic warmth, not a claim that all Biedermeier rooms looked like this.

For another warm domestic interpretation, Butter & Brass puts cream cabinetry, copper and a blue island into a fantasy Biedermeier kitchen. The shared idea is a legible arrangement of useful pieces, rather than matching every decorative detail.
For a closer look at furniture, the Metropolitan Museum's Danhauser-circle side chair pairs refined woodwork with strong aquamarine upholstery. It is a useful corrective to the idea that historical interiors must be beige. You could introduce a single deeper green cushion in an inspired model while keeping the supplied scene's gentle balance.
The Zakopane cottage interior takes warm wood and cushions toward a more patterned folk-art direction. If the glazing is your favorite part, Where Glass Learns to Bloom explores a much more elaborate mint-and-gold conservatory. Each offers a different way to make a small interior feel generous.
A matching dining set could take the same wood-and-ivory palette into a neighboring room, but it is not required here. The sitting room benefits from remaining a sitting room. If you use purchased furniture, keep its scale consistent and resist adding every piece simply because it arrived in the box.

Artist Tips: Make Your Own Magic
The showcase and supporting illustrations are AI-generated inspiration. This guide describes a practical interpretation, not an exact, tested kit or a claim that every generated joint will survive contact with a craft knife. Your materials, scale and results will vary. The sensible goal is a warm, readable room with believable textures, not a tiny furniture-restoration exam.
A suggested starting scale is 1:12, with a simple open-front room box and three walls. The demanding parts are the repeated window framing and curved furniture; straight-backed bought seating is a perfectly respectable shortcut. Plan the seating first, then size the shell around it. Keep the roof or top edge open while working so you can reach the rear sill without performing miniature surgery.
Supplies
For the shell, reuse clean packaging card for templates and mock-ups. Choose craft chipboard sheets, a rigid plywood base and basswood strips for a permanent structure. Thin basswood sheets can face the floor and cabinets. A cardboard mock-up helps you decide what to buy before a collection of expensive offcuts makes the decision for you.
For the glazing and textiles, save clean, unscratched clear packaging, a fine cotton scrap and a little lightweight lace. Purchased dollhouse upholstery fabric is useful if household fabric looks bulky at your chosen scale. Fine craft mesh can suggest cane, but choose an opening size that looks believable beside the seat cushion rather than like garden fencing.

For assembly and color, gather PVA craft glue, water-based acrylics, a compatible matte varnish, brushes, tweezers, small clamps, a sanding block and a sharp craft knife with a protected cutting surface. Test finishes on offcuts. A scrap-paper palette and clean mixing lids are useful reuse options.
For accessories, use dry plant-making materials or purchased miniature foliage, small pots, card picture frames and a plain fabric rug. Optional bought furniture, dishes or flowers can reduce the fiddly work. Keep realistic material distinctions: varnish is a finish, not a substitute for window glazing, and soft upholstery padding will not brace a wall.
1. Plan the Sitting Area Before the Walls
Draw a paper footprint and use simple card blocks for the sofa, round table, chair and two side cabinets. Place the sofa at the rear left and leave space for the chair on the right. Keep a clear view from the open front to the back window. If the table squeezes everything else out, make it smaller before changing the whole room.
Draw window openings on temporary card walls and check the arrangement at furniture height. Use one chosen scale throughout; the proposed 1:12 is a planning choice, not a measurement taken from the photograph. Mark where the top can remain open and which wall panel could be removable. A rear panel fitted after decoration makes the sill, curtains and radiator much easier to reach.

If the reading-corner mood appeals more than building a shell from scratch, MiniCity's Hemingway House offers a separate book-nook kit project. It is not a Biedermeier reproduction or a kit for this particular room.

2. Assemble a Square, Accessible Shell
Cut the base and wall panels, then dry-fit them against a square block. Reinforce interior corners with wood strips where they will later disappear beneath framing. Keep the open front clean and straight. Glue on a flat surface, support the panels while the adhesive sets, and check the base for rocking before adding decorative material.
Cut windows while the panels are flat, using several light knife passes rather than forcing one deep cut. Keep fingers away from the blade path and sand rough edges. Add the broad front arch as a separate laminated-card or thin-wood facing, not as the only structural support. For an easier build, use a rectangular opening and preserve the same warm palette; the room does not depend on a difficult curve to feel inviting.

3. Lay the Floor and Frame the Walls
Cut narrow floor strips from thin wood or sturdy card. Stagger their end joints modestly and test the pattern dry before gluing. Use a light hand with adhesive so the floor stays flat. Suggest fine seams through alignment and color rather than deep black lines that make each board look like a separate railway sleeper.
Add wall battens and window surrounds as repeated, measured pieces. Paint the wall fields warm ivory and finish the wood in related honey-brown tones, allowing a little variation between boards. Test stain or diluted paint on scraps first; different woods absorb differently. Let each layer dry before adding compatible matte or low-sheen protection. A quiet surface finish suits this room better than an all-over high gloss.

A rustic craft-wood assortment can be useful for small decorative pieces, but rough bark-covered stock is not a replacement for flat, dimensionally suitable flooring or window strips. Sort any wood by its actual shape and condition before assigning it a role. Tiny cabinets are not improved by surprise splinters.

4. Fit the Windows and Their Soft Curtains
Make window frames as separate units on paper templates. Glue the bars square, finish the wood and let it dry before attaching clear packaging behind the frame. Test the adhesive on a scrap of the same plastic to check for fogging or distortion. A removable glazing insert is easier to clean or replace than a permanently trapped cloudy pane.
Cut lightweight curtain panels a little fuller than the opening, then form gentle folds rather than thick gathers. Attach the fabric to a small rod or concealed strip and tie it back with fine thread. Keep the sill visible. Make the radiator from a row of small card or wood shapes painted warm ivory, with no functional heat source. It is decorative scenery, and a simpler flat relief will read well behind the furniture.

5. Build the Sofa and Round Table
Start the sofa with a strong, simple seat box. Make the curved back as a separate card template, then laminate thin layers around a form, allowing the adhesive to set before removing it. Do not force thick dry wood into a tight curve. A straight back with curved side arms is the easier alternative and still preserves the room's relaxed character.
Use fine mesh behind a thin decorative frame to suggest woven cane. Keep its edges concealed and paint it a slightly lighter brown than the surrounding wood. Wrap thin padding with ivory fabric for the seat. For the table, stack and sand card discs or use a smooth wooden circle, then fit equal-length legs and a lower shelf. Test the table on a flat surface before adding the flowerpot, which should not be responsible for structural balance.

For a more fanciful change of pace, the Magic Clock Tower book nook turns the next project toward fantasy architecture. Keep it as a separate build, rather than a period accessory for the quiet room we are planning here.

6. Add the Chair, Cabinets and Rug
Build the chair as a small, braced frame before adding its decorative back. If a looped back proves too delicate, simplify it to two or three shaped slats. Match the seat height to the sofa rather than copying a chair from a different scale. Cover its cushion with the same pale fabric family so the two pieces belong together without being identical.
Make the side cabinets as simple boxes with applied drawer fronts and tiny bead or wire handles. Their visible repetition matters more than working drawers. Finish them before positioning them against the walls. Cut the rug from thin fabric or printed textile material, seal or stitch the edges as appropriate, and keep it flat beneath the table. A rug that curls upward at the corners quickly becomes a miniature skateboard ramp.

A small porcelain tea set is an optional way to suggest an afternoon ritual. Choose one or two pieces and leave the tabletop readable; the flowers already have a starring role.

7. Bring in Plants and Little Domestic Details
Group plants by height: a few small pots along the rear sill, a taller leafy form near the sofa, and a restrained flowering plant on the table. Use dry miniature foliage or painted paper leaves, keeping glue hidden at the stem bases. Vary the silhouettes instead of using the same round shrub everywhere. Leave enough glass visible for the room to retain its airy feeling.
Add simple framed pictures and a white pitcher on the right cabinet. Keep these small enough that the window remains the main visual feature. If you include Lena’s appointment book from the tale, make it a clearly intentional extra beside the table arrangement. No interior lights are necessary for this daylight composition. That choice avoids wires and lets the window shadows establish the atmosphere.

The flower-and-vase selection below offers optional ready-made accents for an interpretation of this room. Compare the proportions to your table and sill before using them. A single convincing stem often works better in a small interior than an enormous bouquet that has apparently rented the entire sofa.

8. Settle the Composition and Finish
Dry-fit all furniture, then look through the open front at table height. You should be able to read the sofa's curve, the chair's open back and a useful strip of floor between them. Move or remove accessories that merge into clutter. Check that curtains stay clear of the plants and that the chair is not blocking the right cabinet completely.
Fix only the pieces that need to stay in place for handling. Leave fragile plants and the central table removable when practical. Clean the glazing with a method compatible with its plastic and finish, then touch up visible glue marks and raw edges. Let adhesives and finishes reach their label's handling conditions before enclosing the model. Finish by checking the outer frame: a tidy boundary helps the intentionally loose, sunny interior feel deliberate.

Photograph the Warm Wood Without Turning It Orange
Place the room on a stable table against a soft neutral backdrop. Use one broad, diffused light outside the rear or side window, then a white card near the open front to lift shadows. Keep paper and fabric away from hot fixtures and follow the light's clearance guidance. The goal is a believable window direction, not the brightest possible miniature.
Photograph the full room from a low, slightly off-center position, keeping the outer frame visible. Check that the camera has not made the warm wood orange or the curtains pure white with no texture. Adjust the light and white balance before compensating with heavy editing. Take separate closeups of the sofa weave, the rear sill and the table arrangement, using gentler background blur without losing the detail you are trying to show.

Small Problems, Sensible Fixes
Warped floor strips need flatter material and more restrained adhesive, not another decorative layer hiding the same problem.
Heavy curtains need thinner fabric and fewer folds. Test one panel before making the whole set.
Mesh that looks oversized can be replaced with a finer weave or a painted suggestion of cane.
A rocking chair or table needs equalized legs and sound joints before accessories go on top.
Harsh yellow photographs need a more neutral light or corrected white balance, not blue paint on the furniture.
Closing: Until Next Time in the Small World
Which part would you borrow for your own little retreat: the curved sofa, the deep plant-filled sill or the round table with its very complicated sunlight arrangements? I like how the empty floor gives the beautiful textures a chance to be noticed.
Share your own warm miniature interiors with #smallworldminiatures. For more small-world inspiration, you can join the newsletter at the bottom of the site and browse the online shop. Meanwhile, Lena has left Thursday’s appointment book open beside the flowers. There is room for another name.








Comments