



100 Miniature Ideas from Household Items: Little Finds, Big Magic

A button can suggest a dinner plate long before you reach for a paintbrush. An empty spool already has the silhouette of a stool. I love that moment when an ordinary shape stops being rubbish and starts asking for a very small room of its own.
These 100 miniature ideas from household items give you a fresh collection of projects for dollhouses, room boxes and display scenes. Choose one useful detail, match it to your scale, and try a sample. The aim is a convincing little object, not a recycling bin with curtains.
The illustrations are AI-generated visual references, not photographs of tested builds. Use them for shape, color and arrangement; the instructions are starting points to adapt to your materials. Results vary, and a successful scrap test is worth more than a handsome picture.
The purchased alternatives below use Amazon affiliate links; if you buy through them, it helps fund this tiny world. As an Amazon Associate I earn from qualifying purchases.
For the earlier collection of material transformations, explore the original Tiny Treasure Hunt. This guide gives you a separate set of makes to try.
Prefer a ready-planned room for your handmade accessories? The Rolife Farmhouse Kitchen DIY Miniature Kit offers an alternative starting project; check its dimensions against your chosen props.

Plan your miniature ideas from household items
Start with one scale and a reference object already in your scene. Divide the full-size measurement by the scale denominator: a 24-centimeter plate becomes 2 centimeters across at 1:12, or 1 centimeter at 1:24. These are planning examples, not a claim that every button or container will fit. If the shape is useful but too large, give it a different job rather than forcing it into the room.
Use clean, fully dry scraps that you own and can spare. Skip containers that held medicines, pesticides or unknown chemicals; discard moldy, greasy, brittle or sharp pieces. Keep small parts away from children and pets. These are indoor display props, not toys, food vessels, working appliances or candle holders.
Cut paper with scissors. If a piece needs a blade or saw, secure it on a suitable support, keep fingers clear and cut away from your body. Skip material your tools cannot handle.
For paper and untreated wood, choose a craft adhesive whose label lists those materials. Smooth plastics, flexible fabrics and coated surfaces need their own compatibility checks; ordinary white glue will not reliably bond every plastic. Follow the product's curing and ventilation instructions, and let a test joint cure before judging it.

Found at home: the clean scrap for your chosen idea and plain paper for a size trial. Useful tools: small craft scissors, a self-healing cutting mat and fine detail paintbrushes. Purchased extras: PVA / white craft glue for compatible porous materials, or the adhesive specified for your particular surface. Keep painting and embellishment optional until the silhouette works.
Find your next make: Kitchen and pantry details · Paper shop and desk treasures · Soft furnishings with character · Little garden and conservatory pieces · Furniture from unexpected shapes · Market and cafe miniatures · Architecture and surfaces · Workshop and utility props · Decorative finishing touches · Tiny signs of everyday life
For a compatible painted surface that needs a glossy accent, Vallejo Gloss Varnish 70.510 is an optional finish. Test first; gloss is not a substitute for material compatibility or full curing.

Kitchen and pantry details
1. Paper cupcake liner → fluted pie dish
Flatten an unused paper cupcake liner, then press its center into a shallow circle while retaining a short pleated rim. Glue that rim to a card base for a dollhouse pie dish. Choose fine pleats; giant folds overpower tiny pastry.
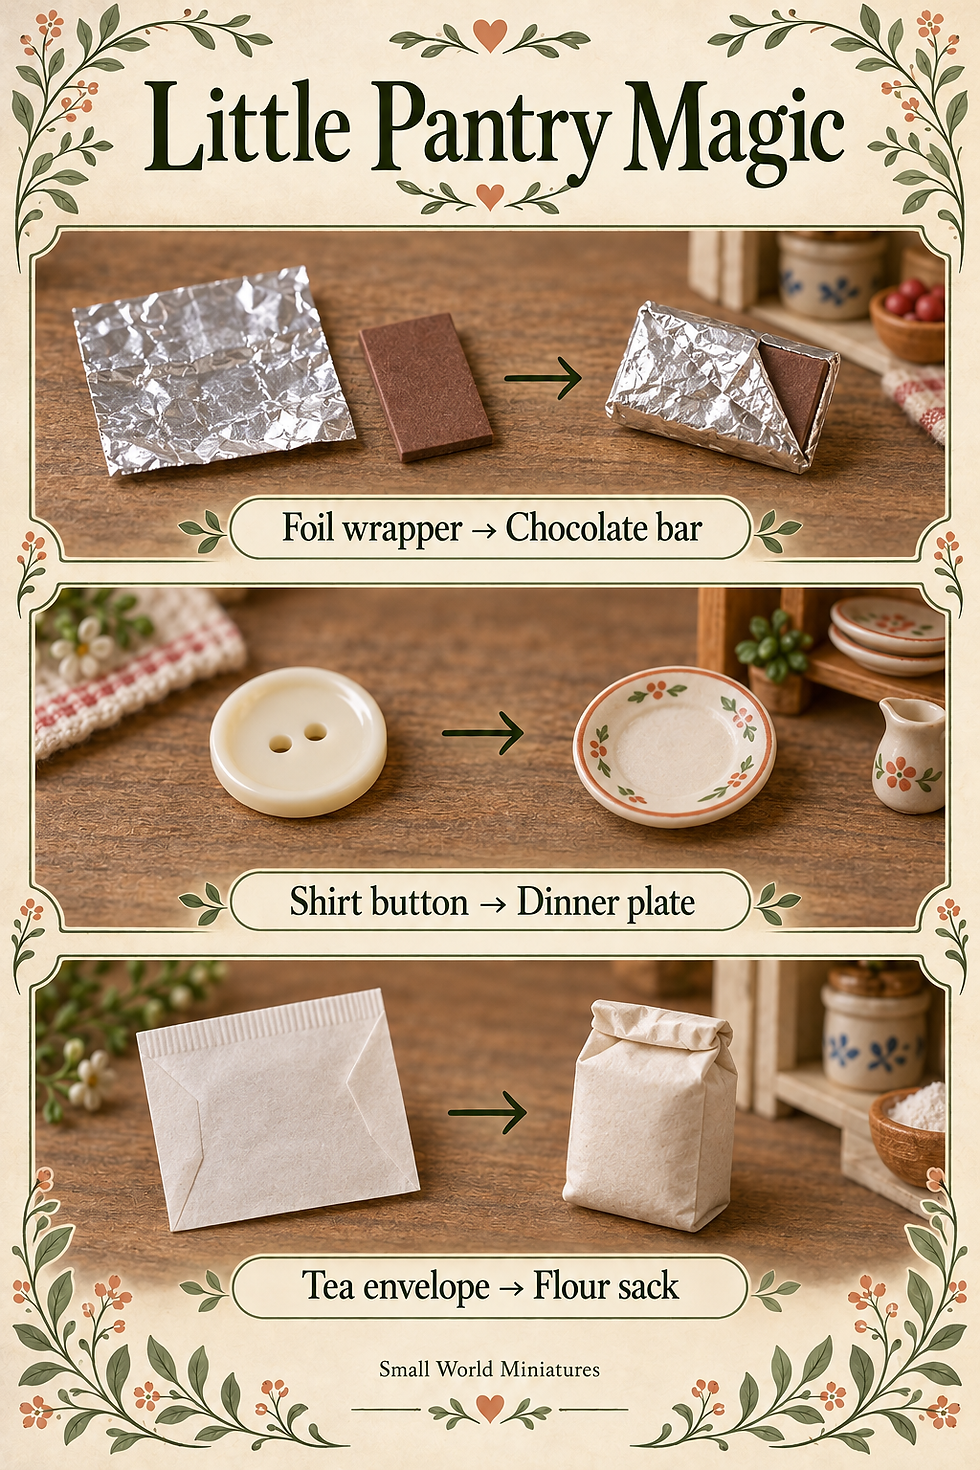
2. Clean foil chocolate wrapper → half-open chocolate bar
Trim a clean foil chocolate wrapper around a small folded-card rectangle and crease the edges underneath. Leave one corner peeled back over a brown-painted card insert for a half-open chocolate bar. Keep familiar lettering out if it looks oversized.
3. Unused paper coffee filter → baker's piping bag
Cut an unused paper coffee filter into a narrow triangle, roll it into a cone and secure the overlap with a little paper glue. Pinch the top closed for a baker’s piping bag. Leave it unfilled so it stays convincingly light.
4. Wooden clothespin half → rustic chopping board
Use one intact wooden clothespin half as a rustic chopping board, rounding the narrow end with fine sandpaper. A painted hanging-hole dot avoids drilling. Check it beside your miniature bread before finishing: clothespin sizes can make unexpectedly enormous kitchen equipment.
5. Smooth shirt button → dinner plate
Choose a smooth, shallow shirt button without a raised center and cover its holes with a tiny circle of thin paper. Paint the center and rim separately for a dinner plate. Match the diameter to your table setting before making a whole service.

6. Small suction cup → mixing bowl
Turn a small, clean suction cup bowl-side up and seat it in a card ring so it cannot tip. Its curved interior becomes a mixing bowl without heat or cutting. Use a shallow example; a deep cup can resemble a bucket.
7. Clean squeeze-pouch cap → stovetop casserole pot
Choose a clean squeeze-pouch cap with a shallow recess, turn it open-side up and add two folded-paper handles. Paint it as a casserole pot using a coating suited to that plastic. Dry-fit it on the stove; keep everything purely decorative.
8. Plastic measuring-spoon bowl → kitchen sink basin
Use the shallow bowl of a spare plastic measuring spoon as a sink basin, hiding its handle beneath the countertop rather than snapping it off. Cut the counter opening in card, not the spoon. A smaller spoon suits a compact washroom.
9. Bamboo sushi-mat offcut → bread cooling rack
Trim a damaged bamboo sushi mat along its existing gaps and secure the cut binding before lifting the section. Lay the miniature rack on two thin card runners. Use only clean, dry bamboo and choose spacing that supports your pretend loaves.
10. Clean paper tea-bag envelope → flour sack
Open a clean paper tea-bag envelope along one seam, turn the printed side inward and refold it around a tiny paper core. Crease the top closed for a flour sack. Keep the finished corners soft rather than making a rigid cereal box.
Mix handmade kitchen details with selected finished props if you like. SAMCAMI Baking Accessories offers another route to a furnished baking scene; compare the scale before combining pieces.

Paper shop and desk treasures
11. Old paperback page → open miniature book
Fold thin strips from an unwanted paperback into a few nested pages, glue only the spine and add a plain paper cover. Fan the pages gently for an open book. Choose a book with tiny print so the lettering suits the miniature scale, and never sacrifice a valued edition.
12. Magazine spine offcut → stack of closed magazines
Cut a narrow strip from an unwanted magazine’s folded spine, preserving the folded edge. Divide it into miniature issues and stack them slightly unevenly. A light card backing can stiffen floppy pieces; check that the printed pictures read as small covers.
13. Paper shopping-bag scrap → folded grocery bag
Fold a brown paper shopping-bag scrap around a small rectangular block, crease the base and remove the block before gluing. Add narrow folded-paper handles for a grocery bag. Thin paper gives better corners than thick luxury bags with heavy coatings.
14. Security envelope patterned lining → desk blotter
Cut a rectangle from the patterned lining of a security envelope and mount it on thin card for a desk blotter. Add a plain border if the pattern needs taming. Choose a tiny repeating design; a large motif reads like wallpaper.
15. Cardboard tissue-box panel → file folders
Cut two connected rectangles from a clean tissue-box panel, score the middle lightly and fold them into a file folder. Add a small offset tab on one edge. Put the printed face inside or cover it so the desk stays visually calm.

16. Ordinary notepad paper → adding-machine paper roll
Roll a narrow strip of ordinary notepad paper around a tiny paper core, leaving a short tail unrolled. Set it beside a shop till and add a few pencil marks. Keep the strip narrow enough to resemble a receipt rather than a banner.
17. Smooth paper label backing → writing-pad pages
Stack small rectangles of smooth label-backing paper with their clean sides outward and bind one short edge with a folded paper strip. The result is a writing pad. Glue may resist the slick surface, so let the wrapper hold the stack.
18. Uncoated business card → menu stand
Score an uncoated business card into a small tent shape and trim both panels evenly for a tabletop menu stand. Add simple menu marks rather than trying to squeeze in a whole restaurant novel. Keep its height below diners’ eye level.
19. Postage-stamp selvage → perforated ticket strip
Save the perforated blank margin from a sheet of stamps and cut a narrow ticket strip along it. Add tiny colored bars and fold the strip loosely beside a kiosk. Use only discarded selvage; the perforations supply the useful detail.
20. Small cardboard jewelry box → shop display counter
Turn a small cardboard jewelry box upside down for a shop counter and cover its outer walls with plain paper. Add a contrasting top and a recessed paper panel on the customer side. Compare its height with a seated or standing figure.

Paper books and shop clutter can inspire a whole reading corner. The CUTEBEE Owl Bookstore DIY Book Nook Kit is a separate kit project, rather than a supply required for these paper makes.

Soft furnishings with character
21. Fine cotton handkerchief → pleated window shade
Fold a fine cotton handkerchief strip into shallow, even pleats, pressing each crease with your fingers. Secure its top behind a card pelmet for a window shade. Keep the folds narrow and avoid soaking the fabric, which can leave stiff blotches.
22. Worn silk necktie → bolster pillow
Wrap a narrow strip of worn silk necktie around a small roll of paper and tuck the ends inward for a bolster pillow. Glue underneath where it will not show. Choose a fine woven pattern; enormous paisley belongs to a much larger sofa.
23. Fine ribbed sock → folded knit blanket
Cut a rectangle from a fine ribbed sock, secure its raw edges with a compatible fabric adhesive and fold it over a bed foot. The ribs suggest a knitted blanket. Select fine yarn and avoid stretched-out areas that distort the weave.
A finished sofa can give handmade bolsters a place to land. The iLAND Turquoise Velvet Sofa is an optional 1:12 furnishing; compare your fabric details with its dimensions before combining them.

24. Denim pocket scrap → tool apron
Trim a small apron shape from thin denim, keeping an existing seam only if it suits the scale. Add paper ties and a folded pocket for a workshop wall. Denim can be bulky, so a flat hanging apron is easier than a draped one.
25. Thin leather wallet scrap → ottoman cover
Wrap thin, flexible leather from a worn wallet around a small card box to cover an ottoman. Turn the joins underneath and keep the corners smooth. Skip stiff or peeling material; thick leather can turn a tiny seat into a suitcase.

26. Braided shoelace → coiled basket
Coil a fine braided shoelace into a small oval base, then build one or two rows upward to form a basket. Use a compatible adhesive sparingly between coils. Fine braid suits smaller scenes; thick sports laces make substantial market baskets.
27. Flat woven shoelace → stair runner
Lay a flat woven shoelace down a miniature staircase and fold it over each tread before securing the ends. Its finished edges become a stair runner. Check the width first, leaving visible stair edges on both sides rather than carpeting the entire stairwell.
28. Fine sweater cuff → hot-water-bottle cover
Slip a tiny rounded card shape inside a fine sweater-cuff scrap, fold the fabric around it and secure the back. Add a short folded neck for a hot-water-bottle cover. Keep this soft prop small enough to sit naturally on a pillow.
29. Fleece seam offcut → pet bed
Shape a narrow fleece seam offcut into a shallow oval around a card base, with its fluffy side facing inward. A second scrap fills the center for a pet bed. Choose short pile so the bed does not swallow its intended resident.
30. Fine fabric gift-bag cord → curtain tassel
Unravel the end of fine fabric gift-bag cord, bind the top with a narrow paper strip and trim the loose fibers evenly. It becomes a curtain tassel. Make one sample first; coarse cord can look like a mop at dollhouse scale.

For more help choosing cloth and keeping seams thin, the miniature fabrics guide explores drape, edges and filling in detail.
If your scrap basket lacks a suitable small print, Hanjunzhao Pastel Floral Cotton Squares, Spring Floral, 42pcs is a purchased fabric option. Judge motif size and thickness against the actual miniature.

Little garden and conservatory pieces
31. Acorn cap → birdbath bowl
Choose a clean, fully dry acorn cap with an intact rim and mount it on a short rolled-paper pedestal for a birdbath. Leave the bowl empty or paint its inside blue-gray. Natural pieces vary, so select the scale before building the base.
32. Pistachio shell → hanging planter
Clean and thoroughly dry an empty pistachio shell, then glue it into a fine thread or paper-strip sling for a hanging planter. Fill it with paper foliage rather than damp material. Check for leftover food and avoid using it around anyone with relevant allergies.
33. Small wooden tasting spoon → hanging bird feeder
Use the shallow bowl of a small wooden tasting spoon as a bird feeder, keeping its handle as the support. Suspend it in a paper-strip sling and add painted paper seed dots. Choose a tiny spoon and keep this decorative feeder indoors.
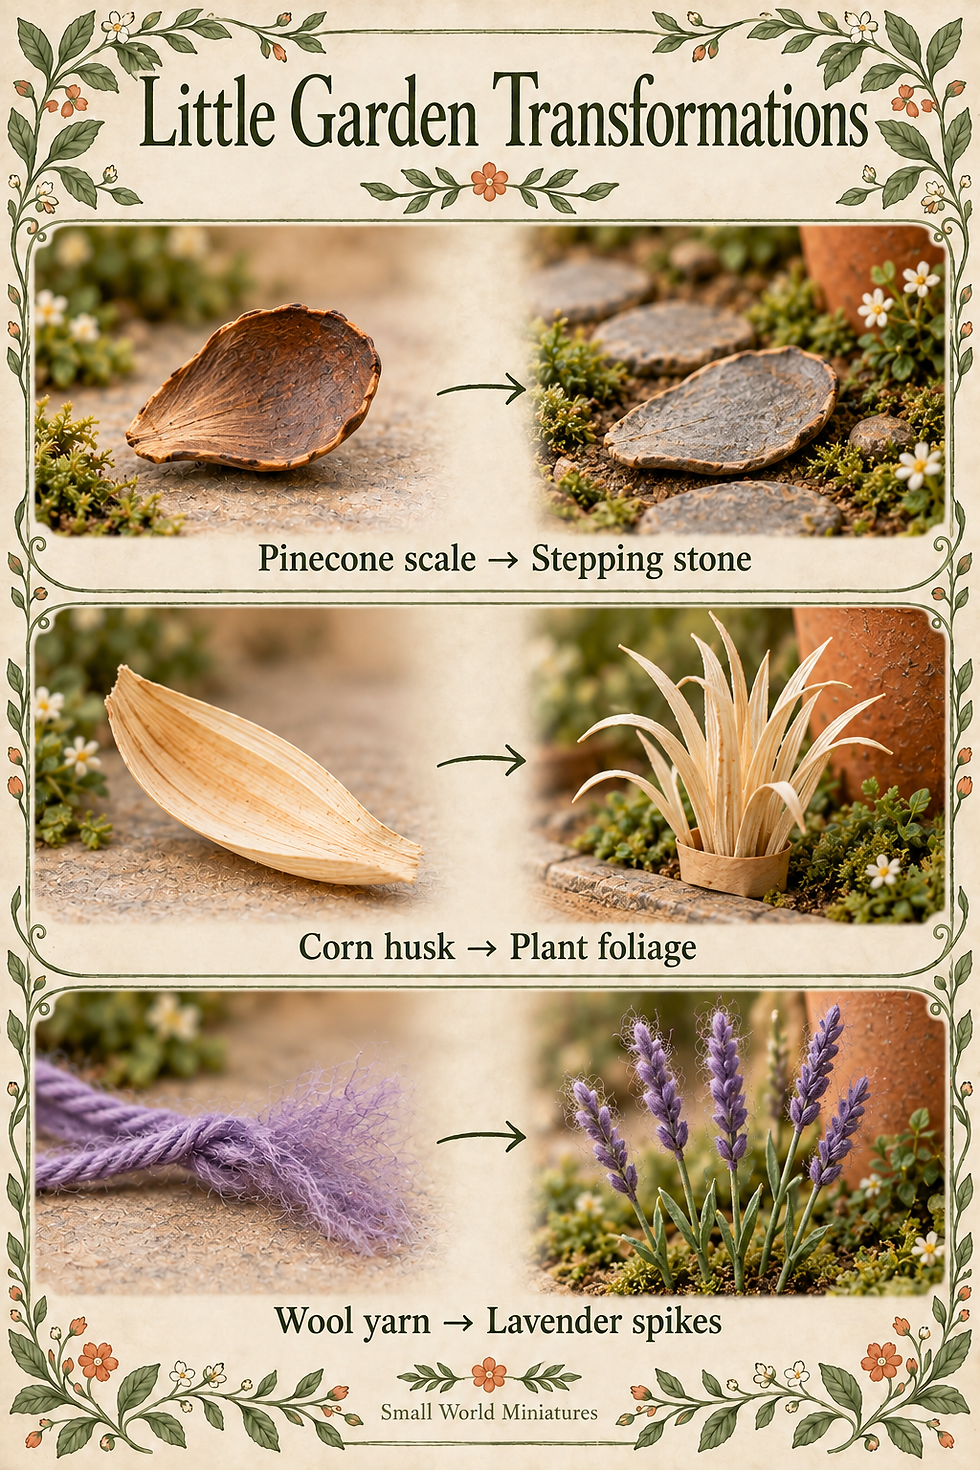
34. Dry pinecone scale → woodland stepping stone
Choose a clean, fully dry pinecone scale with a broad end and glue it flat onto a garden base as a woodland stepping stone. Paint it a muted gray if desired. Keep the walking surface level rather than leaving a trip-worthy curl.
35. Clean dry pencil shavings → curled fallen leaves
Save clean wooden shavings from a plain pencil, remove any graphite fragments and trim the curls into leaf-like pieces. Paint them before scattering them on a base. Choose tiny fragments and glue each down; loose curls rapidly become oversized tumbleweeds.

36. Dried corn husk → strappy plant foliage
Cut thin strips from a clean, fully dry corn husk and taper their ends with scissors. Arrange them upright in a paper collar for strappy plant foliage. Use gentle curves rather than tight bends, and keep the finished plant indoors and dry.
37. Onion outer papery skin → dried floral bouquet
Cut clean, dry outer onion skin into small petal shapes and gather them around rolled-paper stems for a dried bouquet. Use only sound, odor-free pieces and keep them dry. Their translucency works best in a tiny arrangement, not a dense clump.
38. Fine sisal scrub-brush bristle → garden broom
Gather a few clean bristles from an unused or retired natural-fiber scrub brush, bind them inside a paper cuff and attach a rolled-paper handle. Trim the head for a garden broom. Use known clean fibers, not bristles from chemical-cleaning equipment.
39. Unraveled wool yarn → lavender flower spikes
Tease tiny pieces from clean wool yarn and glue them in narrow clusters along rolled-paper stems for lavender flower spikes. Paint or select muted purple fibers, leaving green stem visible below. Keep each cluster slender; fluffy pompons suggest a different plant.
40. Flat wooden game counter → garden sundial
Mount a small flat wooden game counter on a low paper pedestal and add a folded-card triangle on top for a sundial. Draw a few fine radial lines around it. Keep it clearly decorative, with a face small enough for the garden.
For a garden display without saved organic scraps, Warmtree Realistic Miniature Leaves Simulation Leaves Diorama Scenery is an optional finishing material. Keep the leaves proportionate and use fewer than you first think.

Furniture from unexpected shapes
41. Wooden thread spool → pedestal stool
Add a thin padded card circle to a small wooden thread spool for a pedestal stool. Leave the wood exposed or wrap the center in plain paper. The lower flange makes a stable foot; compare the seat height with your table before gluing.
42. Wooden napkin ring → curved barrel-chair frame
Set a small wooden napkin ring on its side and add a fitted card seat and back inside for a barrel chair. Brace the underside with a concealed flat base. Its diameter determines the scale; a large ring may suit a generous armchair.
43. Small chess pawn → turned table pedestal
Use an unwanted small chess pawn as a turned table pedestal, keeping it intact beneath a lightweight card tabletop. Paint the whole base consistently to unify the shapes. Choose a pawn with a broad foot and test the table’s balance before gluing.
44. Flat domino → coffee-table top
Lay a flat domino across two folded-card supports for a coffee table, covering the dots with a paper top if needed. Keep the tile intact rather than cutting it. Its weight requires a firm base, and larger dominoes suit larger-scale scenes.
45. Clean rigid plastic floss case → retro refrigerator shell
Use a clean plastic dental-floss case as a retro refrigerator shell, with its original opening facing backward. Choose an already blade-free shell or one with a safely enclosed cutter; never pry out metal. Add a paper door seam and handle to the front.

46. Small hinged mint box → storage trunk
Line a small hinged mint box with decorative paper for a storage trunk and add thin paper straps outside. Keep the hinge working without covering its moving parts. Use an intact, smooth-edged tin; do not cut the metal or leave rough corners exposed.
47. Matchbox sleeve and drawer → bedside drawer unit
Cover an empty matchbox sleeve in plain paper, then slide its drawer back inside to make a bedside unit. Add a paper pull and a slightly larger card top. Use a completely empty box and keep the drawer clearance free of glue.
48. Rigid cardboard glasses case → chaise-longue shell
Use the lower half of a rigid cardboard glasses case as a chaise shell, supporting it on two folded-card feet. Add a thin fabric cushion and cover exposed branding. Choose a shallow case; a deep one can resemble a bathtub instead.
49. Flat wooden gift-box lid → writing-desk top
Rest a small wooden gift-box lid on two narrow card cabinet units to make a writing desk. Use its raised lip as a back edge if the shape allows. Avoid heavy lids, and check knee clearance before fastening the supports.
50. Plastic pizza saver → garden side table
Keep a clean plastic pizza saver intact and paint it as a garden side table with a finish suitable for its plastic. A paper tabletop can hide embossed marks. Its three-legged form works best where the height matches an existing chair.

A finished furnishing can provide a useful scale reference. The iLAND Modern White Dining Set is a 1:12 option to compare with your handmade accessories; it is not required for these furniture projects.

Market and cafe miniatures
51. Unprinted paper drinking-cup base → market fruit basket
Cut down a clean paper drinking cup, retaining its base and a short wall for a fruit basket. Add thin paper bands around it for woven-looking texture. Choose the smallest cup available; full-size cup bottoms often suit market tubs rather than hand baskets.
52. Brown paper sandwich-bag scrap → bakery bread sleeve
Fold a small rectangle from a brown sandwich bag into an open-ended bakery sleeve, gluing only the side seam. Slide a paper bread prop inside with its top showing. Leave the sleeve slightly loose; tightly wrapped bread loses its soft, fresh-bakery feeling.
53. Small rigid chocolate-box divider → produce-bin compartments
Cut one intact compartment from a rigid chocolate-box divider and hide its outer edge within a card market stall. Paint it as a produce bin before adding paper fruit. Clean away food residue and choose broad, shallow compartments rather than deep wells.
54. Clean eyeglass-lens tissue → tailor’s tissue pattern
Cut a clean, unused eyeglass-lens tissue into tiny garment-pattern shapes and draw sparse cutting marks with a fine pencil. Lay them over a shop cutting table, with one corner gently curled. Avoid premoistened cleaning wipes; dry, thin tissue gives the right delicacy.
55. Thin cereal inner-bag film → pretend pastry wrapping
Wrap a tiny pretend pastry in a small piece of clean cereal inner-bag film, folding the seams underneath. Use the natural translucent finish instead of heating the plastic. Thin pieces are easier to control, and small folds look more convincing than bulky twists.

56. Round paper hole-punch dots → macaron halves
Glue two tiny stacks of paper hole-punch dots around a contrasting paper filling for a macaron. Round the color gently with paint rather than building a thick crust. Check the finished diameter beside a miniature plate; office punches vary considerably.
57. Empty lip-balm tube cap → tall drinks tumbler
Stand a clean empty lip-balm cap upright as a tall drinks tumbler, disguising its rim with a thin painted line if needed. Use only the empty cap, without cosmetic residue. A wide cap may work better as a smoothie cup than a water glass.
58. Clean cosmetic sample jar → countertop sweet jar
Clean and dry a tiny cosmetic sample jar, remove its label and use it as a countertop sweet jar with paper sweets inside. Keep its original lid intact. Check the proportions beside the counter; larger samples make floor-standing shop containers instead.
59. Small plastic funnel → cafe pendant shade
Invert a small plastic funnel over a paper collar for an unlit cafe pendant shade, concealing the long stem above the ceiling. Keep it decorative, with no electrical components. Choose a shallow funnel and test its silhouette against the room before attaching it.
60. Clean takeout sauce cup → outdoor cafe parasol canopy
Invert a clean, shallow takeout sauce cup on a rolled-paper pole for a cafe parasol. Paint simple radial panels and add a stable card foot. Keep the canopy intact rather than cutting ribs; a wide cup suits an outdoor restaurant table.

For a cafe with a coordinated tea service, the Odoria Blue Lotus Porcelain Tea Set offers a finished alternative to handmade tableware. Check individual piece dimensions before choosing its place in the scene.

Architecture and surfaces
61. Bamboo placemat strip → roller shop shutter
Cut a narrow section from a bamboo placemat, securing its bindings first, and mount it inside a shop opening as a closed roller shutter. Paint the slats a muted metal color. Keep the slat width modest so the storefront does not resemble a garage.
62. Thin cork table-mat scrap → brick garden wall
Cut thin cork table-mat scraps into small rectangles, arrange them with staggered joints and glue them to a card wall. Paint the faces for garden brickwork. Keep the cork layer thin; deep joints make the wall look like stacked cushions.
63. Paper drinking cup wall → curved alcove backing
Cut a curved panel from a clean paper drinking cup and fit it behind a rectangular card opening for an alcove. Cover the inside with plain paper before assembly. Use the cup’s existing curve without forcing it flat, and check its depth against nearby furniture.
64. Foil-lined drink-carton interior → mirror panel
Open a clean drink carton, wash and dry it thoroughly, then cut a flat foil-lined panel for a pretend mirror. Frame it with paper strips to hide the edges. Its reflection will be softer than glass; position it where that softness feels intentional.
65. Textured paper napkin → embossed ceiling border
Separate a textured paper napkin into its thinnest layers and apply a narrow strip along a card ceiling border with minimal paper glue. Paint after it dries according to the adhesive instructions. Choose fine embossing; large floral ridges can overwhelm a small room.

66. Small woven coaster → wattle wall panel
Trim a small woven coaster to fit a card wall opening and secure every loose end before handling it. Mount it as a wattle-style panel with plain card framing. Check the weave size against the room, and avoid using it as a load-bearing wall.
67. Smooth wooden paint-stirring paddle → stair treads
Use thin paint-stirring paddle offcuts as stair treads, or cut them with a fine hand saw on a clamped support. Sand the edges and mount them on a card stair form. Keep tread depths consistent; the wood thickness sets the scale limit.
68. Flat plastic comb section → balcony balustrade
Use an intact section of a spare plastic comb as a balcony balustrade, concealing its spine beneath a card top rail. Select a comb that already fits rather than snapping hard plastic. Check the spacing; broad teeth suit stylized larger-scale architecture.
69. Thin paper gift-bag panel → accordion room divider
Refold a thin paper gift-bag panel into even accordion pleats for a room divider, covering printing with thin paper if needed. Mount the end folds on small card feet. Keep several folds visible and avoid thick paint that clogs the creases.
70. Paper honeycomb protective wrap → radiator-cover lattice
Stretch a small piece of paper honeycomb protective wrap slightly and trap it between two card frames for radiator-cover lattice. Glue only the outer edges so the openings remain clear. Choose a small section with even cells and keep it away from real heat.

BYHER 4-inch Craft Sticks, 45 Pieces, Natural Wood Log Twigs (Rustic) can add a rustic accent around a garden or workshop scene. These irregular twigs are not a substitute for flat, accurately sized stair stock.

Workshop and utility props
71. Spent wooden pencil stub → wall-mounted fire extinguisher prop
Paint an intact, short wooden pencil stub red and add a paper label and loop to make a wall-mounted fire-extinguisher prop. Hide its writing end in the bracket. Keep it clearly decorative and size it to the wall rather than a full-size pencil.
72. Clean empty glue-stick tube → water-heater prop
Cover a clean, empty glue-stick tube with plain paper and stand it against a utility-room wall as a water-heater prop. Add simple paper bands and labels. Leave its mechanism intact and keep its diameter proportionate. Do not connect it to water or power.
73. Small wooden dowel furniture plug → paint pot
Turn a small wooden furniture dowel plug flat-side down and add a thin paper band around it for a closed paint pot. A colored circle on top suggests the paint shade. Choose smooth, clean plugs and scale them beside the workbench tools.
74. Loose plastic furniture screw cover → workshop clock face
Use a loose plastic furniture screw cover as a workshop clock face, adding a paper dial and two painted hands. Mount it flat against the wall rather than building a deep housing. A small diameter keeps the clock readable without dominating the room.
75. Small zipper slider → vintage flatiron
Glue an unused zipper slider onto a tiny card sole and add a folded-paper handle for a vintage flatiron. Keep the slider intact and cover any sharp projections. Check the silhouette from the side; a bulky slider may suit a larger laundry scene.

76. Plastic sewing bobbin → cable drum
Wrap narrow paper strips around the center of a plastic sewing bobbin to suggest cable on a drum, leaving the two side discs visible. Glue it onto a workshop shelf. Keep the imitation cable thin so the spool’s characteristic shape stays clear.
77. Clean pump-bottle collar → laundry washbasin
Turn a clean pump-bottle collar open-side up, cover any central hole with card and add a paper rim to make a laundry washbasin. Paint with a compatible finish. Choose a shallow collar and fit it on a stable base rather than leaving it rolling.
78. Small plastic wall plug → workbench drill-body prop
Use a small, clean plastic wall plug as the body of a pretend bench drill, mounting it vertically in a folded-card support. Add a paper lever, keeping everything nonfunctional. Select a modest plug without sharp projections; the ribbing supplies the mechanical detail.
79. Clean toothbrush bristles → boot scraper brush
Trim a small tuft from a clean, unused toothbrush and glue it into a shallow card block for a boot scraper brush. Cut carefully over a tray so the bristles are contained. Keep the finished brush low enough to sit beside a doorway.
80. Cardboard tape-roll core → washing-machine drum surround
Set a narrow cardboard tape-roll core into a card appliance front as a washing-machine drum surround. Paint the inner ring dark and leave the circular opening unobstructed, with dark card behind it. Use a small core and keep the appliance shallow behind it.

For a decorative workshop display, BigOtters 150PC Steampunk Gear Charms supplies ornamental mechanical shapes. Treat them as decorative parts rather than functioning gears, and check their size beside the handmade props.

Decorative finishing touches
81. Vintage pierced button → decorative wall medallion
Mount a pierced decorative button on a thin card backing, then paint both together as a wall medallion. Allow the openwork to remain visible rather than filling it with paint. Choose a restrained diameter so the ornament complements the wall instead of becoming a shield.
82. Clear glass marble → crystal-ball ornament
Seat a clear glass marble in a snug paper ring on a tiny card pedestal for a crystal-ball ornament. Secure it so it cannot roll off the shelf. Its weight and size need checking first; use only unchipped glass and keep it away from edges.
83. Small earring clutch back → perfume-bottle stopper
Glue a small earring clutch back onto a tiny paper bottle shape as an ornate perfume stopper. Use a spare clean backing with no sharp parts protruding. Keep the bottle modest and the stopper smaller still; oversized jewelry hardware can take over the dressing table.
84. Faceted necklace bead → table vase
Stand a faceted necklace bead on its widest face and add a narrow paper collar around the opening to suggest a vase. Use paper stems that fit without forcing them. Check stability before gluing; round beads need a concealed flat support underneath.
85. Fine jewelry chain offcut → fireplace fender trim
Fix a short length of fine, clean jewelry chain along a card fireplace fender, securing it at several points. Paint the support to match the chain’s tone. Choose small links and keep this strictly decorative, nowhere near an actual flame or heat source.
If you would rather shape a custom vessel, the miniature pottery guide offers a different route to bowls and vases.

86. Small curtain ring → round picture frame
Use a small curtain ring as a picture frame, placing a tiny paper image behind it and adding a card back. Hang it from a paper tab rather than drilling. Choose a ring with a slim profile so its depth does not dwarf the artwork.
87. Flat wooden clothing button → wall-mounted coat rack
Glue a flat wooden clothing button onto a narrow card backing and add short rolled-paper hooks below it for a coat rack. Paint the parts together for a unified finish. Keep the hooks blunt and space them to suit miniature hats or scarves.
88. Broken zipper teeth strip → picture-frame molding
Remove a narrow strip of zipper teeth from an unwanted garment, keeping its fabric tape attached, and glue it around a card picture frame. Turn joins toward the bottom. Fine teeth create carved-looking molding; chunky zippers suit bold, larger-scale decorative frames.
89. Thin elastic waistband strip → woven-look storage-bin rim
Wrap a thin elastic waistband strip around the top edge of a paper storage bin to suggest a woven rim. Secure it without stretching so it does not pull the bin out of shape. Choose a fine weave and hide the joint at the back.
90. Plastic shirt-collar stay → dressing-room shoehorn
Use a smooth, flexible shirt-collar stay as a miniature shoehorn, shortening it with scissors only if it cuts easily. Round the cut end and add a narrow paper handle wrap. Size it beside miniature shoes; leave brittle or thick plastic uncut.

Tiny ornaments need somewhere to live. The Chivertion 1:12 Bookcase with 48 Miniature Books offers a finished furnishing option; leave a little empty shelf space so your own details remain visible.

Tiny signs of everyday life
91. Thin paper packaging insert → folded newspaper
Fold a thin, uncoated packaging insert into a small newspaper, with its original printing inward and tiny pencil columns outside. Leave one corner slightly lifted. Choose genuinely thin paper; a thick folded leaflet looks more like a parcel than the morning news.
92. Small smooth eraser offcut → bar of soap
Cut a small rectangle from a smooth, clean eraser and soften its corners with gentle trimming for a bar of soap. Add a shallow pressed line using a blunt tool. Keep it dry and decorative, and size it to a miniature soap dish.
93. Fine shoelace aglet → thermos flask
Stand a clean shoelace aglet on a small card disc and add a narrow paper lid for a thermos flask. Keep the original cylinder intact rather than splitting it. A short, broad aglet reads better than a long tube that towers over the lunch bag.
94. Paper straw wrapper → tissue-box tissues
Tear a tiny piece from a clean paper straw wrapper, crumple it lightly and tuck it into a slit in a miniature card tissue box. Thin, irregular folds feel convincing. Leave only a small amount showing so it resembles a tissue rather than laundry.
95. Clean empty dental-floss spool → bathroom toilet-roll core
Use the small empty spool from a clean dental-floss container as the core of a pretend toilet roll, wrapping it with narrow strips of soft paper. Reuse only a loose, safely removable spool. Check its width against the bathroom fittings before making a holder.

96. Cardboard luggage tag → clipboard
Cut a small rectangle from a discarded cardboard luggage tag and round its corners for a clipboard. Add a folded paper clip shape at the top and one thin paper sheet. Use an uncoated section; thick laminated tags can look unnecessarily heavy.
97. Tiny snap fastener half → pet food dish
Choose a shallow snap-fastener half with no exposed sharp prongs and glue it into a small paper ring for a pet food dish. Paint the outer edge if needed. Keep the dish small and secure it to the scene rather than leaving loose hardware.
98. Clean ballpoint pen cap → umbrella stand
Stand a clean, empty ballpoint pen cap open-side up on a concealed card foot for an umbrella stand. Remove or hide any distracting branding with paper. Leave its clip at the back, and choose a cap tall enough for paper umbrella props without overwhelming the hall.
99. Wooden clothespin end → door wedge
Choose a spare wooden clothespin half with a shallow tapered end for a door wedge. Sand any rough edges and slide the thin end under a miniature door. Leave it intact when possible; choose a smaller clothespin if it raises the door too far.
100. Small paper fastener head → wall thermostat
Mount the smooth head of a small paper fastener on a card square and add a tiny painted dial for a wall thermostat. Fold and cover its legs behind the card. Use a compact head; oversized fasteners can resemble clocks instead of controls.

A glimpse of greenery behind everyday props can tie the scene together. Woodland Scenics Light Green Foliage F51 is an optional scenery material; use it sparingly and keep its texture subordinate to your smallest objects.

Small fixes that make a big difference
A familiar package still looks like packaging? Hide the branding, simplify the outline and add only the detail that explains its new purpose. A convincing rim or handle usually contributes more than another coat of paint.
Paper curls or a seam swells? Use less compatible adhesive on the next sample, support the piece flat while it dries as directed, and avoid wetting both sides repeatedly. Thin material needs thin construction.
The prop overwhelms its neighbors? Compare it with a chair seat, door or figure in the actual scene. Swap in a smaller find, or move the oversized object to a different scale; paint cannot shrink it.
A joint peels or a finish stays tacky? Stop adding layers. Check the product's listed surfaces and curing instructions, then test a fresh scrap. Mechanical support or a different material may be a better answer than stronger glue.
Give your little finds their moment
Arrange three or four related makes at miniature eye level, leaving enough space to read each silhouette. A plain curved paper backdrop removes the distracting corner behind them. Use soft window light from the side and a white card opposite it to soften shadows; keep the scene out of hot direct sun.
Take a close view that shows the transformation, then a wider view placing it in a room. For a useful before-and-after picture, show a clean unaltered scrap beside the finished prop without suggesting they are the same scale as the surrounding room. Check reflections and focus before adding more decoration.

Until next time in the Small World
You do not need to make all 100. Pick the object your scene is missing, keep the first attempt simple, and let the next good shape find you. I am particularly fond of a tiny room that feels lived in: a folded paper bag on the floor can tell as much of a story as a grand cabinet.
Which everyday find would you try first? Share your own version with #smallworldminiatures, and tell us what it became. You can explore the shop for finishing touches and join the newsletter on the site for the next small-world adventure.








Comments