



Miniature Fabrics That Actually Drape: Realistic Curtains, Bedding, Cushions, and Rugs

The Secret to Convincing Miniature Fabrics
A curtain can change an entire dollhouse room. Let it fall in a few soft folds beside a window, and the room suddenly has morning light, privacy, and someone who probably opens the curtains before making coffee. Give that same window a stiff rectangle with a chunky hem, and the fabric starts applying for a job as a door.
Textiles are wonderfully persuasive little things. A rumpled sheet suggests somebody slept there. A cushion with gently rounded corners invites a tiny nap. A rug sitting flat beneath a chair makes the furniture feel settled into its home.
I love the moment when those details begin to work together: the weave is quiet, the edges are thin, and the folds seem to follow the furniture rather than hover above it.
This is a practical guide to getting there. We will choose fabrics by what they do at miniature size, then make curtains, bedding, cushions, and rugs with sewn and no-sew approaches. You can start with a single window or give a whole room its textile wardrobe.
The illustrations are AI-generated visual inspiration. They show proposed materials and techniques rather than a photographed, tested build; your fabric and adhesive trials still get the final vote. Beautiful imaginary linen has yet to help anyone unstick their scissors.
The purchased alternatives below use Amazon affiliate links; if you buy through them, it helps fund this tiny world. As an Amazon Associate I earn from qualifying purchases.

Why Miniature Fabrics Need a Different Approach
Fabric brings its original thread thickness, finish, and stiffness into a miniature room. Cutting it smaller changes the outline, but those properties stay put. A heavyweight upholstery scrap that folds comfortably over your hand may make a small cushion look upholstered in breakfast cereal.
Start by looking at four things: thickness, flexibility, surface texture, and the finished edge. A fabric can be thin yet springy, soft yet hairy, or beautifully drapable until the hem becomes a little reinforcing beam.
Gravity also has less fabric weight to work with in a tiny panel. A short curtain may need fewer layers, a simpler heading, or carefully placed hidden attachment points to achieve a convincing shape. Think of the miniature as a small composition whose folds must remain believable at the viewing angle you intend.
Keep two goals separate as you plan. A movable textile needs to remain flexible. A permanent display textile can be arranged and secured in position. Both are useful. A curtain shaped with stiffener may look soft, but it will behave like a fixed model element when touched.

A Fabric Library for the Small World
Fiber and fabric construction describe different things. Cotton, linen, silk, and polyester identify fibers. Plain weave, satin weave, and knit describe ways yarns are arranged. Velvet describes a pile fabric. Silk can be woven into a crisp cloth or a fluid one, and a satin can be made from several fibers.
Read the composition and handle a sample whenever possible. A name narrows the search; the actual scrap tells you whether it belongs in your room.
Cotton Lawn and Batiste
Fine cotton lawn is a strong starting point for sheets, light curtains, and small cushions. Look for a smooth surface, closely spaced threads, and enough body to cut cleanly. Batiste can offer a similarly delicate appearance, although weight and composition vary. A lightweight cotton handkerchief may be a useful reclaimed option if it passes your drape and edge tests. Keep decorative embroidery away from folds unless its thickness suits the scale.
Cotton Voile
Voile gives a lovely translucent curtain effect when you want daylight to remain part of the scene. Test it against the actual window: a sheer that looks white on your worktable may nearly disappear against a bright opening. Its transparency also reveals glue marks and doubled hems. Plan restrained edge finishes, and check the care instructions before washing or pressing; shrinkage can change the proportions of a carefully cut panel.

Fine Silk Habotai
Fine habotai has a smooth, luminous surface that can suggest delicate curtains, a light coverlet, or an elegant cushion. Try a sample of lightweight silk fabric, checking its opacity and how willingly a small piece bends. Silk listings may use momme as a fabric-weight measure. “8 mm” in such a listing can mean eight momme, not eight millimeters thick. Slippery edges and visible adhesive marks make silk a patient second project.
Fine Linen and Linen-Look Cloth
Linen suggests relaxed bedrooms, quiet kitchens, and sunlit rooms. Choose fine threads and restrained slubs: a beautiful full-size texture can become visually coarse in a dollhouse. A thin cotton with a linen-like appearance may make a more convincing miniature than a chunky actual linen. Fine linen-blend fabric is another option, provided the sample folds easily. Judge the finished effect rather than the prestige of the fiber name.
Small-Scale Cotton Prints
Tiny florals, narrow stripes, checks, and scattered dots can do a great deal of decorating. Miniature-scale cotton prints are useful for cushion faces, lightweight coverlets, and country curtains. Some quilting cottons have more body than a hanging panel needs; keep those for flatter pieces. Cut a paper window the size of your intended cushion and move it over the print. A charming flower should not accidentally become the entire sofa's family crest.

Short-Pile Velvet
A thin backing and very short pile are the important qualities in fine velvet fabric. Try it for a seat cushion or a small accent pillow. Check the nap direction before cutting matching pieces: turning one can change the way it reflects light. Heavy upholstery velvet usually makes hems and corners too bulky. Avoid crushing the pile while gluing or pressing, and follow the fabric maker's care guidance.
Fine Knits
A clean scrap from a thin, tightly knitted garment can suggest a relaxed throw or softly folded blanket. Inspect the loops up close; coarse stitches announce the full-size source immediately. Stretch can distort your outline, and some knits curl when cut. Let the scrap relax on the table before marking it, then test the actual edge treatment. Choose a woven fabric instead if keeping the rectangle square becomes the project's main entertainment.
Thin Felt, Reserved for Rugs
Thin craft felt can make a simple, low-profile decorative rug or mat. It is useful when you want a cut edge without a turned hem, although a fuzzy surface may need careful inspection. Save it for this flatter job in our guide. Its thickness and springiness are usually unhelpful for convincing curtains, sheets, and delicate cushion corners. A felt rug should still let the nearby chair stand level.

Scale, Pattern, and the Surprisingly Large Little Hem
Divide a full-size measurement by the scale denominator. At 1:12, a 24-inch cushion becomes 2 inches square; at 1:24, it becomes 1 inch square. An 8-by-10-foot rug becomes 8 by 10 inches at 1:12, or 4 by 5 inches at 1:24. Those are planning examples, so check your actual furniture before cutting.
Patterns need the same scrutiny. A 6-millimeter flower represents a bloom roughly 72 millimeters across at 1:12 and 144 millimeters across at 1:24. That could be a deliberate oversized botanical print, but it will read differently from a tiny sprig.
Seam bulk is equally revealing. A 1-millimeter edge represents 12 millimeters at 1:12 and 24 millimeters at 1:24. Three folded layers may create a ridge that attracts more attention than the print itself.
Use a paper frame cut to the finished size of a curtain, cushion, or rug. Move it across a scrap and view the result beside your miniature furniture. Check where the motif lands at corners and whether a stripe remains visible after folds form.

The Scrap Tests That Save a Finished Room
Before committing your best fabric, make a miniature-sized sample. A large swatch hanging over a chair does not tell you how a three-inch curtain will behave.
First, cut a strip the proposed finished curtain length and hold it from the top. Encourage two or three folds with clean fingertips or tweezers, then release it. Does it settle, spring outward, or collapse into a twist? Keep the sample with a note naming the fabric and its intended use.
Next, test the complete edge. Make the same fold, apply the same amount of adhesive or stitching, and allow it to cure or cool as directed. Compare it with the untreated cloth. Check for a dark line, stiffness, puckering, fraying, and adhesive showing through.
For bedding, lay a scrap over an actual mattress corner. For cushions, fold together the number of layers your seam will contain and pinch the corner. For rugs, place the sample under a chair leg and look from tabletop height.
If the fabric will be washed or treated, prepare the test piece the same way first. Follow the textile and adhesive instructions; avoid fabric softener where the adhesive maker prohibits it. Let everything dry fully before deciding whether it works.

Supplies for a Small Textile Workbench
Begin with clean, sound remnants: a fine handkerchief, a lightweight shirt offcut, or a plain piece of thin knitted cotton. Check for worn patches and old finishes. A narrow usable area is enough for a cushion, so there is no need to sacrifice an entire garment to the tiny upholstery department.
For cutting and planning, gather paper templates, a pencil for marking the reverse where suitable, and sharp fabric scissors. Smaller craft scissors help trim corners. Cut on a stable work surface, keep blades away from fingers, and store needles securely between sessions.
For sewn pieces, use fine hand-sewing needles with an eye that accepts your chosen sewing thread. Match thread weight to the cloth. Thick decorative thread can become a visible cord in a miniature seam.
For no-sew pieces, choose a fabric-compatible fabric glue after testing it on your scrap, or a manufacturer-declared no-sew hem adhesive suited to the fabric. Add tweezers, a disposable fine applicator, and the protected pressing surface required by your product.
For soft fillings, a small amount of polyester stuffing or thin quilt batting may help. They do different jobs: loose fibers shape a pillow; sheet batting creates an even, shallow layer. Many miniature coverlets need no filling at all.

Choose the Seam Before You Cut
Sewing, gluing, and fusing each add something to the fabric. The useful question is how much of that addition your miniature can tolerate.
A hand-sewn seam can stay narrow and flexible. Work small, even stitches appropriate to the weave, keep tension gentle, and test before trimming the allowance. Very loose weaves need enough cloth beyond the stitches to resist pulling apart. A narrow seam that fails is not a successful reduction in bulk.
Fabric glue can suit a hidden cushion closure or a fixed curtain heading. A product described as flexible may still change the feel of very thin fabric. Apply the minimum amount that creates a secure bond, keep it inside the intended seam, and let it cure for the full manufacturer-specified period before stressing it. A clear-drying label does not promise an invisible mark on every textile.
Iron-on hem adhesive is useful only when the fabric and product are compatible. Choose a product explicitly intended for no-sew hems, follow its current packet for temperature, pressure, and dwell time, and let the bond cool before testing. Protect the work surface and keep hot equipment away from finished miniature furniture.
Do not assume every fusible web makes a permanent no-sew seam. HeatnBond Lite and FeatherLite require sewing for permanence according to the manufacturer. A stitched-appliqué product may be excellent for its intended purpose while adding an unnecessary layer to your tiny sheet.

Three Edge Finishes Worth Sampling
A single narrow turn reduces layers, but leaves a raw edge on the reverse. It suits concealed edges where fraying is controlled by the chosen construction. Test how the particular weave behaves rather than relying on glue to rescue a fabric that sheds threads endlessly.
A double turn encloses the raw edge. It gives a tidy finish on stable fine cotton, at the cost of an extra layer. Keep it proportionate and inspect the corner before repeating it around an entire bedspread. Four neatly finished sides can still produce four very bulky corners.
A concealed raw edge can be appropriate behind a fixed curtain heading or beneath a permanently positioned mattress. Secure the hidden portion with a tested method and leave the visible drape as free as possible. This is especially helpful when a hem would pull a sheer panel out of shape.

Curtains That Settle Beside the Window
A Simple Soft Curtain, Sewn or No-Sew
Plan the curtain in place. Decide where its top attaches, where its bottom ends, and how much of the window stays visible. A panel just above the floor is easier to manage than a generous puddle, especially in a shallow room box.
Make a paper template for the finished drop and coverage. Add only the seam allowances your successful sample needs. As a starting trial, give a softly gathered panel about one-and-a-half to twice its intended covered width, then adjust for the fabric and fold density. This is a visual starting point, not a universal formula.
Cut with the fabric grain and check matching panels together. Keep printed motifs facing the same way. Test the side finish first, then finish the bottom. Sew with fine thread, or bond a small turn using your tested fabric glue or compatible no-sew hem product. Allow the adhesive to cure or the fused edge to cool completely.
Form a simple heading. A shallow rod pocket works when its finished thickness suits the scale. For a fixed display, a narrow hidden support strip at the top can hold the folds without a bulky pocket. Keep adhesive confined to the heading rather than coating the panel.

Hang the panel on its intended rod or support and arrange the folds. Look from inside the room and from the main viewing position. If it swings outward, reduce the stiffness or bulk before adding more decoration. A finer fabric often solves more than a stronger fixing.
Secure only what needs to stay put. A small hidden attachment near the heading or behind a side fold can establish the shape of a display curtain. Keep the center and lower areas free when you want a soft, movable result. Test any adhesive against both materials before attaching it to finished woodwork.
Let the curtain settle and check its lower edge again. One pair may need a little visual adjustment even when the cut measurements match. Work from the actual installation, especially if the floor or rod is slightly uneven.

Fixed Pleats, Tiebacks, and the Formal Curtain
A formal curtain can be deliberately shaped for display. Arrange the folds on a protected temporary support, secure the heading, and check the panel against the window before committing the bottom edge. Use a fabric-compatible stiffener only if a fixed result suits the scene, following its instructions and testing for color change and surface marks.
The trade-off is clear: stiffener helps retain a shape by stiffening the textile. It does not improve natural drape. If your curtain must open, close, or be rearranged, choose a construction that preserves that movement instead.
A tieback should gather the cloth without looking like a rope around a sleeping bag. Try fine narrow ribbon or a simple thread loop before adding ornate trim. Keep the attachment hidden behind the fabric and check that the tieback does not pull the hem into an accidental diagonal.

Bedding That Looks Ready for a Tiny Nap
Start with the Mattress and a Thin Sheet
Measure the actual mattress, including its depth. Then decide which edges will tuck underneath and which will be visible. The same bed may need a generous top sheet and a much smaller decorative coverlet; cutting every layer to one size creates unnecessary bulk.
Cut a sheet from fine cotton lawn or batiste using a paper pattern. Add enough fabric for the intended tuck, plus only the edge allowance you need. Keep printed or embroidered borders away from areas that must fold beneath the mattress.
Finish visible edges with a tested narrow seam. Hidden edges can use a simpler finish if the fabric and display construction permit it. Press only according to the cloth's care instructions, and complete any heat-based work away from the miniature bed.
Fit the sheet over the mattress. Smooth the top gently, then arrange the side drops and corner folds. Avoid pulling so hard that the mattress compresses or a striped pattern bends across the surface.
Tuck the hidden portion underneath. For a fixed scene, discreet attachments under the mattress can hold it in place after compatibility testing. Leave enough ease for the exposed fabric to turn the corner softly.
Look at the bed from pillow height. If the sheet edge forms a rigid shelf, reconsider the hem or the fabric. A real-looking turn over the mattress corner is more valuable than a perfectly flat rectangle on the worktable.

Make a Coverlet Before a Duvet
A single layer of fine printed cotton can suggest a light bedcover surprisingly well. Hem it sparingly, drape it over the bed, and turn back one edge. Check how the pattern behaves across that fold before deciding it needs a lining.
For a more substantial coverlet, try two fine layers with no filling. Sew a narrow seam around the perimeter, leave a turning opening, trim corners cautiously without cutting the stitches, and turn right side out. Ease the corners with a blunt tool and close the opening with small stitches. Test the finished thickness on the mattress before adding quilting details.
A no-sew version can use two thin panels with their edges turned inward and bonded narrowly, provided your scrap test shows a flexible, clean result. Glue only the edge construction. A full sheet of adhesive between the layers usually works against the drape you are trying to preserve.
If you want a duvet, begin with the thinnest useful layer of batting and keep the corners lightly filled. Cut the batting back from the seam area so the edge does not become a stuffed ridge. Secure layers only as needed for the chosen construction.

Pillows, Folded Throws, and Gentle Disorder
A narrow cuff on a pillowcase reads well when the cloth is fine enough. You can also suggest a case with one clean folded edge, keeping the hidden back simple. Test a single pillow before making a matching pair, because two identical little flour sacks remain two little flour sacks.
For a throw, cut a fine knit or lightweight woven scrap and arrange it across the foot of the bed. Start with one broad fold and one smaller turn. Too many equally spaced folds make the textile look packaged for a shop display.
Put the intentional untidiness where the eye can understand it: a turned-back cover, one corner resting lower, or a pillow slightly off center. Keep the layers underneath orderly so the scene reads as comfortable rather than unfinished.

Cushions with Soft Corners and Sensible Filling
The Sewn Cushion
A square cushion is an excellent first sewing project because you can inspect every ingredient in a small sample. Begin with stable fine cotton. Save plush fabrics and slippery satin for later, when you know what your seam and filling should look like.
Cut two matching pieces with the right sides facing inward. Mark the intended finished outline on the reverse if your chosen marking method removes cleanly. Leave a modest seam allowance that suits the weave rather than trimming it as narrowly as possible from the start.
Sew around the outline, leaving an opening along one straight edge. Keep the stitch tension even. A tiny backstitch can give a secure hand-sewn seam; test the stitch length and needle on your scrap first.
Reduce excess corner bulk carefully, staying clear of the stitches. Turn the cushion through the opening and ease out the corners with a blunt tool. Sharp points can puncture fine cloth or force a squared corner into a spike.
Add small wisps of filling, working gradually into the corners. Stop before the cushion becomes taut. You want a soft center with enough give to rest against a chair back.
Turn in the opening and close it with small stitches. Place the finished cushion on the actual furniture, then redistribute the filling if it rocks on a hard center or refuses to lean naturally.

The No-Sew Folded Cushion
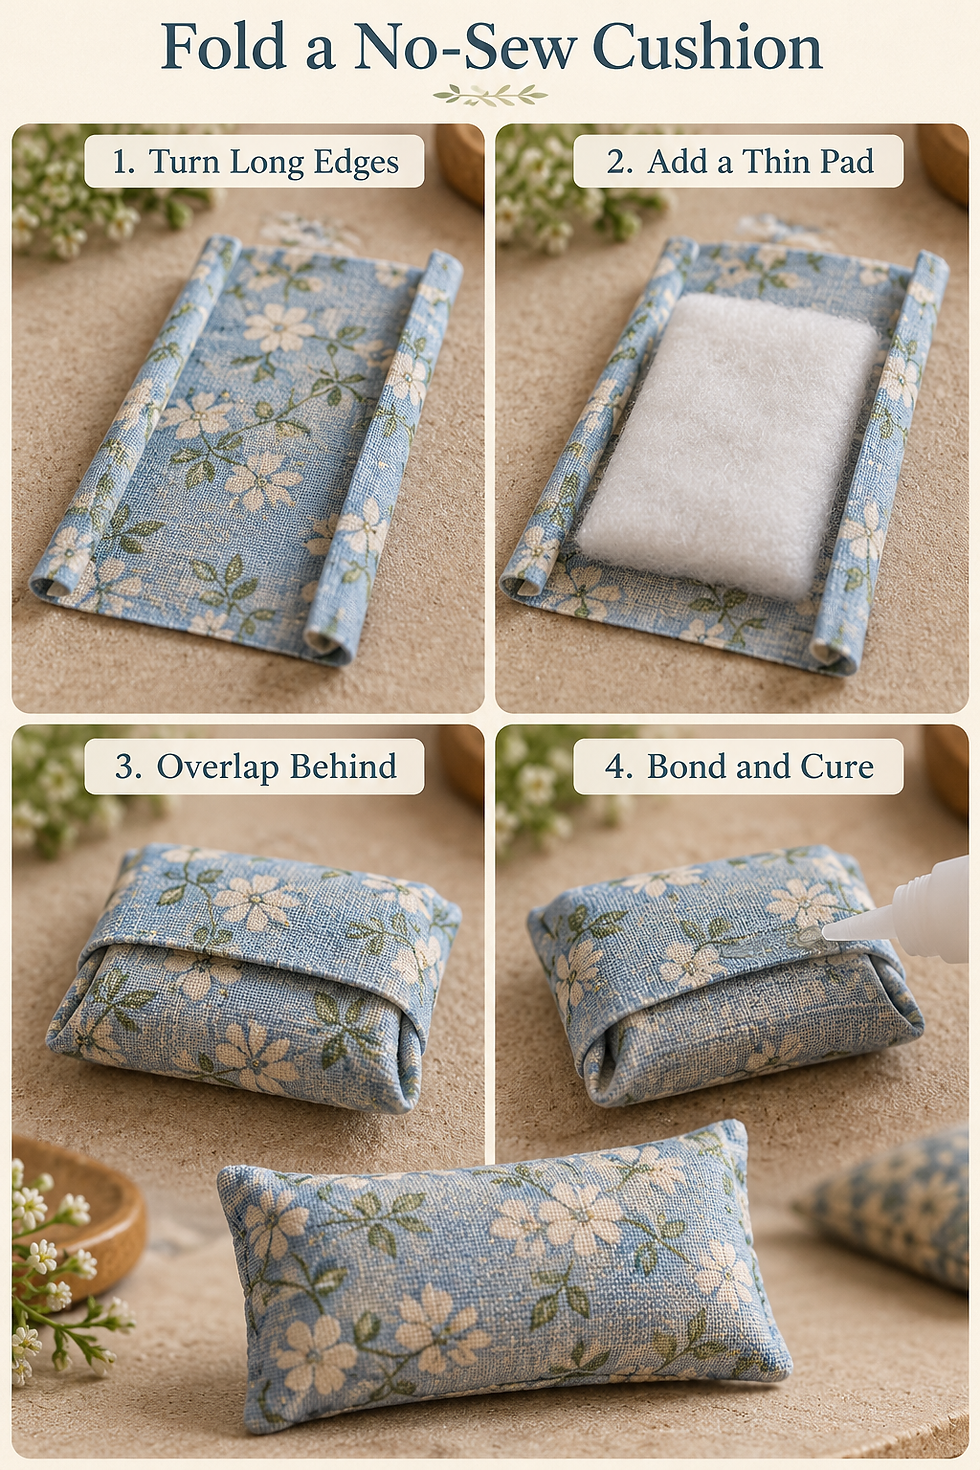
For a small decorative cushion, try a folded envelope construction. This keeps the opening on the back and lets you avoid turning a glue-stiffened seam through a tiny gap.
Cut a rectangle wide enough for the cushion front plus narrow side turns, and long enough to wrap over a shallow filling pad with an overlap on the back. Make a paper trial around the pad first so you can see where the overlap lands.
Turn the long raw edges inward. Use your scrap-tested adhesive sparingly to hold those turns if necessary, then allow it to cure. The center of the fabric should remain free of glue.
Place a small, even pad of thin batting in the center. Fold the short ends around it so they overlap on the back. Adjust the pad and folds before bonding anything; the front should remain gently rounded.
Bond the overlap and the small side openings with a narrow application of compatible fabric glue. Keep adhesive away from visible corners and filling. Support the shape without crushing it while the bond cures according to the product instructions.
This method makes a display cushion with a concealed back seam. Its finished softness depends on the cloth, filling, and adhesive. Test one before making a whole set, and reduce the pad if the sides refuse to close cleanly.
A Little Trim Goes a Long Way
If you add fine braid trim, keep its scale in proportion to the cushion. Wrap a short sample around a corner before committing. A braid that bends neatly on a straight edge may form a bulky knot at the turn.
For seat pads, measure the seat and make a separate fitted template. The guide to miniature sofa styles can help you match a textile to the furniture’s silhouette. A shallow pad with softly rounded corners usually sits more convincingly than a square throw cushion forced onto a shaped chair. Keep the underside flat enough that the chair still feels usable in the little room.

Miniature Rugs That Rest Flat on the Floor
A Simple Flatweave Rug with Short Fringe
Choose a fine, stable woven cloth with a surface that suggests the rug you want. Avoid a very open weave if the tiny chair legs will catch in it. Cut a paper template first, place it in the room, and test the door swing and furniture arrangement.
Cut the cloth on grain. Align the weave with the rug edges so a striped or geometric design does not appear to drift sideways. Allow for the planned side finish and any fringe at the ends.
Finish the long sides with your tested narrow method. If a turned hem creates a ridge, try a finer cloth or a discreet backing that stops short of the outer edge. Keep any backing thin and test for curling before using it on the final piece.
At each short end, remove a few crosswise threads to form a small, even fringe. Work gradually and stop at your planned line. Secure the inner fringe boundary on the reverse with tiny stitches or a tested narrow adhesive application so unraveling cannot creep into the rug.

Trim the fringe evenly with small sharp scissors. Short, restrained ends usually read more convincingly than long, tangled strands. Arrange them after all adhesive has cured so you do not accidentally bind the fringe into a solid strip.
Lay the rug on a flat surface and inspect it from table height. Check the corners and side hems, then place it back in the room with the furniture. If a chair wobbles, solve the ridge or thickness before permanently arranging the scene.
A backing can help a fragile textile hold its outline, but it also adds another layer. Cut it slightly smaller than the visible rug when appropriate to hide the edge and avoid doubled corners. Test the complete sandwich; a neat backing does not automatically prevent curling.

Printed-Fabric Rugs for Intricate Patterns
A detailed rug design printed on fine fabric can suggest a much more intricate textile than you could comfortably weave at that scale. Use your own artwork, a design with suitable permission, or an appropriately licensed source, and keep the pattern scaled to the finished rug.
Choose fabric sheets made for your exact printer type. Follow the sheet manufacturer's feeding, drying, fixing, and care instructions. Do not feed loose household fabric into a printer or assume a sheet intended for one printing process will suit another.
Test any edge adhesive on that printed sample after the required drying or fixing period. Printer ink, fabric treatment, and adhesive can interact. Do not assume a printed textile is waterproof or washable, and do not apply an untested wet sealer to preserve it.
Finish the printed rug with the same attention to thin edges and flat corners as a woven one. Its visual depth comes from the design, subtle cloth texture, and placement in the scene; it does not need a thick backing to announce that it is a rug.

Felt Mats and Other Low-Fuss Options
Thin felt can make a simple bedside mat, a small hearth rug, or a geometric accent. Cut a clean outline, remove loose surface fibers cautiously, and check the thickness beside the furniture. Keep decoration restrained: several stacked felt layers soon become a little staircase.
A coil of twine glued to card produces a firmer decorative mat. Treat it as a rigid piece in your planning, and make sure the base stays flat. It will not fold like a woven rug, which matters if the edge needs to lie over an uneven floor.
Whatever the method, inspect the perimeter before adding furniture. Rugs are often seen at a shallow angle, where a lifted corner or thick hem becomes very obvious. Finish that outline cleanly and the whole room benefits.
Give the Room a Textile Palette
Choose a lead textile and let the others support it. A patterned rug can supply colors for plain curtains and one small cushion. A floral bedcover can take center stage while the floor and window stay quieter.
Try a small palette on the worktable: one light cloth, one medium tone, and one deeper accent. These are useful roles rather than fixed color rules. Look at the samples beside the room's floor, walls, and woodwork, because a cream that feels warm on white paper may look gray against honey-colored timber.

Mix texture deliberately. A smooth sheet beside a softly textured throw gives the eye a difference to enjoy. Combining highly visible linen slubs, plush velvet, chunky knitting, fringe, and a busy carpet in one small space can leave every surface competing for attention.

When the Fabric Has Other Plans
The Curtain Stands Away from the Wall
Check the fabric and its finished hem separately. Reduce layers, choose a finer cloth, or simplify the heading. Add a discreet positioning point only after you have ruled out an unnecessarily stiff construction. More glue across the panel is unlikely to preserve a soft result.
Glue Makes a Dark Line
Stop and test another scrap. Try less adhesive or a different manufacturer-approved product, and consider sewing that visible edge instead. Let the sample cure fully before judging it. Once adhesive has soaked through a delicate fabric, hiding the stain may be less successful than remaking the small part.
The Bedcover Floats Above the Mattress
Look for a bulky perimeter, excessive filling, or a stiff lining. Remove one layer from the plan and sample again. Arrange folds around the actual mattress rather than setting a finished rectangle on top and expecting it to behave.

Cushion Corners Form Hard Points
Check seam allowance, corner trimming, and filling quantity. Ease out the shape gently with a blunt tool, then redistribute the filling. Stop short of forcing the corner into a sharp tip. A little rounding is often exactly what makes a tiny cushion feel soft.
The Rug Curls or a Chair Rocks
Allow any adhesive to cure as directed on a suitable flat support. Then check whether the backing, side hems, or corner overlaps are thicker than the center. Remaking a bulky edge can be more effective than trying to disguise it with a piece of furniture.
The Pattern Looks Too Large
Use the paper viewing frame again. Crop a quieter part of the design, reserve the fabric for a deliberately large motif, or choose a finer print. At smaller scales, a subtle stripe or near-solid texture may communicate the idea more clearly than a complicated miniature pattern.

Four Rooms, Four Useful Starting Points
For a cottage bedroom, try fine cotton sheets, a small floral coverlet, plain light curtains, and a narrow flatweave rug. Let a single turned-back corner provide the movement. The room can feel comfortably inhabited without a mountain of bedding.
For a modern apartment, choose restrained colors and clean edges: a fine linen-look curtain, a lightly filled cushion, and a low-profile rug with a subtle pattern. Watch the fit of each piece. Simple rooms give awkward hems very few places to hide.
For a formal sitting room, sample thin silk-look curtains and short-pile velvet cushions. Keep trims selective and the rug flat. One carefully proportioned decorative border can provide plenty of ceremony for a room whose entire floor fits on a tray.
For an artist's room or relaxed studio, combine a fine knitted throw with a plain sheet and one distinctive cushion. Fold the throw loosely enough that you can still read the bed or chair beneath it. A tiny resident may be creatively disorganized while remaining quite sensible about blanket thickness.
Photograph the Texture Without Losing the Scale
Set the room beside soft, diffused light and look at the textiles from the height of the miniature furniture. Light from the side helps reveal the weave and shallow folds; very harsh light can exaggerate stray fibers and make smooth fabric look rougher than it appears in person.

Before photographing, remove loose fibers with a gentle method suited to the fabric, straighten the rug corners, and check for shiny adhesive spots. Move the light or camera slightly to inspect velvet nap and silky highlights. Keep the background quiet enough that the folds remain easy to read.
Do a final miniature-height inspection: curtains resting naturally, sheets turning the mattress corners, cushions settling into furniture, and rugs lying flat. Then step back. The room should feel welcoming before the viewer starts examining how every seam was made.
Until Next Time in the Small World
The most useful fabric in your miniature workbox may be a modest little scrap that bends beautifully. Let it pass the fold test, keep its edges thin, and give it a job suited to its texture. Those small decisions do much of the convincing for you.
Which textile gives you the most trouble: curtains, bedding, cushions, or rugs? Tell me what you are making, and share your tiny textile victories with #smallworldminiatures. I would love to see the soft corners, quiet folds, and very small beds that somehow look more inviting than our own.





Comments