



The Midnight Marigold: A Gothic Miniature Flower Shop in Full Bloom

First Impressions in Miniature
Halloween is nearly a month away, and this Gothic miniature flower shop has already dressed for an evening appointment. Its pointed arches and lace-like window tracery suggest a little chapel; its shelves of blooms suggest the chapel has found a much more cheerful line of work. I love gardening, so the plants climbing the dark facade and crowding every available ledge are what pull me close. Keep reading: after a short visit to the shop, I’ll walk through a practical way to make your own Gothic storefront and fill it with miniature flowers.
Miniature Backstory – The Tiny Tale
The Midnight Marigold opened in 1887, when the town of Bellwether decided its disused chapel would make an excellent flower shop. The first proprietor, Mrs. Elspeth Thorn, agreed on one condition: the original bell could remain, even though it rang at irregular hours and had never once been attached to a rope. Bellwether’s council accepted. The council had previously approved a fountain that dispensed soup, so standards were flexible.
Elspeth grew plants for every occasion. Brides ordered moon-white bouquets; mourners asked for rosemary; the local astronomer bought a fern each time he discovered a new star and then had to apologize to his landlord for the increasingly crowded windowsill. By October, the shop smelled of damp earth and dried leaves. Elspeth placed orange roses among the purple stems, then kept a few pale blossoms in the back for customers who preferred a quieter Halloween. Her gardening rule was simple: give each plant enough room to be itself, unless it was ivy. Ivy could negotiate with the building.

The shop’s current keeper is her great-granddaughter, Ada Thorn, who insists that the teapot on the center table is for ordinary tea. Nobody has ever seen her pour from it. At closing time, she checks the hanging baskets, counts the pots along the paving, and leaves one small bouquet beside the front arch. In the morning the bouquet is gone, and the bell has usually rung once. Ada has begun charging the invisible customer. The invoice is tucked inside a seed catalogue, marked PAYMENT PENDING SINCE 1887.
See if you can spot the tiny pot of pink flowers near the front edge of the paving. In Bellwether, that is where the invisible customer always leaves the next order.

A Guided Tour of the Build
From a distance, the roofline is all sharp silhouettes. Slender finials rise above the outer corners, while foliage peeks over the parapets as though the upper garden is trying to see what is happening downstairs. The dark backdrop makes each little leaf and spire stand clear.

Move toward the central gable and the ornament becomes almost botanical. A band of round floral openings runs beneath the peak, with curling leaf shapes tucked around the great pointed arch. The decoration feels formal until you notice how enthusiastically the real greenery has joined it.

At the back of the shop, a luminous window gathers the eye. Its pale panes and clustered tracery sit behind tall grasses and bright flowers, so the plants become silhouettes wherever they cross the glow. The colored blooms feel warmer for being surrounded by blue shadow.

On the left, tiered displays are crowded with shallow trays, potted greenery, and soft flower heads. A hanging basket drops from the outer column, while vines wander down toward the stone floor. There is barely room for a customer to stand without developing a strong opinion about begonias.

The right side answers with more shelves and trays, then spills into planters outside the arch. Purple flower spikes, fernlike fronds, and low mossy mounds give that corner a loose garden shape. The little barrels and pots make it feel as if Ada has brought the workbench outdoors for the afternoon.
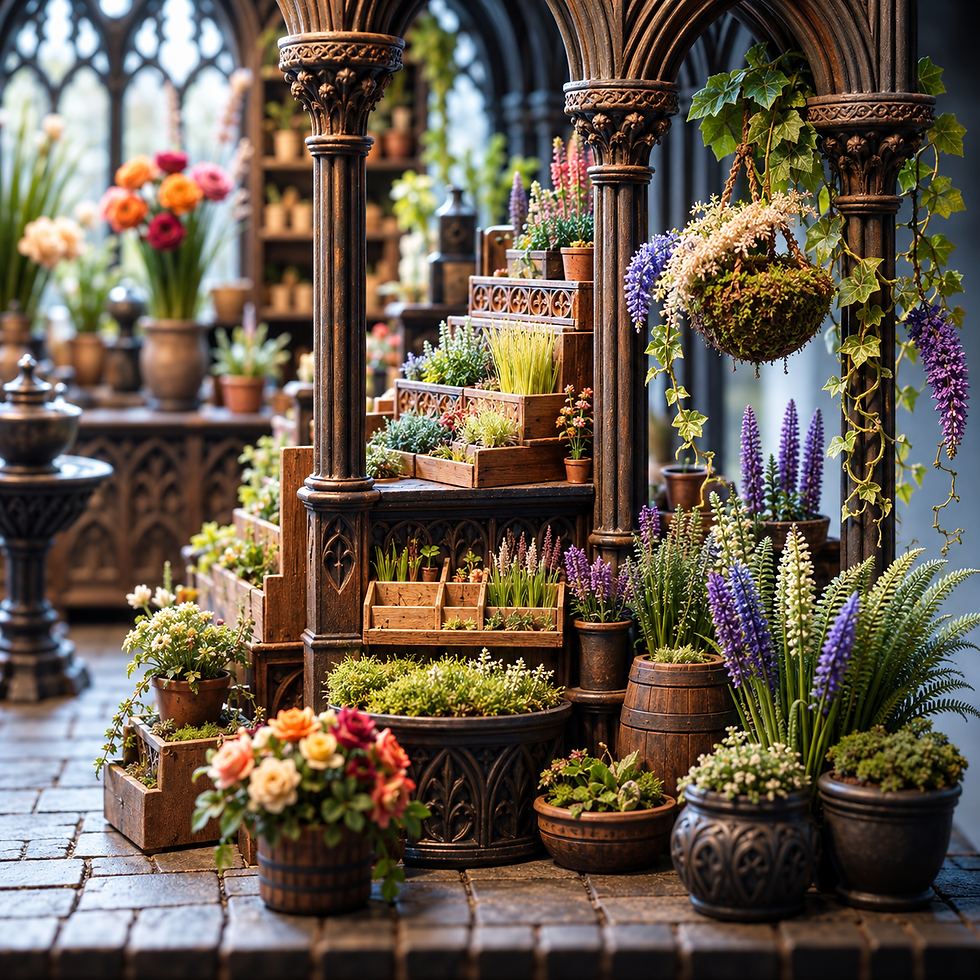
At the front, rectangular paving stones lead past a narrow pedestal table and its mysterious teapot. A few small pots sit near the edge of the base. It is the kind of place where you would step carefully, then immediately forget why you came in because you saw a new plant.

Inspirations – From the Big World to the Small
The strongest architectural idea here is Gothic structure made light. At Sainte-Chapelle in Paris, slender supports and expansive glass create a remarkable feeling of openness. This miniature borrows that visual rhythm: a large pointed arch frames a brighter inner window, and small openings break up what could have been a solid gable. The shop has its own theatrical proportions, but the eye understands the same movement from dark outline to luminous center.
The roofline makes me think of Strawberry Hill House, Horace Walpole’s Gothic Revival home, with its playful pinnacles and castle-like outline. On a miniature, those vertical accents work especially well because they remain legible from across a room. A few carefully spaced finials can give a small facade its entire skyline; a crowd of them may send your tweezers into early retirement.

Then there is the relationship between carving and growth. The Oxford University Museum of Natural History is a Victorian Neo-Gothic building whose stone decoration draws closely on plants; the museum notes that stonemasons often worked from specimens brought from Oxford’s Botanic Garden. This shop takes that kinship a step further. Leaf shapes are worked into the facade, while vines and potted flowers seem ready to reclaim the arches. That overlap is the design choice I love most: the garden and the building appear to have been collaborating for years.

Artist Tips – Make Your Own Magic
You are designing a shop inspired by this image, so treat the guide as a starting point rather than an exact reproduction plan. Your results will vary. I write these posts and use AI image generation for the illustrations; occasionally a window invents a new branch of geometry or a planter balances by means known only to the software. Choose the shapes you love, then make the physical version sturdy enough to survive a dusting. Put on a playlist, clear a table, and let the first arch set the mood.
Shopping List
I like to shop my recycling bin before I shop anywhere else. The purchased alternatives below use Amazon affiliate links; if you buy through them, it helps fund this tiny world. That approach keeps the blog free of the intrusive tracker ads that make a quiet craft read feel like somebody is following you through the garden center. A cereal box with excellent structural qualifications is still welcome to apply.

Base and structure: Save stiff shipping card, cereal boxes, picture-frame backing, clean foam packaging, and coffee stirrers. For a firmer base or straighter walls, consider MDF sheets, chipboard, XPS foam board, and basswood strips and sheets. A metal ruler and cutting mat and a hobby knife with fresh blades make repeat cuts much easier.
Arches and tracery: Save thin food-package card, toothpicks, clear blister packaging, paper doilies, and old jewelry findings. For more regular lines, use styrene strips and sheets, half-round wood strips, laser-cut details, metal filigree, or pre-made dollhouse trim. Tweezers help place the smallest curls without introducing them to your sleeve.
Glass, color, and light: Save transparent packaging and tracing paper; check your drawer for leftover craft paint. Purchasable options include acetate sheets, light diffusion film, acrylic paints and matte varnish, a fine detail brush set, and USB-friendly miniature LED strands.
Garden and shop displays: Save tissue paper, coffee filters, twist-tie wire, dried tea, bits of sponge, thread, and scraps of artificial greenery. Useful extras include floral tape, scenic foliage and leaf punches, flower flocking, preserved moss, embroidery thread, and air-dry or polymer clay for pots. Miniature baskets, jars, and bottles can fill the shelves if the recycling bin has exhausted its talent.

Build the Shop
1. Plan the footprint and choose a scale. Set a loose visual scale before cutting anything. A 1:24 person stands around three inches tall, which gives you a useful check for the counter and the walkable aisle. For a compact display, try a base about 16 by 10 inches, with a facade roughly 12 inches wide and 10 inches high at the peak. Those numbers are suggestions, not a cutting diagram; this illustration plays with height for drama. Sketch the central arch first, then divide the space into left and right display bays. Leave an open strip of paving in front so the flowers have somewhere to spill without hiding every architectural detail.

Cut paper templates of the gable, two side bays, and rear wall. Stand them on the base with low-tack tape and view them at tabletop height. Give the central opening about a third of the facade’s width, then adjust until the rear window is visible through it. You want to see light between the flowers and the roof. Before attaching a single leaf, decide where a camera can look into the shop and where a hand can reach to repair it.
2. Make the bones. Use doubled cereal-box card for a lightweight version or chipboard for a sturdier wall. Cut the back and side walls, dry-fit the joints, then add narrow basswood strips along the corners and behind the gable. Keep the front mostly open: two outer bays, two inner columns, and the high central arch make a convincing shop without enclosing its flowers. A simple hidden shelf across the back braces the walls and later supports the window light.
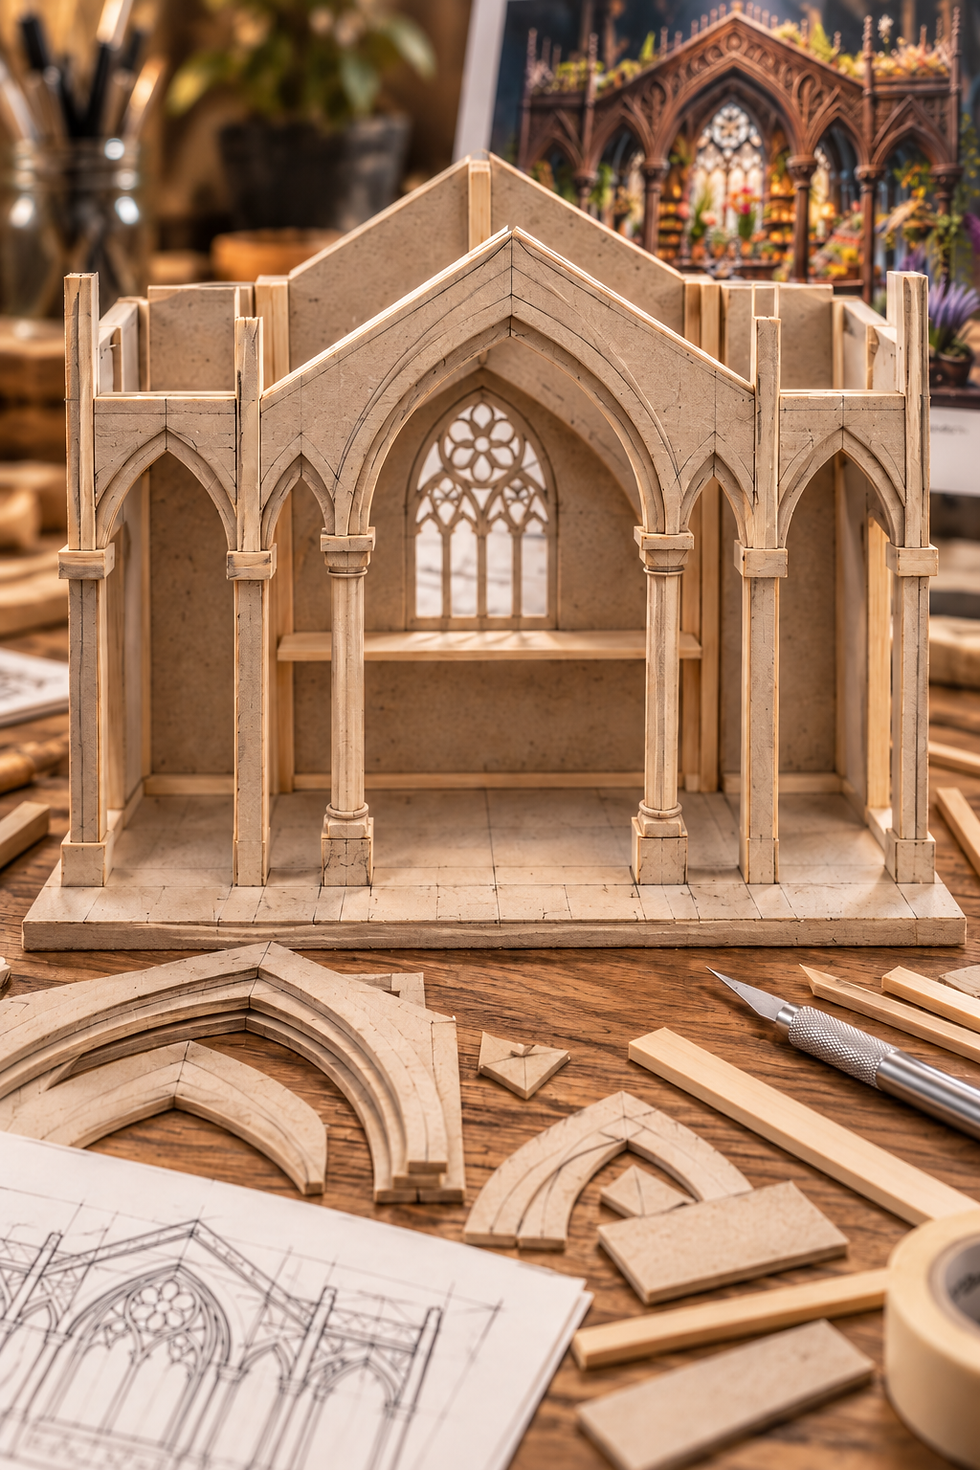
Build the arch as several laminated layers rather than one thick slab. Trace a pointed outline on card, cut it with a sharp hobby blade, and use that first clean piece as a template for the others. Let each layer dry flat under a book protected by scrap paper. Assemble the facade on the table, square the joints with a metal ruler, and attach it to the base only when it stands cleanly. Thin buttresses or doubled column strips at the front corners keep the high openings from wobbling.

3. Cut the tracery while your hands are fresh. The floral band beneath the peak and the glowing rear window are the shop’s most exacting details. Draw the design at finished size on graph paper. Start with one pointed window shape, add two vertical mullions, then place a small circle or quatrefoil near its top. For the gable, repeat one little rosette several times; repetition makes fine ornament read clearly even when each piece is slightly different.

Transfer the pattern to thin card or styrene sheet. Cut the smallest holes first, leaving roughly 1–2 millimeters of material between openings where your scale allows. Rotate the sheet under the blade rather than forcing the blade around a tight curve. If a floral curl keeps tearing, simplify it to a leaf-shaped opening and use a laser-cut detail or a small piece of metal filigree on top. Two clean layers, with the inner pattern set a little behind the outer arch, produce more depth than a thick web of fragile lines.
For the rear window, glue the finished tracery over clear salvaged plastic or acetate. Add a second, pale layer of diffusion film behind it if you want the window to glow. Keep glue away from the visible panes; a few tiny dots along the frame’s edge are enough. If you enjoy tiny leaf shapes, repeat one from the window at the top of the columns so the architecture has its own botanical vocabulary.
4. Give the shop its dark finish. Brush the walls and ornament with acrylic paint in charcoal mixed with a little umber. Once dry, lift the raised edges with a restrained warm-gray drybrush. For the carved lines, use a small amount of dusty taupe or muted bronze. A useful visual balance is roughly two parts dark structure, one part midtone stone or wood, and small accents of pale light; keep the brightest paint for the window and flowers. The exact mix matters less than preserving clear separation between the arch and the shadows behind it.

Score paving rectangles into thin foam or card, staggering the joints. A wash of brown-black settles in the cracks, and a light drybrush catches the edges. Paint the columns before installing the displays, because reaching between a shelf of tiny roses and a pointed arch is a fine way to invent new vocabulary. Keep a few chips and stains near the floor, where years of watering would leave a plausible trace.
5. Furnish the florist’s working space. Make the back counter from card wrapped around a small box, then apply narrow strips to suggest Gothic panels. Build shallow tiered racks from offcuts, with each upper tray set back enough to show the plants below. Coffee stirrers become shelves; cut-down bottle caps or clay become pots; a folded card box becomes a seed drawer. Place the largest containers first, then leave little gaps for bouquets and tools.

That breathing room helps the garden feel cultivated rather than poured into the room.
A central pedestal can be a short dowel between two card discs. If you want to echo the picture, set a little teapot there, or make Ada’s supposed seed catalogue from folded paper. Near the front, add a basket and a few small pots. Keep the pink-flower order spot visible on the paving; Bellwether’s invisible customer has already complained about blocked access.
6. Grow miniature flowers one species at a time. For roses, color coffee-filter paper on both sides with diluted paint and allow it to dry completely. Punch or cut tiny petal shapes, then curl five or six around the tip of fine wire. Begin with a tight center and let the outer petals open. At this size, a flower with an uneven edge often looks more alive than a perfect spiral. Make three or four bloom sizes, working in coral, cream, and deep pink; cluster them unevenly in pots and bouquets.

For lavender-like spikes, wind fine embroidery thread around a wire stem and touch the upper section with glue and flower flocking. Mix mauve with a little dusty blue, and leave a few green stems without flowers. Fern fronds are easier as a long tapered paper spine with short angled cuts on both sides. Bend them gently at the base and place them behind rounder blooms. For ivy, cut several leaf sizes from painted tissue or scenic foliage; run them along thin thread so they can drape naturally from the parapet and hanging baskets.
Use floral tape sparingly to bulk stems at the base, then set them into pots with a bit of clay.
Sprinkle crushed dried tea or preserved moss over the exposed “soil.” For a hanging basket, shape a small half-sphere from foil and cover it with moss; add a thread loop and let a few vines reach lower than the flowers. Group plants by growth habit. Tall spikes rise at the outer corners, ferns soften the columns, and low mounds anchor the front so your eye can still travel into the shop.

7. Add a quiet glow. Run a short miniature LED strand behind the rear window, keeping the switch or USB lead accessible at the back of the base. Warm white makes the blooms inviting; neutral white can feel like moonlight if you soften it with diffusion film. Tape the wire along the back brace and test it before closing that wall. Use a cool, low-voltage light and follow the product’s instructions. Keep paper flowers and dry moss clear of bulbs and connections, and never leave the display powered unattended.
8. Scatter a story, then photograph it. Add seed packets, an empty pot, a spool of twine, and one suspiciously untouched teapot. Keep the details selective. A tiny paper invoice near the front counter gives the invisible customer’s bill a place to hide; the pink-flower pot near the paving gives readers something to hunt for. A single fallen petal near the step says more than a whole floor of clutter.
For photos, set the camera close to the paving and aim diagonally through the central arch. A deep blue or charcoal backdrop keeps the finials crisp, while a soft light from the side reveals the relief in the tracery. Take one wide view, then move close to the window, the floral displays, and the little order spot. If the rear LED looks too bright, lower its output or add another layer of tracing paper. The best photograph lets the flowers glow while the shop retains its shadows.

When the Miniature Misbehaves
The facade leans: Add a discreet brace from the back wall to the side bay, then check the base on a level surface before the glue cures.
Tracery breaks during cutting: Enlarge the smallest openings, cut the interior shapes before the outline, and laminate a second layer behind the weak area.
The window looks cloudy: Replace plastic marked by glue or fingerprints; attach the pane with tiny adhesive dots along its hidden edge.
Flowers look oversized: Hold one beside your three-inch scale figure. Reduce the petal count or reserve the bloom for a foreground pot, where a dramatic variety feels intentional.
The garden hides the architecture: Lower the center plants and move taller spikes toward the corners. Leave a visible rim of dark wall around the luminous rear window.
The light feels harsh: Diffuse it with tracing paper, shift the LEDs farther back, and allow the foreground to remain a shade darker.
Work with a fresh blade on a cutting mat, keep fingers out of its path, and ventilate the room when using paint or glue. Small parts and loose wire belong away from children and pets. If you use polymer clay, follow its baking directions in a dedicated craft setup; air-dry clay is an easy alternative for the little pots.
Until Next Time in the Small World
The Midnight Marigold has everything I want in an October miniature: a slightly theatrical building and a garden that refuses to clock out for the season. I’d probably linger over the ferns until Ada reminded me that the bell has already rung for closing. Which detail catches you first: the tracery, the flowers, or the mysterious teapot? Tell me in the comments, and share your own Gothic garden or flower shop with #smallworldminiatures. You can also join the newsletter for more small-world visits and take a tour of the online shop. Ada promises the invisible customer gets no more credit until the 1887 invoice is settled.
#smallworldminiatures #miniatureart #miniaturegarden #miniatureflowers #miniatureflorist #miniaturebuild #miniaturediorama #gothicminiature #gothicarchitecture #gothicrevival #gothicdecor #halloweencrafts #halloweendecor #dollhouseminiatures #roomboxtutorial #miniaturetutorial #paperflowers #miniatureplants #tinygarden #miniaturephotography #dioramabuild #craftingminiatures #botanicalminiatures #miniaturetracery #artisttips







Comments