



The Crooked Gourd Contest: A Claymation-Style Miniature Pumpkin Carving Night

First Impressions in Miniature
There is a point every October when ordinary pumpkin carving suddenly feels inadequate. Apparently, this tiny neighborhood reached that point several generations ago.
I love this miniature because almost everything seems to have been squeezed, pinched, bent, or sculpted into existence. Five wonderfully peculiar contestants crowd behind a table of pumpkins while an extremely tall judge looms nearby, wearing the expression of someone who has discovered several violations of the official gourd-carving regulations.
The wonky green buildings, glowing pumpkin faces, long noses, tiny stools, crooked windows, and wonderfully tactile surfaces give the whole scene the feeling of a miniature stop-motion film paused between frames.
And if those little clay characters have you reaching for a block of polymer clay already, keep reading. Farther down, I’ve put together a full inspiration guide for creating your own miniature clay characters, pumpkins, buildings, and Halloween props.

The Tiny Tale: The Ninety-Seventh Crooked Gourd Contest
The village of Gourdwick Hollow has held its annual Crooked Gourd Contest every October since 1929, although the exact reason remains disputed.

According to the town records, the first contest began when local vegetable merchant Horace Crimple accidentally ordered 400 pumpkins instead of 40.
According to Horace Crimple’s descendants, this is slander.
Either way, the excess pumpkins had to go somewhere.
The villagers dragged tables into Crimple Lane, sharpened their carving knives, and agreed upon three judging categories: expression, craftsmanship, and “general pumpkin personality.”
The last category has never been properly defined.
That has caused problems.
Today, the competition is overseen by Bartholomew Spindle, the extremely tall gentleman standing to the right of the judging table. His family has chaired the event for seven generations, largely because nobody else wants to read the 83-page rulebook.
Bartholomew takes pumpkin carving very seriously.
Contestants are prohibited from using enchanted gourds, borrowed teeth, concealed lantern spirits, mechanical jaw mechanisms, or “pumpkin enhancement substances of an alchemical nature.”
The five competitors clustered around the table are this year’s finalists.
There is Edwin Nib, whose pumpkins always look mildly concerned.
Morris Thatch specializes in enormous teeth.
Clem Fallow refuses to carve symmetrical eyes on philosophical grounds.
Silas Bramble once entered a turnip and still insists it counted.
And finally there is Wilbert Crow, who has been accused—without proof—of whispering instructions to his pumpkin during judging.
Their entries sit in a neat row across the wooden table.
Mostly neat.
At the far end of the contest grounds is this year’s most controversial entry: an enormous carved pumpkin sitting proudly on a stool.
Bartholomew has inspected it three times.
Its mouth contains far too many teeth.
Nobody remembers carving them.
More troublingly, the pumpkin appears to have moved approximately three inches closer to the judging table since sunset.
The committee has decided not to discuss this until after prizes are awarded.
If you look closely, there’s one more little mystery hiding in the scene: a tiny hand seems to be reaching from inside the blue pumpkin near the center.
Gourdwick Hollow officials maintain that everything is completely normal.
They would appreciate it if everyone stopped asking.

A Guided Tour of the Build
Start on the left and look at the houses themselves. Their green walls lean slightly beneath oversized blue-black roofs, while circular windows sit unevenly across the façades. Thin, crooked mullions divide each opening. Warm orange light behind several windows immediately pushes the cool green structures forward.

Move down toward the doorway and the first contestant. His tiny body almost disappears beneath a narrow dark coat while the oversized sculpted head does all the storytelling. The long nose, bulging eyes, orange beard, and individual strands of hair make him feel wonderfully animated.

The judging table creates the center of the scene. Several carved pumpkins sit shoulder to shoulder, each with a different expression. One has round surprised eyes. Another seems slightly annoyed. One appears to have just remembered an unpaid bill.

Behind them, the contestants form a row of mismatched silhouettes. Their faces share a visual language—large eyes, narrow jaws, long noses—but differences in hair, mouths, posture, and color give each character a personality.
Just right of center sits the strange blue pumpkin. Its orange interior glows dramatically against the dark shell, and something decidedly suspicious appears to be emerging from inside.

The enormous pumpkin on the stool becomes another visual anchor. Deep cuts around the eyes and mouth create heavy shadows while individually sculpted teeth turn the grin into something halfway between friendly and hungry.

Finally, the tall judge stretches nearly to the roofline. His impossibly thin body and elongated neck exaggerate the scale difference between him and everyone else. The curled red hair and beard echo the warm pumpkins below, tying the whole composition together.

From the Big World to the Small
The strongest influence here comes from the long tradition of stop-motion character design, where physical texture becomes part of the storytelling.
Will Vinton helped popularize clay animation through expressive sculpted characters whose fingerprints and irregular surfaces often remained visible. Aardman Animation later pushed that tactile quality into wonderfully readable facial expressions, where a slightly raised brow or reshaped mouth could completely change a character’s mood.
There’s also a bit of theatrical miniature-set logic at work. Studios such as Laika build environments with exaggerated proportions because tiny objects sometimes need stronger shapes to read on camera. Doorways become narrower, rooflines bend farther, and ordinary props gain distinctive silhouettes.

That same thinking works beautifully here.
Look at the architecture. Real houses rarely have windows that wobble quite this enthusiastically, but perfect circles and straight walls would actually make the miniature less convincing as a fantasy environment. The repeated imperfections establish their own design language.
The characters follow the same rule.
A realistic human nose at this scale might disappear visually. Stretch it three times longer and suddenly it becomes personality.
Large eyes make expressions readable.
Thin shoulders emphasize oversized heads.
Wild hair creates silhouette.
A pumpkin mouth becomes much more memorable when the teeth feel almost comically deep.
Miniature fantasy benefits from exaggeration because viewers understand the design from across the room before discovering all the smaller details up close.

If you enjoy this kind of crooked Halloween world-building, the architectural approach in The Crooked Bloom, with its uneven shopfronts, layered arches, and dark-fantasy streetscape, explores a similar idea. Explore The Crooked Bloom miniature
There’s also a useful clay connection in my Pumpkin Pies & Peculiar Rooflines miniature, where pumpkins and baked goods become sculptural details inside another very tiny Halloween neighborhood. Visit the miniature pumpkin pie shop
And for another look at sculpted characters surrounded by crooked fantasy scenery, the Curious Curiosities Cart has plenty of strange botanical creatures and miniature character-building inspiration. Tour the Curious Curiosities Cart
Make Your Own Crooked Little Pumpkin Contest
You can take this project in dozens of directions. Build three contestants instead of five. Make the pumpkins friendly. Make them horrifying. Replace the entire village with one crooked shed and a folding table.
This guide is meant as inspiration rather than an exact reproduction plan, so measurements and materials can wander a little. That actually suits this particular miniature rather well.
One quick note before we start: I write the guides here, while many of the accompanying process illustrations are made with AI image generation. Occasionally a generated miniature tool will acquire an extra handle, a character may develop an ambitious number of fingers, or gravity may briefly resign. Use the pictures for ideas and the written instructions for the practical part.
Shopping List
I always like starting with things already hiding around the house. Cereal boxes, shipping card, coffee stirrers, wooden skewers, clean foam packaging, foil, toothpicks, thread, and scraps of thin plastic can cover a surprising amount of this build before you buy anything.
If you do need supplies, the linked items below are Amazon affiliate links. Buying through them helps support Small World Miniatures and fund future tiny worlds, without filling the site with those intrusive tracker-heavy display ads.

For the buildings and base
Save cereal boxes, shipping card, picture-frame backing, coffee stirrers, wooden skewers, clean foam packaging, and popsicle sticks.
For sturdier construction, use chipboard, basswood strips and sheets, XPS foam board, or MDF sheets.
For the characters and pumpkins
You’ll want air-dry or baked polymer clay, plus thin craft wire, aluminum foil, toothpicks, sewing pins, and tiny scraps of thread or fabric.
Polymer clay is especially useful for complex faces because you can keep refining noses, eyes, mouths, teeth, and hair before curing the piece.
Paint and finishing
Gather acrylic paints and matte varnish in moss green, blue-black, pumpkin orange, ivory, raw umber, brick red, gray, and deep brown.
A fine detail brush set is especially useful for pupils, teeth, wrinkles, pumpkin faces, and tiny weathering marks.
For glossy eyes or wet-looking details, use a tiny amount of satin or gloss varnish.
Lighting
Warm mini LEDs and light kits work well behind the windows and inside selected pumpkins.
Use light diffusion film or tracing paper between the LED and the opening to soften bright points of light.
Adhesives
For the structures and furniture, hot glue, PVA/wood glue, and super glue will cover most materials in the project.
Use PVA for card and wood, super glue for tiny rigid parts, and hot glue where you need a quick hidden bond.
Basic tools
A hobby knife with fresh blades, metal ruler and cutting mat, tweezers, sandpaper or emery boards, and a pin vise with tiny drill bits will handle most of the fiddly construction.
These are Amazon affiliate links, which help support Small World Miniatures if you purchase through them. I prefer doing that over covering the site in tracker-heavy display ads. The tiny residents get their building budget, and you get to browse without fighting six pop-ups and a video that begins playing somewhere behind your browser tab.

Deep Dive Build Guide
1. Plan the contest before sculpting anything
Choose a rough scale first.
Something around 1:24 works nicely for a compact diorama because the characters can land roughly 2½–4 inches tall while still leaving room for exaggerated heads.
Sketch the scene as simple shapes.
Place the contest table across the lower middle. Cluster several contestants behind it. Put one much taller character off to the side so the composition has a strong vertical shape.
Then block in two shallow building façades.
You only need enough architecture to imply a street.
A base around 14–18 inches wide gives you comfortable working room, but use whatever fits your shelf.
2. Build the crooked structures
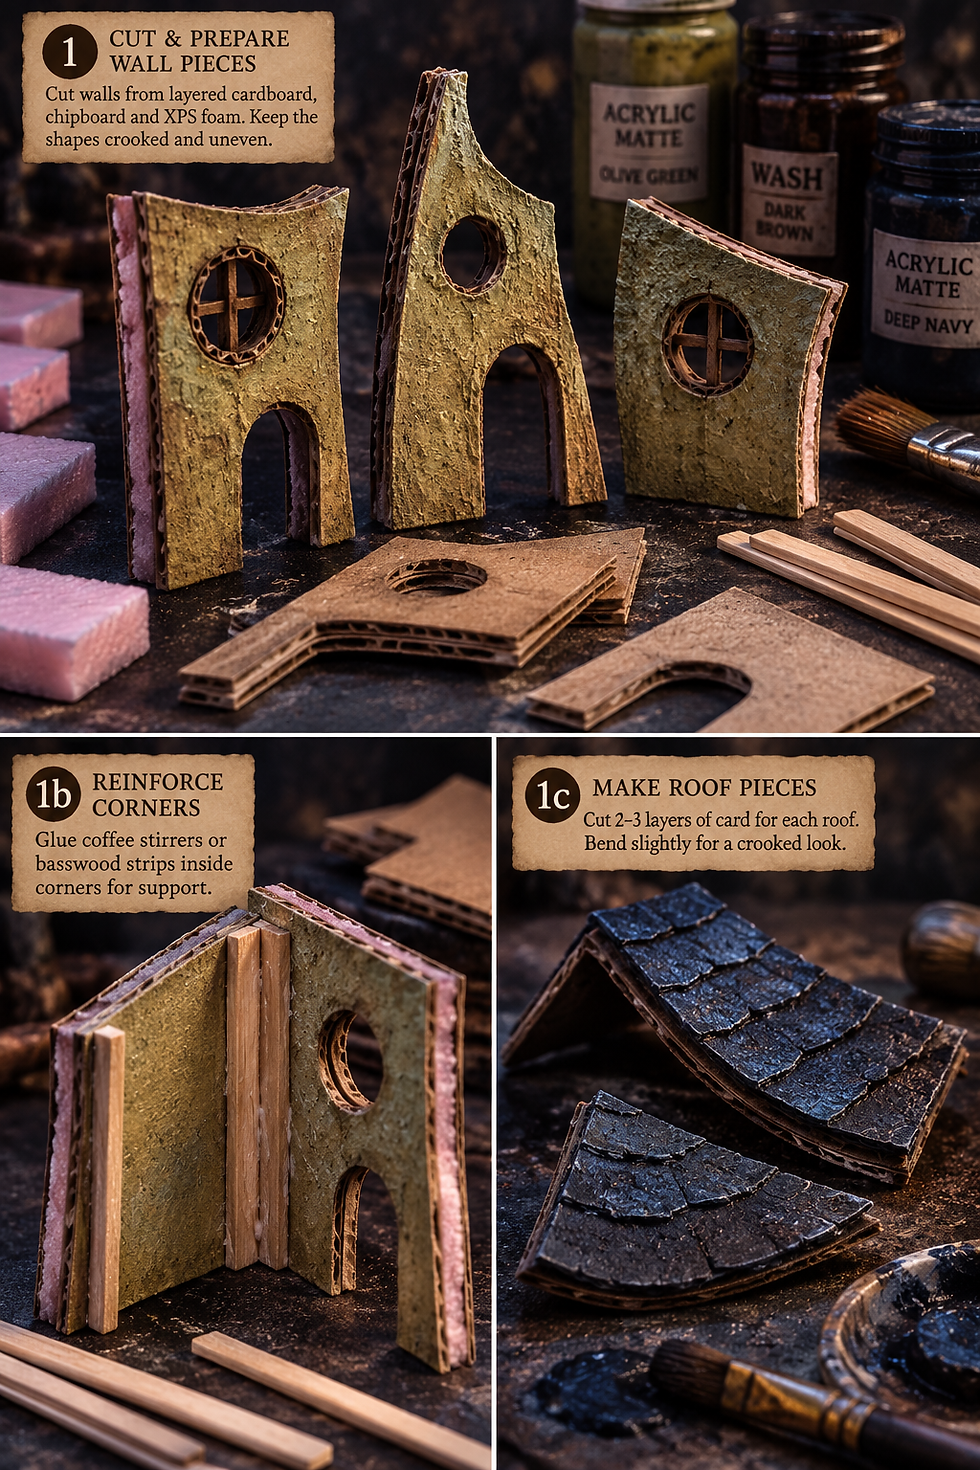
Cut your basic walls from layered cardboard, chipboard, or XPS foam.
Avoid trying to make the walls perfectly square.
Tilt one side slightly.
Raise one roofline.
Shift a doorway a little off center.
Those variations make the set feel handmade and animated.
Reinforce cardboard corners internally with coffee stirrers or basswood strips.
For the roofs, laminate two or three layers of card so they hold their shape, then curve or bend the edges gently.
Paint the walls with a muted yellow-green acrylic base.
Once dry, brush a darker green-brown wash into corners and around windows. Finish with a light drybrush of olive or dusty beige across the raised areas.
The roofs can start with deep navy mixed with black, followed by a slightly lighter blue drybrush along their upper texture.
3. Make the strange round windows and doors
Draw circles onto thin card, then deliberately distort them.
Perfect geometry feels too architectural for Gourdwick Hollow.
Layer two or three rings around each opening to create thick frames.
Coffee stirrers, rolled clay, thin basswood, or even narrow strips of cereal-box card can become the crossbars.
Add clear acetate behind the openings if you want glazing.
For the glowing windows, place tracing paper behind the acetate and hide a warm LED farther inside the building. The gap between LED and diffuser keeps you from seeing a bright pinpoint.
Keep your LEDs cool-running and low voltage, and always leave access to wiring or battery packs.

4. Sculpt expressive character heads
This is where the project gets wonderfully strange.
Start with a loose ball of aluminum foil slightly smaller than the finished head. Cover it with a thin layer of clay.
Building around foil saves clay and reduces the weight.
Instead of sculpting every face the same way, try several approaches.
For one character, begin with a pear-shaped head and pull the nose directly from the clay.
For another, sculpt the nose separately and blend it into the face.
For a third, exaggerate the brow first, then press deep eye sockets underneath it.
Small differences change the entire personality.
Insert clay eyeballs into the sockets and press tiny pupils into them with the end of a pin.
Cut mouths using a fine sculpting tool or toothpick.
Individual teeth can be tiny ivory clay wedges inserted before curing.
The most important trick is asymmetry.
Raise one eyebrow.
Pull one side of the mouth higher.
Make one eye fractionally larger.
Turn the nose slightly.
Suddenly the face has history.

5. Give each character a different hairstyle
Hair provides another chance to vary your sculpting technique.
For smooth hair, add one thin clay cap and carve grooves into it.
For stringy hair, roll very fine snakes of clay and attach them individually.
For wild red tufts like the ones in this scene, taper thin pieces at both ends, press them into the scalp, then bend them outward before curing.
You can also combine thread with sculpted clay for finer strands.
Beards work particularly well as individual tapered pieces because they create strong shadows.

6. Build thin bodies over wire armatures
Twist thin wire into a simple stick figure.
Create a loop for the shoulders, run a central wire down the torso, and branch it into two legs.
Wrap the torso lightly with foil.
Then add clay only where you need visible hands, shoes, necks, or clothing details.
For extremely skinny characters, sculpted jackets can form most of the torso.
Hands can be simplified. A tiny mitten shape with two or three cut lines often reads better than five perfectly separated fingers.
And it is significantly less likely to make you reconsider all your hobbies.
Pose the figure before curing.
Lean shoulders forward.
Turn heads toward the pumpkins.
Bend elbows.
A stiff figure quickly feels like a figurine. A slightly awkward pose feels like a frame from an animated film.

7. Sculpt several kinds of pumpkins
Pumpkins are perfect practice pieces because each one can use a different method.
For a traditional pumpkin, roll a clay ball and flatten it slightly. Press vertical grooves around it with the blunt edge of a sculpting tool.
For a lumpy pumpkin, start with several smaller balls and gently blend them together.
For the large carved face, create the entire pumpkin first and chill the clay briefly if it becomes too soft. Then cut deep eye and mouth cavities.
Roll individual teeth separately and press them inside the mouth.
A thin dark wash inside the recesses after painting creates much more depth.
For an open pumpkin, build the shell around a loose foil core, cut away a section before curing, and paint the interior a brighter orange afterward.
You can even add loose clay seeds or stringy pulp.

8. Build the contest table and stools
Coffee stirrers are ideal here.
Cut several roughly equal planks for the tabletop and glue them across two braces underneath.
Use thin dowels or skewers for the legs.
A little irregularity helps, so allow one board to sit fractionally higher.
For the stools, cut a small round or square seat and attach three legs underneath.
Paint everything medium brown, wash with darker umber, then drybrush the edges with a pale tan.
Tiny scratches made with a pin before painting can imitate worn wood grain.

9. Paint faces in layers
A single flat skin tone can make sculpted detail disappear.
Start with a muted green-gray, tan, or pale ochre base.
Brush a thin darker wash around noses, beneath brows, inside ears, and beneath cheekbones.
Then add a lighter version of the base color to the forehead, nose bridge, cheekbones, and chin.
Paint eyes slightly off-white rather than pure white.
Finish with tiny pupils and one microscopic dot of gloss varnish.
That little reflection does a surprising amount of work.

10. Add story clutter
Now sprinkle in evidence that the contest has been happening for hours.
Add pumpkin scraps beneath the table.
Put a carving tool near one contestant.
Scatter a few stems.
Leave an empty stool beside the table.
Make a tiny rulebook from folded paper.
You could even add miniature prize ribbons labeled:
MOST UNSETTLING
BEST TEETH
TECHNICALLY A PUMPKIN
And somewhere in the scene, hide something that suggests one pumpkin may be alive.
A tiny footprint behind it would do nicely.

11. Light the miniature like a stop-motion set
Warm light and cool scenery create beautiful contrast.
Aim for LEDs around 2200–3000K behind windows and pumpkins.
Keep the general scene cooler with dark blue or charcoal surroundings.
You do not need every pumpkin illuminated. One or two glowing elements will feel much more dramatic than ten equally bright ones.
Hide LEDs behind tracing paper when possible and route wires behind walls or underneath the base.
Never use real candles inside a miniature scene filled with card, foam, clay, dried materials, and adhesives. Gourdwick Hollow already has enough municipal problems.

12. Photograph the finished scene
Place the camera low enough that you feel as though you are standing in the street with the contestants.
A straight-on image works well for the full contest, while a lower three-quarter view gives the pumpkins more depth.
Use a deep blue or almost-black backdrop.
Place one soft light slightly above and to one side of the scene. Add a weaker fill light from the opposite side if the faces disappear into shadow.
Then photograph individual details.
The contestants deserve portraits.
The giant pumpkin deserves one.
And that suspicious blue pumpkin absolutely deserves photographic documentation before it moves again.

Troubleshooting
The clay faces look generic → Push one feature much farther. Lengthen the nose, enlarge the eyes, tilt the jaw, or stretch the forehead.
Thin clay parts keep breaking → Add a wire core inside noses, fingers, legs, or tall hair pieces.
Your pumpkins look like oranges → Flatten them slightly and deepen the vertical grooves around the body.
The buildings look too neat → Distort repeated elements. Shift windows, bend the roofline, and vary the width of trim.
The scene looks visually crowded → Reduce the number of colors. Let green-blue architecture, orange pumpkins, and dark clothing carry most of the palette.
LEDs look like bright dots → Move them farther behind the opening and diffuse them with tracing paper.
Until Next Time in the Small World
I’m still concerned about the pumpkin with all those teeth.
Bartholomew Spindle insists the judging committee has everything under control, although that same committee has apparently added a new rule forbidding contestants from feeding their entries after midnight.
Probably unrelated.
What I love most about this miniature is how thoroughly the sculpted texture carries the story. The crooked buildings matter. The lighting matters. The tiny furniture helps. But those stretched faces, imperfect pumpkins, and wonderfully awkward poses are what make Gourdwick Hollow feel inhabited.
If you make your own miniature pumpkin contest, I’d love to know what category your winning pumpkin takes home. Share your creations with #smallworldminiatures, and tell me your favorite detail from this scene in the comments.
You can also visit the Small World Miniatures shop or sign up for the newsletter to keep wandering through new tiny worlds as they appear.
Preferably before the pumpkins begin wandering through them on their own.
#SmallWorldMiniatures #MiniatureArt #Miniatures #MiniatureDiorama #ClayMiniatures #PolymerClay #ClayArt #ClaySculpture #MiniatureSculpture #HalloweenMiniatures #HalloweenCrafts #PumpkinCarving #MiniaturePumpkins #SpookyMiniatures #DarkFantasyArt #WhimsicalArt #StopMotionInspired #ClaymationInspired #DioramaArt #MiniatureMaking #MiniatureArtist #MiniatureWorld #FantasyMiniatures #HalloweenDiorama #PolymerClayArt #MiniaturePhotography #CraftInspiration #TinyWorlds
Social teaser
Gourdwick Hollow’s annual pumpkin-carving contest has three rules: carve carefully, respect the judges, and under NO circumstances feed your entry after midnight. 🎃 I’m touring this wonderfully strange claymation-style miniature and breaking down how to sculpt the characters, pumpkins, crooked buildings & props. Follow the link in bio for the full post! #smallworldminiatures #miniatureart #halloweenminiatures #polymerclay







Comments