



Where the Waterfalls Rest: A Rivendell-Inspired Miniature Elven Pavilion

First Impressions in Miniature
I have loved The Lord of the Rings since I was a child. My father first introduced me to that world through The Hobbit, and I was hooked. Those stories helped shape my love of fantasy fiction, eventually leading me to The Wheel of Time, which I got to introduce to him. I love that we passed that sense of discovery back and forth.

And yes, I have always wanted to live in that world. Preferably in the safety of Rivendell, with a comfortable chair and a view of the waterfalls. My enthusiasm for fantasy becomes considerably more selective when someone mentions giant spiders.
This Rivendell-inspired miniature captures the part I would happily move into: pale, intricate architecture, golden autumn trees, water slipping over rocks, and windows glowing as though someone has already put the kettle on. The pavilion has enough pointed roofs to keep a roofer occupied for several lifetimes, but the terrace feels wonderfully welcoming.
Below, we'll explore the scene, meet its entirely fictional caretaker, and work through ways to recreate its terrain, cascading water, elaborate building forms, tracery, stonework, and warm evening light.
The purchased alternatives below use Amazon affiliate links; if you buy through them, it helps fund this tiny world. As an Amazon Associate I earn from qualifying purchases.

Miniature Backstory — The Tiny Tale
This is the Pavilion of the Last Leaf, a place where travelers are permitted to recover from their adventures before anyone asks them to describe the adventures in detail.
Its caretaker, Ilin, maintains three rules: muddy boots stay by the stairs, weapons do not belong on the upholstery, and urgent prophecies can wait until after breakfast.
Each autumn, Ilin hosts the Quiet Supper. No speeches. No quests. No ancient rivalries unfolding over the bread basket. Just soup, fresh bread, and the sound of the little waterfall beneath the terrace.
This year, however, the valley's poet has announced that he will perform a new work called The Seventeen Sorrows of the Falling Leaf.
It has seventeen verses per sorrow.

Ilin responds by moving the poet's chair beside the waterfall, where the louder rush of water makes extended performances pleasantly difficult to hear. The poet mistakes this for an honor and immediately begins composing an eighteenth sorrow about acoustics.
By sunset, the guests are gathered inside, the soup is warm, and the pavilion's windows shine against the darkening cliffs. Ilin settles onto the cushioned bench by the great doorway and allows herself a small smile.
That bench is the visible detail to look for in the image. In this little story, it's the most desirable seat in the valley: close to supper, far from the recital, and absolutely unavailable for meetings about destiny.

A Guided Tour of the Build
A roofline worth looking up for
The blue-gray roofs rise in different heights, balancing the taller left pavilion against the projecting tower on the right. Small dormer windows interrupt the tiled surfaces. Gold-colored edging and ornate finials pull the eye upward, while rounded ornaments add a slightly storybook extravagance. The effect feels related to Rivendell without presenting itself as an exact replica of a particular screen location.

Architecture with room to breathe
Cream-colored columns frame open porches and tall pointed openings. Branching tracery spreads between them, particularly around the central doorway. Some lines suggest stems; others form intersecting arches. The dark openings behind this pale framework are essential. They give the lace-like details enough contrast to read clearly.

The inhabited edge
The broad steps at the right lead onto a terrace furnished with seating and planted urns. Through the openings, warm light picks out shelves and furniture. I like that the grand architecture includes somewhere to sit down. A beautiful fantasy house becomes much more appealing when it appears to understand tired feet.

A valley on a plinth
At the front left, a small cascade runs between boulders into a shallow channel. Mossy ground, clipped-looking evergreens, and orange-red foliage stitch the building into its rocky setting. The straight, dark plinth frames the composition and makes its miniature presentation clear. Beyond it, enormous cliffs and waterfalls form the surrounding visual setting; a practical recreation can suggest that distant landscape with a backdrop instead of building an entire mountain range.

Inspirations — From the Big World to the Small
Rivendell supplies the emotional starting point for me: beauty, shelter, and a pause between journeys. The pavilion's individual details also offer useful connections to real architecture.

The gallery at Monserrate Palace, in Sintra, provides a lovely comparison for its repeated columns, decorative arches, and nature-inspired ornament. The palace's own interpretation describes leaves, stems, birds, and flowers appearing throughout the house. For a miniature, the useful lesson is repetition: a few related curves can connect doors, railings, and roof brackets into one coherent design.
Victor Horta offers another point of reference. UNESCO describes the open planning, diffusion of light, and curved decoration integrated with structure in his major Brussels town houses, including his house and workshop. For a miniature, that suggests a useful principle: let the branching ornament reinforce the shape of an opening rather than hide it.

These are visual comparisons, rather than claims about the illustration's actual design sources. I would borrow their sense of rhythm, then keep the pavilion's palette restrained: warm ivory, weathered blue-gray, touches of gold, and autumn foliage. If elaborate roof silhouettes appeal to you, my Peacock Roof Penthouse miniature explores another playful meeting of ornament and architecture.
Artist Tips — Make Your Own Magic
You can approach this as a series of small, manageable assemblies: landscape, terrace, pavilion shell, roofs, and decorative screens. Build a single porch first if the full complex feels ambitious.
A friendly note before the cutting begins: the illustrations here are AI-generated, and this guide is an inspired construction approach rather than a tested, exact reproduction. Results vary, and a particularly enthusiastic arch may need a real support even if its illustrated cousin seems perfectly happy floating.

Gather your supplies
Use clean household materials where they suit the job, and buy specialist materials only where they improve control. Keep the decorative pieces separate from the parts carrying the building's weight.
Base and terrain: Reuse a sound wooden offcut, sturdy packaging card, and clean cork scraps. A rigid plywood base and XPS scenery foam are useful alternatives for a larger scene. Add foam-compatible adhesive, lightweight filler, and water-based paint. Avoid unidentified insulation or treated demolition scraps.
Architecture and ornament: Reuse thin cereal-box card, clean coffee stirrers, and suitable clear packaging. Basswood strips, chipboard, styrene sheet, and acetate provide more predictable thicknesses. Add a sharp craft knife, cutting mat, metal ruler, fine files, tweezers, and suitable glue.
Surface finishes: Crumpled kitchen foil can stamp stone texture; an old stiff brush can stipple it. Use acrylic paints in ivory, gray, umber, muted blue-green, and a restrained metallic gold, with matte and gloss finishes kept for different surfaces.
Water and planting: Use clean, fully dry twigs for small tree experiments, or wire armatures with fine scenic foliage or miniature paper leaves. A pourable scenic-water product and a separate waterfall-effects gel are optional purchases. A clear plastic stream surface offers a simpler alternative to poured water.
Finishing touches: Fabric scraps become cushions, layered card becomes books, and a ready-made low-voltage LED kit supplies illumination. Check the dimensions of any purchased furniture or decorative doors against your chosen scale before ordering.

1. Plan your Rivendell-inspired miniature: scale and major forms
For a detailed shelf display, consider 1:48 as a planning option; the actual scale of the illustration isn't known. At that scale, a six-foot person is about 38 mm tall, and a seven-foot doorway is about 44 mm high. Those two paper templates help keep stairs, seats, and railings consistent.
Sketch the footprint on scrap card. Put the small stream toward the front left and the main stair approach on the right. Mock up the building with plain boxes and paper cones before cutting final parts. Leave space between columns for the view into the interior.
Use a removable roof or rear panel so you can reach the lights later. Resolve that access now, before a beautiful turret becomes a permanently sealed battery container.

2. Shape the terrain around a convincing water route
Attach layers of scenery foam or cork to a rigid base, leaving a clear recess for the stream. Use the layers to establish the terrace height and two small waterfall drops. Water should have a continuous downhill route, with space to collect beneath each drop.
Cut foam with controlled shallow knife passes on a protected surface. Avoid hot-wire cutting and solvent sprays for this approach. Use products specifically compatible with your foam; a coat of paint is not a guarantee against solvent damage.
Break straight contours with irregular rock shelves. Fix the larger masses first, then blend joints with lightweight filler. Let adhesives and filler dry according to their instructions before carving fine details or painting.

3. Build the terrace, stairs, and load-bearing shell
Make the terrace as a stiff platform with supports beneath it. Assemble its stone-looking skirt separately so it conceals the structure without carrying it. Build the broad right-hand steps from repeated layers of card or foam, keeping each riser and tread consistent.
Construct the pavilion as a central rectangular room with smaller projecting polygonal bays. A six- or eight-sided bay is easier to build accurately than a perfectly curved wall. Draw one full-size panel template and repeat it.
Cut doors and windows while the wall panels are flat. Reinforce corners inside with basswood strips and provide solid beams beneath roof edges. The delicate ornamental arches come later, after the shell stands firmly on its own. Allow the assembly to set square before adding roofs.

4. Turn simple roof forms into an intricate silhouette
Make each roof as its own removable module. Draw a paper cone or a set of triangular roof panels, test the fit, then transfer the pattern to card. For the gently sweeping lower edges, use narrow curved ribs supporting a thin card skin; avoid forcing thick card into a curve that wants to spring apart.
Add dormers as small boxes with triangular fronts. Cut their roof openings before applying tiles. Overlap thin card shingles from the eaves upward, staggering the joints and making the courses progressively smaller toward the peak.
Use a pin or dowel as a finial's supporting core, with light beads and thin decorative shapes added around it. Keep heavy ornaments off slender roof tips. Prime and paint each module separately, then fit it only after the finish is dry.

5. Make tracery as repeatable flat panels
Draw a pointed arch on paper and add a branching pattern within it. Start with one central stem and a few mirrored offshoots. Keep open spaces generous; tiny enclosed holes disappear quickly under primer and paint.
Cut the pattern from thin card or styrene on a mat, using several light passes instead of forcing a blade through in one stroke. For a stronger panel, laminate two matching layers with an appropriate adhesive and let them dry flat under a clean board. Test the glue on an offcut first.
An easier version uses a solid pointed frame with just three internal branches. Paint it ivory and position it against a dark interior or clear glazing. Repeat the same motif in balcony panels and smaller windows. That shared pattern creates complexity without requiring every opening to become a new design project.

6. Give the stone two distinct personalities
Use orderly, shallow joints for the terrace masonry and irregular fractured surfaces for the surrounding boulders. Scribe masonry into a suitable foam or thin modeling layer with a blunt tool. Press crumpled foil lightly into broad areas for a finer texture; crushing every surface equally makes the building look eroded.
Paint the architectural stone a warm pale gray, then vary a few blocks with ivory and muted beige. Apply a thin gray-brown wash selectively to joints, followed by a restrained pale drybrush after it dries.
For rocks, start darker and use cooler grays mixed with brown. Keep the undersides deepest in value, and catch upper edges with lighter paint. Add small green stains near the future stream. Let the coatings dry fully before adding water or foliage.

7. Paint the roofs and establish the warm interiors
Base-coat the roofs in muted blue-gray. Vary individual shingles with slightly greener, darker, or paler mixtures, then drybrush sparingly across their raised edges. Use metallic gold on selected ridges and finial details rather than outlining every tile.

Paint interior surfaces before installing glazing. A few shallow shelves, book spines, and a warm wall color create depth through the windows without requiring fully furnished hidden rooms.
Test a ready-made low-voltage LED kit on the bench before fitting it. Follow its voltage and power instructions, keep the power supply accessible, and route wires away from the water feature. Use manufacturer-compatible diffusion where needed. Avoid improvised mains wiring and burying batteries beneath permanently glued terrain.

8. Create the stream before adding the waterfall
Paint the streambed first: lighter stony edges, darker muted green-brown pockets, and a few visible pebbles. Avoid an even bright-blue stripe. Seal the basin with a compatible system and test for gaps before introducing any pourable medium.
For an uncomplicated surface, cut clear plastic to the stream outline and fix it above the painted bed, hiding its edges beneath stones. Add only a compatible texture medium on top after a scrap test.
Alternatively, use a scenery-water product exactly as its manufacturer directs, including its maximum layer depth and drying requirements. Different products behave differently. Keep the base level, protect it from dust, and let every layer reach the required state before continuing. Small clear areas between rocks will sell the illusion more effectively than a deep, oversized pool.

9. Form a small waterfall with clear falling strands
A separate waterfall medium gives you control over the vertical drop. Woodland Scenics' Water Effects instructions describe shaping it on freezer paper or a non-stick pan, allowing it to dry clear, then peeling it away and attaching it with the same product. Follow the current instructions for your exact medium rather than assuming every clear gel releases from the same surface.
Shape narrow, slightly irregular streaks that follow gravity. Fit the dried piece from the upper lip into the lower pool and conceal the joins with compatible effects material. Add very little white to the impact zone and the most turbulent ridges. Leave most of the falling sheet translucent.
Keep this foreground cascade modest, as in the reference. The huge distant falls can remain in the backdrop. You get the atmosphere without trying to fit an entire river system beside the sofa.

10. Plant autumn around the architecture
Build trees from tapered wire branches or suitably fine twigs, leaving visible air between the limbs. Cover wire trunks with a thin compatible modeling layer, let it dry, and paint the bark gray-brown before attaching foliage.
Group leaf colors by tree and branch: golden yellow on the left, orange-red toward the right, with dark evergreen shapes near the stone. Use fine scenic leaf material rather than thick clumps that conceal the branch structure.

Concentrate moss around damp rock crevices and stream margins. Keep terrace paving more restrained so the steps remain readable. A few fallen leaves on the roof and path suggest autumn without burying all that careful work. For another approach to wet stone and seasonal planting, see my Japanese autumn railway station diorama.

11. Furnish a place someone would stay
Make the central bench from thin wood or sturdy card, then add cushions covered in fine fabric. Keep seams and padding small enough for your chosen scale. Place a couple of planted urns beside the entrance, leaving a clear route through the doors.
Add books or a small tray where they can actually be seen. If you want a Tiny Tale Easter egg, place a tiny folded recital program on the bench; that would be your own addition, rather than a detail already present in the illustration.
A purchased fireplace or garden seat can inspire a separate interior or larger-scale version. Measure it first. A beautiful 1:12 accessory would overwhelm a 1:48 pavilion, however persuasive its tiny upholstery might be.

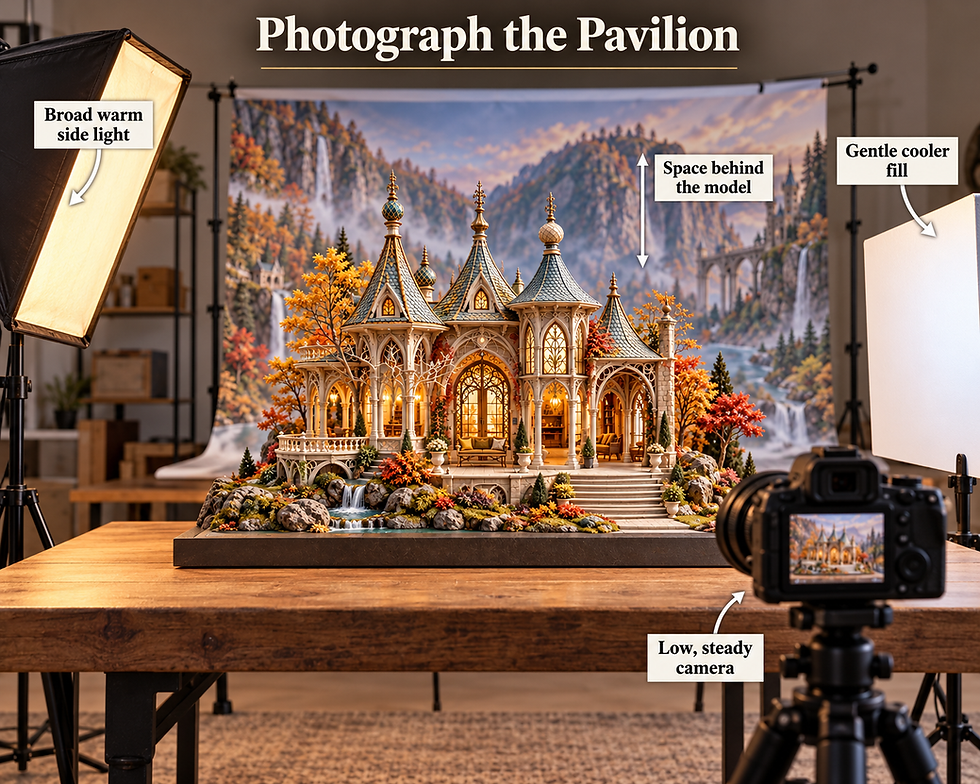
12. Photograph the pavilion as a small sanctuary
Position the camera low enough to see through the arches, while leaving a little of the plinth visible. Use a softly lit mountain backdrop with space between it and the model so it falls out of focus.
Set one broad warm light to the side, then use a gentler cooler fill to separate the roofs from the background. Lower the interior light level if the windows turn into blank yellow rectangles. Shift the light or camera until the stream catches a narrow reflection.
Take one overall view and close-ups of the tracery, stone, cascade, and bench. A steady support and timer help preserve those fine details. Check the photographs for visible wires, shiny glue, and foliage hiding your best window before calling the scene finished.
Troubleshooting the enchanted valley
Tracery disappears: Simplify the pattern, keep paint thin, and darken the space behind it.
Roof panels lift: Improve the internal ribs and seams before applying more shingles; let glued modules set fully.
Stone looks chalky: Introduce subtle block variation and selective shadow, keeping drybrushing light.
Water stays cloudy: Allow the product's full drying period and check layer thickness; avoid sealing uncured material beneath another coat.
The waterfall looks white and solid: Reduce the foam effect and retain clear sections between the strongest highlights.
The scene feels crowded: Remove some accessories and foliage until the main doorway, stairs, and water route are clear again.
Closing — Until Next Time in the Small World
What draws me back to this scene is the promise of somewhere peaceful at the end of a journey. My father opened the door to that kind of imaginative world when he introduced me to The Hobbit. Years later, sharing The Wheel of Time with him let me open another door in return.
This little pavilion brings that feeling into miniature: a welcoming light, a place to sit, and enough water nearby to discourage a very long poem.
Which detail would you build first: the branching tracery, the autumn trees, or the waterfall beneath the terrace? Share your own fantasy sanctuaries with #smallworldminiatures. You can find more inspiration and the newsletter signup at Small World Miniatures, or explore the online shop for miniature finds.
I'll be claiming the bench. Ilin has assured me there are no prophecies scheduled this evening.








Comments