


Retro Apocalypse: Miniature Diorama Inspired by Fallout and 1950s Nuclear Chic
- Oct 30, 2024
- 8 min read
Updated: Nov 15, 2025

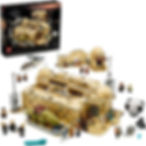
Ah, the smell of canned beans, recycled air, and the faint hum of radiation—home sweet home! This exquisite miniature diorama transports you straight into a 1950s-inspired, post-apocalyptic bunker, heavily reminiscent of the Fallout game series. With its rusted metal panels, tangled wires, glowing amber lights, and survival crates scattered like forgotten dreams, this piece radiates (pun intended) charm. If you’ve ever wanted to know what mid-century optimism mixed with nuclear fallout looks like, this is it. Welcome to a world where time stopped ticking but the coffee pot keeps brewing!
Before we dive into the nitty-gritty of this scene, a heads-up: This image would lose a lot of its depth and detail if you just tried to download and print it on your office printer. Trust me, those delicate rust stains and peeling posters deserve better. If you want a high-quality print of this masterpiece on canvas, you can order it right here—and best of all, shipping is FREE within the U.S.! Now, let’s explore the backstory of this delightful dystopia. https://www.smallworldminiatures.com/product-page/post-apocalyptic-fallout-shelter-diorama-canvas-print

A Bunker with a Backstory
Meet “Rad Ralph’s Refuge,” a cozy hideout for survivors of the Great Atomic Ruckus of 1957. After "The Big Boom," Ralph—once a mild-mannered appliance salesman—decided that if he had to live underground for the rest of his life, he might as well do it in style. Armed with a stockpile of vintage appliances and a deep love for canned peaches, he turned this bunker into a halfway home for wandering vault dwellers. The mismatched mugs on the table? Ralph calls them "community-building tools." Visitors leave behind old cans or useless trinkets, adding to the eclectic decor. His motto: If we’re gonna glow, we might as well glow with charm.

And oh, that door with the radiation symbol? It creaks just enough to make visitors reconsider staying too long. But hey, if you can look past the peeling paint, cobbled-together tech consoles, and questionable canned food shelf, you’ll find the place downright cozy—if a little radioactive.

The Design: Nostalgia with a Decay Filter
This diorama marries two worlds: the hopeful futurism of 1950s design with the grim decay of a post-apocalyptic setting. You can almost hear the tinny sound of a forgotten doo-wop song playing faintly from a busted radio on the shelf. The color palette is dominated by mustard yellows, military greens, and rusty browns—an evocative combination that perfectly captures both optimism and survival. The glowing amber lights add warmth to an otherwise cold, metallic interior, giving the whole space a strangely inviting vibe.
Notice the worn-out tablecloth with frayed edges? That’s a brilliant touch of realism. And the clutter—oh, the clutter! Each crate, tool, and poster adds layers of storytelling. Even the smallest items tell a story, like the bottle of orange juice sitting out, because Ralph believes in starting each nuclear day with a healthy breakfast.
The design draws inspiration from Fallout’s retro-futuristic aesthetic, which imagines what the world would look like if the future evolved from the 1950s—but with radiation storms instead of flying cars. You might also detect hints of films like The Road and Mad Max in the weathered textures and survivalist touches. It's a setting that feels oddly familiar yet utterly alien—equal parts nostalgia and nightmare.

Make Your Own Magic
If you’ve ever wanted to bottle that cozy-apocalypse vibe (mugs of mystery orange juice and all), here’s how to build a 1950s fallout-shelter diorama inspired by Fallout’s retro-futurism. Quick wins first, then the step-by-step deep dive.
Quick Wins
Instant rust: Mix matte Mod Podge + cinnamon + a pinch of black pigment; stipple, then mist with isopropyl alcohol for crusty edges.
Aging paper posters: Print at 60–70% opacity on matte paper, rub with brewed tea, crumple, flatten, and edge with a tan pencil.
Milk-jug magic: Diffuse harsh LEDs with squares cut from a milk jug to get that warm bunker glow.
Hairspray chipping: Basecoat metal in dark steel, hairspray, topcoat olive drab, then chip with a damp brush.
Floor filth fast: Brush on a thin slurry of talc + gray pastel dust + matte varnish; push it into corners with an old makeup brush.

The Deep Dive (step-by-step)
Scale notes: Works in 1:12, 1:16, 1:24, or 1:35. When I say “1 inch pipe,” scale it: 1:12 ≈ 2.1 mm styrene rod; 1:24 ≈ 1.1 mm; 1:35 ≈ 0.7 mm.
1) Plan the pit
Sketch a U-shaped floor plan: control consoles left, blast door center, canteen table right. Foamcore or 6 mm MDF base. Scribe plank seams and floor grates with a hobby saw; for the central grate, laminate two layers of cardstock at 90° and frame with 2 mm strip.

2) Curve the vault ceiling
Heat-form 3–5 mm XPS foam over a jar to get that tubular vault arch. Glue ribs (strip styrene) every 2–3 cm. Texture by rolling crumpled foil, then nick with a wire brush. Prime with rattle-can gray.

3) Build the blast door (hero piece)
Laminate two sheets of 2 mm PVC/foamboard. Add a raised rim and hinges from strip styrene; punch “bolts” with a leather punch from plastic sheet. Cut a stencil of the radiation trefoil from masking tape; airbrush or hand-paint it slightly off-center so it feels hand-applied by a nervous technician in 1959. Add a little slot window from clear acetate fogged with 1000-grit sanding.

4) Pipes, conduits, and cabling
Pipes: Styrene rod and drinking straws with collar rings punched from paper. Heat-bend gently.
Conduits: Twisted bell wire and old headphone cords; secure with “brackets” (U-shaped paperclips).
Junction boxes: Tiny wood blocks or 3D-printed cubes; face them with punched discs for screws.
Route left to right; let runs overlap and “disappear” behind panels to imply a bigger system.

5) Retro consoles & utility boxes
Kitbash from:
Dead calculator keypads (for chunky buttons),
Watch gears (for meters),
Bottle caps (as pressure housings),
Altoids-tin lids (as panel doors).
Faceplates are 0.5 mm styrene scored with panel lines. Add labels with micro printouts: “Aux Pump,” “Geiger,” “Don’t Touch (Larry).”

6) The canteen cluster (right side)
Scratch-build a round table from a wood disk and a brass tube pedestal. Chairs: balsa or 3D prints with slightly bent legs—this shelter isn’t OSHA-approved. Tablecloth = finely woven cotton torn along the grain, tea-stained, then stiffened with diluted PVA so it drapes and stays put.

Orange drink: UV-resin tinted with a drop of transparent orange ink in 1:12 cups (or cut clear sprue for smaller scales). Freeze bubbles with a quick blast of compressed air for “not-from-concentrate” authenticity.

7) Storage crates & soft gear
Ammo boxes are tiny rectangles of basswood with photo-etched or card hinges. For padded seat cushions, wrap foam offcuts in tissue soaked with diluted PVA, then paint canvas-khaki. Add chalky dust fingerprints on top edges.

8) Surface prep & base colors
Spray all “metal” parts in dark iron (black + a touch of silver).
Mask a few panels with liquid mask for later paint lifts.
Airbrush olive drab, pea green, and industrial gray in irregular panels; hit door and fridge units with slightly different tones so nothing is too matchy.

9) Chipping & scratches (1950s neglect)
Do the hairspray method: hairspray over the metal base, topcoat color, then scrub edges with a damp stiff brush and toothpick. Add directional scratches around latches, bolts, and along footpaths with a silver pencil. Keep the inner door rim heavily chipped—hands, boots, panic.

10) Rust mapping
Stipple a tri-mix: burnt sienna, orange oxide, and a touch of violet. Deepen pits with dark brown oil paint (Van Dyke brown) placed as tiny dots, then feather downward with odorless thinner to form rust streaks. Add “sweaty” halos around bolts.

11) Grease, soot, and grime
Oil filters: Dot filtering with blue-gray and green oils to modulate big surfaces.
Soot: Airbrush very thin black around ceiling vents and lamp cages.
Grease: Satin varnish + black oil around hinges and pipe unions; pull with a micro-cotton swab for drips.

12) Posters, labels, and ephemera
Design era-appropriate civil-defense posters at 300 dpi, shrink to scale, and print on matte paper. Age with tea, dry, then rub edges with 400-grit to reveal “paper fibers.” Glue with PVA; press with a silicone shaper to follow ribbed walls. Add crooked tape corners from tiny slivers of masking tape toned with a tan wash.

13) Lighting the mood (warm + flicker)
General glow: 2700–3000 K warm white pico LEDs under milk-jug diffusers for ceiling panels.
Task lamps: 3 mm yellow LEDs inside bead “shades” on the right wall; paint the interior of shades chrome for punch.
Flicker trick: Put one LED on a candle-flicker module near the “fluorescent” center light so it feels like power is failing.
Wiring: Run all wires in a hidden trench behind the back wall to a 3 V coin cell or 5 V USB pack; add a 220–330 Ω resistor per LED if using 5 V. Label the switch “Stay Calm.”

14) Floor filth & fallout fluff
Make a dust soup: talc + light gray and umber pastels + matte medium. Stipple, then blow gently to settle ash into corners and grate squares. Drop a few fibers of jute twine for abandoned mop strings. Add torn “lead-line” rags (tissue painted slate gray) near the door threshold.

15) Micro-stories (a.k.a. the Easter eggs)
A single bobby pin on the console (hello, lockpicking).
A tally of days on the wall scratched with a needle.
A mug ring on the tablecloth—stamp with a damp paint bottle cap.
“Property of Vault…ish” stenciled crookedly on a crate.
These little winks make viewers linger.

16) Color harmony pass
With everything in, glaze thin filters (acrylic or oil) to unify:
Left tech bay: cool blue-gray filter (muted, machine-like).
Center door: olive filter (military).
Right canteen: warm sepia filter (human warmth).
This keeps the eye moving left-to-right like a story.
17) Final matte vs. selective sheen
Seal with ultra-matte varnish. Then spot-gloss:
Coffee cups, orange drink, greasy hinges, and glass meters.
Keep posters and cloth dead-flat so the shiny bits pop.

18) Photograph like the wasteland
Kill room lights; shoot with just the model LEDs plus a dim fill card. Use a long exposure and a black or deep-gray backdrop. White balance slightly warm (+300–500 K) so the scene feels lived-in, not icy.

Troubleshooting & Pro Tips
Too much rust? Knock it back with a thin green-gray filter; real rust rarely covers evenly.
LED hotspots: Add another layer of milk-jug plastic or a slip of parchment paper behind the grate.
Flat paint job: Break up big areas with hand-painted serial numbers, stencils, or chalk tally marks.
Pipes look plastic: Dust them with graphite powder at the end and buff lightly—instant cold steel.
Mini Shopping List (condensed)
XPS foam, foamcore or MDF; styrene rods/strips; assorted wires; basswood; tissue & cotton scrap; matte photo paper; warm white/yellow pico LEDs + resistor + flicker board; acrylics (olive drab, industrial gray, mustard, rust tones), oils (raw umber, blue-gray, Van Dyke brown); hairspray or chipping medium; talc + pastels; ultra-matte and satin varnish; UV resin + orange ink; milk-jug plastic; CA glue + PVA.

Build slow, layer stories, and let entropy be your art director. When the door finally looks like it’s squeaked shut a thousand times, you’ll know you’ve nailed that 1950s-meets-Fallout bunker charm.
From the Big World to the Small
This bunker wears big-world DNA on its sleeve: Cheyenne Mountain–style blast doors (all rivets and trefoil attitude) shrink to palm size, while a hint of the Greenbrier Bunker gives us that sociable canteen—enamel mugs, bad coffee, good gossip. The surface language nods to Raymond Loewy and Henry Dreyfuss—rounded corners, friendly toggles, candy buttons—washed in a Googie/Space Age palette: machine greens and grays softened by mustard lamps and mint cabinets.

In miniature, we stand on particular shoulders: Martin “Night Shift” Kovac for layered chipping and oil-dot streaks; Ken Hamilton and Black Magic Craft for kitbash greebles from dead gadgets and XPS; Michael Paul Smith’s Elgin Park for that one warm bulb that turns steel into a story. The shared style DNA is simple: ribbed vault ceilings, riveted sheet metal (punched plastic discs), Bakelite-like knobs (painted beads), enamel finishes, blocky labels, and crooked warning stencils.
Why it matters: this look captures the Atomic Age tug-of-war between optimism and dread—and Fallout turns that tension into narrative. To translate it small, we thicken the door, oversize the knobs, simplify cable runs, and push contrast with targeted chips, rust streaks, and tea-aged posters, then swap fluorescent glare for a warm LED wash. Same engineering bones, friendlier curves—tuned for how minis read across a room.
#smallworldminiatures #miniatureart #miniaturephotography #diorama #scalemodel #scalemodeling #scratchbuilt #kitbash #kitbashing #atompunk #retrofuturism #postapocalyptic #falloutshelter #Fallout #FalloutFanArt #1950sdesign #midcenturymodern #coldwar #weathering #rusteffects #ledlighting #dollhouseminiatures #modelmaking #craftyourfandom #hobbyphotography #xpsfoam #styrene #greebles #tabletopterrain #makersgonnamake