
Nook Miles & Terracotta Smiles: A Cozy Civic Office Diorama from Animal Crossing: New Horizons
- Aug 19, 2025
- 7 min read
Updated: Aug 22, 2025

First Impressions in Miniature
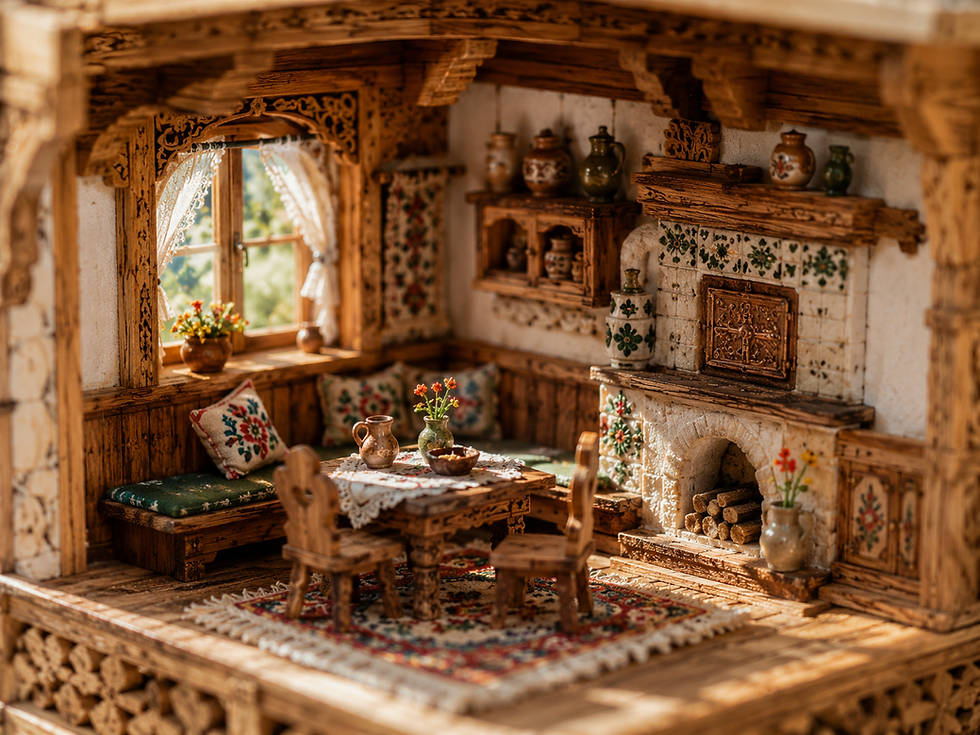
Welcome to the most charming municipal room you’ll ever want to shrink into—our miniature of the Animal Crossing: New Horizons Resident Services interior. Think arched dollhouse windows, a miniature office counter with a classic landline (because Isabel—er—somebody still calls), an eco-green miniature ATM, and a floor of miniature terra-cotta tile that looks warm enough to toast tiny marshmallows. The palette is all honeyed wood tones and clay oranges, punctuated by leaf-green accents and the soft glow of evening—like a town hall built by a kindly raccoon with impeccable taste. Quiet textures do the heavy lifting: beadboard wainscoting, matte cabinet fronts, smooth stoneware planters, even a demure recycling bin. It’s tidy, reassuring, and gleefully game-accurate—an Animal Crossing Resident Services miniature diorama that makes you want to pay off a loan you don’t have.
Why This Photo Needs the VIP Treatment
Screens are great for scrolling, but they compress detail. This image is optimized for web viewing—perfect for blogs, not for big wall moments. If you download and print it yourself, those crisp tile grout lines and file-box labels can turn mushy. Treat your walls right: order a professional high-resolution canvas print for gallery-worthy sharpness and color fidelity. We offer FREE U.S. shipping, because bells are for building bridges and inclines, not postage. https://www.smallworldminiatures.com/product-page/cozy-island-civic-office-miniature-diorama-canvas-print-acnh-inspired

The Tiny Tale — Resident Services, For Real
In Animal Crossing: New Horizons, Resident Services is your island’s civic heart. It begins as a tent, staffed by Tom Nook (with Timmy and Tommy early on), and includes a DIY workbench, a recycle box, and the Nook Stop terminal for Nook Miles and shopping. It’s where your first crafting lessons happen and where the daily rhythm of island life quietly starts.
As your island grows, Resident Services upgrades from a tent to a permanent building once you’ve attracted enough residents. With the upgrade comes Isabelle, who takes over daily announcements and handles civic “vibes”—think evaluations and public-facing options—while Tom Nook focuses on infrastructure.
Inside the completed building, you’ll still find the Nook Stop (with ABD banking, Miles redemptions, and Nook Shopping) plus that handy recycle box for stray items. The desk duo splits responsibilities:
Tom Nook: bridges and inclines, plots and major construction—the nuts-and-bolts of island development.
Isabelle: Island Evaluation (your path to 3–5 stars), the island tune and flag, and since Version 2.0, the ability to set ordinances (Beautiful Island, Early Bird, Night Owl, Bell Boom) to shape your schedule and economy.
A fun, game-accurate “spot it” detail in our model: the recycle box on the left side—exactly where it lives in the real Resident Services building. In other words, this cozy room isn’t just cute; it’s a tiny, functional snapshot of your in-game HQ.
A Guided Tour of the Build
Left wall: We start at the arched window, its frame a soft chestnut that echoes the beadboard running along the lower wall. Nestled beneath it: a two-tone recycling bin whose rounded lid breaks up all the rectilinear order. A small potted plant softens the corner—just enough foliage to suggest someone here cares about oxygen.

Back-left corner: A shelving unit and stacked archive boxes climb neatly toward the ceiling. Note the alternating widths and quiet shadow gaps; these little variations keep the composition from feeling toy-flat. Next to the shelves sits the combo printer/fax/copier (remember faxes?), rendered in pale gray with a satin finish so it reads as plastic, not metal.
Center stage: The long service counter anchors the room, its stepped base giving it miniature gravitas. On top: a blotter, a classic push-button telephone, a tidy notebook stack, and a sprightly desk plant. Two upholstered stools with rounded legs tuck under the front—blue seats chosen specifically to cool the warm spectrum of all that wood and clay.

Back wall: A simple flush door promises a staff lounge stacked with unfiled paperwork and unclaimed fossils. The notice board to its right waits for your imaginary flyers. Beside it: a compact sideboard with a flip-open laptop (shh—low battery).
Right wall: A second arched window rhymes with the first. And in the spotlight: the green Eco-Leaf ATM—our friendly neighborhood bell dispenser—its soft bevels and chunky buttons screaming “press me!” without actually screaming.

Floor: The terracotta tile grid ties everything together, a warm stage with deliberate grout lines that recede just enough to imply scale without shouting at it.
Make Your Own Magic:
From the Big World to the Small
While the diorama’s DNA is unmistakably Animal Crossing, its aesthetic lineage taps into the Arts & Crafts love of honest wood and joinery (think Greene & Greene’s warm wainscoting), the Scandinavian modern affection for calm, functional spaces (hello, Alvar Aalto’s friendly curves), and the Mediterranean romance of terracotta tile under soft light. Those arched windows could have strolled out of a modest civic building in an old-world plaza, then stopped to pet the village dog.
In the miniature world, it nods to the precision and material clarity of Mulvany & Rogers interiors (scaled woodwork that feels real), the approachable playfulness of Re-ment accessory design (chunky, readable forms with crisp color blocks), and the hyper-neat finish you’ll see in N-scale Japanese dioramas, where edges are softened just enough to look lived in.

The shared style DNA is clear: rounded profiles, friendly proportions, natural wood tones, and color pops in utility objects (the ATM, notebooks, recycle bin). Why it matters: this blend balances warmth and order—modern civics with a beating heart—which is why Resident Services feels like a place you might actually enjoy waiting for a permit. How it translates to miniature: we simplify profiles (fewer bevels, bigger radii), exaggerate contrasts (tile-to-grout, wood-to-plastic), and swap materials (styrene for ABS, basswood for oak) so details read clearly at small scale without visual noise.
Quick Wins
Color-match first. Pick three hero colors (honey wood, terracotta, leaf green) and pre-mix them in small dropper bottles for consistency.
Round the edges. Lightly chamfer furniture edges with 600–800 grit sandpaper—kawaii proportions love soft corners.
Vellum windows. Back arched windows with vellum or baking paper for instant frosted glass.
Label love. Print micro labels (6–8 pt) on matte sticker paper; one crooked label = instant story.
2700K lighting. Warm LEDs give that cozy “evening at Resident Services” glow.

Step-by-Step Build Guide
Base & Walls
Cut a rigid base from 5–6 mm MDF or foam board. Scribe a shallow rabbet around the edges if you want that framed diorama look.
Walls: 3 mm foam board skinned with 1 mm cardstock for crisp edges. Score panel lines for the wainscoting, then add a cap rail from 2 × 4 mm basswood strip.

Terracotta Tile Floor
Prime the base with gray acrylic.
Lay a tile grid using 1 mm automotive masking tape or a laser-cut stencil.
Paint tiles with a warm mix: burnt sienna + a touch of yellow ochre + a dot of rose. Vary 10–15% of tiles with slightly different tints for life.
Peel tape; wash the whole floor with very thin Payne’s gray to settle into grout lines. Finish with satin varnish.

Arched Windows
Print a template; laminate two layers of 0.5 mm styrene, cutting the arch with a sharp #11 blade and sanding smooth.
Add muntins from 0.5 × 1 mm strip. Paint in your wood tone (raw sienna + burnt umber, glazed with transparent orange).
Back with translucent vellum; add a tiny spacer so it sits 1 mm off the wall for shadow depth.

Beadboard & Wood Tones
For beadboard, score 1 mm vertical grooves into cardstock every 3 mm.
Wood finish: base with raw sienna; glaze with thin burnt umber; dry-brush with buff titanium along edges for wear. Seal with satin.

Service Counter & Stools
Counter carcass: foam board box skinned with 1 mm basswood. Add a plinth to ground it.
Top: 1.5 mm basswood, edge rounded with sandpaper.
Stools: Turn from dowel or build from stackable rings of cardstock; pad the seat with 2 mm craft foam; wrap in painted paper “vinyl.” A final satin coat sells the faux leather.

Office Props
Telephone: build from polymer clay or 3D print; gloss the buttons, satin the body.
Notebooks: laminated cardstock with colored spines; add 0.3 mm thread for bookmark tails.
Printer: boxy styrene, panel seams engraved with a scribing tool. Use semi-gloss clear to mimic ABS plastic.
Isabelle's small terracotta pot with a a small flower and glass misting bottle.

Shelves & Archive Boxes
Shelf frame from 2 × 4 mm basswood; shelves are 1 mm sheet.
Boxes: cardstock cubes with separate lids. Dust the top edges with pastel chalk to suggest handling. One slightly skewed lid creates instant realism.

Eco-Leaf ATM (Hero Prop)
Body: laminate two layers of 1 mm styrene; round edges with files.
Screen: glossy photo paper.
Buttons: slice of 1.5 mm styrene rod for the dial; squares from 0.5 mm strip.
Paint: base green (sap green + a touch of phthalo); highlight with a lighter mix on front planes; decal the leaf logo; finish with satin. A tiny pinhead of silver paint on each button makes them “click.”

Lighting
Warm 2700–3000K LED strip hidden in a ceiling lip. Add a 1–2 mm overhang to hide the source.
For photos, bounce a soft light off white foam board placed “outside” the windows for moonlit diffusion.

Game-Accurate Color Calibration
Screenshot the Resident Services interior and use a color picker to match key hues. Adjust paints with small drops of primary colors until the match is satisfying. Keep swatches—future-you will thank you.

Micro-Weathering (Keep It Friendly)
A gentle edge dry-brush with buff on corners; a satin-to-matte variation between plastics and woods; a single coffee ring made with diluted burnt umber and a 6 mm metal washer. Cheerful realism, not grime.

Finishing Touch: Story Labels
Print micro labels (6–8 pt) like “Loan Ledger,” “Turnips Report,” and “Lost & Found.” Apply slightly off-square with tweezers. Tiny imperfection, big story.

Until Next Time in the Small World
If you need me, I’ll be in Resident Services filling out a form that probably asks whether “Prickleton III” qualifies for health benefits. What detail caught your eye—the leaf-green ATM, the blue-topped stools, or that suspicious coffee ring? Tell us in the comments, share your own builds with #smallworldminiatures, and don’t forget to subscribe to our newsletter (sign-up box below) for new diorama tours, tutorials, and occasional civic gossip.
Hashtags
#animalcrossingminiature #animalcrossingnewhorizons #residentservices #miniaturediorama #dollhouseinterior #miniaturefurniture #scaleModel #terracottatile #miniaturewindows #dollhousewoodwork #kawaiiinterior #tabletopscenery #crafttutorial #miniatureprops #dioramabuild #acnh #nintendofanart #miniaturelighting #foamboardbuilds #basswood #styrenebuilds #rementinspired #archwindows #cozyinterior #tinyplants #modelmaking #makersgonnamake #handmadeinminiature #smallworldminiatures


Comments