



A Bottle of Borrowed Moonlight: A Gothic Miniature Potion Stand

First Impressions in Miniature
Some shops advertise with a modest sign. This gothic miniature potion stand has apparently commissioned a stained-glass crown and half the street’s lighting budget. I approve. The dark roof keeps the silhouette grounded while the bottles below turn the counter into a small, very questionable rainbow.
I love the contrast between the sober architecture and those cheerful ingredients. Blue, amber and violet vessels crowd an ornate curved counter, with flowers spilling around the steps. It feels welcoming enough to browse, provided you resist drinking anything labeled only with an attractive cork.
The purchased alternatives below use Amazon affiliate links; if you buy through them, it helps fund this tiny world. As an Amazon Associate I earn from qualifying purchases.

For an inspired version, start with the bottle collection and work outward. A few thoughtfully varied shapes will establish the business long before the roof earns its elaborate hat. The guide below breaks that larger structure into eight manageable stages.
Miniature Backstory — The Tiny Tale

If you were adding a story detail to your own version, a tiny magpie beside the central blue bottle could hint at its unusual past. A loose cork would be a lovely second clue. Apparently this shop has a rather opinionated security department.

A miniature book tucked onto a side shelf could become Iona’s old toll ledger. Keep it subordinate to the bottles: one closed volume gives the shop a working life without turning the counter into a library.
A Guided Tour of the Build
A roof with excellent posture
The roof rises into a pointed central crest, with slate-like blue-black tiles stepping down toward the eaves. Fine gold-colored scrolls follow its edges, and a vivid stained-glass medallion sits inside the front gable. The taller finials continue that upward movement without making the roof look solid or heavy.

Below the medallion, pointed openings create a deep sheltered counter. The open arches matter as much as the ornament: they leave a clear view through to the bottle shelves and let warm light gather behind the darker columns.
The counter’s bottled rainbow
The strongest color sits at eye level. Rounded vessels, narrow-necked bottles and small jars vary the rhythm across the curved front. The tall blue bottle near the center acts as an anchor, with violet and amber neighbors keeping it company. I like how the dark carved panels beneath give that busy surface somewhere calm to sit.

The rear shelving repeats the bottle shapes in smaller, quieter rows. Hanging globes occupy the space between the arches rather than blocking the whole opening. That layered arrangement produces depth without requiring an enormous shop.
A whole little square
Broad curved steps carry the kiosk down to irregular cobbles. Side tables and crates extend its business into the street, while lavender-colored flowers soften the heavy posts. Ornate lamps frame the composition; shorter bollards at the front give the square a believable edge.

You can borrow the planted cracks and worn paving for a smaller scene too. One counter, a short stair and a pair of lamps would retain much of this miniature’s character if your display shelf refuses planning permission for an entire market square.
Inspirations — From the Big World to the Small
This scene makes me think of Guillermo del Toro’s densely collected worlds, where small objects seem to carry histories of their own. LACMA’s At Home with Monsters exhibition brought together film material, notebook drawings, personal collections and museum objects. That is a useful creative prompt here: let each shelf suggest a different curiosity, while keeping the overall arrangement readable.
The curling metal-like ornament also recalls Art Nouveau. The V&A describes the movement’s natural forms and flowing lines, including the way Victor Horta integrated decoration into buildings. In miniature, the practical lesson is to repeat one family of curves across the roof trim, brackets and counter panels rather than inventing an unrelated flourish for every surface.

For a working palette, pull charcoal and midnight blue from the roof, warm ochre from the trim, and small jewel tones from the bottles. Sketch the pointed arches beside those samples. The inspiration board should explain the relationship between the structure and its decoration, not simply collect attractive dark things.
For more ideas on small vessels and surface finishes, the miniature ceramics and pottery guide explores bowls, vases and tiles. You can adapt those smaller projects without copying every architectural complication of this stand.
Artist Tips — Make Your Own Magic
The illustrations are AI-generated, and this guide is an invitation to make an inspired version rather than a tested set of exact plans. Results vary; your first attempt may qualify as a perfectly respectable neighborhood kiosk before it acquires the full royal roof.
Plan a gothic miniature potion stand
Choose one working scale before buying accessories. A proposed 1:12 version makes bottles and trim easier to handle, but it also demands a substantial display area. A smaller scale saves space while making the finest scrolls more challenging. Use one sample bottle and a paper customer-height silhouette to judge the counter and openings; the reference does not establish measured dimensions.
This is an intermediate project because of its curved front, repeated arches and layered roof. Keep a removable rear panel or roof for access. You can omit working lights and use colored glazing with a warm external lamp instead. Plan the view you want first, then simplify the parts that sit outside it.
Botanical tiles offer an optional route to a patterned counter inset or side-table top. Choose a small restrained area and check the tile size against your planned scale; the supplied scene uses ornate relief-like panels rather than a tiled facade.

Supplies
• Structure: clean cereal-box card for templates, thicker packaging board for layers, or craft chipboard and basswood sheets for the final shell. Use a rigid base that stays flat under the scene’s weight.
• Surfaces: thin card for roof tiles and cobbles, paper strips for trim, and lightweight filler only where the chosen board can support it. Reuse smooth packaging offcuts before buying specialist texture sheets.
• Glazing and bottles: clean transparent packaging for flat windows, or clear acetate sheets; purchased miniature bottles, clean transparent beads and rolled paper necks for vessels. These are display props, never drinking containers.
• Color and glue: acrylic craft paints, PVA craft glue for compatible porous materials, and a clear-drying adhesive specifically suitable for the glazing you select. Test all paint and adhesive combinations on scraps.
• Details: paper foliage, thread for hanging ornaments, small card shelves, craft wire for optional lamp arms, and ready-made battery-powered miniature lights if you want illumination.
• Tools: a hobby knife, cutting surface, scissors, fine brushes, tweezers and a square. Cut away from fingers, use light passes, and cap or safely store blades between sessions.
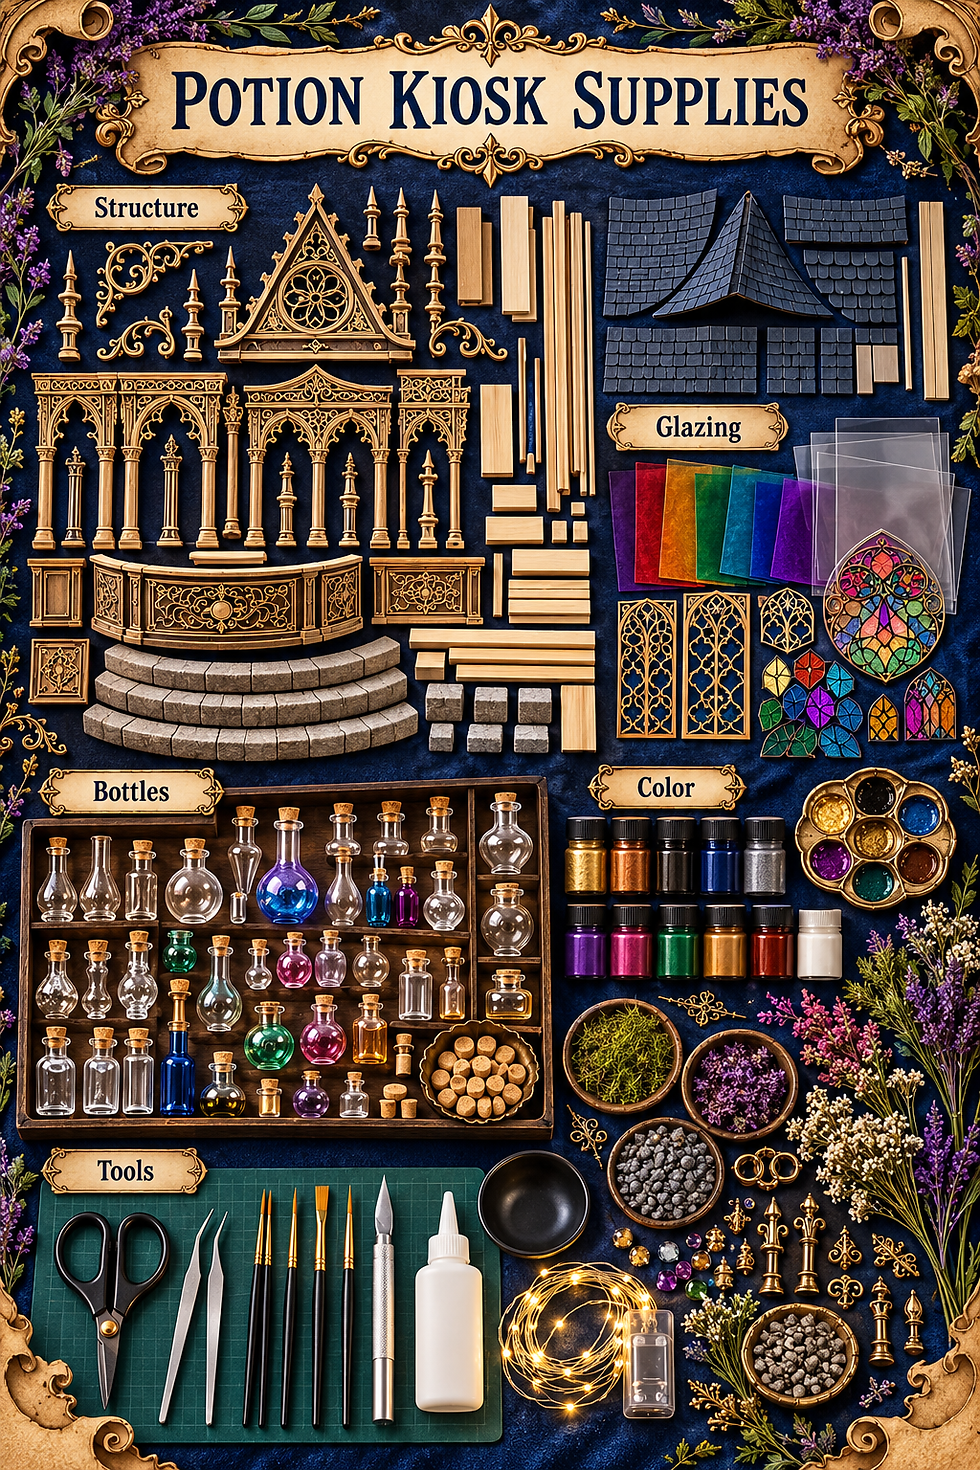
Keep essential structural materials in one tray and optional decoration in another. That small distinction prevents the project from becoming a very glamorous pile of supplies. Make a sample of a finished column, a roof tile and a bottle before committing to dozens of copies.
1. Draw the footprint and test the silhouette
Draw a shallow curved-front kiosk footprint on scrap paper, with a straight rear edge for the shelves. Mark the front columns, the projecting counter and the three broad curved step outlines. Leave room beside the kiosk for narrow tables and around the front for a clear strip of cobbles. A paper mock-up will reveal crowding much sooner than a finished base.
Build a quick folded-card elevation with the central pointed roof crest and lower sloping sides. Place your sample bottle on a temporary counter and check that the arches frame it. Keep the counter low enough to see the shelves behind it, and keep the gable large enough to hold a recognizable medallion.

Photograph this rough silhouette from the intended front viewpoint. If the roof overwhelms the stall, lower its side slopes rather than shrinking every detail. Record your chosen proportions on a separate working sketch, then use that sketch consistently for all repeated parts.
2. Build a rigid base, steps and counter shell
Laminate flat board layers for the base, applying compatible glue evenly and letting them dry flat under a clean protective sheet and suitable weight. Cut three progressively smaller curved step shapes and stack them with their front edges aligned around the kiosk. Dry-fit every layer before gluing so the stair reads as a continuous sweep.
Make the counter from a curved card face supported by short internal ribs and a flat top. A series of shallow angled segments is easier than forcing thick board into a tight curve. Add a straight rear wall and shelf supports, keeping the central viewing area open.

Allow the joints to dry fully before lifting the shell. Check the counter from low eye level: a small twist becomes obvious beneath a row of bottles. Use a thin card shim under a low support instead of trying to hide the problem later with decorative trim.
3. Add the columns and pointed arches
Make matching columns from layered card strips or suitable wood strips. Cut one paper arch template, test it between two columns, and use it to trace the remaining openings. Build each arch as a broad structural band first. Add finer inner tracery as a separate decorative layer so delicate cutouts are not carrying the roof.
Assemble the front frame flat on a protected surface, checking that the columns remain parallel. Let it dry before attaching it to the counter and rear supports. Add small corner braces behind the visible frame, where they will be less noticeable from the chosen viewpoint.

Keep the ornament selective. Repeat a small leaf-shaped curl at the arch tips and a longer scroll on the brackets. If cutting fine tracery becomes frustrating, use a simpler pierced shape and paint the smaller curls on top. A clean open arch is more convincing than a fragile tangle.
4. Shape the roof and its stained-glass crest
Build the roof as a removable shallow shell, using card ribs to support its sloping panels. Preserve the reference’s central pointed front crest and lower side eaves. Test the fit before adding tiles; the roof should sit squarely on the columns without needing pressure to stay in place.
Cut narrow strips of thin card into small overlapping tile tabs. Work from the eaves upward, allowing each row to cover the top of the previous one. For the crest, sandwich colored translucent paper or a compatible painted acetate panel behind a dark card frame. Draw a simplified floral pattern rather than trying to reproduce every tiny pane.

Glue the crest into the front roof opening only after the glazing medium has dried. Add lightweight card finials and curled paper trim along the roof edges. Keep their silhouette consistent, and leave the finest tips until the main roof can be handled safely.
5. Paint the dark structure and restrained gold
Paint a small sample board first. Use charcoal-brown for the columns and counter, blue-black for the tiled roof, and warm gray for the steps. Once the base colors dry, brush a lighter tone across raised edges with very little paint. Leave recesses darker so the carved effect remains visible.
Pick out the strongest scrolls with muted gold acrylic, using a fine brush and a steady support for your wrist. Work from the larger roof border to the smaller counter details. Stop before every line shines equally; the bottle colors need room to become the brightest part of the display.

An optional metallic wax finish such as Rub ’n Buff can provide a different gilded effect on suitable surfaces. Follow its own application, ventilation and cleanup directions, and test compatibility separately; it is not interchangeable with water-based acrylic paint.

Paint the cobbles in related gray-brown shades rather than a checkerboard of extremes. A thin darker wash can settle into the joints once the underlying paint is dry. Test on the same card first so excess water does not soften or curl your paving.
6. Stock the shelves and make the bottles glow
Build the rear shelves from narrow card or wood strips, with enough depth to hold your chosen vessels. Paint them before fitting the bottles. Arrange a few taller pieces at the rear and shorter shapes in front, leaving small gaps so individual silhouettes remain legible.
Use transparent beads or purchased miniature bottles for the brightest vessels. Add color with a medium explicitly suitable for their material, following its label and testing an inconspicuous sample. A dry colored-paper insert behind a clear vessel is an easier alternative to filling it with liquid. Make cork-like stoppers from painted paper or suitable tiny offcuts.

Keep one tall blue bottle near the middle, then distribute violet, green and amber accents to either side. Suspend a few lightweight globes from thread beneath the arches, securing each attachment after the glue cures. They should hang above the counter rather than collide with the tallest bottles.
A wooden room box is a possible starting shell for a simpler apothecary display if a freestanding curved kiosk feels too ambitious. Treat it as a different project format, not a ready-made substitute with matching dimensions or roof parts.

The reward comes from repetition with small variations. Three bottle shapes in several colors usually make a more coherent shop than twenty unrelated ornaments. Keep the central blue vessel as the first thing the viewer notices.
7. Fit lamps and add the planted edges
Choose a ready-made low-voltage battery lighting set sized for miniatures, and follow the manufacturer’s installation instructions. Test it before fitting it into the model. Plan a concealed route behind a column or through the removable rear, leaving the switch and battery compartment accessible. Keep wiring clear of sharp edges and moving roof joints.
For unlit lamps, build decorative posts from suitable rods and card bases, with transparent colored inserts inside lightweight lantern shapes. Add flowers and paper foliage in small pots beside the side tables. Keep the front steps open, and place taller lavender-colored stems toward the sides where they frame the kiosk rather than hide it.

Use a few scenic grass tufts in paving cracks and at the base of pots. Choose their size for your proposed scale and use them sparingly; the plaza should still look like somewhere customers can walk. Let every glued cluster dry before brushing away loose fibers.

If you want a deeper flower-making project, the miniature flower guide offers ideas for petals and pots. Here, a limited purple-and-cream palette will keep the flowers from competing with the bottles.
8. Finish the square and check the story
Set the side tables slightly behind the kiosk’s front edge. Add a few spare bottles, a small closed ledger and pots at different heights. Place the shorter bollards near the front corners, leaving the main sightline clear. Dry-fit these pieces from the camera viewpoint before fixing them down.
Check the model in ordinary room light before turning on its lamps. The arches, counter and roof should still read clearly without illumination. Remove any accessory that hides the central bottle or interrupts the curve of the steps. A believable shop needs a place for its imaginary proprietor to work.

Once all finishes and adhesives have cured according to their instructions, gently remove stray fibers with a soft brush. Test the removable roof or rear access one final time. Iona can find a use for an abandoned tollhouse; replacing a battery through a permanently sealed wall is a less charming problem.
Photograph the glow without losing the building
Set the miniature on a stable surface with a plain dark backdrop beyond it. Use a broad diffused light from one side and a white card opposite to lift the shadows. Start with the camera near counter height, then move slightly upward until the curved steps and roof medallion both remain visible. Keep the lens far enough back to avoid stretching the front bottles.

Take one frame with the model lights off and another with them on, adjusting exposure so the bottles retain color instead of becoming white spots. Turn reflective vessels slightly if they catch an intrusive highlight. Make separate close-ups of the roof crest, counter and planted steps; you do not need every tiny object sharp in one photograph.
Small problems, practical fixes
• The counter face buckles: use narrower segmented panels or thinner card, supported by more internal ribs. Let each layer dry before adding another.
• The roof looks top-heavy: simplify the finials and darken the side slopes, keeping the front stained-glass crest distinct.
• Glazing looks cloudy: test a different compatible adhesive on an offcut, and apply it only around concealed edges.
• Bottles merge into a bright blur: reduce the number of vivid colors, separate taller shapes and soften the light source.
• Lamps overpower the scene: reposition or diffuse them using a manufacturer-compatible method, keeping heat and electrical clearances intact.
Closing — Until Next Time in the Small World
I would happily browse this stall for an hour, although I suspect the magpie would have strong opinions about anyone touching the blue bottle. Which detail would you make first: the stained-glass roof crest, the bottled rainbow or those wonderfully excessive lamps?
Share your own small-world experiments with #smallworldminiatures, and visit the online shop for more miniature inspiration. You can also join the newsletter through the site to keep the next tiny story close at hand. Iona’s magpie is keeping an eye on the cork. Customer service has wings now.








Comments