



The Mirror With Opinions: A Gothic Miniature Dressing Table for Halloween

First Impressions in Miniature
Some dressing tables seem designed for a sensible morning routine. This gothic miniature dressing table appears to require an appointment, a velvet robe and at least one secret. I love the combination of blackened wood-like surfaces, worn gold edges and that extraordinary skull crown, with its fine rays reaching upward like a very elaborate bad-hair day.
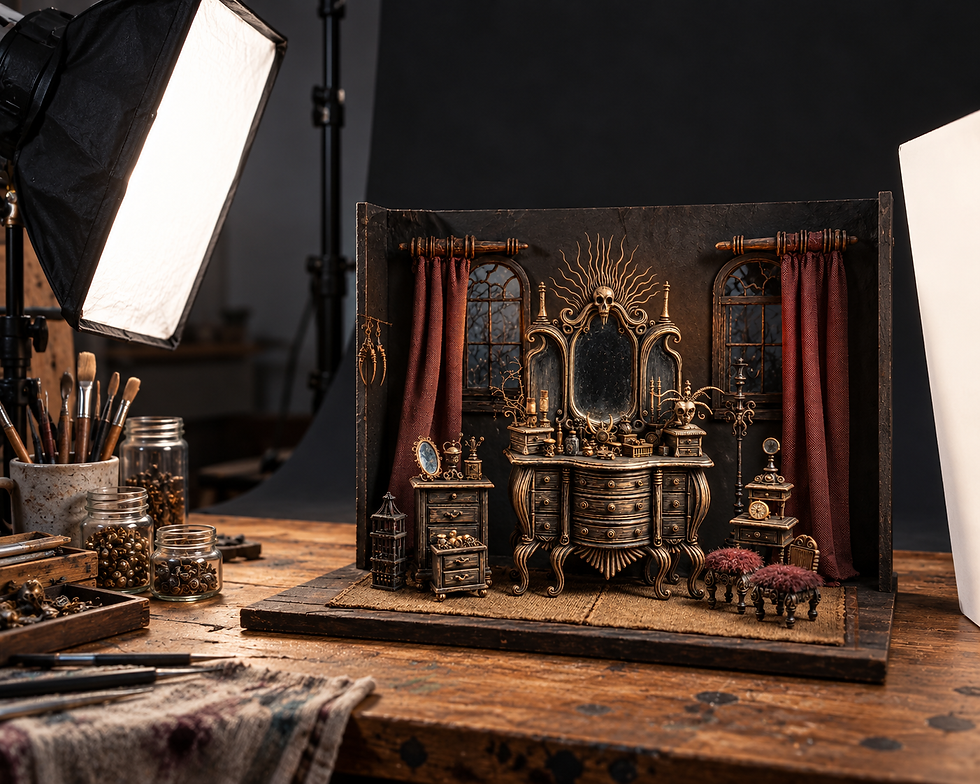
Three mirror panels rise above a bowed chest of drawers. Curved legs give the furniture an almost living stance, while wine-red curtains and fuzzy stools warm the dark room. It is a theatrical Halloween scene with enough ordinary bedroom clutter to feel inhabited. Below, we will turn its intimidating outline into an approachable build using flat templates, layered card and a carefully limited palette.
The purchased alternatives below use Amazon affiliate links; if you buy through them, it helps fund this tiny world. As an Amazon Associate I earn from qualifying purchases.

A ready-made bedroom set can supply supporting furniture if you would rather concentrate on the dressing table. Check the individual pieces against your chosen scale and available floor space. The reference does not establish its actual measurements, construction materials or any particular commercial product.
Miniature Backstory: The Tiny Tale
Madame Vesper, a very particular moth, prepares for the annual Midnight Assembly before three mirrors with distinctly different manners. The left mirror offers encouragement. The right mirror suggests another necklace. The middle mirror checks whether she has remembered the invitation, which makes it the least popular member of the household.
One October evening, all three refused to reflect her hat. They showed her face, her collar and a perfectly reasonable amount of candlelight, but above her head there was only a polite blur. Madame Vesper changed hats. The blur remained. She adjusted the curtains, polished a bottle and accused the smallest stool of conspiracy.
The skull above the frame finally cleared its nonexistent throat. “The invitation says modest headwear.” Madame Vesper looked up at its spectacular crown of golden spikes. Neither spoke for some time.

A compromise was reached. Madame Vesper would wear a plain ribbon, and the skull would stop offering fashion advice until it had located a neck. The mirrors recovered immediately. The left declared the ribbon charming; the right recommended earrings; the middle asked about the invitation again.
When she left, the two red stools edged closer together to discuss the evening. This is the detail I imagine behind their companionable placement in the picture. If you want an extra story object, add a tiny folded invitation beside the bottles.
A Guided Tour of the Build
A crown that refuses to be subtle
The central skull and its fan of slender, irregular rays pull your eye upward. Below, scrolls sweep outward and back toward the mirror. The side finials reinforce the height without competing with the crown. Warm highlights pick out the raised lines against a nearly black background, so the elaborate shape remains legible even before you examine its details.

A tabletop full of small decisions
The three dark reflective panels create a quiet background for an exceptionally busy tabletop. Little drawer boxes anchor either side; bottles, a comb-like object and curious ornaments fill the middle. A horned mask-like object on the right adds another face to the gathering. There is room between the objects, which matters: distinct silhouettes make this clutter feel collected rather than poured from a bag.

Curves below, softness around
The central drawer fronts bow forward between narrower side stacks. Long fluted supports and curled feet continue the movement toward the floor. Beside them, two burgundy-topped stools introduce a completely different texture. The woven rug, smaller cabinets and open cage-like accessory make the dressing table feel large within its little room, without hiding the edge of the miniature stage.

The red textiles also keep the scene from dissolving into black and gold. I would preserve that limited color relationship even in a simplified build: dark furniture, selective metallic edges and one warm fabric family. A smaller table with fewer bottles could retain the same mood if those three elements stay in balance.

The gold belongs mainly on projecting edges, knobs and ornamental ridges. Broad areas remain dark enough to suggest depth. Metallic acrylic paint offers a straightforward route to that contrast; a wax-metallic finish is a different, optional material with its own handling instructions, rather than a substitute for ordinary paint in every step.
Inspirations: From the Big World to the Small
The furniture combines several visual languages. The rounded drawer fronts and curling legs recall Rococo furniture. The Royal Palaces of Sweden describes Rococo through curved forms, softened corners and graceful ornament, and its illustrated bureau attributed to Samuel Pasch offers a useful full-size comparison. Borrow the bowed front and flowing outline, rather than treating this fantasy dressing table as a historical reconstruction.
A second useful reference is the V&A’s painted mirror, probably by Antoine Monnoyer, from about 1710–20. Its ornamental frame turns a reflective surface into an architectural presence. The V&A also discusses Baroque design’s movement and drama. Here, I see that theatrical instinct in the tall mirror group and stage-like curtains, translated into a more macabre room.

The supplied image also has a Tim Burton-inspired sensibility: narrow silhouettes, expressive objects and a comfortable relationship between elegance and the strange. The Design Museum’s exhibition catalogue discusses the meeting of Gothic, carnivalesque and fantastical elements in his visual language. That is a helpful way to describe the atmosphere.
For your own inspiration board, separate shape from finish. Study a full-size curved cabinet for its outline, a historic mirror for its framing rhythm and theatrical interiors for their lighting. Then place black paint, muted gold and burgundy fabric beside those references. You can borrow an idea from each without copying an entire room.
For another approach to expressive cabinets and warm Gothic shadows, visit Where the Green Window Glows. Its kitchen setting offers a useful contrast to this dressing room’s more elaborate furniture.
Artist Tips: Make Your Own Magic
You can make a convincing interpretation with a sturdy core and decorative layers. The illustrations here are AI-generated, and this guide is an inspirational approach rather than an exact, tested reproduction. Results vary with your materials and patience; thankfully, a slightly eccentric dressing table is entirely at home in this room.
Aim for a proposed 1:12 scale, where one inch represents one foot. An intermediate difficulty is sensible because the curved outline and mirror assembly need careful fitting, although fixed drawer fronts keep the mechanics friendly. Essential techniques are card lamination, simple box construction, applied trim, dry-brushing and textile dressing. Leave working drawers and intricate wiring for a later version if they distract from the silhouette.

Good task lighting makes small edges easier to see before they are permanently attached. Set up a bright, uncluttered work area and keep a scrap sample beside the model for adhesive and paint tests. A magnifying lamp is optional; your ordinary work light may be perfectly adequate if it shows the edges clearly without glare.
Supplies
• Structure: reuse clean, flat packaging card for templates and decorative layers. Choose craft chipboard or basswood for a more uniform core. Add PVA craft suitable for the selected porous materials.
• Curves and ornament: use narrow paper strips, thin card, clean beads and short lengths of soft craft wire. Air-dry clay is optional for a simplified skull and mask. Ready-made miniature ornaments are an easier alternative.
• Mirror surfaces: use smooth reflective craft card or purpose-made mirror film on a rigid backing. Avoid broken household mirror glass. Test the adhesive on an offcut before committing to the visible panel.
• Color and finish: gather water-based acrylic paint in near-black, warm brown, muted gold and burgundy, plus fine brushes. A compatible gloss varnish is optional for bottle-like details, not the entire table.
• Textiles and clutter: reclaim fine-weave fabric, short-pile trim, clean thread spools and small packaging shapes. Add miniature bottles only if their dimensions suit the proposed scale.
• Tools: use a sharp hobby knife, a protected cutting surface, scissors, tweezers, a pencil and suitable clamps. Keep optional lighting to a complete low-voltage miniature LED kit with accessible controls.

Keep your materials grouped by stage so the ornamental pieces do not disappear beneath the structural work. A little tray for loose beads is especially helpful: this room has plenty of mystery without an unplanned search beneath the desk.
1. Plan the gothic miniature dressing table
Sketch a front elevation and a simple side view on scrap paper. As a suggested starting point, make the tabletop about four inches wide and two inches deep, with the complete piece roughly six inches tall including its crown. These are proposed planning dimensions, not measurements taken from the reference. Adjust them to suit your room and the scale of any purchased furniture.
Draw the central bowed drawer section, two narrower side stacks and three mirror panels. Cut paper silhouettes and stand them together before adding detail. Keep the center mirror largest, leave room above it for the crown and check that the feet support the tabletop. Simplify repeated ornament now. A clear outline does more work than a dozen tiny flourishes that disappear at normal viewing distance.

2. Build a solid core and shallow room base
Cut a flat base and a shallow cabinet core from your chosen board or basswood. For the cabinet, use a back, top, bottom and two sides; add internal dividers where the narrow drawer stacks meet the center. Dry-fit the parts on a level surface, then glue the joints according to the adhesive instructions. Check the corners before the glue begins to set.
Make the central front gently convex by layering progressively narrower card shapes over the core, then skinning the shallow curve with thin card. Use a scrap test first rather than forcing thick material around a tight bend. Keep the tabletop separate until you can check its overhang. Allow the structure to dry fully under appropriate light restraint before adding legs or lifting it by the edges.

3. Add curved legs and drawer fronts
Trace one sturdy S-shaped leg template and repeat it in laminated card or suitable thin wood. Keep the narrowest sections broad enough to survive handling. Cut on a protected surface, make controlled passes and keep your free hand out of the blade’s path. Glue matching layers together, let them dry flat, then smooth only the rough edges.
Attach the legs against the cabinet sides with generous contact areas, reinforcing them behind with small hidden blocks. Applied drawer fronts give you the reference’s rhythm without miniature runners: three broad curved fronts in the middle and narrow stacked fronts at the sides. Leave shallow shadow gaps between them. Add paper-strip ridges and bead knobs, checking alignment before the glue dries. A straight supporting leg hidden behind a curved facade is the easier option.

4. Assemble the three-part mirror frame
Cut three solid backing shapes and matching open frame layers. Keep the reflective pieces separate while you build and paint the frames. Layer thin card scrolls around the tops; use repeated curves cut from one template so the left and right sides feel related. Test the assembly against the cabinet before gluing, and brace its lower edge to the back rather than trusting a tiny tabletop contact alone.
For the crown, shape a small simplified skull from air-dry clay and let it dry as its maker directs before attaching it. Form the rays from short craft-wire pieces with blunt ends, spacing them in a fan behind the crown. Wear eye protection when cutting wire and contain the offcuts. An all-card crown with rounded ray tips is a gentler alternative. Keep the mirror inserts out until the surface work is finished.

A small test frame is worth the few extra scraps. Try the dark base, the metallic highlight and your chosen adhesive on it before treating the main piece. This also tells you whether your thin trim can handle a wash without lifting, and whether the gold looks convincing under the light you intend to use.

5. Paint blackened wood and restrained gold
Seal or prime the selected materials with a compatible product if needed, following its label, then apply thin coats of near-black acrylic paint. Let each coat dry before the next. Brush a little warm brown along selected drawer edges and leg ridges, leaving the deepest grooves dark. Keep this variation irregular and subtle so the result reads as worn furniture rather than striped timber.
Dry-brush muted gold over raised scrolls, knobs and the outer mirror frame. Test the loaded brush on scrap first; a light pass should catch the ridges without filling their recesses. If you choose Rub ’n Buff instead, treat it as a separate wax-metallic finish, follow its current cautionary labeling and test compatibility. AMACO recommends testing any sealer because it can alter sheen and color. Let all finishes reach their specified handling or curing stage before installing the reflective inserts.

6. Dress the tabletop with readable clusters
Fix the mirror inserts to their backing with an adhesive confirmed suitable for that surface. To suggest old glass without harsh chemicals, test a faint stipple of gray-brown acrylic around the edges of a reflective-card offcut. Leave the center clearer. Do not abrade or chemically strip real mirrors for this effect. Once the test looks right, apply the same restrained approach to the inserts.
Build the little side boxes from layered card, then group bottles and ornaments in low, varied clusters. A few beads on narrow bases can suggest perfume flacons; a small card tray gathers the smallest pieces. Make a mask-like ornament from dry clay if desired, avoiding sharp horns. Position everything with tweezers before gluing. Keep at least one patch of tabletop visible and do not block the entire lower edge of the center mirror.

Gloss is most useful here as a selective contrast. A tiny amount on an appropriate painted bottle can distinguish it from the matte cabinet, but coating the whole piece would flatten the carefully varied finish. Test the exact varnish over your paint and follow its instructions for application and full curing before handling the small accessories.
7. Add the room, textiles and safe candlelight
Make two shallow arched window shapes in the dark backdrop, using separate card frames over cool gray-blue inserts. Fine, irregular dark lines can suggest the branching patterns visible in the reference. Hang narrow burgundy fabric panels from simple rods, arranging the folds first and fixing only the upper edge. Choose fine fabric so the folds look believable beside the furniture.
Cover small stool tops with short-pile trim or closely clipped yarn, keeping their legs visible. A fine woven scrap becomes the rug. For candlelike accents, use unlit painted models or a complete ready-made low-voltage miniature LED set, following its instructions. Keep batteries and switches accessible; never introduce real flames into a card-and-fabric scene. Let the textile glue dry before moving the room, then check that the dressing table still dominates the composition.

8. Add age, story and a final stability check
Bring in a small side cabinet and an open cage-like accessory only if the base still has breathing room. Build the cage as a simplified decorative frame with blunt-edged card strips, or choose a scale-appropriate ready-made piece. A little warm brown weathering around its lower joints can suggest old iron; keep rust tones away from the mirror’s gilded trim unless you intentionally want a different finish.

Place a folded paper invitation beside the bottles as an optional nod to Madame Vesper. Test every projecting ornament with gentle handling and secure anything loose. Check that all feet meet the floor, that the mirror cannot tip backward and that fabric stays clear of electrical components. Let the last adhesive and coatings finish drying or curing as directed. Remove glue threads and stray fibers with tweezers before the final photographs.

Photograph the room without losing the mirror
Start near the height of the tabletop with a dark, plain backdrop extending beyond the scene. Use a large diffused light from one side and a white card on the other to lift the shadows. Move the light or angle the model slightly until the mirror reflects a quiet dark area rather than a bright rectangle. Keep diffusing material away from hot lamps; a cool-running light is the simpler choice.
Leave a sliver of the base visible in the wider view so the miniature scale remains clear. Then photograph the crown, tabletop and curved drawers separately. Focus on the important detail and compare exposures that retain the metallic highlights. Take a second frame with slightly brighter shadows rather than trying to rescue every dark recess later. The aim is to show texture while keeping the room’s evening atmosphere.
Small problems, manageable fixes
• The frame leans: reinforce its lower backing and attachment to the cabinet before adding more decoration. A taller crown needs a dependable support.
• The gold looks too bright: let it dry, then soften selected areas with a compatible dark glaze tested on scrap. Keep a few clean highlights.
• The mirror looks cloudy: reduce the edge stippling and replace the insert if the adhesive has marked it. A clear central reflection gives the surface room to breathe.
• The curtains look bulky: switch to a finer weave, reduce the panel width or suggest folds with narrow fixed strips.
• The scene feels crowded: remove one accessory cluster and recheck the silhouette from the intended viewing angle. Empty tabletop is useful design space.
Closing: Until Next Time in the Small World
I would happily spend an evening arranging those little bottles, although I suspect the center mirror would keep asking whether I had somewhere to be. Which detail would you keep in your version: the extravagant skull crown, the bowed drawers or the two gossiping red stools?
Share your own tiny dressing-room dramas with #smallworldminiatures. You can find more miniature inspiration and the newsletter signup on the Small World Miniatures website, and browse the online shop when you feel like bringing a little more of this world home. Madame Vesper has already chosen her ribbon. The invitation is another matter.








Comments