



A Gothic Miniature Cottage Where the Garden Makes the Rules

First Impressions in Miniature
This gothic miniature cottage looks as though a cathedral wandered into the woods, discovered gardening, and decided never to leave. Its steep crossed gables stretch upward while the balcony spills flowers downward. Between those two movements, warm amber windows keep the dark timber from feeling unfriendly. I love that balance: a house can look wonderfully ominous and still seem like somewhere you would be offered a very good cup of tea.
The garden is not an accessory here. A mushroom rises beside the right-hand path like an uninvited gazebo, lilies curl above the borders, and small flowers crowd the stone stair. The cottage and its surroundings appear to have negotiated a truce rather than a landscaping contract. For an inspired build, I would protect that relationship before worrying about the tiniest roof ornament.
This post contains affiliate links. As an Amazon Associate, I earn from qualifying purchases, at no additional cost to you.
For a bought garden accent rather than the sculpted tan mushroom, mini mushroom figurines offer a different, playful direction. Check their dimensions against your base; they are optional alternatives, not the mushrooms shown in the showcase.

The practical route below translates those complicated shapes into a braced card-and-wood shell, layered paper ornament and removable scenery. You can keep the unmistakable silhouette without carving every flourish. Start with the version your tools and patience can support, then let the garden provide the extravagant part.
Miniature Backstory: The Tiny Tale

A Guided Tour of the Build
Crossed gables and a stubborn chimney
The roof is the cottage's signature. Two steep gables meet around a tall stone chimney, their lower edges curling outward rather than ending in plain straight eaves. Fine slate-like rows establish texture, but the large intersecting planes do the real storytelling. I would keep the chimney slightly rougher and lighter than the timber so it remains legible among the decorative spikes.

Amber arches beneath a flower-filled balcony
Pointed windows repeat across the lower walls, while smaller circular windows occupy the gable faces. That contrast keeps all the vertical lines from becoming monotonous. The balcony railing is dark enough to merge with the house in places; flowers provide the interruptions. Notice how the vegetation drapes over selected sections rather than hiding every opening. Those little glimpses of railing explain the structure underneath.

A stair that belongs to the garden
On the right, pale stone steps climb through planting toward the entrance terrace. The oversized mushroom stands farther back, beyond the first landing, so it does not compete directly with the front door. Pebbles, flowers and low gateposts give the foreground several scales of detail. Keeping a visible route through that abundance makes the garden feel inviting instead of merely full.

Inspirations: From the Big World to the Small
Pointed arches and decorative tracery bring Gothic architecture into a domestic fantasy. The V&A's account of Gothic Revival stained glass describes the nineteenth-century enthusiasm for colorful storytelling windows. Here, the amber glazing offers a simpler lesson: light can be the friendly counterweight to dark, elaborate architecture without requiring a tiny narrative in every pane.
I also like the contrast between disciplined building lines and irregular woodland growth. The cottage repeats arches; the garden refuses repetition. Ferns, mossy stone, peeling bark and the underside of a mushroom make better texture references than a second photograph of another miniature. Study the spaces between real leaves as closely as their shapes, because those gaps stop small foliage from looking like a solid green blanket.

Small miniature red wall bricks could define a separate garden edging or low boundary wall. Their regular brick pattern differs from the cottage’s rough stone stair, so use them as an intentional variation and check size before ordering.

A useful palette is bark brown, charcoal, muted slate, warm gray and moss green, with amber at the windows and small pink, cream and red flower accents. Reserve the brightest notes for places you want the eye to visit. An all-bright garden would make the carefully shaped house disappear.
Artist Tips: Make Your Own Magic
The AI-generated illustrations are visual starting points, not photographs of a tested physical build. This is an inspired construction plan rather than an exact kit or measured reproduction, and results will vary with your materials, scale and experience. I would begin with the silhouette and simplify the filigree wherever it makes the project more enjoyable.
Supplies
Reuse clean packaging card for templates, cereal-box card for trim, plain paper for shingles and flowers, and a sturdy offcut for the base. Add craft chipboard or thin basswood for the shell and balcony, wood strips for concealed bracing, clear acetate and amber translucent paper for windows, and PVA craft glue suited to the surfaces you choose. Test adhesion and paint on scraps first.
For scenery, gather air-dry clay for shallow stone facing and the mushroom, lightweight scrap card for terrain, paper or commercial miniature foliage, fine thread, tiny pots or rolled-card pot blanks, and clean dry texture material. Use acrylic paints, small brushes, scissors, a sharp hobby knife, tweezers and a protected cutting surface. A ready-made low-voltage miniature lighting set is optional; keep its power source accessible.

Choose a manageable footprint before buying materials. One possible starting point is a roughly 25 by 30 cm base, with a house around 25 cm tall, but these are planning choices rather than measurements taken from the image. Keep doors, steps and props internally consistent; this fantasy scene does not need a claimed dollhouse scale to work. Make a paper person-shaped scale marker for planning if helpful, then remove it before display photography.
A separate tree-base vignette could use fairy doors and windows beside the cottage. These outdoor-style pieces are not substitutes for the reference’s pointed glazing; compare dimensions and choose a location where the different scale and design make sense.

For a smaller first project, build only the front and right-hand side as a shallow facade. Keep the crossed roof outline, chimney, balcony and right stair, but suggest the rear roof with a short return. That version still carries the cottage's identity while reducing inaccessible joints and hidden detail.
1. Plan the gothic miniature cottage silhouette
Draw front and right-side elevations on scrap paper. Mark the main floor, balcony line, upper pointed windows, circular gable windows and roof intersection before drawing ornament. Fold a plain paper volume and place it on the proposed base. Leave enough room at the right for a stair and the mushroom beyond it, not directly in front of the entrance.
Check the outline from the intended showcase angle. If the roof feels too low or the balcony too wide, change the paper now. Mark a removable rear panel and a clear internal path for optional lighting. Keep this first model unpainted and unplanted: it should answer questions about mass and access, not distract you with decoration.

2. Build a shell that can carry the balcony
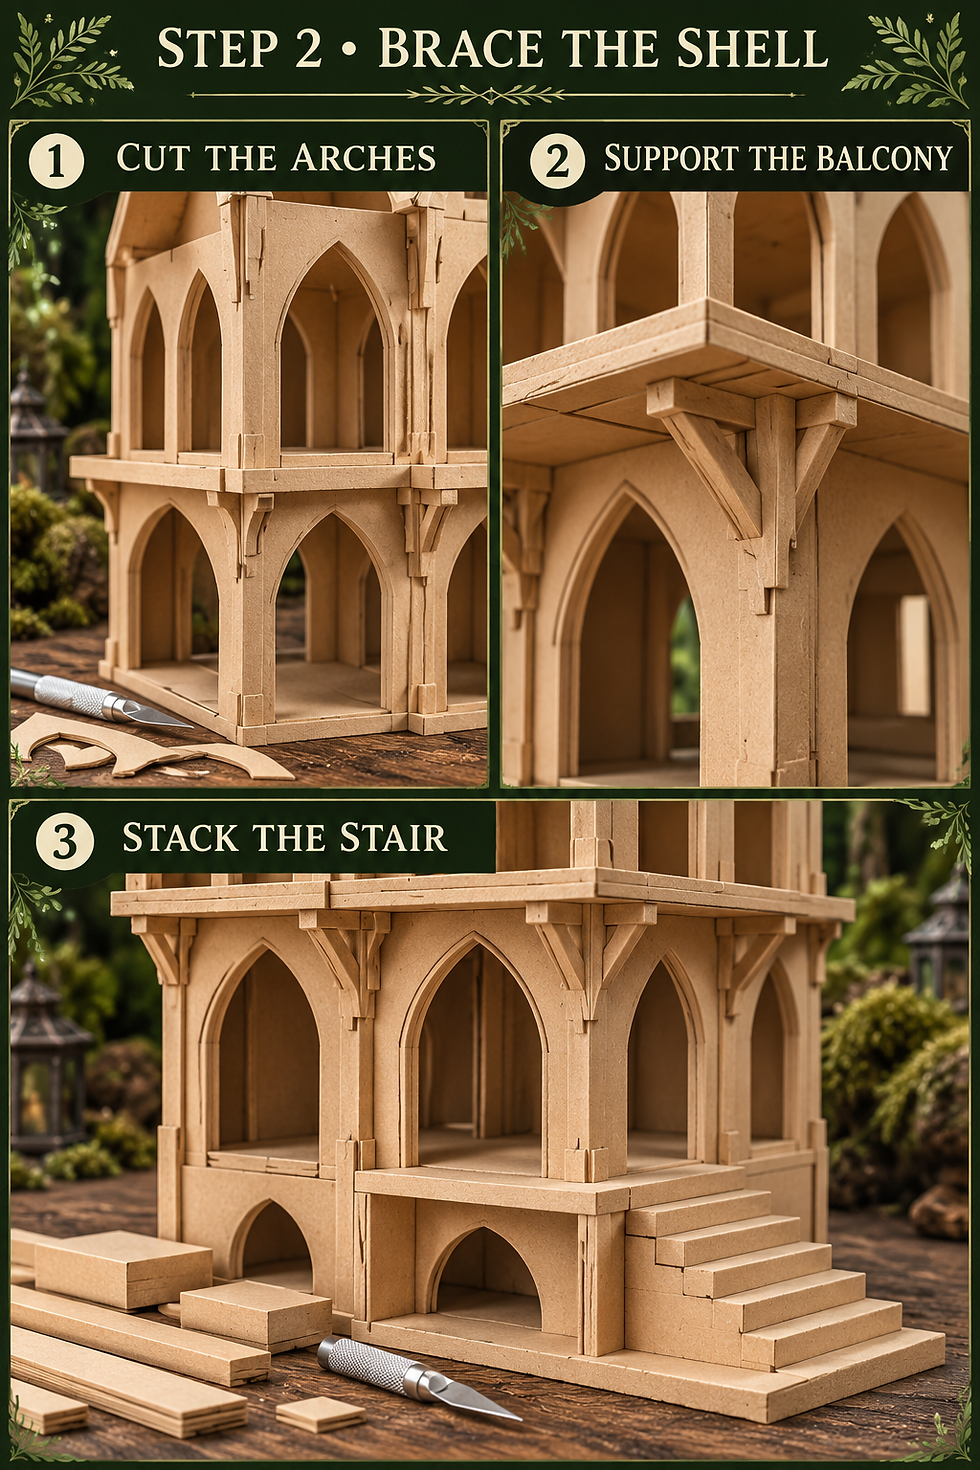
Transfer the corrected wall shapes to chipboard or thin wood. Cut window openings with several light passes on a protected surface, keeping fingers away from the blade path. Join the walls around interior corner braces and add a floor at balcony level. Let the adhesive set according to its label while the structure rests square; decorative trim cannot rescue a twisting shell.
Support the balcony with hidden brackets and tabs tied into that floor, rather than attaching it only to surface paint. Build the right-hand stair from stacked card blocks and trial-fit it against the entry terrace. Leave its stone texture for later. Before continuing, remove and replace the rear panel to prove that access still works.
3. Establish the crossed roof and stone chimney
Use separate card planes for the two steep gables, trimming their meeting edges until the intersection sits cleanly. Dry-fit the roof over the shell before gluing. A short concealed ridge brace can keep the pitch steady. Shape the outward-curving eave tips with layered card profiles rather than trying to bend thick structural material into a fragile hook.
Apply narrow paper shingle strips from the eaves upward, offsetting the joints and leaving a small overlap. Keep the pattern consistent across both gables. Make the chimney as a hollow card box, then add shallow stone-textured facing compatible with the base. Do not load a thin roof with a solid lump of clay. Let wet facing dry fully before testing the chimney in place.

4. Layer the arches, railing and woodland colors
Cut simple nested pointed-arch frames from thin card, using the same template for matching openings. Stack two or three layers for depth. For the balcony, start with straight posts and a solid bottom rail, then add decorative curves inside that sturdy outline. Rolled paper curls can suggest ornate bargeboards without pretending to be structural joinery.
Paint the shell bark brown, darken recesses and lightly brush raised grain with a softer gray-brown. Give shingles muted slate variations, not alternating high-contrast stripes. Paint the chimney warm gray with darker joints. Work in thin coats and allow each to dry; heavy wet paint can soften paper detail. Keep the arches readable against the wall rather than outlining everything in metallic paint.

The best shortcut is repetition with restraint. A handful of well-matched arches looks more convincing than many elaborate but mismatched cutouts. Keep the most delicate curls on the front-facing gables, where they contribute to the silhouette, and simplify trim hidden behind the future foliage.
For rough garden edging or a hidden-base texture, bark-covered craft wood pieces offer irregular, partly split surfaces. They are not uniform round twigs or a replacement for straight structural bracing; select and trim only pieces that suit your composition.

5. Add amber windows and an accessible glow
Cut acetate slightly larger than each opening and place amber translucent paper behind it. Add a few fine dark divisions to suggest tracery, leaving generous clear areas. Glue only the hidden edges with a compatible adhesive, testing for fogging first. Keep the round upper windows circular and the lower windows pointed; their different shapes are part of the reference's rhythm.
If lighting is included, use a ready-made low-voltage miniature set exactly as its manufacturer directs. Position it behind a diffuser so individual bulbs do not dominate the windows. Secure leads clear of the removable rear panel and leave the switch and power source reachable. Test before closing the shell. No mains wiring, real flame or sealed-in batteries are needed for this effect.

6. Shape the stair, paths and giant mushroom
Apply thin stone facing to the stacked stair blocks, keeping the tread edges visible and the surface reasonably level. Continue a narrow path from the foreground toward the steps, then let a second curve lead past the mushroom. Press shallow joints into suitable facing while workable; avoid thick wet layers that can distort a card base. Finish and dry terrain separately where possible.
Build the mushroom from a lightweight core with a thin air-dry-clay skin, or use rolled card for a simpler version. Give it a broad rounded tan cap and a thick ribbed stem. Suggest gills with shallow marks underneath. Keep it behind the right stair rather than centering it on the lawn. Test its stability before painting and attaching it to the base.

7. Grow the garden in distinct layers
Start with low moss-like ground cover around stones, then add small leafy clusters, taller flowers and finally the broad fantasy lilies. Make paper leaves in several sizes and fold a subtle central vein before attaching them to fine stems. Build flower groups on small removable patches so you can adjust the composition without tearing up the entire base.
Carry a few flowering trails over the balcony edge, but leave sections of railing visible. Repeat pink and cream in small groups rather than scattering every color evenly. For another planting approach, explore a miniature fairy garden under the trees. The giant mushroom should remain readable against lower planting. Most importantly, preserve the stair and doorway: an enchanted garden may be unruly, but its resident still needs to reach the kettle.

8. Place the small clues and check the whole scene
Arrange a few tiny pots, a low gate, lantern-shaped details and modest furniture near the lower terrace. Keep these props subordinate to the windows and stair. A tiny loop of measuring cord beside the doorway can quietly recall the Tiny Tale, while a few seed trays beneath an amber window suggest the garden that shaped the house.
Look at the scene from front, side and the intended camera angle before fixing everything permanently. Remove items that hide a key arch or merge into the stair. Check that the balcony is supported, scenery is secure and the rear access still opens. If you added lighting, switch it off before handling and follow the set's storage guidance. Stop when the house and garden feel connected, not when every surface is covered.

Photograph the cottage without losing its silhouette
Place the finished model on a stable tabletop in front of a matte woodland-colored backdrop, leaving space between model and background. A large diffused light from one side will reveal shingles and stone; a white card opposite can lift the dark balcony without flattening it. If window lights are on, lower the surrounding light gradually rather than exposing only for the glow.
Use the showcase's three-quarter angle to keep both gables and the right stair visible. Check the top of the chimney and the mushroom cap before cropping. Then photograph roof texture, amber arches and the garden path separately. Support your phone or camera, avoid digital zoom when possible and compare frames for sharpness.

Small fixes that make a large difference
If the roof looks flat, deepen the shadow at the roof intersection instead of adding more decorative spikes. If the windows look opaque, reduce the number of translucent layers and move the light farther behind the diffuser. If paper trim curls, use less moisture and let pieces dry flat before attachment.
If the garden becomes a green wall, remove a few clumps and expose dark ground between them. If the mushroom competes with the house, move it farther back or mute its cap rather than shrinking every plant. If the stairs disappear, clear the outer tread edges and restore a small light-dark contrast along the route.
If you add metal-looking gate hardware, Vallejo Rust, Stains & Streaking can provide a restrained weathering option. Keep the effect on those metal details rather than painting rust over the timber or foliage, and test the finish on a spare painted piece.

For a gentler variation, omit lighting and use warm amber paper behind the windows. For a more architectural version, reduce flower coverage and emphasize the tracery. Either approach can retain the same crossed-gable silhouette. Changing one emphasis is more useful than rebuilding the entire design because one tiny detail refuses to cooperate.
Closing: Until Next Time in the Small World
What stays with me is the friendship between all that pointed architecture and all that undisciplined growth. The cottage has a strong outline, but the garden gets the last word. That feels like a particularly good arrangement for a fantasy miniature: plan the structure carefully, then allow a little mischief around its feet.
Purchased dollhouse architectural trim is another option for straight balcony edges or a simplified interior return. Check the advertised scale and profile first: classical molding will not reproduce the cottage’s pointed tracery, but a selected section can support your own interpretation.

Would your woodland cottage have a towering mushroom, a practical herb patch or a balcony completely surrendered to flowers? Tell me which detail you would keep, and share your own miniature experiments with #smallworldminiatures.








Comments