



The Last Jar Before Supper: A French Country Miniature Pantry

First Impressions in Miniature
I look at this French Country miniature pantry and immediately start choosing what I would take down from the shelves. A dark jar of preserves, definitely. One of those little golden loaves. Possibly the entire basket, although that seems an ambitious serving size for someone standing outside the dollhouse.
The food draws me in first: glowing bottles, cloth-topped jars, pale eggs, and bread tucked into baskets wherever a basket will fit. Cream paneling and warm wood give everything a quiet background. There is enough here to suggest a household with excellent intentions for dinner and very little available shelf space.
I lived in France for two years after high school, including time in Épinal in the Vosges. That was when I first discovered the pleasure of homegrown ingredients and pantry-canned food going straight to the dinner table. This scene brings that connection back for me.
So that is where I want to spend our making time: filling the pantry. We will give the shelves their supporting role, then concentrate on tiny jars, convincing crusts, and eggs small enough to disappear under a fingernail.
The purchased alternatives below use Amazon affiliate links; if you buy through them, it helps fund this tiny world. As an Amazon Associate I earn from qualifying purchases.

Miniature Backstory: The Tiny Tale
Madeleine had counted the jars twice. There were plenty of pickles, enough beans to keep several sensible suppers occupied, and precisely one jar of plum preserves.
Her sister was coming for dinner.
The difficulty was that her sister was coming in an hour, while Madeleine was already in the pantry with a folded linen napkin and a very persuasive piece of bread.
She lifted the jar from the middle shelf. The plums caught the lamplight, dark and glossy beneath their cloth cap. A sensible person would leave the jar closed until everyone sat down. Madeleine considered herself sensible in most matters, particularly those involving the correct place to keep a wooden spoon.
She untied one end of the string.
From the kitchen, the clock gave a small, officious tick.
“One taste would establish quality,” she told the shelves.
The shelves, which had witnessed the disappearance of half a loaf that morning, offered no encouragement.

Madeleine set the jar down again and examined the bread basket on the round stool. There were rolls with pale cracks across their tops and longer loaves leaning together. She selected a small loaf, turned it in her hand, and imagined breaking it open at the table while her sister reached for the preserves.
That would be a better moment. Annoyingly, it would also require waiting.
She retied the cloth, tucked the loaf beside the jar, and spread the napkin over the remaining bread. Then she moved the basket a fraction closer to the doorway, ready to carry through when dinner was served.
Her sister arrived early.
“Have you been cooking?” she asked.
“I have been exercising restraint,” said Madeleine. “It has taken most of the afternoon.”
They carried the bread and preserves to the table together. Madeleine let her sister open the jar, which she felt demonstrated exceptional character.
The basket on the little stool is my favorite trace of this household negotiation: bread already gathered, dinner almost ready, and the last jar finally going exactly where it belongs.
A Guided Tour of the Build
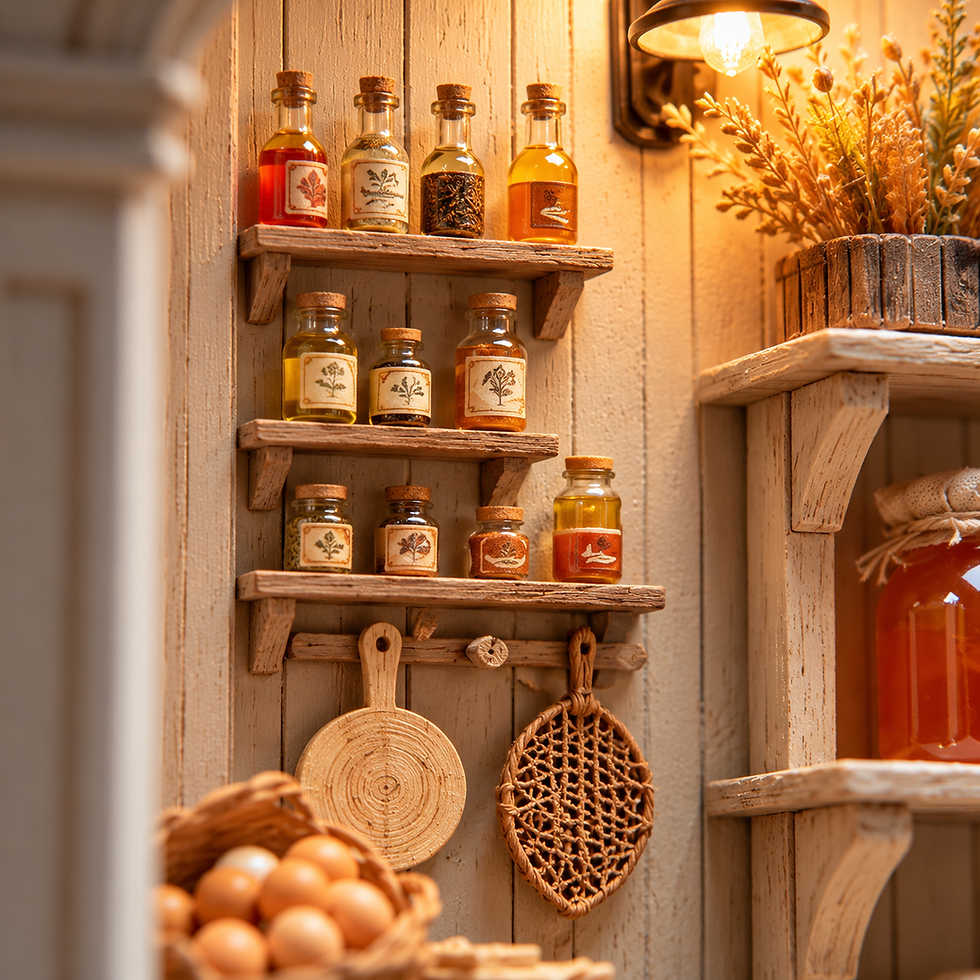
Start with the central shelves, where the pantry becomes a study in food colors. Amber sits beside deep red, pale round pieces press against clear-looking jar walls, and green preserves add a quieter note. The fabric caps have uneven little skirts tied close to the necks. Their softness makes the smooth containers feel even more convincing. I especially like the differences in fill level and jar size; the collection suggests many small batches brought together over time.

Lower your gaze to the bread basket on the round stool. Its handle frames an assortment of golden loaves, placing them forward of the busier shelving. More bread rises from sacks and baskets along the right side, while woven containers below provide a rougher, darker texture. Beyond, the arched glazed cupboard holds additional labeled jars behind a grid of wooden bars, with a dark latch that anchors the pale door.

At the left, slender bottles occupy a shallow rack above hanging wooden utensils and a basket of warm-toned eggs. This small corner changes the rhythm: tall bottle necks above, rounded eggs below, and a short run of countertop between them. The lamp turns the pale wall golden near the top, while the lower bottles remain in gentle shadow. Across the scene, cream boards and worn-looking shelf edges carry the display without competing for attention. I keep coming back to the food, which seems a very reasonable response to a pantry.
Inspirations: From the Big World to the Small
My personal connection here leads toward Épinal, a town along the Moselle with woodland close at hand. The official local tourism descriptions place that relationship between town, river, and forest at the heart of the destination. I would borrow that grounded palette for this pantry: warm timber, creamy cloth, muted greens, and the concentrated color of something gathered and put away.

This is an interpretation of French Country warmth, rather than a claim that the pictured room reproduces a particular Vosges interior. The strongest inspiration is the relationship between ingredients and a meal. A jar belongs near bread because someone might use them together. A sack earns its corner because it holds a household staple. That gives you a useful arranging principle before you make a single apple.
For a roomier companion scene, the soft cabinetry and woven details in the French Country conservatory kitchen offer a lovely continuation of the palette. The miniature bread vendor diorama shifts the same affection for bread into an outdoor display.
Here, I would keep the ingredients close together and let a few repeated materials connect them. Cloth caps echo sack tops. Basket fibers echo wooden shelves. The brightest colors stay inside the jars, where they can do their delicious-looking work.

Artist Tips: Make Your Own Magic
The illustrations here are AI-generated, and this guide offers an inspired approach rather than an exact, tested reproduction; results vary with materials and technique. You may also discover that tying a bow around a tiny jar requires more negotiation than Madeleine's dinner plans.
Supplies for a French Country Miniature Pantry
Start by sorting what you already have; a compact shelf display gives these food projects plenty of room.
• Shell and shelves: Reuse clean box board and smooth wooden stirrers, or purchase basswood. Add acrylic paint, paper-compatible PVA, and small clips.
• Jars and bottles: Reuse clean clear packaging for rolled-cylinder illusions with card caps. Add transparent colored craft film. For shaped shoulders and necks, browse miniature jars. This is a category search, so check individual dimensions and whether the containers actually open.
• Food: Use leftover clay from an identified product line, or choose polymer clay in cream, tan, red, yellow, green, and brown. Paper scraps and craft beads supply dry-goods alternatives. Air-dry clay has different requirements and is not interchangeable here.
• Caps, sacks, and baskets: Reuse fine cotton, tissue, sewing thread, thin card, and paper cord. Purchased miniature baskets are optional; choose a fine weave.
• Tools and finishes: Gather scissors, tweezers, a toothpick or needle tool, brushes, a protected cutting surface, an oven thermometer, and a clay-dedicated oven-safe tray. Repurpose a clean toothbrush for texture. Check adhesive and coating compatibility on scraps.
Keep these decorative pieces away from food, children, and pets. Work over a tray to catch tiny parts, cut away from fingers, and keep craft tools separate from cooking utensils.

1. Plan the food, then give it a simple home
Choose 1:12 as a suggested working scale, rather than an identification of the image's scale. Divide a real object's measurement by twelve: a 24 cm jar becomes 2 cm tall, a 60 cm baguette becomes 5 cm long, and a 6 cm egg becomes 5 mm long. Smaller jars and shorter loaves add useful variety.
Make paper silhouettes of several jars and place them against a trial shelf before cutting the shell. Leave enough headroom for cloth caps. A suggested 24 cm-wide backdrop with shelves around 3 cm deep can hold a satisfying collection; adapt those dimensions to your available space.

Use a shallow box or join two card walls to a firm base. Add narrow card strips for understated vertical paneling, then cream paint. Fit simple shelves with small supports underneath, keeping heavy purchased jars low. Brush a little warm brown along selected edges and allow paint and adhesive to dry as directed. Reserve the elaborate doorway for another day if it steals time from the preserves.

2. Make a family of jars and bottles
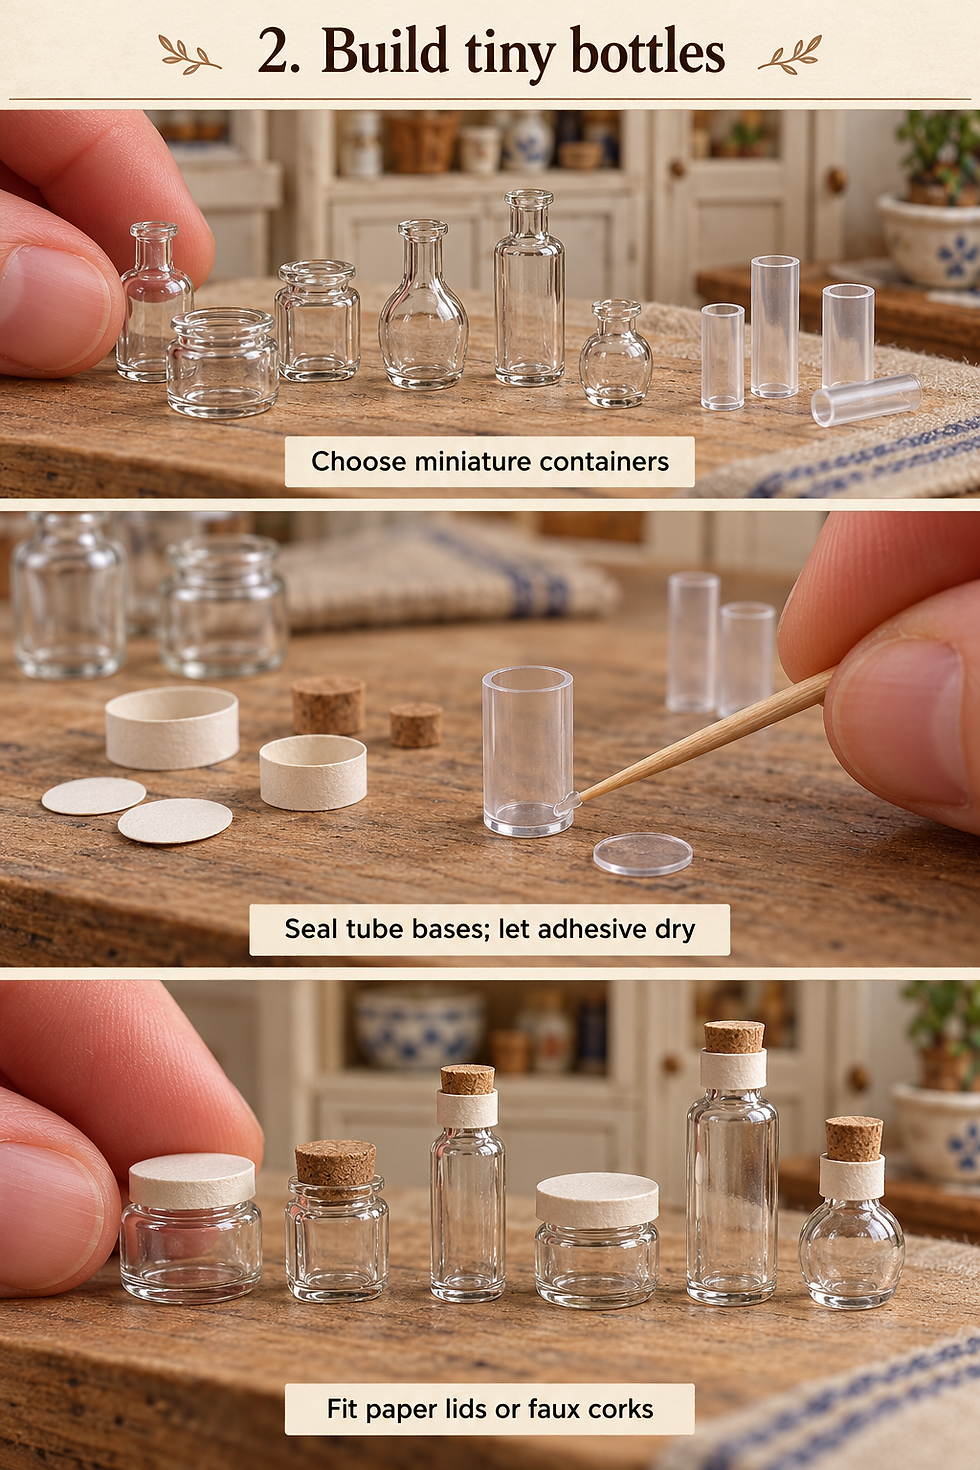
Sort purchased blanks into broad jars for visible contents and narrower bottles for oil or cordial effects. Compare them with your paper silhouettes. Check their proportions before filling them.
For a lightweight jar illusion, cut a rectangle from clean, flexible clear packaging and roll it around a pencil or dowel. Join the overlapping seam with a narrow strip of transparent craft tape. Trim the cylinder square and hide its seam at the rear. Add card discs at the bottom and top, using narrow paper collars to hold the edges together. Keep these simple cylinders capped and handle them by the base.

For an opaque crock, wrap thin card into a cylinder and add a rounded card lid. Paint it warm white and leave space for a tiny label. This adds variety to the collection.
Use shaped blanks for slender bottles; a small paper collar and painted cap give a plain bottle character. Keep glass and plastic containers unheated throughout this project. Let any adhesive cure before filling or handling the pieces.
3. Fill the preserves and pickle jars
Make the food first, sized to pass through each jar's opening after curing. Roll plum-colored clay into small ovals, pinch orange pieces into irregular fruit wedges, and shape muted green clay into short cucumbers. Give the pickles a few shallow dents with a toothpick. Slight differences make a batch look more natural.
Cure the clay pieces separately, following the exact product's package directions for temperature and time. Use an oven thermometer, ventilate as instructed, and let the pieces cool completely. Never use a microwave or heat the assembled jars. Repeat this manufacturer-led curing routine for the bread, eggs, produce, and clay dry goods below.
For an accessible liquid illusion, curl a thin amber or pale green transparent craft-film sleeve inside the empty jar, then add the cooled pieces. Cut the sleeve to the intended fill height, leaving a clear band below the neck. Its color suggests syrup or brine without a liquid pour. Check the result in daylight; a strong tint can hide all your carefully shaped fruit.
Jam can be an irregular, deep-red cured clay insert behind a clear wall, with a small amount of lighter fruit color visible near the front. Keep the top slightly below the lid. Close the jar once everything is dry and secure. This dry-fill approach avoids resin mixing and preserves the option to rearrange removable contents.

4. Shape crusty bread and basketfuls of eggs
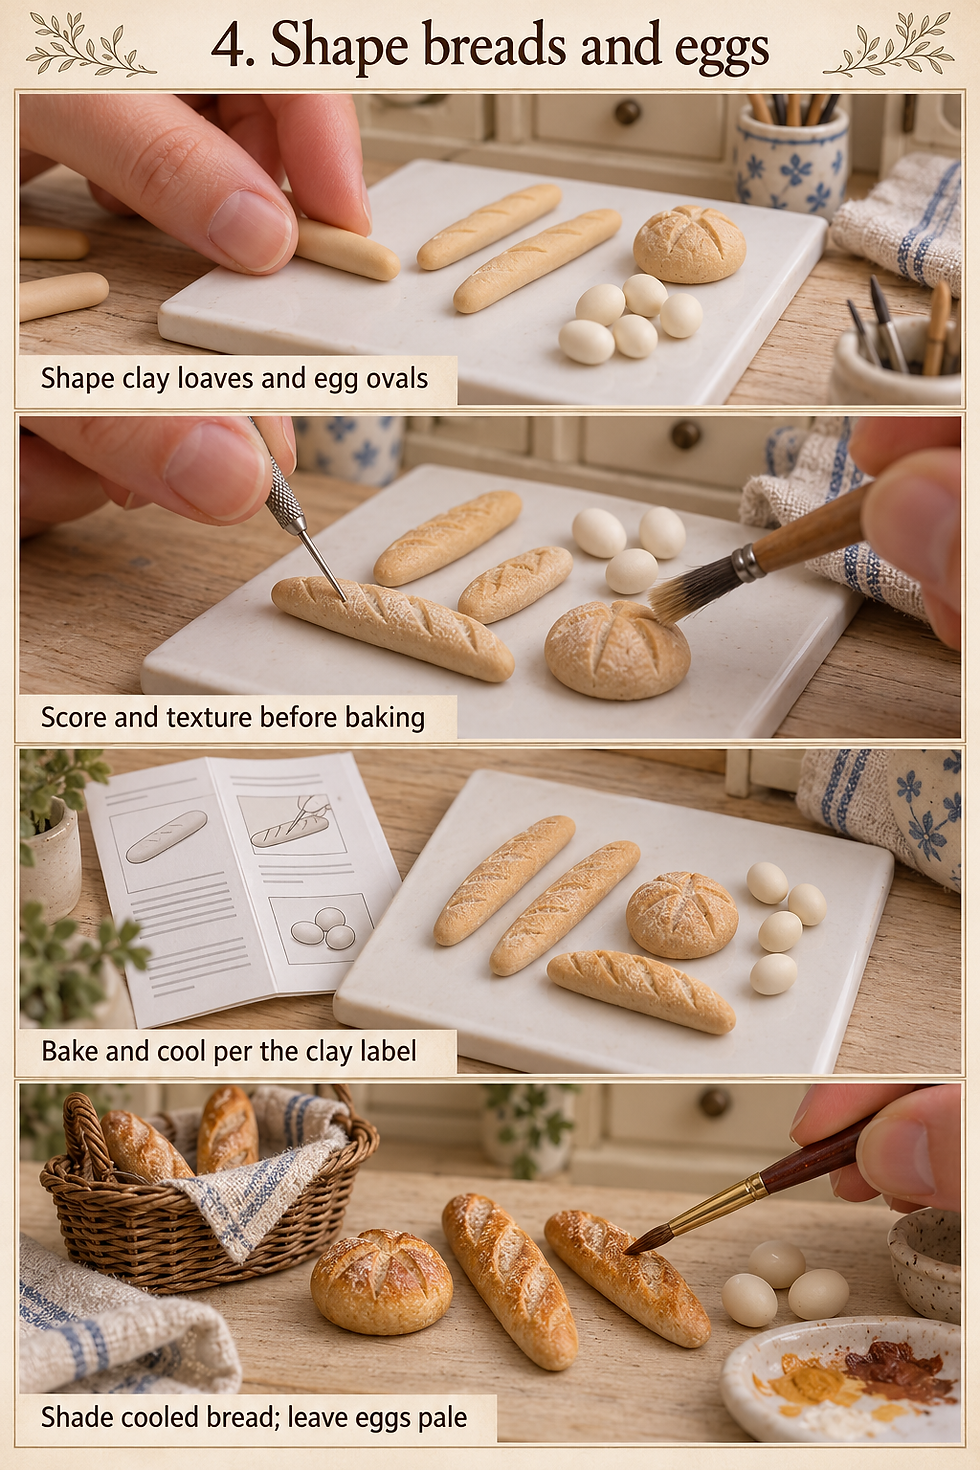
Condition cream clay with a small amount of tan to create a pale bread base. For a baguette, roll an even cylinder, taper the ends, and soften any obvious seam. Make round loaves from flattened balls and rolls from shorter ovals.
Press a clean, dedicated toothbrush lightly against the surface for a fine texture. Add shallow diagonal scores to the baguettes with a needle tool, working on a protected surface and keeping your free hand clear. The grooves need room to remain visible after coloring.
Cure the bread using the routine above and allow it to cool. Test a little compatible acrylic paint on a spare cured sample, then brush thin ochre and brown layers over the raised crust, leaving the cuts paler. Let each layer dry. Keep the finish mostly matte; a shiny baguette begins to resemble varnished furniture with excellent branding.
For eggs, start with a ball of ivory clay and roll one end slightly narrower. Make a second batch in pale warm beige. Check a few against the planned 5 mm example. Cure and cool them separately, then nestle them into a shallow basket lined with thin paper. Arrange a single visible layer over a concealed support if you want the basket to look generously filled without making twenty-four eggs.
5. Add carrots, apples, pears, and garlic
Build a small produce assortment from simple shapes. Roll orange clay into tapered carrots and add a few fine transverse marks. Keep them shallow: at this size, deep grooves can turn dinner into a collection of traffic cones. Leave a tiny hole at the broad end for a paper leaf tuft added after curing.
Make apples from small balls, pressing a slight hollow at the top with a rounded tool. Pears begin as balls too; pinch and lengthen the upper half while keeping the base generous. Mix neighboring shades rather than matching every fruit. After curing and cooling, add short paper stems with a suitable adhesive and let them dry before arranging.
For garlic, press several little ivory teardrops around a central clay core. Draw shallow vertical divisions, then pinch the top together. A tiny paper root tuft can be attached after curing. Three bulbs gathered together read clearly without a complicated braid.
If painting blush onto an apple, build it in thin, translucent layers and stop while some base color remains. Give each food a distinct silhouette first. A good pear shape does more work than a heroic quantity of freckles.

6. Stock dry goods and quietly cheat the sacks
For beans, make small cream clay ovals and add a shallow crease to a few visible pieces. You only need detailed beans at the front of a clear jar. Fill the hidden rear with simpler cured shapes of the same color, keeping the silhouette consistent.
Paper makes useful pasta. Cut narrow cream strips for flat noodles, or roll short rectangles around a fine tool to suggest tubes. Remove the tool, secure the paper seam, and let it dry before filling a container. Straight, thin tan paper strips can stand in a crock like the upright pasta shapes in the reference.

Form a sack around a small card cylinder using fine cotton. Fold and glue the base, leaving the top soft. Add a fitted card platform just below the opening, then cover only that surface with cured clay grains or fine craft beads. The false bottom provides an abundant-looking top layer while keeping the sack light.
Suggest flour with an off-white painted insert instead of loose powder. Avoid real flour, rice, seeds, and dried food: pantry props should remain craft objects rather than potential refreshments for pests. Allow all glue to dry before testing the sacks on shelves.

7. Finish the caps, labels, and baskets
Cut thin cotton circles slightly larger than the jar lids. Drape each over a closed lid, pinch small folds around the rim, and secure with fine sewing thread. Test one circle first; thick fabric and bulky knots can overwhelm a small jar. A tissue-paper cap painted lightly in cream offers an easier alternative.
Make labels from thin paper, using short names such as prunes, haricots, or confiture. Keep lettering sparse and vary the label placement. Apply adhesive sparingly so the paper stays smooth, then let it dry before handling. Leave some containers unlabeled to give the shelf visual breathing room.
For a simple basket effect, wrap fine paper cord around a small card tray, secure each section, and add a doubled paper handle. A wash of tan paint unifies the surface once the adhesive is dry. Purchased baskets can supply a more intricate weave.
If you want a small coffee corner, optional resin coffee accessories provide decorative, nonfunctional props. Check their listed measurements against your scale before choosing them, and keep the pantry foods as the main attraction.

8. Arrange the shelves and photograph the feast
Place your tallest containers first, then gather smaller jars in loose groups. Repeat amber, red, and cream across the shelves without creating identical rows. Turn one label slightly aside and leave a little clear shelf beside a bread basket. Set the central basket forward on a stool or low stand so its rim remains visible.
Photograph from shelf height, with a plain backdrop beyond the open front. Use soft window light or a diffused lamp, and place white card opposite to lift the shadows. Keep diffusion materials away from hot lamps. Move the light sideways until the jars show a slim highlight rather than a broad white reflection.

Take one overall view, then close-ups of preserves, bread, and eggs. Check focus on the food's front edge and review the image for stray glue threads before putting everything away. A bright screen is remarkably good at finding the one fiber you missed.

Tiny problems, manageable fixes
• Fruit disappears inside the jar: Remove the tinted sleeve and compare. Use a paler film or fewer pieces so clear gaps remain.
• Bread looks orange: Add a thin, compatible tan layer on a test piece, preserving darker color only on the highest crust areas.
• Eggs look like beads: Narrow one end gently before curing and reduce the shine; keep the basket lining thin.
• Cloth caps become enormous: Switch to finer fabric or tissue and shorten the overhang. Use thread rather than household twine.
• A shelf looks crowded but empty: Bring some food forward, vary container heights, and remove one oversized item before adding more.
Closing: Until Next Time in the Small World
I would happily leave Madeleine in charge of this pantry, provided someone keeps an eye on the last jar before supper. The little bottles and baskets make it welcoming; the food gives it a reason to exist.

Which would you make first: plum preserves, a basket of eggs, or bread with a properly crackled crust? Tell me in the comments, and share your own pantry creations with #smallworldminiatures.
You can join the newsletter here on the site for more tiny-world visits, or browse the Small World Miniatures shop. Meanwhile, I hope your shelves fill up with good things, one very small jar at a time.








Comments