


Tea Before the Leaves Fall: A Czech Miniature Kitchen

First Impressions in Miniature
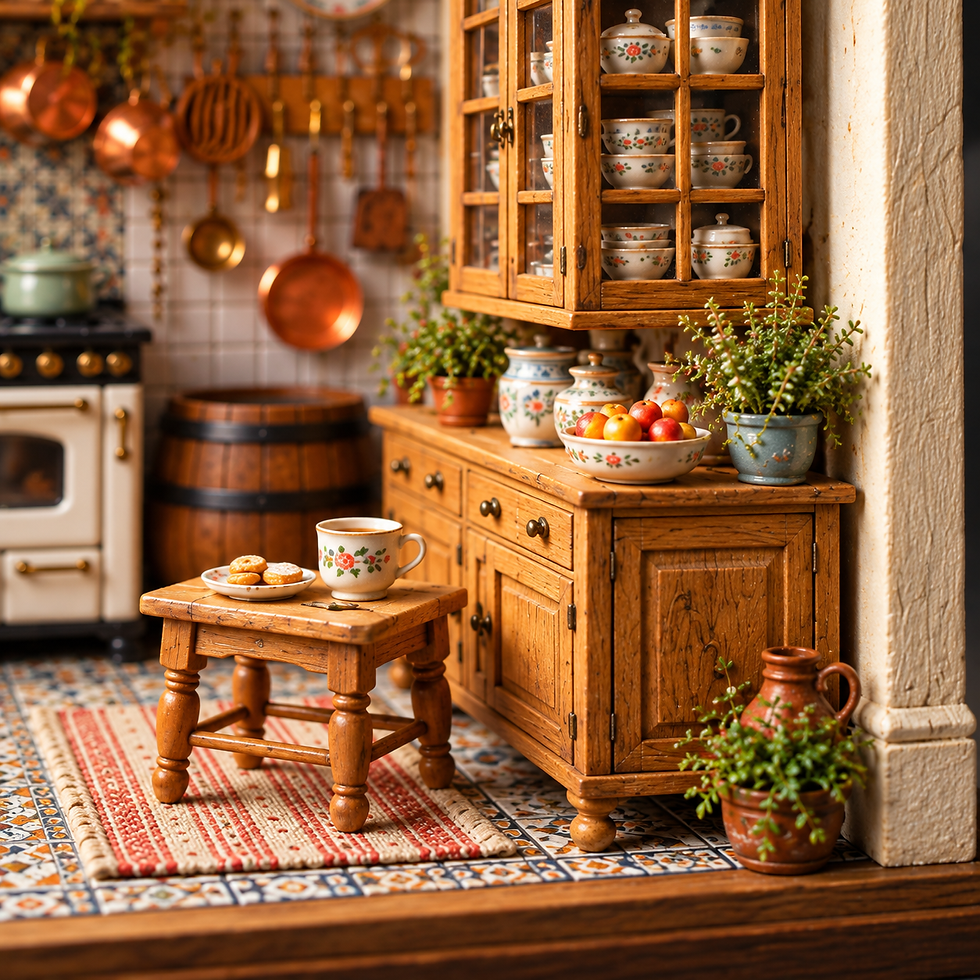
This kitchen looks ready to keep you for the afternoon. Honey-brown window frames gather the last gold of autumn, floral crockery fills the shelves, and a cream stove anchors the room beneath a small forest of copper-colored pans. I’m particularly fond of the stool with its cup and little plate. Apparently the furniture has worked out that every available surface should support a snack.
This Czech miniature kitchen brings a folk-inspired warmth to the quieter weeks of November. The glassy roof sections and generous windows give it a conservatory-like openness, while rugs and painted decoration keep the room intimate. Below, we’ll look closely at the details, discover how the room keeps a little summer in its floral pottery, and plan an approachable room box inspired by the scene. You can borrow its welcoming arrangement without copying every flower on every plate. Your eyesight is allowed a vote.
The purchased alternatives below use Amazon affiliate links; if you buy through them, it helps fund this tiny world. As an Amazon Associate I earn from qualifying purchases.
The Rolife Happy Meals Kitchen DIY Miniature Kit is a separate kitchen kit, not this pictured room. Check its scale before combining accessories.

Miniature Backstory: The Tiny Tale

A Guided Tour of the Build
Windows that make room for autumn
Start at the left corner, where slender wooden-looking divisions turn the windows into a gentle grid. Gold and russet foliage glows beyond the glass. Pots crowd the sill, with finer stems lifting above the larger leaves so the arrangement stays airy. Beneath them, the round table carries a pale runner edged in red. The woven-looking rug, chair seat and hanging basket introduce rougher textures against all that glazing. This is the room’s softest landing place.

A stove framed by flowers and copper
The cream-and-black stove forms a crisp vertical shape near the center. Small warm-metal details repeat the color of the hanging pans, while the patterned backsplash connects the cooking area to the decorated floor. Above, open shelves hold pale vessels with red and green floral motifs. Their rounded shapes soften the straight tile joints. I would keep this view relatively uncluttered in an adaptation: the stove, pots and orderly shelves already have plenty to say.

The cupboard and the unofficial tea station
On the right, a glazed-looking wall cupboard displays stacks of dishes above a matching wooden-looking cabinet. A bowl of bright fruit, leafy pots and a tall jug break up its horizontal top. The little stool sits forward on a striped rug, making that cup feel recently abandoned rather than formally displayed. The model’s pale front posts and dark wooden-looking base remain visible around the whole room. Those boundaries are part of its appeal: a complete domestic world, small enough to admire at once.
For purchased floral dishes, consider the Odoria Blue Lotus Porcelain Tea Set. Check dimensions against your furniture; this is an optional alternative.

Inspirations: From the Big World to the Small
I read this scene as a Czech and Moravian folk-inspired fantasy, with an airy garden-room addition to the vocabulary. Its visible surfaces do not establish a date, a maker or a particular construction material. Three real-world references help explain its character without turning it into a historical reconstruction. The first is Holašovice, whose eighteenth- and nineteenth-century vernacular buildings UNESCO identifies with South Bohemian folk Baroque. That precedent suggests how practical domestic architecture can carry generous ornament. Here, the decorative bands give the room a similar sense of everyday celebration.
For timber and patterned detail, consider Maměnka at Pustevny. The Czech National Open-Air Museum identifies it as a Dušan Jurkovič design built between 1897 and 1899. I’m drawing a visual parallel to the expressive wooden construction, not claiming this kitchen reproduces its interior. At miniature scale, the useful lesson is to make the framing clear before adding ornament. A few strong beams can support an abundance of small painted details without letting the composition become a jumble.

The Museum of Tupesy Ceramics offers a more specific connection to the shelves. Its displays pair a potter’s historic dwelling with the history and technology of local majolica production. That relationship between decorated pottery, craft and daily life suits this kitchen beautifully. The pictured vessels recall a floral folk-pottery language, although their exact tradition cannot be identified from the image. For your own version, repeat a simple red flower and green leaf across several cream pieces. Consistency will feel more convincing than an ambitious pattern on only one pot. For a companion project, explore my French country miniature pantry.
Artist Tips: Make Your Own Magic
The supporting illustrations are AI-generated, and this is an inspiration guide rather than an exact, tested reproduction of a documented physical build. Materials and results vary. In particular, your first tiny saucepan may resemble a very determined button. Keep it; kitchens can accommodate a little character. The plan below favors painted card, straightforward woodwork and a nonworking stove, so you can concentrate on warmth and proportion.
Planning your Czech miniature kitchen
Try 1:12 as a planning scale, not a measured fact about the reference. A suggested base of about 30 by 24 centimeters, with walls around 24 centimeters high, leaves room for a compact table and stove. Aim for a counter near 7.5 centimeters high and a chair seat near 3.8 centimeters. Adjust the footprint after a paper mock-up. This is an intermediate project because window alignment and small furniture need patience. Purchased furniture, printed patterns and an open roof make a simpler version.
SAMCAMI Baking Accessories offers optional kitchen props. Confirm the stated scale before mixing purchased pieces with handmade furniture.

Supplies: a small kitchen workshop
Structure, essential: reuse clean packaging card for templates and surface details, plus straight, sound wood offcuts where suitable. Purchased alternatives are bookboard for the walls, a thin plywood base, stripwood for framing and clear craft acetate for glazing. Use a paper-compatible craft adhesive and wood glue suited to bare-wood joints. Keep the intended glazing adhesive compatible with your chosen clear sheet.
Color and decoration, essential: start with leftover water-based acrylic paint, clean paper and fine fabric scraps. Useful colors are warm cream, brown, muted green, terracotta, charcoal and copper. Printable paper, fine cotton fabric, narrow braid and a small detail brush are purchasable equivalents. A compatible clear gloss finish is optional for selected dishes or tile faces; the walls and timber can remain matte.

Furniture and props: reuse card, smooth wooden beads, thread and thin cord. Buy miniature furniture or stripwood if the offcuts are too bulky. A small amount of air-dry clay is optional for bowls, pots and a pumpkin; ready-made miniature dishes avoid that stage. Use clean tissue or ordinary paper for foliage, rather than damp garden material. All food-shaped pieces are decorative, never edible.
Tools and photo supplies: gather scissors, a craft knife, a suitable cutting surface, tweezers, fine brushes, a pencil, small clamps and a white card reflector. Fine abrasive paper is useful for bare wood. Work with controlled cuts away from fingers, ventilate as each product requires, and keep small pieces and sharp tools away from children and pets. Choose a plain matte sheet for the photographic backdrop.
1. Plan the room before filling the shelves
Draw the base on scrap paper and fold plain card into temporary walls. Leave the front open. Put a large window bank on the left and another behind the sink, reserving the back-right area for the stove and dish shelves. Make folded-card blocks for the counter and cupboard, plus a paper circle for the table. Keep a clear strip through the middle so the furniture does not resemble a kitchen clearance sale.
Check the room at miniature eye level. The table should sit below the window view; the cupboard must leave the stove visible. Try the chair beside the table before fixing its diameter. Mark the positions on the paper plan, then lay loose stripwood along the intended window divisions. If the sloped glazed roof seems demanding, leave the top open and retain one substantial front beam. Nothing needs glue yet. This is your cheapest opportunity to discover that the cupboard has eaten the doorway you never intended to build.

2. Build a square shell and clear window frames
Transfer the wall shapes to bookboard and the footprint to a stable base. Cut window openings while the walls are flat, using several shallow passes on a proper cutting surface. Keep fingers outside the blade path. Dry-fit the shell against a square support, then join it with adhesive appropriate to the materials. Reinforce hidden edges with stripwood. Follow the glue’s handling and curing instructions before lifting or loading the structure; a joint that feels dry may still need support.
Build window frames from stripwood on a flat paper template, with a piece of release material beneath if compatible with your adhesive. Assemble each frame separately so its crosspieces meet cleanly. Lightly smooth rough wood, remove dust, and paint or stain the exposed framing before fitting clear acetate behind it. Test the glazing adhesive on scrap first. For the optional roof, make two small sloped frame units and leave them removable. Install clear panels only after surrounding paint dries, keeping glue away from the visible centers.

3. Layer cream walls, patterned tiles and warm timber
Paint the wall areas warm cream and the framing honey brown, allowing each coating to dry as directed. Create a shallow plaster-like texture by stippling the cream paint with a nearly dry brush; avoid thick lumps that would become boulders at this scale. Use a darker brown sparingly beneath beams and inside corners. Keep broad wall areas lighter so the dish patterns remain readable.
Vallejo Gloss Varnish 70.510 is an optional finish for selected dishes. Test compatibility on a spare painted piece first.
Make the floor and backsplash on separate thin-card inserts. Draw a small repeating flower-and-diamond pattern or print your own design, using muted blue, terracotta and cream. Test the size beside a paper plate before committing. Score or draw restrained joints rather than deep trenches. Apply adhesive evenly and press the inserts flat while it sets, following the product instructions. Add a narrow patterned band high on the wall. Let the surfaces dry fully before installing them. If you want shine, test a compatible clear finish on spare printed card first; some inks run or darken under wet coatings.

4. Make the stove, sink and useful little cabinets
Build the nonworking stove as a sturdy card box with a black top, cream front and layered-card oven door. A dark paper inset suggests the oven window; it needs no opening mechanism. Add small rounded beads or card discs for the controls and short painted-card strips for handles. Keep them consistent in size. Make the sink from a shallow layered-card tray, seal and paint it according to the coating instructions, and suggest a faucet with a purpose-made miniature fitting. No water, heat or electricity belongs in this stove-and-sink assembly.
Make the lower cabinets as simple boxes with thin-card door panels and stripwood edging. Leave doors fixed shut for strength. Build the wall cupboard as a shallow box with shelves, then attach clear-sheet door fronts in slim frames after all paint dries. Position shelves to accept your chosen cups before gluing them. Purchased unfinished cabinets are an easier alternative. Paint the sink cabinet muted green and the right-hand furniture warm brown, then wait for coatings and joints to cure before attaching the units to the shell.

5. Set out pottery, copper pans and soft textiles
Shape a few simple dishes from air-dry clay, or decorate purchased miniature blanks. Keep clay pieces modest and follow the actual product’s thickness and drying guidance. For Crayola Air-Dry Clay, the manufacturer specifies thoroughly dry pieces before acrylic painting; air-dry clay is not oven-bake polymer clay. Paint the dishes cream, add a small red flower with green leaves, and let the decoration dry before testing an optional compatible gloss coating. These are display pieces, with no food-safe or waterproof claim.
Boutigem Miniature Resin Coffee Tools (MixedColor-l) offers optional decorative coffee props. These are not working appliances or edible ingredients; check their scale.

Suggest pans with shallow card circles and layered rims, adding narrow card handles before painting them copper. Short thread loops can hang them from a wooden rail; keep every pan visibly attached rather than floating below it. Use ready-made miniature cookware if the circles become frustrating. Build a simple round table from a card top, a broad central support and stable feet, or use purchased furniture. Drape fine cotton over it, and fray only a little fringe. Add a narrow striped rug and small stool. Allow adhesives to set before arranging the cup and plate.

6. Add autumn plants and a believable daily life
Make foliage from small painted paper leaves attached to fine thread stems, then group the stems in lightweight pots. Vary heights across the sill, keeping several window panes clear. A hanging basket can be suggested by a small card cup wrapped in fine cord, with three thread suspension lines meeting securely above it. Glue the pot and threads before adding foliage, and let every joint set before hanging it. Use a restrained amount of rust-red and ochre among the greens so the room still feels lived in after November.
Add a few rounded fruit shapes and a pumpkin from your chosen dried-and-painted clay, or use ready-made pieces. Place the tea setting on the stool and one arrangement on the table, then stop and look from the front. You should still see the patterned floor and cabinet faces. Suggest the pendant with a lightweight, nonworking miniature shade securely suspended from the upper beam. External photographic light can supply the glow. Keep it unlit rather than introducing improvised wiring. Fix the most vulnerable props only after their positions work, and wait for all adhesives and finishes to cure before moving the room.

Photograph the warmth without losing the details
Set the finished room on a stable surface before a curved matte backdrop. Leave the front edge and at least one side visible in a wider photograph so the model’s scale is honest. Use a soft window light from the left, with a white card on the right to lift the cupboard shadows. A separate autumn-colored paper background behind the model’s windows can suggest the outdoor view without filling the kitchen itself with leaves. Keep it far enough away to blur gently.
Support your phone or camera near counter height, then move slightly above it for the complete room. Angle the model or light until the clear panels stop reflecting bright rectangles. Focus on the stove for the wide view and take separate close-ups of the table, cookware and cupboard. Check each image for visible glue and stray fibers before packing away. If you need artificial light, use suitable cool-running photographic equipment and its intended diffuser; keep improvised paper and fabric away from heat. Let the setup serve the room rather than trying to light every corner equally.
Small kitchen troubles, practical fixes
Bowed walls or floor inserts: stop adding wet layers. Press removable pieces flat while their appropriate adhesive sets, and reinforce the shell’s hidden corners. Replace a badly warped insert rather than hiding it beneath furniture.
Cloudy glazing: test the adhesive on a spare clear-sheet piece. Use less at concealed edges, and replace damaged panes before enclosing them. A successful test matters more than a bottle’s broad promise.
Patterns that overwhelm the room: reduce contrast or simplify the repeat. Let the walls, table runner and cabinet fronts provide quieter areas beside the busy tiles.
The Rolife Garden House Book Nook Kit explores a separate glassy garden setting if you prefer a kit rather than this room-box plan.

Wobbly furniture or slipping pans: level the supports on a flat surface, use appropriate adhesive and wait for the specified cure. Give hanging cookware a real loop or hook and check its attachment before lifting the model.
A crowded window: remove one pot and shorten a few stems. A clear patch of autumn light often contributes more than another beautifully made leaf.
Closing: Until Next Time in the Small World
I keep returning to the cup on that low stool, a small pause among painted flowers after the garden outside has faded. The room’s warmth comes from those ordinary pauses as much as its ornament. A towel left within reach, a pan on its hook and a little light between the plants make a miniature feel ready for someone.
Would you start with the floral dishes, the copper-colored cookware or those generous autumn windows? Tell me in the comments, and share your own kitchen corners with #smallworldminiatures. Join the newsletter for more small-world inspiration, and browse the online shop when you’re planning your next project. Keep a little summer on the shelves. A painted flower can brighten even the greyest afternoon.








Comments