



The Lantern That Knocked: A Bulgarian Fantasy Cottage Miniature
First Impressions in Miniature
Some houses look welcoming. This one looks as though it has already put the kettle on and knows why you came.
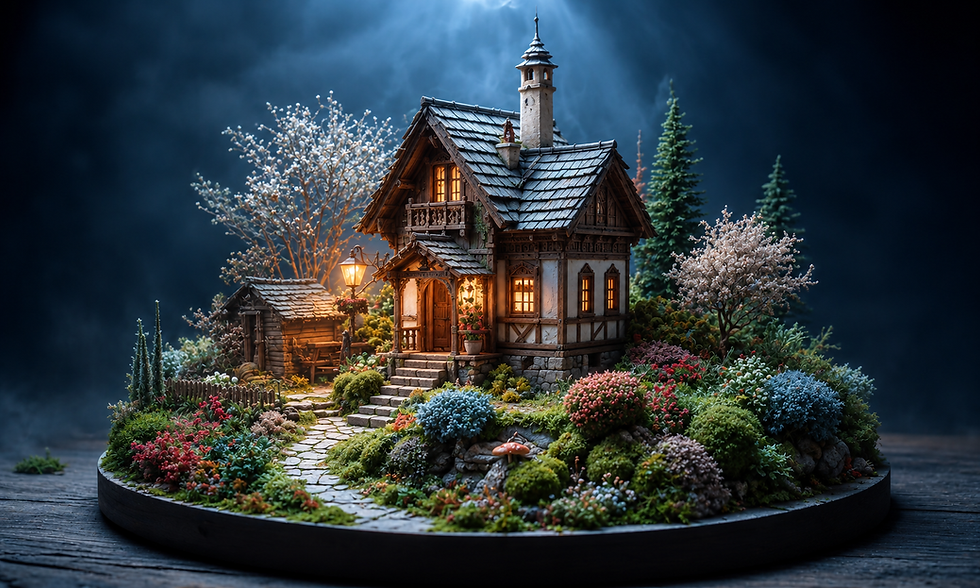
I love the tension in this Bulgarian fantasy cottage miniature: warm windows beneath a cold blue sky, elaborate dark timber against pale walls, and a garden so exuberant it has practically climbed onto the doorstep. The slender chimney gives the roof a wonderfully peculiar silhouette. Somebody clearly requested a modest cottage and then became enthusiastic about the chimney.
With Halloween approaching, this feels like the right place for a small haunting. Come closer for the story, then stay for a practical guide to the carved-looking woodwork, layered roof, lush circular garden, and moonlit photography.
The purchased alternatives below use Amazon affiliate links; if you buy through them, it helps fund this tiny world. As an Amazon Associate I earn from qualifying purchases.

Miniature Backstory — The Tiny Tale
In this imagined little world, a hedgehog called Mosswick keeps the cottage and its garden. He trims the path edges, sweeps the steps, and lights the tall lantern every evening. He also leaves the porch light on for late visitors, though he insists this is hospitality rather than nervousness.
On the first cold evening of October, someone knocks three times.
Mosswick opens the door. The path is empty. The flowers barely stir.
He returns to his chair.
Three more knocks.
This time, he carries a broom. It is a reassuring broom, with a stout handle and absolutely no experience of supernatural matters.
The sound comes again, just above his head.
From inside the lantern.

A pale moth stands behind the glass. Its wings are translucent as old tracing paper, and its shadow falls toward the flame-colored light instead of away from it.
“You’ve moved the house,” the moth says.
“I’ve weeded the path.”
“Same difficulty from my perspective.”
The moth explains that it has visited this garden every October for so long that it can no longer remember being alive. Each year it follows the moon to the little red mushroom beside the rocks. Tonight, the moon has vanished behind clouds, and the lantern has been offering very confident but entirely incorrect directions.
Mosswick lowers the broom.
“I suppose you’d like an escort.”
“I’d prefer a refund, but an escort will do.”
Together they cross the garden: a hedgehog in slippers and a moth that makes the flowers shiver as it passes. At the mushroom, the moth pauses.
“You kept the light on.”
“I always do.”
For a moment, Mosswick sees dozens of tiny pale wings in the shadows beneath the shrubs. Then the clouds part, the garden turns silver, and the moth is gone.
He goes inside and writes a note for himself: CHECK LANTERN. POSSIBLY HAUNTED. KEEP LIT.
By morning, the broom has moved from the porch to the shed. Mosswick is almost certain he left it outside.
You can spot the red-capped mushroom low in the garden, in front of the cottage. The moth and its complaints belong to our story; the mushroom has already supplied a perfectly good meeting place.

A Guided Tour of the Build
A doorway with a warm welcome
The curved wooden door sits beneath a little tiled canopy, framed by carved-looking trim and pale wall panels. Broad stone-like steps give the entrance weight. Nearby flowerpots soften its edges, while the taller lantern to the left creates a second warm pool of light. I like how the paving leads us there without cutting the garden neatly in half.

Rooflines, balcony, and a very ambitious chimney
Cool blue-gray shingles overlap across the steep roof. Deep eaves throw dark shadows onto the timber below, and a tiny balcony sits beneath the front gable. Above it all, the pale chimney rises to an ornamental cap. The carving and roof edges reward a close look, but the strong outline still reads from across a room.

A garden that keeps its secrets
The circular base contains a complete landscape: mossy rocks, bright low flowers, rounded shrubs, blossom-covered trees, and taller evergreens behind the house. A small timber shed anchors the left side. The dark rim keeps this abundance visually contained. Cool light brushes the foliage while the windows glow amber, giving even the cheerful flowerbeds a little nighttime uncertainty.

Inspirations — From the Big World to the Small
This is a Bulgarian-inspired fantasy scene rather than a reconstruction of a documented house. Its theatrical roof, ornamental chimney, and flowering garden belong comfortably to an invented world. That gives us room to borrow useful design ideas without assigning the cottage an authentic village, date, or folklore tradition it has never claimed.
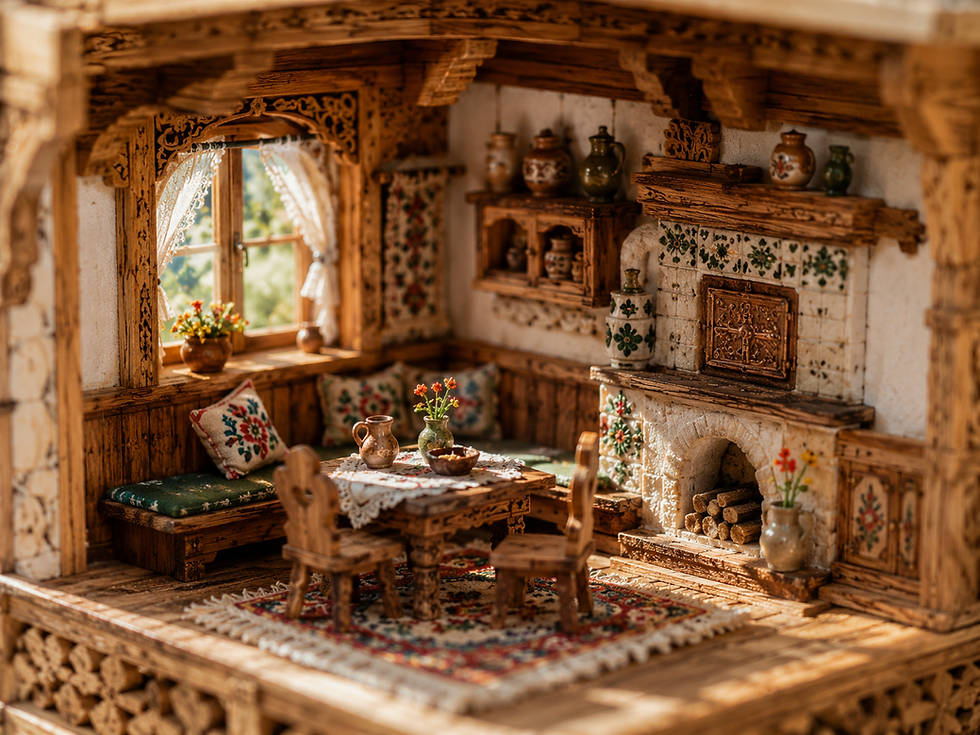
The pale walls and dark decorative woodwork recall Tryavna’s Revival-era architecture, which the town’s museum describes through white walls and projecting upper bays. Its Daskalova House preserves carved wooden sun ceilings. Those are interior features, but their careful craftsmanship suggests a useful miniature approach: choose a few purposeful carved-looking details and let light reveal them. Our cottage’s trim can echo that affection for worked timber without reproducing a particular house.
The Zgurovski Konak in Shiroka Laka offers another loose parallel. There are projecting bays, decorative wooden elements, and overhanging eaves. Here, the balcony and broad roof edge similarly build layers of shadow. I would borrow that depth before trying to copy any one ornament. A projecting strip above a pale panel often does more for a small façade than an entire afternoon of microscopic decoration.

For the miniature, the useful relationship is simple: a heavy-looking stone base, lighter pale wall areas, and dark wood that draws the eye toward the openings. You can preserve that visual hierarchy even if you simplify every carved detail. The moonlit palette then supplies the Halloween mood without covering the garden in seasonal props. For another meeting of weathered timber, strange residents, and warm lights after dark, visit The Midnight Nursery miniature mandrake market.
Artist Tips — Make Your Own Magic
The cottage and supporting illustrations are AI-generated design inspiration. This guide suggests ways to build your own interpretation; it is not an exact, tested reconstruction of a photographed physical model. Results will vary, especially if your resident ghost starts giving architectural advice.
Plan your Bulgarian fantasy cottage miniature
Try 1:24 as a manageable starting scale, with a roughly 30-centimeter circular base and a door about 8 centimeters high. These are suggested planning dimensions, not measurements taken from the image. Keep the house compact enough to leave a generous foreground garden and room for the shed.
The project is intermediate because intersecting roof shapes, tiny trim, and hidden lighting need planning. Its main techniques are layered card construction, applied timber details, painted paper stonework, and clustered scenic planting. A hobby knife, steel straightedge, craft scissors, tweezers, brushes, and a self-healing cutting mat cover the essentials. Let each adhesive and coating dry or cure according to its own instructions before loading or covering it.
Supplies
Plan this as an indoor display. Card, paper scenery, and ordinary craft glue are not a weatherproof garden construction system.
Structure: start with clean, dry packaging card and straight wooden coffee stirrers. Use craft chipboard sheets or basswood sheets where you need more reliable stiffness. A ready-cut wooden circle makes a practical base; thin cereal-box card alone will bend under the landscape.
Roof, stone, and walls: reuse thin card for roof tiles and clean paper egg carton for stone faces. Optional air-dry clay adds small raised details. Keep it separate from polymer clay, which follows a different curing process.

Joining and color: use a suitable PVA craft glue, acrylic paints, brushes, and a water-based matte acrylic varnish compatible with your materials. An old clean makeup sponge is useful for stippling stone. Test combinations on offcuts first.
Windows and lighting: reuse clean, flat transparent packaging for glazing and plain translucent paper for diffusion. Choose a complete low-voltage plug-and-play miniature LED kit with its matched power supply, switch, and connectors. Keep small parts and batteries away from children and pets. Lighting is optional; painted warm windows are the simpler alternative.
Garden and details: use paper scraps for leaves, saved thread for climbing stems, and clean small twigs for tree armatures. Model foliage, flower tufts, miniature trees, and small terracotta pots offer easier finishing options. Reclaimed material should be dry, sound, and free of pests.
1. Establish the footprint and light routes
Draw a full-size paper plan of your proposed base. Place the cottage slightly behind center, the shed to the left, and a curving path from the front edge to the steps. Leave planting pockets between the path and rim. Make a quick folded-card house to check that the garden still has breathing room.
Mark the lantern position and a concealed wire route before anything is glued down. Keep the battery compartment or power connection accessible from the rear or underside, following the kit's requirements. Stack scrap card temporarily to establish the higher house platform. Photograph the arrangement from a low angle and adjust it now, while moving a building is still pleasantly uneventful.

2. Build the shell and prepare the openings
Transfer your wall shapes to sturdy craft chipboard. Cut the door and window openings while the pieces are flat, using several controlled knife passes on a protected surface. Keep fingers outside the cutting path. Add internal corner strips and a floor to keep the shell square, then let the joints dry fully.
Make the roof removable while you fit and test the lights. Paint the interior opaque so illumination does not bleed through thin walls. Add simple dark partitions if one lamp would otherwise flood every opening equally. You only need believable light behind the windows; a fully furnished unseen interior can wait for another project.

3. Layer the pale walls and dark timber
Paint the wall panels a muted warm ivory. Apply a thin, slightly uneven coat with a sponge for a plaster-like surface, keeping the texture small enough to suit the scale. Allow it to dry before attaching wood strips, so the pale paint stays out of their grooves.

Build the timber pattern from stained-looking basswood strips or trimmed stirrers. Paint them deep brown, then drag a nearly dry lighter brown brush along the grain. Suggest carved friezes with repeated small card shapes and narrow grooves; a few readable motifs work better than a crowded band of random cuts. Glue finished trim in stages, keeping pressure gentle until the bonds set. My Zakopane cottage interior explores another carved-wood miniature, drawing on Poland’s distinct highland tradition.

4. Give the entrance its character
Make the arched door from a card backing faced with narrow wood strips. Add a separate curved surround, a tiny dark handle, and shallow crosspieces. Build the canopy on small brackets, and make the balcony as a separate subassembly with a floor, posts, and a simplified pierced-looking rail.
Paint these parts before installing clear glazing, which is easier to keep clean off the model. Glue glazing around its edges with a compatible clear glazing glue tested on a scrap. Place diffusion paper behind the panes without pressing it against an LED. Leave the roof off for access. Let the joinery set before handling the house by its walls; the balcony is decorative, not a carrying handle.

5. Overlap the roof and shape the chimney
Fit card roof panels to the shell, checking the meeting line between the front gable and side roof. Start paper tiles at the eaves and work upward in overlapping rows. Stagger the vertical joins and vary a few lower edges slightly. Keep the roof ridge and valleys orderly so the building retains its structure beneath the weathering.
Paint the tiles charcoal, then drybrush muted blue-gray across their exposed edges. Make the tall chimney around a light card core with a pale textured covering. Use stacked card pieces for its cap, keeping the assembly balanced and securely attached. You can simplify the ornament into a clean stepped silhouette. Allow glue and paint to dry before fitting the finished roof back onto the house.

6. Build stone steps, paving, and the little shed
Stack and glue firm card blocks for the steps, then face their visible surfaces with thin torn paper-carton pieces. Use the same material for foundation stones and paving, changing the piece sizes to suit each location. Preserve a convincing flat walking route; deep gaps between every slab make a path look abandoned rather than gently aged.
Paint a dark gray-brown base, then stipple several subdued stone colors over it. When dry, lightly brush pale highlights onto raised edges. Make the shed from a small card box clad in wood strips, with its own overlapping paper roof. Keep its finish quieter than the cottage's entrance. Fit the buildings only after the landscape support and their bases are stable and dry.

7. Plant the circular garden in layers
Build shallow raised beds from layered card, cover exposed edges with torn paper and suitable glue, then paint the dried terrain earthy brown. Place the tallest trees behind the cottage and a blossom tree at each side. Try every position before gluing: the balcony, lantern, and front door should remain visible.

Add dark low ground cover first, then shrubs in several sizes. Cluster flowers instead of scattering every color evenly. Repeat a few pink, blue, and pale accents around the circle, leaving breaks that reveal stone and path. Tease apart clump foliage so it does not read as a single sponge. Let the scenery adhesive dry before turning the base or trimming loose fibers.

8. Test the warm light and add the story details
Install and test the complete plug-and-play LED kit exactly as its manufacturer directs, using only the matched power components. Disconnect power before adjustments. Keep connections protected from wet scenic glue and avoid enclosing parts that require ventilation or access. Route the lantern lead behind its post or through the planned base opening.
Aim for a warm doorway and readable window frames, rather than maximum brightness. Use the kit's supported dimming option if it has one. Add the porch pots and a small red-capped mushroom near the foreground rocks. An optional paper note could borrow Mosswick's reminder, but it is a new detail for your version. After the last glue dries, test the lights again before securing the removable roof.

Photograph the moonlight
Place the finished model against a dark blue or charcoal backdrop that curves gently behind it. Use a cool continuous light high and behind one side to skim the roof and tree edges, then add a weak neutral fill from the front. Keep lamps and any modifiers safely clear of flammable craft materials. The warm miniature lights should remain visibly warmer than the surrounding scene.
Set your phone or camera on a stable support at roughly doorstep height. Begin with a three-quarter view that shows the round base, shed, and right wall. Reduce exposure until the windows retain their frames, then adjust the external fill if the garden disappears. Change one light at a time so you can see what it contributes.
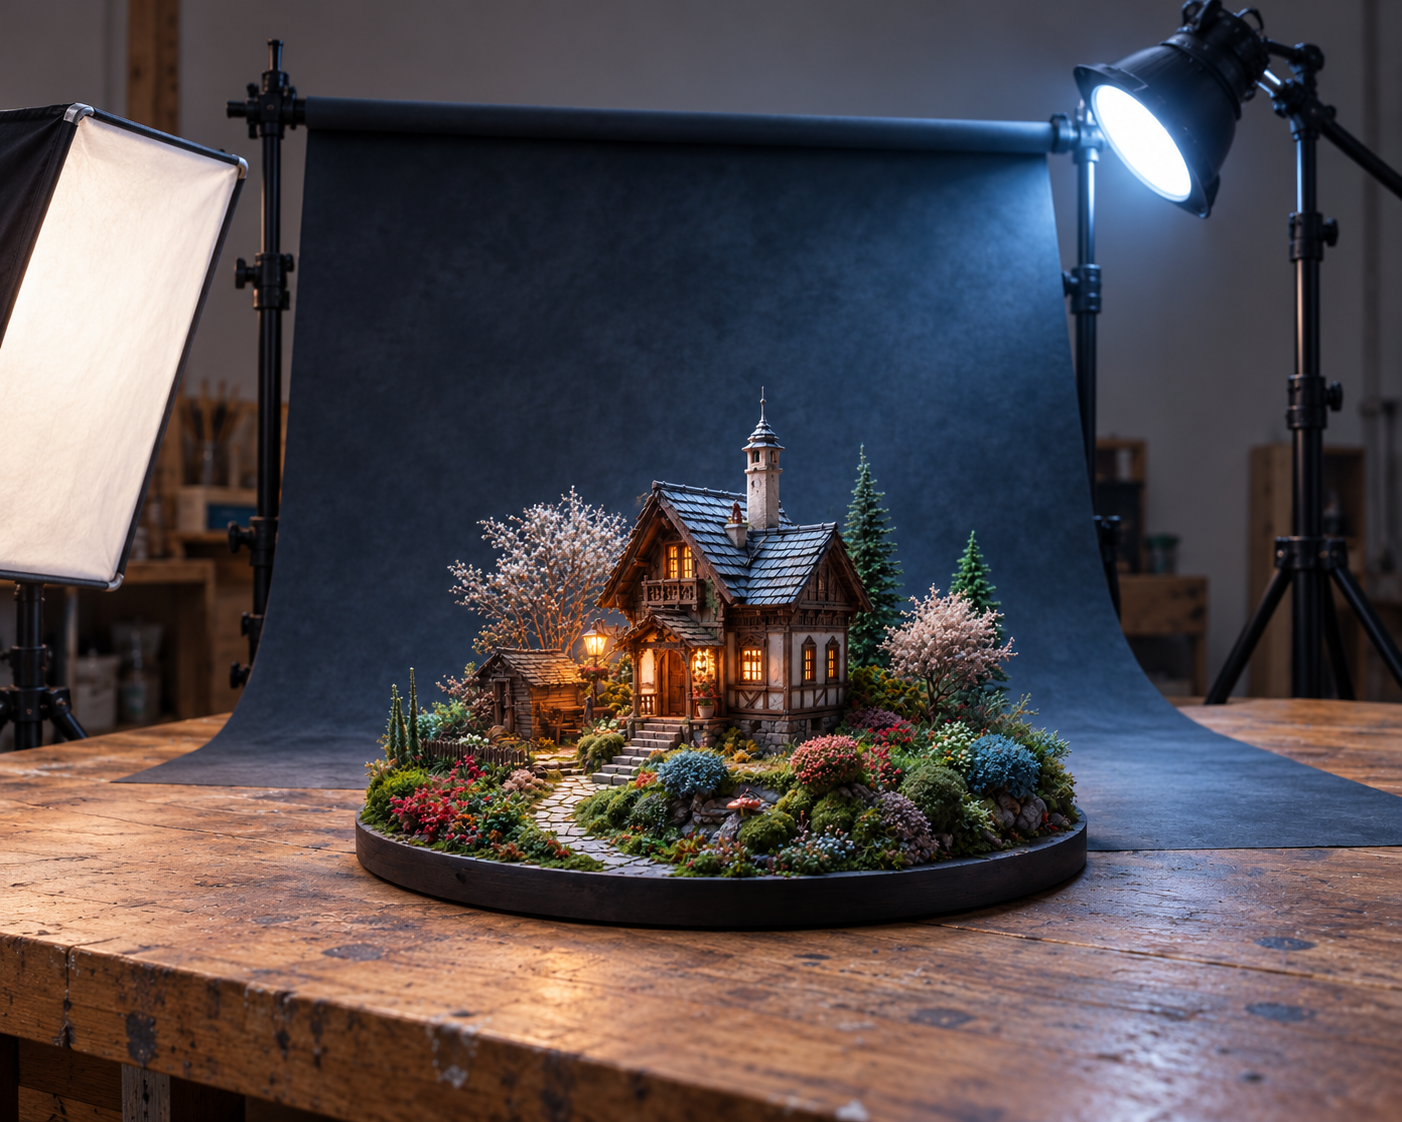
Move the light or your viewpoint to tame reflections on the glazing. Take separate closeups of the doorway, roof details, and garden mushroom, placing focus on the important surface. A gently blurred backdrop creates depth; excessive blur can erase the tiny work you want people to enjoy. You can suggest mist with a softly lit backdrop, keeping liquids, smoke, and sprays away from the model and electronics.

When the tiny world misbehaves
Curling roof tiles: use thinner adhesive coats and let painted card dry flat before cutting. Replace a few lifted pieces rather than soaking the roof in more glue.
A glowing wall: disconnect the lights, open the removable roof, and add an opaque inner lining. Retest before closing it up.
Chalky stone: soften the lightest highlights with a thin compatible paint glaze. Leave the deepest joints darker.
A crowded garden: remove one foreground shrub and reopen a view toward the steps. Empty space helps the planting feel intentional.
Flat nighttime photos: move the cool light farther to the side and lower the front fill. Keep enough light on the house to show its materials.
Closing — Until Next Time in the Small World
I keep coming back to that lantern. It makes the cottage feel inhabited, and it leaves just enough room for an October visitor with a questionable sense of direction.
Would you spend your extra detail time on the carved balcony, the flower-filled garden, or the extravagant chimney? Tell me which feature you would build first, and share your own tiny worlds with #smallworldminiatures. You can also join the newsletter for more miniature inspiration and explore the online shop.
And if somebody knocks from inside your lantern, perhaps check whether they need directions before reaching for the broom.








Comments