



Where October Keeps the Lanterns: An Autumn Elf Cottage Miniature

First Impressions in Miniature
This autumn elf cottage miniature looks as though the tree offered a spare room and the cottage gradually moved in. A great twisting trunk fills the left side, while curling roof tips reach toward it from the right. Between them, amber windows and hanging lanterns make a welcoming little clearing. I would knock, although the owl appears to be conducting a fairly rigorous guest assessment.
What draws me in is the contrast between the unruly silhouette and the orderly details. Shingles overlap in tidy rows. Window spokes meet at a sensible center. Pumpkins gather beside a door that seems just large enough for someone carrying a very small pie. There is a practical build hiding inside all this extravagance, and below we’ll separate it into a hollow shell, a paper-wrapped tree and a series of manageable layers.
The purchased alternatives below use Amazon affiliate links; if you buy through them, it helps fund this tiny world. As an Amazon Associate I earn from qualifying purchases.

If the woodland-house idea appeals more than scratch-building every wall, a tree-house kit offers another starting point. Choose it for its own design, then check its actual dimensions before borrowing accessories. The reference image does not establish a scale, a particular kit or the materials used to create the scene.
Miniature Backstory — The Tiny Tale
The cottage belongs to Nettle, Keeper of the Autumn Lanterns. Her responsibility is simple: light the path before dusk. Her assistant, an owl named Mr. Wick, has expanded the job into a department with opinions about leaf placement.
One evening he refused to approve the hanging pumpkin lantern. It was, he explained, “far too cheerful for a serious October.” Nettle tried a dimmer glow. He objected. She moved it farther from the window. He objected from a different branch. Finally she placed a bowl of toasted pumpkin seeds beneath his perch and asked whether the inspection required refreshments.

The lantern passed immediately. Mr. Wick called this a procedural improvement. Nettle called it supper and went back inside, leaving the warm windows to keep watch over the clearing. The owl perched in the reference tree makes a lovely place to imagine our inspector; the seed bowl belongs to the story and would be an optional addition to your own version. I rather like the idea that the smallest resident manages the largest amount of paperwork.
A Guided Tour of the Build
The tree that holds the clearing together
Start at the broad roots, then follow the grooves upward. The trunk divides into sweeping branches rather than a symmetrical fork. Curled tips and sparse leaves keep open space between the limbs, while mushroom shapes and a pale owl provide little stopping points. The dark wood-like surface acts as a frame for the warmer house, and those long strands hanging from the branches extend the woodland feeling without filling every gap.

The tree’s outline is worth studying before its surface. If you blur your view slightly, the large curves remain readable. Small natural twigs can supply useful texture references or modest branch details in an inspired build, but choose pieces that suit the planned model rather than allowing a found stick to dictate the entire composition.

A roof with room for moss
The roof slopes and lifts in several directions, yet the repeated rectangular shingles make it feel coherent. Green, moss-like patches collect on the roof planes, leaving enough dark edges visible to show the construction. My favorite focal point is the round upper window: bright amber panes, dark spokes and a deep curved frame. The flower box below supplies a softer horizontal pause beneath all those upward gestures.

The welcome at ground level
At the entrance, the curved plank door, narrow threshold and sandy path bring the scale back down to a visitor’s height. Orange pumpkins cluster on the right; red-capped mushrooms balance them on the left. The path stays relatively plain, which gives the eye somewhere to rest. A miniature can contain a remarkable amount of detail when one small route through it remains easy to follow.

Inspirations — From the Big World to the Small
I read this scene as woodland storybook architecture, with useful echoes of timber buildings and illustrated fairy tales. Norway’s Urnes Stave Church is a valuable real-world reference for dark wooden surfaces, overlapping roof textures and carved ornament. UNESCO identifies it as an outstanding example of Scandinavian wooden architecture. The cottage is not a replica, and its exuberant curling eaves should not be mistaken for a historically accurate church detail.
Arthur Rackham provides a second lens. The early introduction to Arthur Rackham’s Book of Pictures discusses his expressive trees and exposed roots. That idea translates beautifully here: give a trunk gesture before adding texture.

For a third reference, look closely at ordinary bark, fallen leaves and overlapping garden shingles. Their value is in the changes of size and direction. A convincing miniature does not need every crevice copied; it needs selected marks that remain legible at its viewing distance. Our guide to miniature autumn trees explores a wider range of seasonal foliage approaches if the tree becomes your favorite part.
Model foliage is useful for those selective patches. Treat light green as an accent among deeper greens and warm browns, rather than covering every roof surface with one bright color. The visible shingle edges need to survive the gardening.

Artist Tips — Make Your Own Magic
The illustrations are AI-generated, and this is an inspired route toward the scene rather than an exact, tested reproduction. Results vary; even a well-behaved elf cottage may develop an opinion about its roof. Use the reference for atmosphere and proportions, then simplify anything that would make your own build unnecessarily fragile.
Plan your autumn elf cottage miniature
A suggested starting point is a roughly 25–30 cm display base with an 18–22 cm cottage, but these are planning choices, not measurements taken from the photograph. Choose a consistent door height first, then relate windows, pumpkins and mushrooms to it. This is an intermediate project because the curved roof and branching tree require patient dry-fitting. Card, paper, glue, acrylic paint, scissors, tweezers and a suitable craft knife cover the essential techniques; lighting is optional.
Supplies
• Structure: reuse clean cereal-box card for roof skins and paper for templates. Use craft chipboard or basswood for the hollow shell, plus a stable wooden plaque or a sound, clean offcut for the base. Thin packaging card alone needs internal bracing.
• Tree and trim: reuse clean kraft packing paper and tissue. Add soft non-electrical craft wire for the armature, paper strips for bark and PVA craft glue suited to the materials. Smooth twigs are optional texture references or small decorative branches.
• Windows and surface: reuse clear, unprinted packaging for glazing after checking that it is clean and uncracked. Add tracing paper, thin card strips, acrylic paint and brushes. Avoid packaging with sharp, brittle edges.

• Woodland details: use paper scraps for leaves and flower petals; purchase model foliage or miniature leaves if preferred. Fine clean craft sand makes the path. Air-dry clay supplies pumpkins and mushrooms; follow its own drying and finishing instructions.
• Optional glow: choose a complete, ready-made, low-voltage battery lighting kit with a protected battery holder and accessible switch. Amber glazing can suggest warmth without electricity. Use no real flame.
• Tools and finishing: scissors, tweezers, a blunt sculpting tool, brushes and a craft knife with a proper cutting surface are useful. A desk magnifier helps with tiny window bars. Keep cutting tools, loose wire, small parts and batteries away from children and pets.
Step 1: Arrange the silhouette before making details
Draw the base outline on scrap paper and place two simple paper silhouettes on it: a broad branching tree to the left and a steep-roofed cottage to the right. Leave a distinct gap between the trunk and upper wall. That breathing space is part of the design, not unused real estate waiting for another mushroom.
Make a door template and use it as the scale reference for everything that follows. Try a few paper circles for windows, then mark a clear path from the front edge to the door. View the layout from the intended front and from a low three-quarter angle. If the branches hide the round window, change them now.
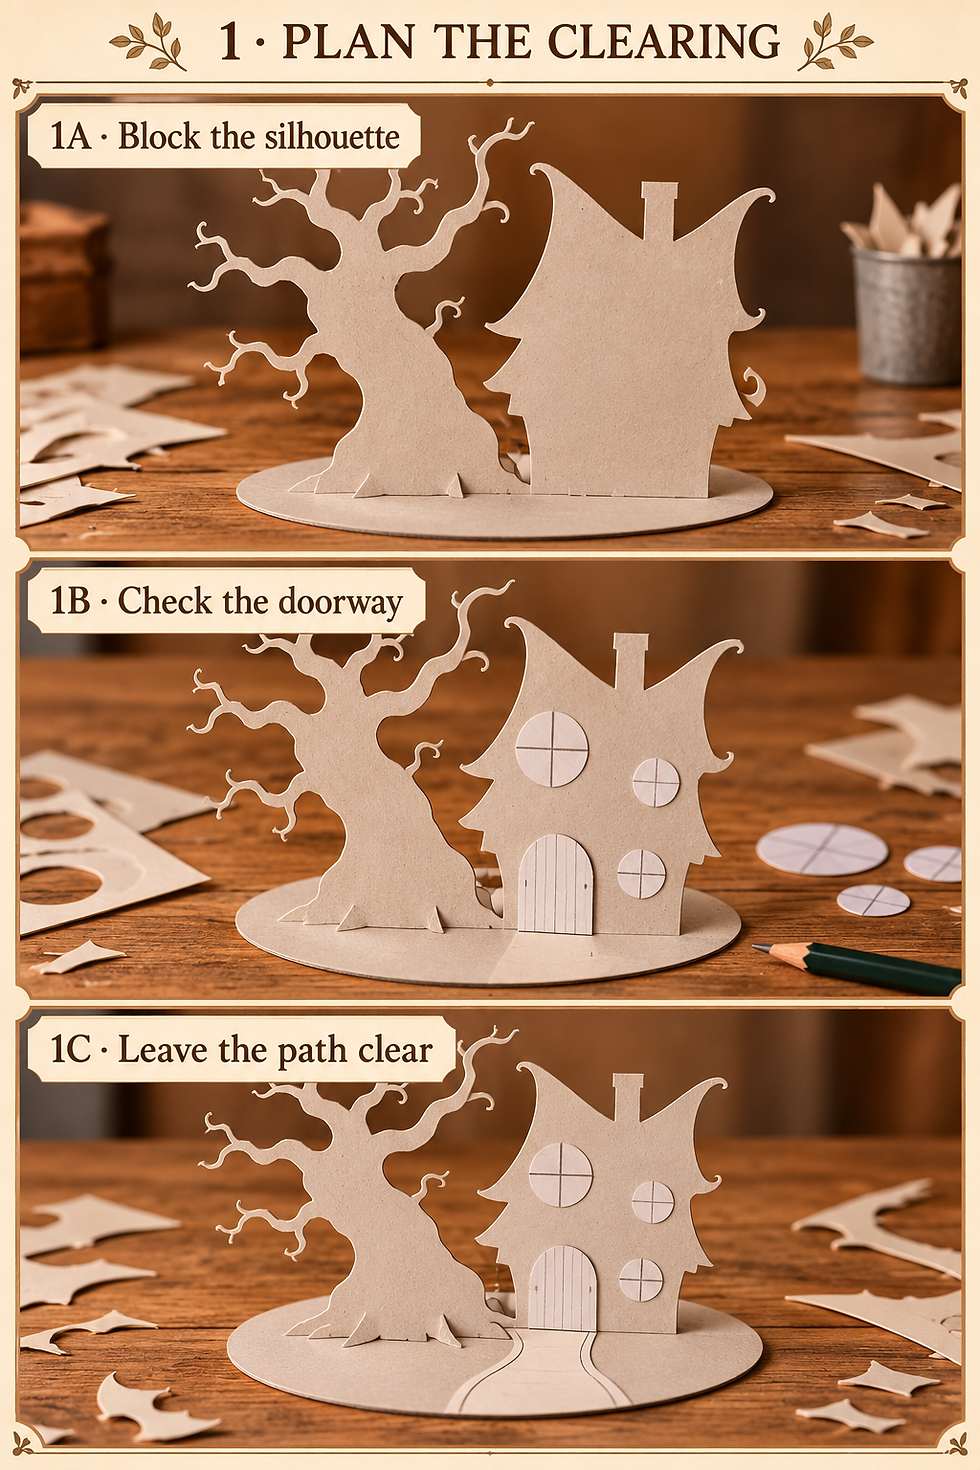
Keep a small paper footprint for the battery holder behind the cottage if you intend to light it. Set aside access space before committing to a base thickness. An unlit version can omit this area entirely. Photograph the dry arrangement as a placement reminder, then remove the paper pieces; no permanent attachment is needed yet.
Step 2: Build a hollow shell and sweeping roof ribs
Transfer the cottage outline onto sturdy card or thin basswood and cut the front, sides and rear. Cut openings while panels are flat, using several controlled passes with a sharp craft blade on a proper cutting surface. Keep your supporting hand clear of the blade path. Leave stout temporary cross-braces in large openings if the card needs support, then remove them when fitting final windows. Reinforce corners with small interior strips and let the chosen adhesive set before adding roof weight.
Use paired card ribs to establish the sweeping eaves, then bridge them with narrow strips of thin card. Laminate curves gradually instead of forcing one stiff sheet around a tight bend. Add a simple hollow chimney. Leave the rear removable or open for access, and keep the window holes clear.

Dry-fit the shell on the base and check that it sits steadily. A simpler version can use straight roof planes with curved applied edge trim; this retains the storybook outline while reducing compound curves. Allow the shell and roof laminations to dry fully before cladding them, so later layers do not lock a twist into the building.
Step 3: Wrap a tree with generous roots
Twist soft craft wire into a trunk with a few main limbs, leaving broad root loops at the bottom. Turn sharp wire ends inward and cover them securely. Build bulk with crumpled kraft paper, then wrap with glued tissue or narrow paper strips. Support the branches while drying so the armature keeps its planned gesture.
Create bark ridges with twisted paper strands running along the trunk. Let some divide around knots and continue into branches, rather than wrapping everything in horizontal bands. Keep the deepest grooves broad enough to paint. A shallow hollow made from a curled paper edge can suggest a sheltered nook without cutting into the structural armature.

Test the tree beside the shell before fixing its roots to the base. Spread the root footprint and use an adhesive appropriate to the base and armature covering. Support the trunk until the joint is firm. Shorter branches are an excellent first-build choice; long, heavily decorated limbs put more leverage on the attachment and are easier to damage.
Step 4: Lay shingles and establish the woodland palette
Cut small card shingles in strips or individual pieces. Start at the eaves and overlap each higher row over the one below. Stagger the joins. Leave the chimney and roof valleys readable, then add narrow layered card or paper trim along the curved edges. Suggest door planks with shallow scoring and applied crosspieces rather than cutting every board apart.
Once the glue is dry, brush on a dark brown base coat. Build the wood-like finish with a lighter warm brown across the raised grain, followed by restrained gray-brown highlights. Paint roof shingles slightly cooler than the trunk so their textures do not merge. Let each coat dry before adding the next, and test the paint on an offcut first.

A wet palette is optional but useful when you want to revisit the same small family of acrylic colors. Keep the highlights selective: the leading roof curve and a few trunk ridges deserve emphasis, while the deepest recesses can stay quiet. Strong contrast everywhere would leave the glowing windows with too much competition.

Step 5: Fit windows and create a gentle glow
Make the round window frame from layered card rings. Add spokes over a clear backing, checking the arrangement against your paper template before gluing. Build the arched lower window the same way with narrow card bars. Fit a tracing-paper diffuser behind the glazing, leaving room between it and any light source according to the lighting kit’s directions.
For an unlit model, use warm yellow-orange backing paper. For a lit version, test a complete ready-made battery kit before installation, then route it through the access area you reserved. Do not cut, splice or alter the kit unless its manufacturer explicitly supports that operation. Keep the switch and battery holder reachable, and follow all clearances and operating instructions.

Painted amber beads or small paper lantern shells can suggest hanging lanterns without adding separate wiring. Fix them to short covered hooks or threads, avoiding sharp exposed wire. The interior window glow can remain the main light source; a convincing warm atmosphere does not require every tiny object to illuminate. Never use candles or an improvised mains connection.
Step 6: Add moss, autumn leaves and a quiet path
Paint the ground a dark earthy color before applying texture. Brush suitable adhesive onto the path area and add fine craft sand sparingly; keep loose grains out of the doorway and lighting access. Allow the adhesive to dry as directed, then remove unattached material gently. A clear front route makes the cottage seem inhabitable.
Add model foliage in irregular patches along selected roof edges and around the roots. Keep some shingle rows exposed. Choose several greens, using the brightest in small amounts, then bring in ochre and rusty orange paper leaves. The reference retains plenty of green, so a complete orange canopy would change its character.

Miniature leaf products are an optional shortcut when cutting individual paper leaves becomes more meditation than crafting. Check the apparent size against your door template, and place a few at branch tips and in sheltered ground pockets. Avoid coating the path evenly; scattered leaf groups look more considered and leave the route legible.

Step 7: Make pumpkins, mushrooms and flower boxes
Shape small air-dry-clay pumpkins as rounded forms, pressing shallow grooves with a blunt tool. Add a short stem, then make mushroom caps and stems as separate simple shapes if your clay handles that more reliably. Follow the product instructions for joining and drying. Keep these pieces modest in size, and allow them to dry completely before painting; touch-dry is not the same as ready for finishing.
Paint pumpkins in related orange, cream and muted yellow tones. Give the mushrooms red caps with a few irregular pale spots. Make flower boxes from folded card and add tiny paper petals among foliage. Work over a tray so small pieces cannot vanish into the carpet and begin their own settlement.

A magnifying desk lamp can make the little painting and placement jobs easier to see, especially the window spokes and mushroom dots. Arrange accessories loosely before gluing: pumpkins on one side, mushrooms on the other, flowers beneath the windows. Keep the doorway clear. An owl figurine is optional; leaving a small perch still gives Mr. Wick somewhere to conduct his inspections.

Step 8: Balance the scene and secure the final details
Place the cottage and tree together and assess the whole silhouette again. Add only enough curled paper vine to connect nearby areas. Long suspended strands should remain sparse and lightweight; shorter threads are easier to protect during handling. Test each attachment gently after its adhesive has dried, supporting the model from the base rather than the branches.
Check the composition with the optional lighting both on and off. If one pumpkin is overwhelming the entrance, move it before gluing. If a bright moss patch pulls attention away from the round window, soften it with a darker accent or reduce the patch. Finish the base edge cleanly so the woodland has a deliberate boundary.

Let all finishes and adhesives reach the product-specified state before handling or enclosing the model. Keep any battery compartment accessible and follow the lighting maker’s storage advice. This is an indoor decorative project, not an outdoor fairy house; paper, ordinary craft adhesives and many air-dry clays are unsuitable for weather exposure without a specifically supported system.
Photograph the clearing, not the entire room
Set the model on a stable surface with a plain muted teal or gray backdrop curving behind it. Use soft side light from a window, or a diffuse continuous lamp positioned safely away from the model. Add a white card on the opposite side to lift the trunk shadows. Keep paper away from hot bulbs and leave ventilation around lighting equipment.

Lower your viewpoint toward the door for the main image, then try a slightly higher angle for the roof and tree. With internal lights on, reduce the exposure until window bars remain visible rather than disappearing into white glare. Move the external light or backdrop if glazing reflects the room. For closeups, focus on one feature, support the camera or phone steadily, and let the background soften without losing the miniature’s important edges.
Small problems, practical fixes
• The roof has flattened: add a hidden support rib beneath the sagging area and simplify the curve on the next panel. Do not bury the problem under extra moss.
• The tree looks striped: vary the bark-strand widths and let ridges split around knots; soften repetitive highlights with a thin compatible paint layer.
• The windows look like floodlights: reduce brightness using the kit’s supported control or increase diffusion while preserving the manufacturer’s required clearances.
• Foliage conceals every shingle: lift excess loose material before the adhesive sets, then restore a few clear roof-edge lines.
• A clay pumpkin cracks: follow that clay maker’s repair guidance, or remake the small piece. Painting over a moving crack rarely improves its manners.
Closing — Until Next Time in the Small World
What I love about this cottage is how much character comes from a few large decisions: a tree with a good gesture, a roof with a confident curve and windows warm enough to suggest company. The little mushrooms and pumpkins reward a closer look, but they work because the clearing beneath them feels organized.
Would you build the curled roof first, or give Mr. Wick a more comfortable inspection perch? Tell me which detail wins, and share your own creations with #smallworldminiatures. For another seasonal roofline with a very different appetite, explore Pumpkin Pies & Peculiar Rooflines. You can also find the newsletter and online shop through Small World Miniatures. Bring a handful of pumpkin seeds. Apparently that helps with the paperwork.








Comments