



The House That Kept Its Lanterns Lit: An Art Nouveau Haunted Mansion Miniature

First Impressions in Miniature
Some haunted houses announce themselves with a skeleton in the window. This one has hired an architect, commissioned elaborate ironwork, and decided that subtle intimidation is worth the extra paperwork. I love the way its tall green windows pull the eye upward while the lanterns keep inviting us back to the front steps.
This Art Nouveau haunted mansion miniature mixes curling, plantlike ornament with a stern, almost Gothic silhouette. Pale stone-like walls, bronze-colored tracery and rust-colored vines give it an autumn palette without covering every ledge in pumpkins. The little pumpkins are there, quietly doing their seasonal job at pavement level.
I would approach an inspired build as a shallow theatrical façade. You get the grand entrance, layers of window detail and a convincing pool of lamplight without furnishing a mansion whose housekeeping bill would frighten even its ghosts. Below, we will break those elaborate surfaces into manageable layers of card, clear glazing, wire and paint.
The purchased alternatives below use Amazon affiliate links; if you buy through them, it helps fund this tiny world. As an Amazon Associate I earn from qualifying purchases.

Miniature Backstory — The Tiny Tale
Every evening at dusk, the lanterns of Number Seventeen came on together. Nobody remembered seeing a lamplighter. Nobody remembered seeing the owner, either, though someone polished the brass door handles with extraordinary dedication.
Across the street, a small brown moth named Ilona had made a respectable living inspecting lights. She knew which shop window stayed warm after closing and which streetlamp attracted the most argumentative beetles. Number Seventeen was the only address she had never approved. Its lanterns glowed beautifully, but the entrance had the peculiar habit of whispering, “Not yet.”
On the last dry evening of autumn, Ilona landed on the left-hand gate and asked for the inspection book.
“We have been waiting for the guest of honor,” said the house.
“For how long?”
The vines shuffled. Somewhere above the door, a stone flower gave an embarrassed little cough.
“Long enough that the refreshments may require replacing.”
Ilona flew past the green windows. Behind one pane she saw a gold shimmer, behind another a shadow shaped like a folded coat. At the central balcony, she found the problem. A leaf had lodged against the bell pull. Every autumn breeze rang the bell a fraction, just enough for the house to believe its guest was arriving.

“It is a leaf,” Ilona said.
“It has excellent timing,” replied the house.
She tugged it free. The bell gave one clear note. For a moment all the lanterns dimmed, and the old doorway seemed to take a breath.
Then the gates opened.
From the pavement came a procession of beetles, a spider carrying a silk tablecloth, and a snail who insisted he had left home promptly. The house had spent so long waiting for one important visitor that it had forgotten the whole street could come in.
Ilona entered last. She stamped the inspection book with a dusty wing and wrote, in very small letters, “Lighting satisfactory. Hospitality overdue.”
By morning the guests had gone. The lanterns were still glowing, and a few autumn leaves rested on the steps. If you give your own mansion a tiny moth beside a lantern, let that be Ilona checking that nobody has started waiting again.
A Guided Tour of the Build
The upper windows carry most of the drama. Their green panes look deep and cool, while the fine branching patterns give each opening a lighter inner rhythm. Narrow columns and layered arches create a sequence of shadows. That repeated framework is what makes all the ornament feel organized rather than tangled.

At the entrance, the warm lamps change the mood immediately. The doors sit inside several layers of molding, and the shallow steps spread out toward the viewer. I especially like the contrast between the delicate door pattern and the slightly irregular stone-like treads. One is formal; the other looks as though generations of nervous visitors have hurried across it.
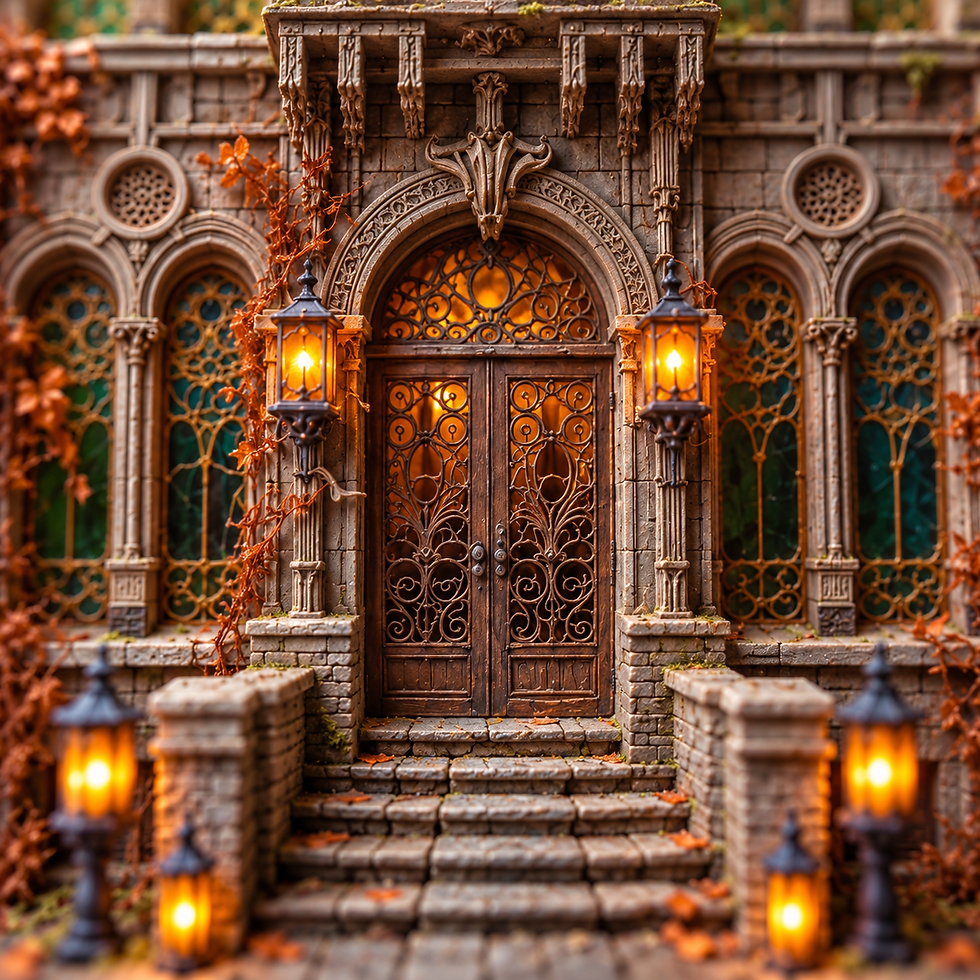
The side gates and autumn growth frame the whole façade. Dark scrollwork stays readable against the cooler background, while thin orange-brown stems climb across the pale wall. Low moss, scattered leaves and a few pumpkins soften the straight pavement edge. Those small, uneven details keep the building from looking like a perfectly cleaned architectural model.

Inspirations — From the Big World to the Small
Budapest offers wonderful references for ornamental architecture, but I would treat this scene as a fantasy interpretation rather than a model of a particular Hungarian building. Its upright, almost cathedral-like proportions sit beside fluid decorative lines. That mixture is part of its appeal, and an inspired miniature does not need to pass an architectural identity test before it earns a place on the shelf.
The Gresham Palace is a useful real-world reference for the relationship between ironwork, stained glass and architectural luxury. The building's official history describes an Art Nouveau interior with ironwork gates, stained glass and mosaics. For our purposes, the valuable lesson is consistency: repeat one curve across a doorway, a window and a railing so the small details feel as if they belong to the same house.

The Museum of Applied Arts in Budapest offers another direction. Its own historical material identifies the work of Ödön Lechner and Gyula Pártos and the importance of Hungarian decorative design. I would borrow the idea of an ornament-led architectural identity, rather than claiming our gray façade reproduces that building. A leaf shape, seedpod or flower can become a little family of motifs across an entire model.
For the story illustration, I am drawn to the decorative atmosphere of early twentieth-century Central European storybook art: flattened leafy borders, jewel-like windows and a small creature given a very serious responsibility. The tale can be whimsical while the building remains convincing. The contrast is rather like discovering that the caretaker of a grand palace is a moth with a clipboard.

Artist Tips — Make Your Own Magic
These illustrations are AI-generated inspiration, and the guide is a practical route to your own version rather than a tested, exact reconstruction. Results vary with materials and patience; fortunately, a haunted mansion can survive a slightly crooked stone without filing a complaint. Work in layers, make sample pieces first, and let the simplest successful test guide the rest.
Plan an Art Nouveau haunted mansion miniature
Suggested approach: a shallow façade at approximately 1:24 scale, with a base deep enough for steps and gates. Choose a door height first, then keep windows, railings and lanterns proportionate to it. This is an intermediate project because repeated arched openings and fine tracery reward careful templates. Essential tools include scissors, a sharp craft knife, a protected cutting surface, a metal straightedge for real cutting work, tweezers and a few brushes. Any planning dimensions are choices for your version, not measurements taken from the image.

Supplies: a small architectural workshop
• Structure: reuse clean, flat packaging card for templates and surface layers. Choose rigid bookboard or thin plywood for the permanent base; add basswood strip braces where a tall façade needs support.
• Ornament: use narrow card strips, paper punches and clean paper offcuts first. Thin basswood trim is an optional alternative for straight columns. Avoid making fragile curves from wood unless you have suitable tools and experience.
• Glazing: reuse clear, unscratched food-packaging plastic only when clean and suitable for cutting. Clear acetate or model glazing sheet is a predictable purchased alternative. Use a compatible clear-drying glazing adhesive and test it on a scrap.
• Surfaces: water-based acrylic paints, a small amount of water-based texture medium, fine brushes and a compatible matte protective finish. Keep shiny finishes for selected glass-like details rather than the stonework. Test optional gloss varnish on a spare painted insert first; it is a finish, not a substitute for transparent glazing.
• Gates and vines: soft craft wire, thin card, paper leaves and a little model foliage. Wear eye protection when cutting wire; turn or cover sharp ends. Dried plant material is optional and should be clean, dry and suitable for indoor display.
• Lighting: an optional ready-made low-voltage miniature LED set with its matching battery holder and instructions. Use no real flame. Keep the power source reachable and leave access for replacement.

1. Make a template before you make a mansion
Draw a simple front elevation on scrap paper. Begin with a center line, a door rectangle and two window groups on either side. Add the upper windows only after the lower story feels balanced. Fold a spare paper copy along the center line to compare the two halves, then unfold it and correct obvious mismatches. The reference is richly detailed, but a simpler arrangement with fewer windows can retain its character.
Cut a paper mock-up and stand it on the proposed base. Check the height from your intended viewing angle and leave enough ground in front for steps. Mark the gate positions and a route for optional lighting wires. Keep these planning marks on the hidden back or on the disposable template. Make one master arch template and reuse it so repeated openings share the same curve. Save every template until the project is finished; future repairs become much easier when you have the shape that originally worked.

2. Build a rigid, shallow shell
Transfer the main outline to rigid card or thin plywood, choosing tools suited to that material. Cut card with several controlled light passes on a protected surface, keeping your other hand outside the blade's path. Do not try to force a thick cut in one pass. For plywood, use suitable woodworking tools and their safety instructions, or have the piece cut to shape before adding detail.
Create shallow side returns and reinforce the back with straight braces. Dry-fit the shell on the base, checking that it stands square before applying adhesive. Add a removable rear panel if you intend to light the windows. Let joints set fully according to the glue's directions before lifting the structure. Build the steps from stacked, evenly cut card blocks, leaving a comfortable miniature landing at the door. Keep the shell plain at this stage. A stable wall is a much more useful achievement than a decorated wall that leans toward the biscuit tin.

3. Layer the arches, columns and stone skin
Cut separate window surrounds from thin card, using your arch template. Stack two or three progressively larger outlines to create depth, then add narrow straight strips for columns and horizontal ledges. Test one complete window surround before cutting the entire set. You want the shadows to describe the architecture without making every frame bulky.
For the stone-like wall, glue small, slightly varied card rectangles around the openings, leaving narrow joints. Keep their thickness consistent enough that adjacent courses meet neatly. Use less texture than you think you need; thick lumps can make a small façade resemble a cake with a structural problem. Brush on a thin, compatible water-based primer or base coat and let it dry. Paint a muted warm gray, then add a restrained darker wash in the joints and a light dry-brush on raised edges. Test the wash first so it does not flood or soften the card.

4. Make green glazing and flowing tracery
Cut each clear window insert slightly larger than its opening so it can attach behind the wall. Test transparent green paint made for the chosen plastic, or use a transparent colored film. A thin, even color allows the background or optional light to remain visible. Let the coating dry completely before handling; do not assume every paint adheres to every plastic.
Build the decorative pattern separately on a paper template covered with a nonstick craft surface. Use narrow card curls or fine, soft wire, simplifying the reference into a stem with a few repeated loops. Paint the finished tracery a muted bronze, allow it to dry, and attach it to the front frame rather than smearing adhesive across the visible glazing. Use a glazing adhesive compatible with both surfaces and follow its directions. For an easier version, draw the pattern on the back of the clear insert with a suitable paint pen, checking a sample for smearing first.

5. Give the doorway and gates a family resemblance
Make the doors from layered card or thin basswood, with a plain backing and separate decorative panels. Repeat one window curve in the door design. A small bead or bent wire can suggest a handle, but keep it discreet: an oversized handle makes the whole entrance feel smaller. Paint the doors a deep brown and reserve bronze highlights for the raised ornament.
For the gates, start with a rectangular card frame and evenly spaced upright strips. Add a few wire curls only after the basic frame is stable. Work on a flat template and let the adhesive cure before standing the gates upright. Fix them as static decorative elements rather than adding complicated hinges. Use a charcoal base coat and sparse metallic dry-brushing for an iron-like finish. Turn wire ends inward and hide them inside the frame. Carry the same dark finish onto a simple balcony rail so the separate pieces read as one coordinated design.

6. Add lantern light without hiding the batteries
Test a ready-made miniature LED set before installation, following the supplier's instructions for its matching power source. Plan accessible wire channels behind the façade and beneath the base. Do not modify electrical components beyond the manufacturer's permitted setup, and keep metal gate wire away from exposed electrical contacts. No mains wiring or open flame belongs in this project.
Build nonfunctional lantern shells from small card frames and translucent inserts, or choose scale-appropriate ready-made lantern fittings designed for the lighting set. Keep the LEDs away from materials as directed by their maker, and avoid tightly wrapping components in paper. Warm light works well against the green windows, but leave some openings dim so the façade retains depth. If lighting feels like one complication too many, paint amber inserts and photograph them with an external warm light nearby. The visual idea still works, and there is nothing to switch off afterward.

7. Let autumn climb the walls
Twist a few lengths of soft wire into irregular vine branches, keeping the thicker stems near the ground. Paint them brown before attachment, then add small paper leaves in rust, ochre and muted orange. Use fewer leaves near the highest tips so the growth feels seasonal rather than like a solid orange blanket. Attach the vines at several discreet points without covering the best window detail. For a larger garden around the house, the miniature autumn trees guide explores branching and foliage in more depth.

Add tiny patches of model foliage along the pavement and gate bases, using the product's recommended adhesive. Scatter paper leaves in small groups where they might collect beside steps. Make a few pumpkins from air-dry clay, shaping shallow grooves and a short stem; follow the clay's drying directions before painting and do not treat air-dry clay as oven-bake polymer clay. Keep the pumpkins low and sparse, as in the reference. Ilona's optional moth can be a folded paper silhouette beside a lantern, clearly a little addition to your own version.

8. Weather, balance and finish the scene
Stand back before adding more detail. The entrance should remain the clearest route into the composition, with vines and gates framing it rather than competing for attention. Add restrained darkening below ledges and a little green-brown staining near the ground. Keep upper stonework lighter so the building still has a readable silhouette. A nearly dry brush is more controllable than a wet wash at this stage. A dedicated rust-colored paint can warm the lower gate details. For optional antique-gold wax accents, follow the product’s ventilation and handling directions and test compatibility first; do not treat a metallic wax as acrylic paint.

Secure loose leaves and check every projecting wire end. Test any protective finish on a sample first, including its effect on metallic paint and clear glazing. Apply only where appropriate and let the finish cure according to its label before covering or handling the model. Leave windows clear of matte overspray and keep the removable back accessible. Finally, photograph a quick front view and look for anything that feels oversized. Removing one large leaf or one heavy curl can improve the whole scene more than adding another hour of ornament.

Photograph the lanterns and the stone
Use a dark, plain backdrop set a little behind the model, with one soft light from the side and a white card on the opposite side to lift the shadows. Keep the viewpoint near the miniature entrance rather than looking steeply down from above. Let the complete base remain visible in an overall photograph so the scene reads as a crafted miniature.
For lit shots, reduce the room light gradually instead of plunging everything into darkness. Expose for the lanterns so they keep their warm color, then add enough soft external light to reveal the stone and green glazing. Take separate close-ups of a window, the doorway and a gate. Move the light or viewing angle if the clear plastic reflects the room; avoid promising that a filter will solve every reflection. A steady support helps keep those tiny lines sharp.

Troubleshooting the grand entrance
• Warped card: reduce wet coatings, dry parts flat, and reinforce the back before attaching ornament.
• Uneven repeated arches: return to one master template and replace the mismatched surround rather than disguising it with vines.
• Cloudy windows: test the glazing adhesive and paint on scrap; keep glue off the visible center.
• Heavy tracery: simplify the motif and use thinner strips. Leave enough open glass for the pattern to breathe.
• Lanterns that overpower everything: soften their visible brightness with a compatible diffuser only if the lighting maker permits it, or increase the external photographic fill light.
Closing — Until Next Time in the Small World
I think Ilona would approve of a house that keeps its lamps glowing without expecting one perfect visitor to arrive. This miniature has that lovely balance of grandeur and welcome: dramatic windows above, a familiar scatter of leaves below, and a front step that practically asks for a story.
Would you begin with the green windows, the curling gates or the lantern-lined staircase? Tell me which detail you would make first, and share your own small creations with #smallworldminiatures. You can find more tiny-world inspiration through the site's newsletter and browse the Small World Miniatures shop. There is always room for another peculiar house, especially one whose lighting inspector fits on a leaf.








Comments