



The Dinner That Outlasted the World: An Abandoned Dining Room Miniature

First Impressions in Miniature
Apparently, the end of the world arrived before anyone cleared the table. This abandoned dining room miniature has turquoise wallpaper, a chandelier still catching the sun, and enough greenery to suggest that the garden has quietly taken possession of the house. The tablecloth hangs in place while the ceiling has largely resigned.
Fallout and The Last of Us are two of my favorite franchises, so a room like this immediately gets my attention. I love the storytelling potential of an ordinary domestic space after people have gone. A plate, a pulled-out chair, a curtain moving toward a broken window: you can start asking questions before you know anything about the residents.
Here, the old elegance remains legible beneath the damage. We’ll explore those layers and create a ruined miniature room with believable wear, foliage, and afternoon light.
The purchased alternatives below use Amazon affiliate links; if you buy through them, it helps fund this tiny world. As an Amazon Associate I earn from qualifying purchases.

Miniature Backstory — The Tiny Tale
Mara Vale believed that every problem improved slightly after dinner. Power cuts, arguments, the collapse of the telephone service: all had previously yielded to a hot plate and her instruction to sit down.
On the last Thursday, her brother Ellis arrived carrying a suitcase and no appetite. The roads were closing. Somewhere beyond the hill, a siren had been sounding for so long that the birds had begun leaving gaps for it in their songs.
Mara continued arranging the table. Her niece June was late, and nobody ate before June arrived. Ellis stood beside his chair, trying to decide which of several alarming facts might finally persuade his sister to put down the serving spoon.
Then June appeared at the back window. She had crossed the garden because the lane was blocked. There was a bicycle outside, a neighbor waiting, and just enough daylight to reach the old railway cutting.
Mara looked once around the dining room. The good dishes were out. The flowers had been expensive. She straightened a glass that did not need straightening, took June’s hand, and left the room with Ellis close behind.
The first winter loosened the plaster. The next spring sent a green shoot through the ceiling. Over the years, rain reached the carpet, ivy found the cabinets, and the roof opened wide enough to admit the afternoon sun.
The table remained set.

Long after the house had become a landmark for travelers, someone asked June whether she remembered what her aunt had served that evening.
“Nothing,” she said. “She was waiting for me.”
Look at the upright chair beside the table. There is still room to sit down.
A Guided Tour of the Build
The ceiling that lets the garden in
The large opening overhead gives the room its strongest visual connection to the outside. Broken ceiling edges frame exposed timber-like beams and dangling vines, while the chandelier occupies the remaining center. Those clear hanging drops catch the same warm light that illuminates the leaves. I like how much of the room’s former formality survives in that single fixture. Leave a recognizable outline intact and the surrounding damage gains something to work against.

A table that keeps its manners
At the center, the cloth falls in soft folds beneath plates, glasses, and a tired-looking floral arrangement. The table is small enough to leave a clear route around it, but its pale surface catches your eye immediately. Dark chairs and the patterned rug hold that bright patch in place. The dishes scattered nearby suggest disruption; the remaining place settings preserve the original purpose of the room. The relationship between the two is more interesting than covering every surface with rubble. The abandoned wedding room inspired by Miss Havisham explores another table left waiting, with a more gothic mood.

The floor tells the slow part of the story
At the front edge, uneven boards lead into leaf litter, fallen crockery, and a chair resting on its side. The exposed edge makes the miniature setting unmistakable. Farther back, pale cabinets, dark wood furniture, and a gold-framed mirror give the eye vertical resting places. Small pockets of green connect the floor to the walls without hiding every painted panel. You can still read the room’s arrangement, which makes its gradual unraveling feel personal.

Inspirations — From the Big World to the Small
Fallout, The Last of Us, and the things people leave behind
Fallout’s retro-futuristic world and dark humor make familiar objects feel newly peculiar after catastrophe. For this scene, I’m drawn to the quieter side of that idea: a household continuing to announce its tastes through furniture and tableware long after its owners leave. You don’t need a branded bottle or a recognizable game prop to explore that feeling. A formal table beneath a failing roof already carries a wonderfully stubborn sense of occasion.
The Last of Us offers another useful reference in the relationship between built spaces and vegetation. In Naughty Dog’s official podcast, its artists discuss nature reclaiming the world and balancing the visual values of natural and constructed elements. That is a helpful way to think about this room. The plants need somewhere to enter, something to follow, and spaces where they become dense. Letting them climb the window edges and descend through the broken roof creates a readable pattern. For another take on this overgrown atmosphere, visit the Verdant Aftermath miniature greenhouse.

The decorative interior adds its own layer: damask-like wallpaper, paneled lower walls, framed pictures, and a hanging crystal-style light suggest a room assembled over years. I would treat it as an eclectic older dining room rather than assign an exact architectural date from the image alone. Repeating turquoise, aged cream, brown, and muted gold makes the collection feel related even when the furniture differs.
For your version, choose what survives before deciding what breaks. A readable wallpaper motif, one graceful cabinet, and a few intact dishes give the scene a past. Then choose where the weather has interrupted it. That small design decision will carry more atmosphere than applying the same dirt wash to absolutely everything.

Artist Tips — Make Your Own Magic
The illustrations here are AI-generated, and this guide offers an inspired approach rather than an exact, tested reproduction. Results will vary with your materials and scale; even a very convincing apocalypse benefits from a practice scrap.
Plan your abandoned dining room miniature
A suggested 1:12 scale gives you room to handle chairs, dishes, and chandelier details. A smaller room works too, provided you resize everything together. This is an intermediate project because the ceiling frame and hanging fixture need careful assembly; a premade room box and furniture reduce the tricky joinery considerably. The reference image’s actual scale is unknown.
Keep a pencil, scissors, tweezers, brushes, a suitable craft knife, and a protected cutting surface nearby. Make knife cuts on a stable surface, away from your hands, using several light passes. Follow the safety and curing instructions on each adhesive and finish rather than borrowing a timing estimate from another product.

Supplies
Base and structure, essential: Start with a clean, flat offcut you already have and sound packaging card for mock-ups. Purchasable equivalents include plywood sheets for the base, craft chipboard sheets for wall layers, and basswood strips for framing. Use material thick enough for the span you choose; thin decorative card alone should not carry a hanging fixture.
Floors and architectural details, essential: Clean, dry wooden coffee stirrers make useful trial floorboards; thin basswood strips offer more consistent dimensions. Save clean card for paneling and ceiling flakes.
Paint and wallpaper, essential: Reuse small amounts of suitable water-based craft paint and clean paper scraps. Choose acrylic craft and hobby paints in muted turquoise, cream, brown, gray, and restrained gold, plus a small-scale wallpaper print. Matte acrylic medium can help make transparent acrylic layers; it is a painting medium, not a substitute for every glue or final varnish.

Furniture and fabrics, essential: Repurpose spare dollhouse furniture or make simple pieces from clean card and wood scraps. Fine cotton from an old, washed garment can become curtains and a tablecloth. Purchasable miniature furniture and narrow fabric trim are optional shortcuts. Check their dimensions together before committing to a scale.
Plants and debris, essential: Tear tiny leaves from clean paper for an inexpensive trial. Warmtree Realistic Miniature Leaves offer a ready-made alternative for scattered foliage; check the individual leaf size against your room. Fine model turf and miniature ivy can supply different textures. Keep natural garden soil, actual mold, and unknown outdoor debris out of the build. Optional BYHER 4-inch rustic craft sticks come as 45 bark-covered wood pieces. Use a few suitably sized pieces for woody debris near an opening, checking their thickness against your chosen scale. Keep the thin basswood or stirrers for the floor.

Adhesives and finishing details: Use suitable craft glue already on hand for paper, and wood glue where the maker recommends it for your wood joints. Clear acetate sheets, clean transparent packaging, small beads, fine thread, and plain wire are optional. Keep small parts away from children and pets; trim and tuck wire ends so they cannot catch your fingers.
1. Work out the room before breaking it
Draw a simple floor plan and place paper rectangles for the table and cabinets. Leave enough space to see between the chairs, with the table slightly forward of the back wall. Hold the plan at the viewing angle you want to photograph. If a tall cabinet blocks both windows, move it now rather than discover the problem after decorating it.
For a manageable starting point, try a base around 30 by 25 centimeters and a wall height near 24 centimeters at the suggested scale. These are optional planning dimensions, not measurements taken from the picture. Use one chair or a paper chair silhouette to check the table height and the reach of the window sill.
Mark the ceiling opening on a separate paper template. Keep a substantial perimeter and a continuous supporting crosspiece for the chandelier. Plan a removable ceiling assembly if you want easier access later. At this stage, simply dry-fit everything; no scenic damage is worth sacrificing the frame that keeps the room square.

2. Build a sound shell with a ruined ceiling
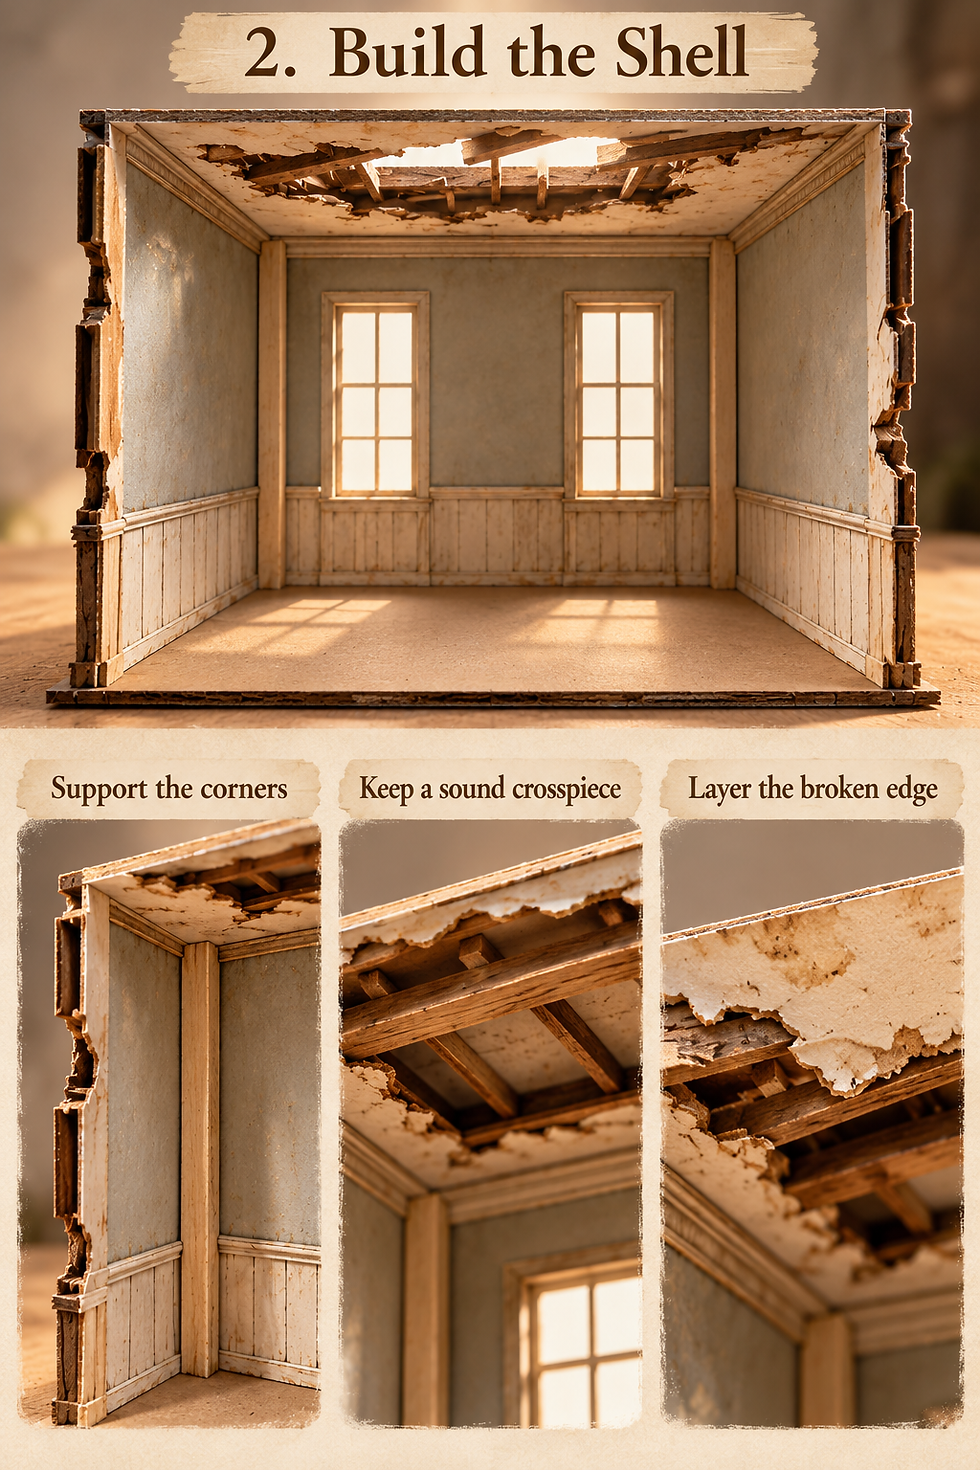
Cut the wall and window shapes before assembly. Reinforce the corners with appropriate wood strips and assemble the shell on its base with a compatible adhesive. Check that it sits flat, support the corners while the joints cure, and leave the front open for viewing.
Build the ceiling frame separately. Add sound crosspieces first, then layer thin card around the planned hole to suggest missing plaster. Trim irregular edges with scissors or controlled knife cuts before attaching them. Keep the supporting pieces intact beneath the decorative damage. Avoid snapping timber in your hands to create splinters.
A few narrow card strips under the broken edge can suggest lath. Paint these dark brown and the plaster-like layer a dirty cream after the adhesive has cured. Test-fit the ceiling again. If the span sags, shorten it or add discreet support before any chandelier goes up. The easier alternative is a shallow rear ceiling strip that frames the scene while leaving most of the top open.
3. Lay a floor with controlled wear
Cut stirrers or basswood into varied lengths, checking that their widths look reasonable beside the furniture. Paint the base a dark neutral color first, then arrange the boards with staggered joints. Leave a few narrow gaps near the foreground where the dark base can suggest depth.
Create the appearance of lifted edges by supporting selected boards on tiny card shims. Keep the central table area stable. Sand rough edges carefully and remove the dust before painting; use the protection appropriate to your material. Unknown reclaimed wood with old coatings is best avoided for miniature cutting work.
Brush on thin brown and gray acrylic layers, allowing each to dry before adding the next. Drag a nearly dry, lighter brush along the grain to pick out worn edges. Test the effect on an offcut before treating the floor. Once the finish dries, secure the boards with the appropriate glue and let the assembly cure flat. Your scenic warping should remain deliberate, rather than becoming a real structural surprise.

4. Give the walls a memory of turquoise
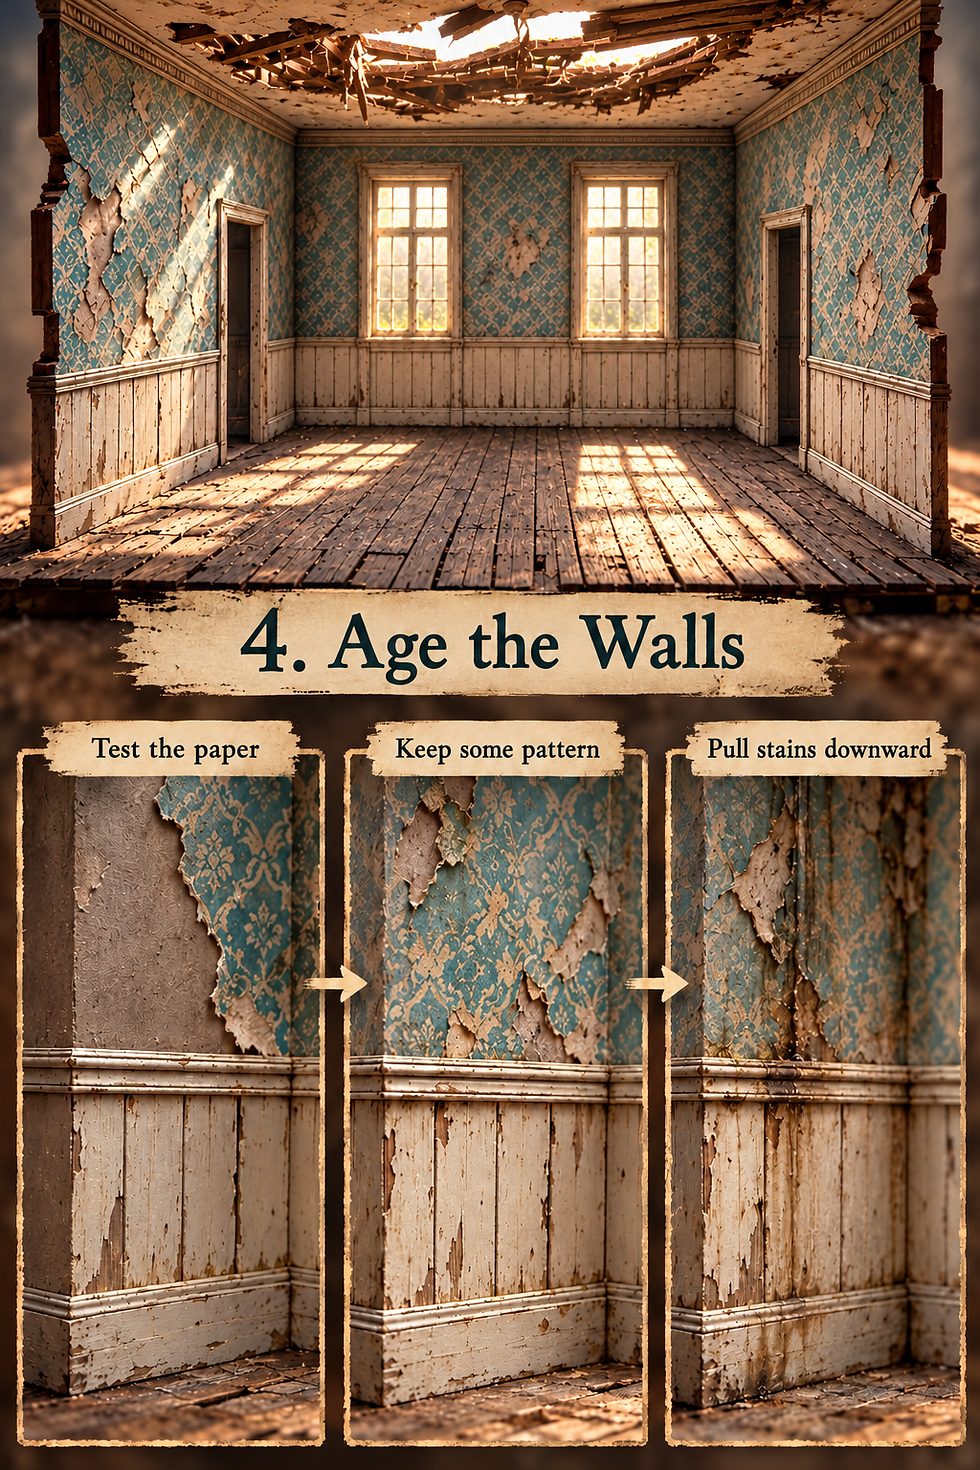
Paint a muted brown-gray layer where damaged wallpaper will expose the surface beneath. Let it dry, then fit small-scale patterned paper in sections. Apply only enough paper-compatible adhesive to hold it; excess moisture can distort the print and wall card. Test one scrap for bleeding before covering a whole wall.
Tear selected paper edges before attaching them, then curl one or two loose corners gently. Concentrate deterioration below the ceiling opening and around the windows. Preserve broad areas of the pattern so the original room remains visible.
Build the lower panels with strips of card or thin wood, paint them cream, and add subdued wear along their edges. On dry surfaces, use a little brown acrylic mixed with a compatible matte medium for a translucent stain, following the medium’s directions. Pull a few streaks downward and soften them with a clean brush. Let the layers dry between passes. Real damp or mold has no place here; paint supplies all the unpleasant-looking history you need.
5. Furnish the last dinner
Arrange the dry furniture before fixing it in place. Keep the dark cabinet on one side and pale pieces on the other, or follow a simpler arrangement that suits your room. Repeat a little of the wall color in a rug or accessory to connect the pieces visually.

For painted furniture, put a dark base beneath the lighter finish and leave small areas exposed at likely wear points. A lightly loaded brush gives you more control than aggressive sanding on fragile pieces. Let each coat dry before handling. Cut a patterned paper rug or use thin fabric with a fine weave, checking that it lies low enough to feel in scale.
Drape washed cotton over the table and pin the folds temporarily outside the visible area. Secure only a few hidden points with fabric-compatible glue, then allow it to cure. Use the same approach for curtains. Set out a modest number of dishes; leave some table surface visible. Keep one chair upright and place another on its side after the floor finish has fully dried.

6. Add the chandelier and small witnesses
A nonworking chandelier can be made from a lightweight craft finding or a small wire frame with clear beads on fine thread. Match its size to the table, and check that the frame is light enough for the ceiling support. A purchased nonworking dollhouse chandelier is the simpler route. Avoid hanging a heavy jewelry component from paper alone.
Attach the fixture to the sound crosspiece planned earlier, keeping its lowest drop clear of the table arrangement. Let all attachment points cure before lifting the ceiling into position. Use a dark metallic finish on the frame and keep the transparent drops mostly clean so they can catch the light.
Add a small framed picture, a mirror-like panel, and a few recognizable household objects. Clean reflective packaging can stand in for a mirror; cut it with an appropriate tool and cover the edges with a frame. Paint cracks onto miniature crockery instead of smashing real ceramic or glass. These details give the room its domestic identity before the plants arrive.

7. Let the greenery follow a route
Begin at the roof opening and window edges, using thin scenic vines or paper leaves along a few fine stems. Secure them at discreet points with adhesive recommended for the foliage material. Let those connections set before bending the vines into their final positions.
Build small clusters of fine turf around floor gaps and cabinet bases, leaving clear stretches of wood between them. Test how your adhesive affects the foliage color on a scrap. Add the Warmtree miniature leaves sparingly as fallen litter, choosing pieces that suit the scale. Keep leaf scatter denser near openings rather than spreading it evenly like seasoning.
Finish with torn card painted to resemble plaster and a few miniature dishes near the fallen chair. Put heavier-looking fragments below the ceiling damage to give the arrangement a cause. Leave the main tablecloth readable. Allow every adhesive to dry or cure as directed, then tilt the base only slightly over a tray to check for loose scenic pieces before moving it to the photography area.

8. Bring in the afternoon light
Keep the miniature unlit internally for the simplest version: a cool-running LED photography light outside the rear windows can provide the whole effect. Set it above and behind the room, angled through the ceiling opening. Use the lamp’s intended diffuser where needed and keep fabric, paper, and foliage clear of the fixture according to its instructions.
Place a white card outside the open front to lift the darkest shadows. Move it farther away if the scene becomes too bright. The chandelier should reflect the external light; there is no need to thread electrical wiring through every tiny drop. Make sure the finished paint and glue are fully dry before arranging the model for its photographs.
Set the camera or phone on a support near table height and use a timer to reduce movement. Start with a wide view that includes the front edge, then move closer for the table, chandelier, and floor details. A plain, subdued backdrop keeps the broken silhouette readable. Watch reflections in the mirror and windows, shifting your camera slightly when they reveal the room around you. Reduce exposure if the window highlights wash out the curtain folds.

Small fixes before the final photograph
The foliage overwhelms the room: Remove or thin a few clusters around the table and central wall. Preserve a visible route from the opening to the densest growth.

The wallpaper looks freshly printed: Reduce its brightness with a thin, tested acrylic glaze, letting the paper dry between layers. Keep some pattern visible rather than covering it completely.
The boards curl unpredictably: Let them dry fully, then replace troublesome pieces or secure them to a sound backing. Reserve raised edges for your planned shims.
The chandelier feels enormous: Compare its width with the table and substitute a smaller lightweight fixture. Recheck the support before hanging it.
Everything photographs brown: Move the light and reflector before repainting. Check that the turquoise walls and pale cloth retain their color under your chosen white balance.
Closing — Until Next Time in the Small World
Mara’s table still has a place waiting, and that is the detail I keep coming back to. The broken roof supplies the drama; the chair makes me wonder who might return.
Which would you keep intact in your own abandoned dining room: the chandelier, the table setting, or the wallpaper? Tell me in the comments, and share your own creations with #smallworldminiatures. You can also join the newsletter at the bottom of the page for more small-world inspiration and explore the online shop.








Comments