
Victorian Pastel Gingerbread Miniature Village – A Tiny Tour, A Tiny Tale, and How to Make Your Own Magic
- Dec 7, 2025
- 9 min read

First Impressions in Miniature
The first time I saw this gingerbread miniature village, my brain did that little Windows-98 error noise. There’s just so much happening in such a small footprint.
You’ve got a whole boulevard of Victorian townhouses, every roofline piped like royal icing lace. There’s a turret capped with a glittering star, storybook bay windows, sugar trees flocked with snow, and those soft mint-green doors and shutters that feel like somebody cross-bred a Wes Anderson movie with a bakery.
The color palette is all winter pastels—cream, blush, and mint—with pops of gold and copper. It’s cozy and decadent at the same time, like drinking hot cocoa from fine bone china while wearing fuzzy socks.
If you look closely, you’ll spot:
A central “mayor’s house” with a glowing clock window
Tiny lamp posts marching down the street like mint-green soldiers
Two frosted trees on either side acting like bookends to the scene
Little gift boxes, candy tufts, and a perfectly raked path of icing running through the square
And yes, later in this post we’re going to dive into a full “make your own magic” section so you can build your own gingerbread village—whether you bake from scratch or cheat (lovingly) with pre-built kits. Definitely stick around for that part; I’ve raided my whole pile of modelling books and hobby guides to pull together tips that translate beautifully into edible architecture.
Why This Photo Needs VIP Treatment
On the site you’re seeing a web-optimized version of this image—perfect for scrolling, not so perfect for hanging huge over your fireplace while you sip eggnog and quietly judge your own gingerbread attempt.
For that, you’ll want the high-resolution canvas print:
Crisp enough to see every piped bead and candy pearl
Printed on gallery-wrapped canvas with rich, true-to-color detail
Ships FREE in the U.S. so you can save your money for more sugar and sprinkles
We’ll be adding the product link and photo on the shop page, but just know: what your browser sees is the diet version. The canvas is full-strength sugar rush. Victorian Gingerbread Village Canvas Print in Pastels, Mint, and Champagne Gold | Small World Minis

Miniature Backstory – The Tiny Tale of Pastelwick
Legend has it that this gingerbread village was once a magical holiday retreat for Victorian confectioners. In the 1800s, a mischievous baker named Cornelius Gumdrop invented the "Candied Clocktower," a structure powered entirely by peppermint steam and gumdrop gears. Soon, other bakers began building homes for the clocktower workers—each house fancier than the last, as everyone vied for the annual "Sugary Structure Award." One year, the overzealous architect Madame Éclair added a tower with spun sugar spires so delicate it dissolved when someone sneezed nearby. The result? A town ordinance requiring frosting reinforcements on all future buildings.

A Guided Tour of the Build
Step onto the snow-frosted base and you’re in the main square.
Straight ahead: a wide icing path, striped like a candy crosswalk, leads to an arched front door crowned with a wreath and flanked by peppermint garlands. Light spills out of the windows in that warm, late-evening glow that says “we have cookies and you’re invited.”
To the left, a tall turreted house wears a swirl-iced roof dotted with tiny sugar blossoms, like someone planted a spring garden on top of winter. Below it, an octagonal conservatory bulges with windows, each framed in delicate scrollwork icing.
On the right, a stately gingerbread townhouse sports mint shutters, frosted gables, and a wreath so ornate it could probably vote in an election. A smaller cottage kneels beside it with a candy-striped path and a little fenced garden made of white pickets and gumdrops.
Everywhere you look there’s texture:
Roofs shingled with overlapping scallops of icing
Walls dusted with powdered “snow”
Trees spiraled with sugared garlands and pastel ornaments
Street lamps and fence posts echoing Victorian ironwork, but, you know… edible
The mood is late-evening December: the outside world is quiet and dark, but this little village is just getting cozy.
Inspirations – From the Big World to the Small
This village lives in that sweet overlap between Victorian architecture and classic gingerbread house “gingerbread trim.”
Real-world cousins you might recognize:
The elaborate wooden scrollwork on 19th-century American “gingerbread” houses in places like Cape May, New Jersey and Eureka, California. Those frilly brackets and bargeboards inspire the piped lace around the rooflines and windows.
Storybook central-European townhouses with steep roofs and dormers (think Rothenburg ob der Tauber), echoed in the clustered gables and tall, nested roofs.
Classic dollhouses and model homes from the miniature hobby world—multi-story facades, stacked bay windows, and fancy cornices translate beautifully into cookie form once you simplify a few shapes.
In miniature, all that complexity gets distilled into strong silhouettes and repeated motifs: the same shutter shape, the same scalloped roof line, the same wreath form echoed across several houses. That repeated visual “vocabulary” keeps the scene cohesive even as each building has its own personality.

Artist Tips – Make Your Own Magic (Gingerbread Edition)
Before we jump into the Make Your Own Magic section: yes, I’m Brandon—the human who writes these blogs. The illustrations, though? Those are cooked up with AI image generation, which means they’re occasionally a little… janky. If you spot a weird extra shingle or a suspiciously ambitious leaf, just know the robot is doing its best. Be nice to the robots. They have feelings too... uh oh... do they??
You, a pile of cookie walls, and a head full of ideas—that’s the vibe we’re going for. Think of this as your friendly map through the candy forest, not a GPS that yells at you when you miss a turn. Your village will look like your village, and that’s exactly right.
I’ve pulled these ideas from years of miniature building, painting guides, and old-school model-making manuals—then translated them into gingerbread scale.
Shopping List – Pantry, Craft Drawer, and Store
Start at home first, then fill in gaps with store-bought goodies.
From the kitchen & junk drawer (free or nearly so):
Cardboard or a wooden cutting board as a base (cover with parchment if you want it food-safe)
Drinking straws or chopsticks as internal supports for tall walls
Zip-top bags + tape as DIY piping bags
Small jars, cookie cutters, or glasses to trace roof curves and round towers
Powdered sugar, cocoa powder, and cornstarch for snow and weathering
Leftover ribbon for tiny “banners” or tree garlands

Edible build materials:
Gingerbread walls & roofs
From-scratch dough if you love baking
Or pre-baked kits and mini house sets to mix and match: big box stores like Target carry pre-built houses and village kits with the walls already baked and ready to decorate, which saves a ton of time. (Target)
Review sites like The Spruce Eats and The Kitchn regularly test gingerbread kits and highlight which ones hold their shape best, which is gold for village builders. (The Spruce Eats)
Royal icing (either homemade or from a mix)
Assorted candies in a pastel palette: mints, pillow candies, jelly beans, candy canes, marshmallows, gumdrops
Sugar pearls and edible gold/silver decorations for that Victorian jewelry-box look; you can find a rainbow of edible pearls from baking suppliers and grocery sites. (Amazon)

Lighting & display bits:
USB-powered warm white mini LED strings or fairy lights—look for ones labeled for indoor decor with a soft “warm white” glow. (Amazon)
Small clear plastic cups or battery-tea-lights if you want lights inside the houses
A cake stand, cutting board, or finished wood slab as your final display base
Deep Dive: Building Your Gingerbread Village (Step-by-Step)
1. Plan the story & pick a scale
Decide what your village is: a Victorian street, a cozy cul-de-sac, a cookie castle complex.
Pick a rough scale: maybe one gingerbread person is about 1–1.5 inches tall and doorways are just a little taller than that. Keeping sizes consistent makes your village feel believable.
2. Safety first
Use a stable cutting surface and a sharp knife for trimming cookie pieces—dull blades slip more easily.
Keep kids’ fingers away from cutting and hot sugar work; give them decorating jobs instead.
If you run wires or LEDs, keep electronics separate from sticky icing and don’t leave anything plugged in unattended.
3. Lay out the base
Sketch your layout on paper: where do the tall houses go, where does the path run, where will trees and gifts cluster?
Transfer that plan lightly onto your board with pencil or a dusting of cocoa so you remember where things belong.

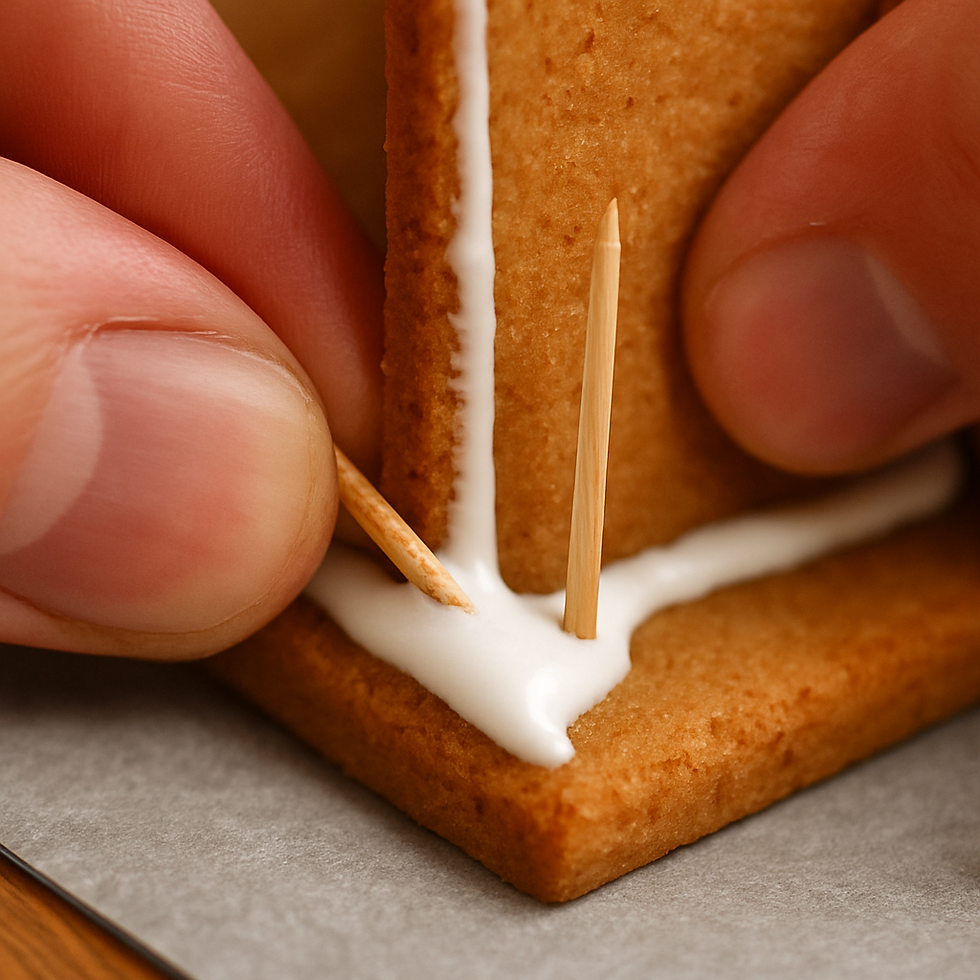
4. Build the “bones”
If you’re baking: cut wall pieces with cardboard templates so repeated houses match.
If you’re using pre-baked or pre-built kits, think like a kit-basher—combine pieces from multiple kits to get turrets, bays, and different roof heights.

Use royal icing “mortar” and let each joint set before stacking higher. Toothpicks or bits of dry spaghetti make great hidden supports.
5. Doors & windows
Cut window openings before assembly if possible.
Window “glass” options:
Melted hard candy poured thin

Gelatin sheets
Or just leave them open and rely on the glow behind.
Pipe frames, shutters, and small details (like tiny hearts or scrolls) once the walls are mounted and stable.

6. Walls, base color & “materials”
Think like an architectural model maker here: different wall textures tell you what each building is made of.
Smooth royal icing with scribed “brick” lines for townhouses
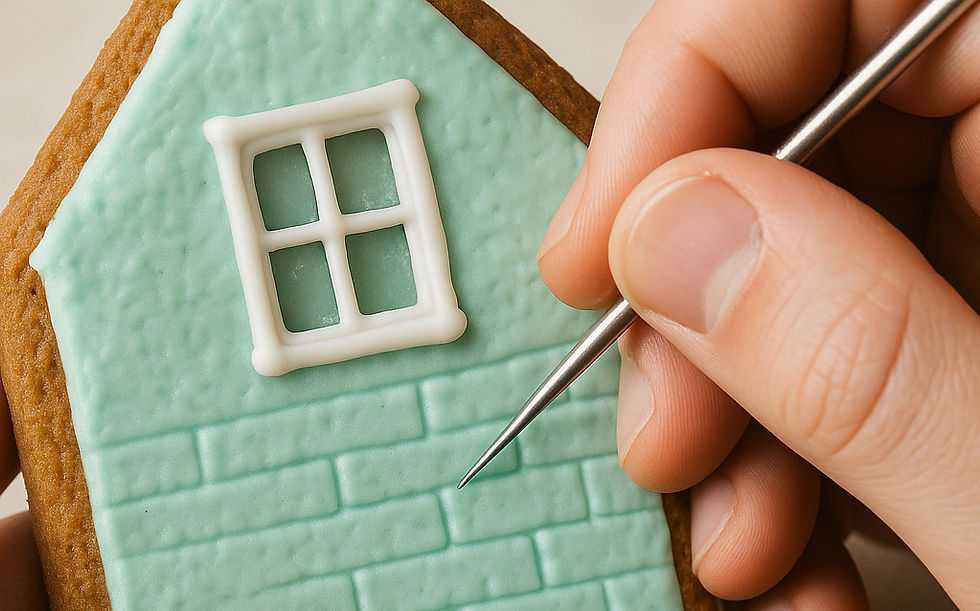
Rough, stippled icing for stucco cottages
Vertical lines to mimic wooden siding
Mix in a tiny bit of cocoa or food coloring to get warm tans, pinkish bricks, or mint-green trims.
7. Roofs & snowdrifts
Pipe shingles in overlapping scallops, starting from the bottom edge and working up.
Add icicles along eaves by piping vertical drips and letting gravity stretch them a little.
Dust everything with powdered sugar once dry for instant snow—this is your “weathering pass,” just like in regular miniature painting.
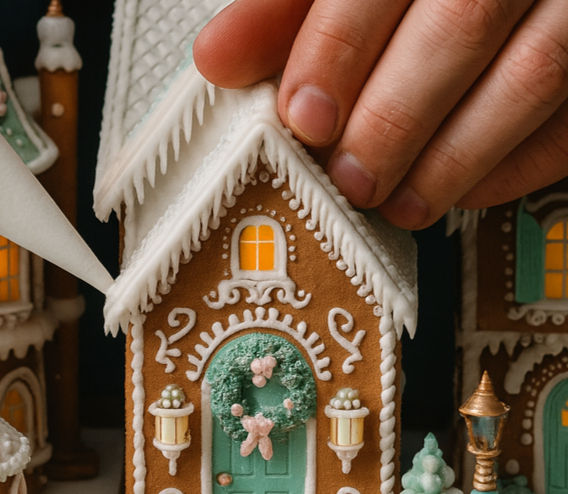
8. Choose your hero building
Your hero piece is the one your eye lands on first—often the tallest house in the center.
Give it the fanciest door, the biggest wreath, maybe a clock window or balcony.
Use a slightly richer color on its roof or trim so it quietly stands out.
9. Utilities & “greebles”
Borrowing a term from sci-fi modeling: greebles are tiny details that make the world feel lived-in.
In gingerbread land that means:
Lamp posts made from pretzel sticks and candy caps
Candy “mailboxes,” tiny barrels, or stacks of peppermint “firewood”
Little fences from piped icing or broken wafer sticks

10. Furniture & soft goods (edible edition)
Pipe doormats, welcome signs, and tiny rugs at the thresholds.
Use thin fondant strips for buntings, ribbons, and curtain swags above windows.

11. Lighting – simple, cozy, safe
For interior glow, set a (cool) LED tealight under an upside-down clear cup and place the house over it like a lampshade.
For exterior sparkle, drape a USB-powered warm white fairy chain behind the village or weave it between the trees and lamp posts. (Amazon)
Diffuse harsh points of light with a scrap of parchment or wax paper taped over the LED.
12. Story clutter & Easter eggs
This is where Pastelwick-style personality happens.
Gifts piled by doors, a sled made from a trimmed cookie, a marshmallow snowman in the square.
Hide one or two “secret” details only close viewers will spot—a candy-cane cat, a broken cookie being quietly nibbled by a gingerbread kid, a tiny faux poster on a wall.

13. Unifying glaze & finish
Just like miniature painters use a final glaze to tie colors together, you can:
Mist a very thin, slightly tinted sugar glaze over roofs for a subtle sheen.
Add one last dusting of powdered sugar from high above so it falls like fresh snowfall instead of clumps.
14. Photo tips & backdrop ideas
You built the thing—now make it look as magical in photos as it does in real life.
Use a dark, uncluttered background (a sheet, a wall, or a piece of black foam board) so the pastel colors pop.
Shoot at house-level, not bird’s-eye—get your camera down into the street.
Turn off harsh ceiling lights; rely on the village’s own glow plus one soft lamp bounced off a wall.
Try a close-up or two that feels like you’re standing on the cookie path yourself.

Troubleshooting: Common Gingerbread Village Emergencies
Problem: Walls keep collapsing.Fix: Use thicker royal icing “mortar,” let joints dry fully before adding roofs, and reinforce corners with hidden cookie “buttresses” or spaghetti sticks.
Problem: Roof slides off.Fix: Rough up the contact surfaces (lightly scrape with a knife), use more icing, and support the roof with jars or cans until completely set.
Problem: Candy won’t stick.Fix: Your icing is probably too dry—add a few drops of water, or pipe a fresh dot right before pressing candies in place.
Problem: Colors look chaotic, not cohesive.Fix: Pick 2–3 main colors (like our white/mint/blush combo) and limit everything to that family. Use gold only as an accent “metal.”
Problem: Lights look harsh or too bright.Fix: Switch to warm white LEDs, tuck them out of direct view, and diffuse with parchment or a sheet of tissue.
Problem: Everything is leaning by day two.Fix: Build on a flat, rigid base and avoid placing the village in warm or humid spots like right next to a radiator or sunny window.
Until Next Time in the Small World
Pastelwick might be made of gingerbread, but the real secret ingredient is story. Once you name a mayor, invent a lamplighter guild, and hide a candy-cane cat in the alley, it stops being “a centerpiece” and becomes a tiny world people want to explore.
If you build your own gingerbread street this year, I’d love to see it. Drop a comment with your favorite detail from this village, or tag your creations with #smallworldminiatures so I can wander through your cookie neighborhoods too.
And if you’d rather enjoy the magic without worrying about your roof sliding off at 2 a.m., grab the canvas print, hang it in your creative space, and let Pastelwick keep glowing all season long.
Hashtags
#smallworldminiatures#miniatureart#miniaturevillage#gingerbreadhouse#gingerbreadvillage#miniaturemodel#dollhouseminiatures#holidayminiatures#christmasvillage#victorianminiature#pastelchristmas#miniaturebaking#edibleart#gingerbreaddecor#miniatureworld#tabletopvillage#dioramaart#miniaturearchitecture#royalicingart#cakedecorating#miniaturephotography#handmadeholiday#festivefoodart#miniaturetutorial#gingerbreadinspiration


Comments