


The Boarding Stair to Somewhere Else: A Victorian Fantasy Airplane Miniature

My Vision for This Small World
My Victorian fantasy airplane miniature brings the silhouette of a jet together with the ornament of an extravagant little house. Mint and ivory panels keep the gold-colored details gentle, while a grand boarding stair leads toward rooftop rooms and roses. The wing beside the entrance keeps the aircraft shape unmistakable beneath all that architecture. I’ve treated it as a playful static display concept, where the passenger experience appears to begin with making a suitably impressive entrance.
Some links earn me a commission from qualifying purchases and help keep this tiny world growing. As an Amazon Associate I earn from qualifying purchases.
A tiny vase of flowers can make a whole room feel welcoming. These miniature arrangements are lovely accents for a dollhouse table, little shop display or that corner of your collection waiting for a touch of color.

Jump to the build guide or browse the supplies. We’ll make a static fantasy display, with decorative engines, a grand boarding stair and rooftop rooms. Keep the engines unpowered and lift the finished model by its base; the wings are here to look magnificent.
Miniature Backstory — The Tiny Tale
Miss Ada Bellweather had prepared the departure list with admirable care. Six guests, twelve cases, one cello and a silver biscuit tin. Captain Finch examined the list, then looked up the boarding stairs at the much larger object waiting beside Ada.
“That,” he said, “is a wardrobe.”
“It is a travelling wardrobe,” Ada replied. “The distinction seems important.”
The wardrobe refused to negotiate. It stood squarely on the landing, blocking a magnificent view of the front door. Behind it, the cello player began a slow and rather pointed scale. Below, the porter waited with the biscuit tin balanced on one palm, unwilling to interrupt an argument involving furniture of such confidence.

Captain Finch proposed leaving half the dresses behind. Ada proposed leaving Captain Finch behind. The porter, who had heard both suggestions before, opened the wardrobe and removed a single hatbox. Inside it sat the captain’s missing teacup.
After that, the negotiations improved. The wardrobe stayed at the station, the dresses travelled in ordinary cases, and the teacup received its own place beside the biscuits. Ada climbed aboard beneath the golden door ornament with the satisfied air of someone who had made a very reasonable compromise. If you wanted to add a tiny clue to your own version, a little hatbox near the stair would remember the whole affair without requiring an actual wardrobe.
A Guided Tour of the Build
The entrance that changes everything
The broad staircase rises from the wooden plinth to a tall doorway in the fuselage. Its green runner repeats the body color, while white balusters give the climb a crisp edge. The flower urns soften the bottom landing. I like how this one vertical gesture interrupts the aircraft’s long horizontal shape: the entrance becomes the natural place to begin looking.

A pavilion above the wing
The upper room has a steep mint roof, tiny dormers and rounded corner turrets. Balustraded terraces spread beside it, with pink flowers tucked along their edges. Warm window light makes the pavilion seem occupied without needing to reveal a detailed interior. Its compact footprint matters: the little building feels perched on the fuselage, rather than swallowing the aircraft beneath it.

Gold around the machinery
The engine mouths repeat the mint color in dark, fan-like centers, surrounded by ivory casings and gold flourishes. Along the side, tall decorative windows sit above a row of small aircraft-style openings. The contrast is wonderfully readable. One set belongs to a grand room; the other belongs to a passenger cabin. Fine gold edging ties those two scales together without asking them to become historically consistent.

A little architectural trim can make a dollhouse room feel beautifully finished. These wooden moldings are a lovely addition to your craft supplies for framing doors, dressing walls and giving tiny interiors their own character.

Inspirations — From the Big World to the Small
The most useful reference is the collision between a modern airliner and an ornamental house. Boeing records the 747’s first flight in 1969, well beyond the Victorian period. That makes the broad-winged, four-engine silhouette a wonderfully unlikely companion for the pavilion and garden stairs. In this fantasy, two different eras have been persuaded to share the luggage allowance.
For the architectural side, I would study the terraces, towers and formal approach of Osborne, Queen Victoria and Prince Albert’s island home. English Heritage describes its Italianate design. The miniature does not reproduce Osborne; it borrows a comparable sense of a residence organised around terraces and a conspicuous upper silhouette. You can translate that lesson through a clear doorway, a small towered roof and repeated railings, without copying an entire palace.

Another useful comparison is our Clockwork Canteen miniature, where a vehicle gains the welcoming character of a little shop. Here, the same balance depends on keeping enough aircraft visible. Preserve the nose, wings and tail as strong simple shapes; let the architecture occupy selected places rather than coating the whole silhouette in buildings.
A wooden dollhouse room box gives your favorite miniatures a place to shine. Turn it into a little shop, a reading retreat or a room built around the furniture you have been waiting to display.

Artist Tips — Make Your Own Magic
AI-assisted imagination has cleared this tiny palace for takeoff. Begin your version with a simple silhouette, test your templates and add detail gradually. Even a small palace appreciates a patient ground crew.
Plan a Victorian fantasy airplane miniature
Choose a static display with an aircraft body roughly 35–45 cm long as a suggested starting size, not a measurement taken from the image. Let the doorway and stair establish a consistent architectural scale within your design. You do not need to calculate a literal passenger-aircraft scale and then force dollhouse furniture into it. Use paper mock-ups of the whole composition before committing to a scale label.
The main challenge is supporting a long body, wide wings and an upper pavilion without relying on delicate wheels. Plan a hidden cradle beneath the fuselage, connected to a rigid base. Make the landing gear decorative around that support. Keep the rooftop room light and centered over the cradle, and avoid a heavy solid roof. This is an intermediate display build because symmetry and fragile trim require careful fitting.

Supplies for the aircraft
Home and reclaimed options: clean packaging card for templates and fuselage ribs, straight coffee-stirrer wood for simple trim, paper for shingles and scroll tests, empty cardboard tubes for engine forms, fine-weave fabric scraps for the stair runner, and sound clear packaging plastic for optional windows. Reject damp, greasy or crushed material. A clean cereal box is useful; a mysterious sticky carton is less charming.
Store-bought materials: a rigid plywood display base, basswood strips for the central spine and wing reinforcement, sturdy chipboard, lightweight card, wood glue for wood joints, tacky craft glue for paper details, water-based acrylic paints, metallic gold craft paint, fine brushes, ready-made dollhouse trim and small artificial flowers. Optional warm battery LEDs can illuminate the cabin; leave their switch and battery compartment accessible.
Tools: a sharp craft knife, an appropriate cutting surface, scissors, a sanding block, tweezers, small clamps and a soft pencil. Cut away from your hands with light repeated passes. Have thick plywood cut by a suitable tool or supplier. Follow each paint, adhesive and lighting product’s instructions for compatibility, ventilation and curing; there is no universal drying time that suits every material.
A gentle glow can make a miniature display feel ready for evening. These iLAND battery-operated string lights are a lovely finishing touch for a little room, festive scene or cozy corner in your collection.

1. Establish the base and hidden support
Draw the body, wings and staircase at full proposed model size on paper. Check the footprint on your shelf before cutting anything: wings need more room than a photograph suggests. Leave a visible margin around the finished model and reserve space at the front for the stair. Move paper shapes until the composition feels balanced from a three-quarter viewpoint.
Make a low cradle from joined wood blocks or laminated card with broad contact surfaces, and fix it securely to the prepared base. Shape the upper supports to meet the underside of the fuselage. The model’s weight should transfer through this cradle, not through tiny wheel axles. Keep it below the main sightline, where later stairwork and decorative landing gear can soften its appearance.

Test the arrangement with temporary lightweight stand-ins for the body and pavilion. Press gently at several points to check for rocking before adding detail. A wide, flat base is preferable to a dramatic narrow stand. Do not suspend the aircraft, and do not assume glue alone can compensate for a joint with almost no contact area.
2. Build a lightweight fuselage
Use a straight basswood spine with card cross-sections spaced along it, then wrap the framework in narrow card panels. Make the nose and tail from layered tapered sections rather than forcing one thick sheet into a compound curve. An easier alternative is a clean cylindrical card tube with separate faceted ends. Accept a slightly stylized shape if it is stronger and easier to finish.
Cut tall window openings in separate side panels before assembly. Back them with dark paper for an unlit version, or fit clear plastic behind painted frames when the interior can remain accessible. Leave a removable upper panel beneath the future pavilion so you can reach lighting and internal joints. Keep the central structural spine intact when positioning openings.

Dry-fit the shell on its cradle and check that the centerline is straight. Seal and paint a test offcut before covering the entire body: water-heavy coatings can warp thin card. Build up light coats with adequate drying between them. Do not use expanding foam or heavy filler merely to hide an inaccurate paper template; adjust the underlying shapes first.
3. Support wings, tail and engine shells
Laminate each wing from card layers around a straight internal spar, keeping left and right shapes matched. Connect the spars securely to the central framework with broad tabs or fitted slots. For a first build, add discreet supports beneath the wings rather than relying on long unsupported joints. Position them where the engine area or base details make them least conspicuous.
Make engine casings from short lightweight tubes. Add a dark recessed circle and simple folded-paper fan shapes inside each mouth; these are fixed visual details, not moving mechanisms. Attach each casing to a substantial small pylon under the wing. Keep all four similar in size and check their bottom edges against the base so nothing unexpectedly bears weight.
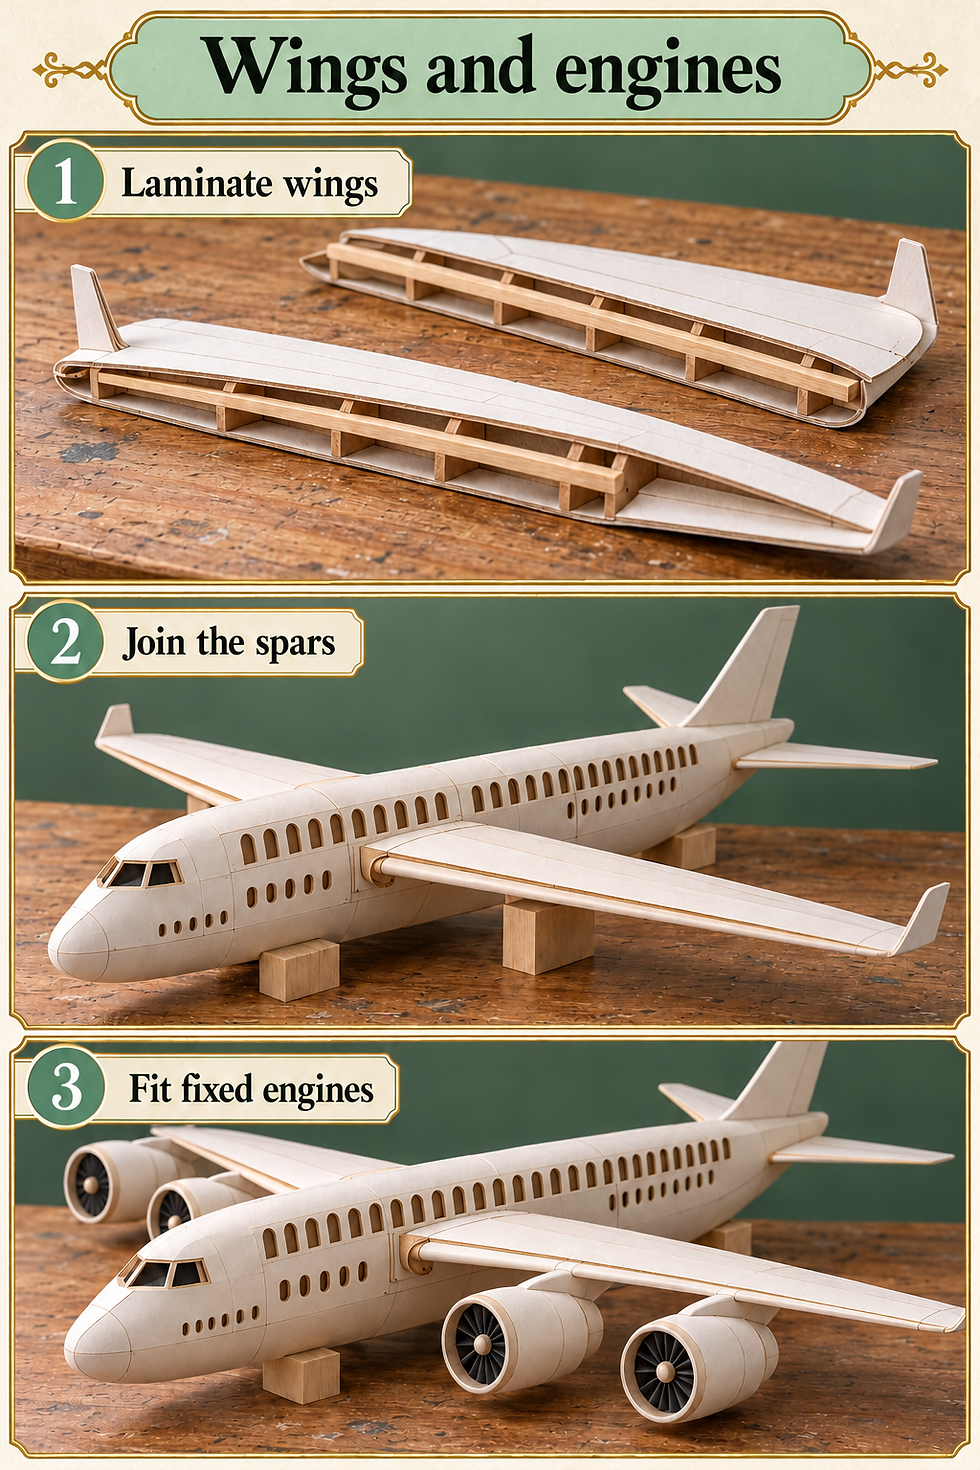
The tail can be laminated card with a tab extending into the body. Let every structural joint cure before adding ornament. Keep the engines fixed and lift the piece only by its base.
Keep your favorite little color mixtures close at hand with the Army Painter wet palette. It is a useful addition to a miniature-painting setup, especially when an afternoon of details turns into one more tiny touch-up.

4. Assemble the pavilion and terraces
Build the upper room as a small card box with square corners and a hollow roof. Add its arched windows before closing the walls. Use narrow strips to suggest corner pilasters and paper shingles to texture the roof, keeping the pattern fine enough that it does not compete with the gold trim. Make any turret as a lightweight tube with a folded paper cap.
Place the pavilion above the main cradle, with a broad platform spreading its load across the shell’s reinforced upper framework. Do not perch it on unsupported card skin. Make the adjoining terraces shallow and clearly bounded. Their railings can be purchased miniature trim or repeated paper balusters strengthened by continuous top and bottom rails.

Leave enough space around the pavilion to read its shape. A crowded roofline becomes difficult to clean and easy to break. Test the removable upper assembly before gluing flowers or finials in place. If a turret catches your sleeve during a dry run, shorten it or move it inward rather than trusting yourself to become permanently more graceful.
Catherine’s Living Room brings a cozy vintage mood to your miniature collection. With its red sofa, fireplace and inviting little details, it is the sort of room that makes you wish you could shrink down for the evening.

5. Fit the staircase and decorative landing gear
Make the stair as a separate sturdy module that stands on the base and meets the doorway without pushing the fuselage upward. Cut two matching side profiles, join them with small treads and add a broad landing at the top. Test the height using a paper version first. The stairs should support themselves; they are not a lever for lifting the aircraft body.
Add handrails only after the stair is square. A continuous rail is stronger than a row of isolated posts, so connect the posts at top and bottom. Glue a narrow fabric runner down the center after painting the steps. Fold its edges under where possible, and use a thin adhesive layer to avoid shiny patches or bulky ridges.

Represent wheels with layered discs or purchased model parts, placing them around the hidden cradle without transferring the main load to them. Keep the tires dark and the hubs restrained so they do not compete with the doorway. Leave the stair removable until the last practical moment; it is much easier to paint the lower fuselage when that grand entrance is not in the way.
6. Paint, ornament and plant the small world
Begin with warm ivory on the main body and wings, then add mint to selected roof and fuselage panels. Test the palette on scrap beside your gold paint. A muted mint usually gives the ornament more room than a bright turquoise. Keep broad surfaces relatively smooth and save raised texture for roof shingles, trim and a few architectural borders.
Apply gold to repeated edges and small scrolls, leaving quiet spaces between them. Fine paper cutouts or thin ready-made embellishments are easier to control than large blobs of dimensional paint. Paint separate trim pieces before attaching them when possible. Dry-fit every flourish against a window or engine casing so it follows the curve rather than hovering above it.

Group small flowers in terrace planters and stair urns, repeating the same pink and cream palette. Use short stems and firm containers; loose foliage should not snag the wings. Optional warm LEDs belong inside accessible compartments, installed exactly as their manufacturer directs. Keep light units clear of flammable trim, never add heat effects, and make the model equally attractive with its lights switched off.
A few miniature books can give a little room an entire personality. Fill a shelf, leave one beside a chair or make a colorful stack on the desk for an easy, charming addition to your collection.

Photograph the display with its scale intact
Use a slightly elevated three-quarter view that shows the staircase, pavilion and wing together. Keep the wooden base visible to frame your little flying palace. A quiet sage or warm-gray backdrop will support the palette and give the gilded details room to shine. Leave breathing room around the wing tips instead of cropping them accidentally.
Place one large diffused light to the side and a white card opposite it for gentle fill. Move the light until the gold edges glow without turning the windows into bright white rectangles. Photograph close details separately rather than expecting every railing and engine mouth to remain equally prominent in one wide frame. Support the camera steadily and avoid an extremely shallow focus that erases the structural clues.

Anavrin’s Kyoto Gion Book Nook brings an inviting Japanese streetscape to your bookshelf. It is a lovely gift for someone who enjoys miniature architecture and the feeling of discovering a little world between the books. Use code EOUFQ5ZWKCSNGM for 10% off select Anavrin products. Shopping through my link helps keep this tiny world growing.

Small problems, practical fixes
Wing droops: reduce its weight, strengthen the internal spar and add a discreet support; do not conceal a weak joint with ornament.
Body twists: recheck the spine and cradle before skinning the framework, then replace the distorted panel rather than forcing the opposite side to match.
Gold looks heavy: repaint a few broad areas ivory and keep metallic highlights on raised edges.
Railings break during handling: make them a continuous assembly and finish the main structure before attaching them.
Stair fails to meet the door: adjust its separate landing height, keeping both the cradle and stair feet flat on the base.
Closing — Until Next Time in the Small World
The pleasure of this miniature is that a familiar machine has acquired the manners of an extravagant house. The doorway invites us in; the wings keep the invitation wonderfully improbable. I would keep Ada’s hatbox small, the flowers neatly contained and the captain’s teacup somewhere it can be found before departure.
Which detail would you build first: the mint-roofed pavilion, the sweeping stair or those gold-trimmed engines? Share your own interpretation with #smallworldminiatures, and explore the Small World Miniatures homepage and online shop for more little-world ideas. There is plenty of room for imagination here. The wardrobe may still have to wait at the station.








Comments