
The Ultimate 80s Sewer Lair Miniature Diorama – Inspired by the Teenage Mutant Ninja Turtles!
- Oct 31, 2024
- 9 min read
Updated: Jan 18

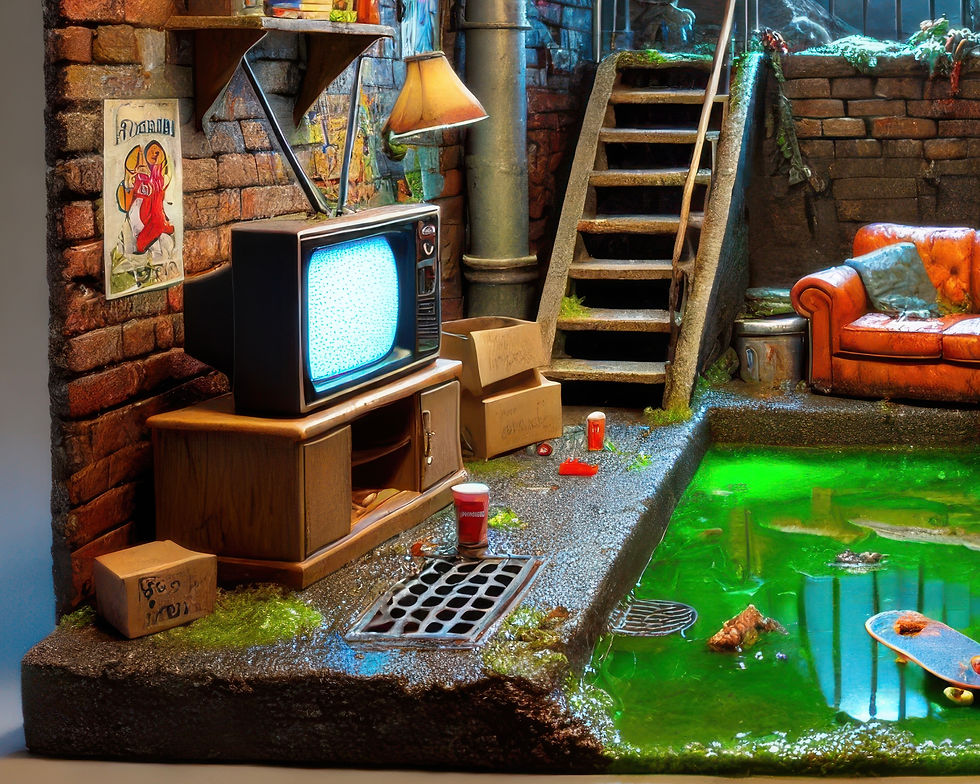
Cowabunga! Feast your eyes on this gnarly miniature recreation of the iconic Teenage Mutant Ninja Turtles' sewer lair, a spot that’s half-pizza-party, half-urban hideout, and all nostalgia. This miniature diorama perfectly captures the essence of the Turtles' underground hangout, from the grimy sewer pipes to the comforting, though battered, orange couch. Every detail in this 1:12 scale masterpiece screams "turtle power" and will transport fans of the classic cartoon straight back to their childhoods. Just imagine Michelangelo, Donatello, Leonardo, and Raphael chilling here between missions, slicing up pizza and arguing over the next arcade high score.
Now, a quick note to our viewers: this digital image might look shell-tacular on your screen, but downloading it and printing it out just won’t do it justice. If you want to fully appreciate the gritty textures and brilliant details of this diorama, consider ordering a high-resolution print on canvas. It’s the ultimate way to bring this slice of turtle history to life in your own space, and shipping is totally FREE within the U.S.! https://www.smallworldminiatures.com/product-page/teenage-mutant-ninja-turtles-turtle-lair-diorama-canvas-print

The Teenage Mutant Ninja Turtles Sewer Lair: A Slice of New York Underground
This diorama reimagines the Turtles’ sewer lair as it might have looked in the late 1980s, back when pizza, VHS tapes, and arcade games ruled. The lair itself has always been a cozy mix of salvaged New York artifacts and grungy industrial decor. This model nails it with that glowing green sewer sludge (no doubt oozing with mysterious "mutagen"), exposed brick walls, and of course, the vintage TV set endlessly tuned to static. Each item feels pulled straight from a back alley or basement, lovingly curated by four mutant turtles with an eye for the eclectic and a knack for DIY.

A Closer Look at the Design and Details
The creator of this diorama has done a masterful job recreating the textures, colors, and ambiance of a 1980s underground lair. From the moldy pipes to the scratched-up arcade machine, every element has been carefully designed to evoke both the grime and charm of the Turtles' hideaway. Let's break down some of the standout pieces:
The Couch: This orange, faux-leather tufted couch has seen better days, but its well-worn look is perfect for the Turtles’ homey, if slightly chaotic, vibe. It’s a true testament to the mix of comfort and grunge.
The Arcade Machine: Covered in graffiti, stickers, and plenty of scrapes, this miniature arcade cabinet captures the feel of the Turtles' love for old-school video games. It’s a nostalgic throwback to the days of coin-op fun.
The Sewer Pool: In the center of the lair, a toxic green pool of ooze adds just the right amount of radioactive glow. This resin feature gives the model a dynamic sense of the slimy, hazardous world these heroes call home.
The Wall Decor and Accessories: Posters of characters like April O’Neil, a pizza box, and soda cans add a layer of realism that makes this miniature feel like a true slice of TMNT life.
Color, Composition, and Materials
This diorama’s color scheme uses an earthy palette dominated by rust, green, and grunge. The designer has wisely limited the use of bright colors, reserving them for the pool of ooze, the pizza box, and the arcade machine—creating focal points that draw the eye. The textures here are absolutely essential: rough bricks, corroded pipes, scuffed-up furniture, and mossy puddles give this piece its well-worn, lived-in look.
To achieve similar results, hobbyists can explore mixing and matching materials. For example, foam board can be used for walls, modeling clay or resin for smaller props, and textured paint to simulate grime and rust. For that extra touch of realism, use weathering techniques like dry brushing, stippling, and washes to add depth to surfaces and give them a weather-beaten, gritty appearance.
Make Your Own Magic: TMNT-Style Sewer Lair (1:12)
You’re chasing cozy grime: a secret hangout where neon ooze meets pizza crusts and a warm 2700 K bulb hums over a cracked Chesterfield. Let’s build that miniature brick sewer lair you’ve wanted since Saturday mornings.
Quick Wins
Instant brick texture: Press a crumpled ball of aluminum foil into XPS foam—one good squeeze → believable miniature brick wall in seconds.
Grimy mortar fast: Mix 1 part light gray acrylic : 10 parts water; wick it into brick lines, blot—hello aged mortar.
Arcade glow without glare: 3 mm warm-white LED (2700–3000 K) + thin milk-jug diffuser behind the screen → soft cabinet glow.
Slime pool pop: UV resin tinted with 2 drops fluorescent green ink per 10 ml resin, then a selective gloss varnish ring on the edge → wet look.
Graffiti that sticks: Print tags on matte paper at 600 dpi, feather the edges with a damp brush, PVA them on, then stipple a thin grime glaze to bed them in.

Deep Dive
1) Planning & Scale Notes
Aim for 1:12 scale (one real foot = 25.4 mm).
Footprint: 360 mm (W) × 200 mm (D) × 240 mm (H) comfortably fits pipes, couch, stairs, and a miniature ooze channel.
Brick courses: Scribe bricks 6 mm × 3 mm × 2 mm for a grittier, older look (not architect-perfect—this is a miniature brick tunnel after all).

2) Bones: Base Structure
Cut floor and two side walls from 10 mm XPS; back wall from 6 mm XPS.
Laminate the floor to a 6 mm MDF base for rigidity.
Carve the central channel 120 mm × 45 mm, 8–10 mm deep. Chamfer the edges slightly to catch slime gloss.
Pin walls with 2 mm bamboo skewers + PVA, square everything, and weight while curing.

3) Hero Piece: The Orange Chesterfield
Build the sofa from high-density foam blocks: seat 82 mm, back 90 mm, depth 45 mm.
Scribe tuft lines, press 2 mm ball stylus for buttons.
Paint: Base—Burnt Sienna + a touch of Cadmium Orange (3:1); shade with Raw Umber; highlight with Naples Yellow on worn edges.
Selective satin varnish on the seats to sell “well-loved.”

4) Utilities & Greebles (Pipes, Grates, Cables)
Pipes: Use 10 mm and 16 mm styrene tube; elbows from PVC conduit bends.
Strap with 3 mm styrene strip, scribe screw slots.
Grates: Aluminum mesh framed with 2×2 mm styrene angle.
Cables: Twist 28–30 AWG hookup wire; spot CA every 15 mm to control hang.

5) Furniture & Soft Goods
CRT TV: Basswood box 48 mm × 38 mm × 32 mm; frame the screen with 1×2 mm strip. Add a rectangle of opal acrylic as diffuser.
Arcade cabinet: Foamcore box 55 mm tall; bevel the front at 12°; skin with styrene.
Pizza chaos: Sculpt slices from epoxy putty; base Yellow Ochre, sauce Alizarin Crimson, cheese glaze = gloss varnish + 1 drop Ivory.
Skateboard: 65–70 mm long from thin basswood; burnish foil for trucks.

6) Base Colors & Materials
Prime everything with rattle-can gray primer (light passes).
Bricks: Base Red Oxide; sponge English Red + Burnt Umber; random Payne’s Gray bricks for variety.
Mortar wash: 1:10 Light Gray : water; wick + blot.
Metal: Base Gunmetal; stipple Graphite powder on edges for cold sheen.
Concrete stair & channel: Neutral Gray with 10% Raw Umber; speckle darker dots with an old toothbrush.

7) Weathering Stack (10 steps—don’t skip)
Primer: Uniform gray.
Base metal: Gunmetal on pipes/grates.
Chipping layer: Hairspray or chipping medium on those metal areas.
Color coat: Industrial Green pipes (Olive Drab + 20% Black); bricks already colored.
Mechanical chips: Dampen and scrub with a short brush; expose metal at elbows/edges.
Oil dot filter: Place tiny White, Raw Umber, Olive, Payne’s Gray dots; feather with odorless thinner downward.
Rust mapping + streaks: Burnt Sienna oil for halos; add dark centers with Van Dyke Brown; pull streaks vertically.
Dust/pigments: Soot around vents; Earth along floor; fix with isopropyl spritz (light!).
Varnish (matte): Seal to unify.
Selective gloss: Edge of slime channel, soda spills, TV screen bezel.

8) Lighting Plan (temps, diffusion, wiring)
Ambient “shop light”: 1 × warm-white LED (2700–3000 K) hanging over the couch.
Moonlight from grate: 1 × cool-blue LED (5600–6500 K) hidden behind the barred window for contrast.
Arcade + TV: Warm-white LEDs behind opal plastic diffusers; optionally add a flicker board for the TV static.
Power: 5 V USB or a coin cell. Always run a 220–330 Ω resistor in series with each LED at 5 V; heat-shrink and insulate joins.
Diffusion: Milk-jug plastic or parchment paper, double-layer if hotspots persist.

9) Slime Pool (UV Resin Water)
Seal the channel with gloss varnish, then PVA; let cure 24 h.
Mix UV resin : hardener (as directed); tint 2 drops fluorescent green per 10 ml; for yellowish depth, add 1 tiny toothpick tip of Transparent Yellow to the bottom layer.
Pour in 2–3 mm lifts; burst bubbles with a light pass of heat or IPA mist; embed the 1:12 skateboard in the final lift at a 5° angle.
Skim the edge with gloss varnish once cured for scum.

10) Story Clutter & Easter Eggs
Scatter crushed soda-can bits (aluminum foil cylinders), pizza box lids, and a bobby pin bo-staff by the couch.
Easter egg idea: stencil “TCRI” on a manhole cover and hide a tiny TV remote under the sofa cushion.
Add a mini “Channel 6” press pass peeking from a crate for deep-cut fans.

11) Unifying Glaze/Filter + Finish
Glaze the lower 20 mm of all walls with 1:15 Raw Umber : water to tie floor grime upward.
Cool–warm balance: 1:20 Payne’s Gray glaze around the moonlit grate; 1:20 Burnt Sienna around the couch lamp.
Final coats: Overall matte varnish, then selective satin on leather, high-gloss for spills and ooze.

12) Photo Tips (for that web-ready glow)
Key light: softbox or desk lamp through parchment at 45°, gelled ½ CTO to keep warmth.
Rim light: cool LED behind the grate for silhouette drama.
Camera: shoot at f/8–f/11, ISO 100–200, 1/4–1 s on tripod; for phones, use Pro mode, tap focus on the couch, exposure −0.3 EV.
Add a whisper of glycerin-water (1:3) mist for humidity—not over the electronics.

Troubleshooting & Pro Tips
Problem: Bricks read flat. → Fix: Dry-brush Naples Yellow + White (1:1) across the highest ridges; pin-wash mortar lines with 1:8 Payne’s Gray.
Problem: Rust looks like orange paint. → Fix: Stipple 3 tones (Burnt Sienna, Orange + Umber 1:1, Van Dyke Brown); edge with graphite for metal bite; add a few vertical streak pulls.
Problem: LED hotspots in the arcade. → Fix: Double the diffuser, pull the LED 20 mm back, line cavity with aluminum tape for even bounce.
Problem: Resin leaks from the channel. → Fix: Back-seal with PVA, then mod-podge + tissue as a gasket; test with water before resin.
Problem: Color soup; no cohesion. → Fix: Apply a 1:25 Raw Umber glaze across the lower half and a 1:25 Payne’s Gray glaze up top; then a final matte varnish to marry values.
Mini Shopping List (≤12 items)
XPS foam (6–10 mm) + MDF base
Styrene tube/strip + aluminum mesh
Basswood + foamcore
Acrylics: Red Oxide, Burnt/Raw Umber, Payne’s Gray, Olive Drab, Cad Orange, Naples Yellow, Neutral Gray, Gunmetal
Oil paints: White, Burnt Sienna, Van Dyke Brown, Olive
Pigments: Soot black, Earth brown
Adhesives: PVA + CA (cyanoacrylate)
Varnishes: Matte, Satin, High-Gloss
LEDs (warm + cool), 28–30 AWG wire, 220–330 Ω resistors, switches, heat-shrink
Diffuser plastic (milk-jug/opal sheet)
UV resin + fluorescent green ink
Texture tools: aluminum foil ball, ball stylus, toothbrush
Safety first: Work with aerosols, resins, and oils in good ventilation; wear gloves and eye protection; keep isopropyl alcohol and flammables away from heat; use correct resistors and insulate all electrical joins.
Now go make the world under the world—complete with green goo, a battered sofa, and a cabinet that still eats your quarters.
From the Big World to the Small
This lair borrows its bones from real New York infrastructure—the arched masonry of the City Hall Subway Station (1904) and the brick-and-iron Croton Aqueduct gatehouses—then dresses them in the pop grit of the 1980s, channeling Keith Haring’s bold subway-line graffiti. That mash-up is the same DNA that powered TMNT: civic-era brickwork + industrial pipes + street-art color = cozy grime with attitude.

In miniature you translate those references into choices: 6×3×2 mm bricks to echo turn-of-the-century courses, olive-drab pipes with rust mapping for public-works realism, Haring-style micro-decals scuffed under a Raw Umber glaze, and the 2700 K vs 6500 K light duel (lamp warmth vs moonlit grate) that mimics sodium streetlight and night air. The ooze channel becomes UV-resin “canal”, a tiny Chesterfield nods to Victorian salvage, and everything is unified with city-grime filters—shrinking big-world history into a diorama that feels lived-in, comic-book plausible, and unmistakably NYC.
Until Next Time in the Small World
Thanks for crawling through the ooze with me. If the orange couch, the arcade glow, or that very questionable “swampy spa” made you grin, tell me your favorite detail in the comments—I’m taking bets on Team Pizza Box vs. Team Grate. Got your own sewer-chic build? Share it with the tag #smallworldminiatures so we can cheer you on (and borrow your best tricks). Want more tiny tutorials, printables, and early peeks at new builds? Hop on our newsletter—no spam, just snacks-sized updates and the occasional slice of chaos.
Until next time, keep your LEDs dimmed, your rust streaks classy, and your pizza off the resin. The city’s big, but our worlds are small—and that’s where the real adventures happen.
Hashtags:
#smallworldminiatures #miniatureart #miniaturediorama #sewerdiorama #scaledmodel #modelmaking #dollhouseminiatures #scratchbuilt #kitbashing #foamcraft #xpsfoam #bricktexture #tinyfurniture #miniaturepainting #weathering #ledlighting #uvresin #oozeglow #arcadecabinet #retrowave #industrialdesign #urbanminiatures #tabletopterrain #handcraftedminiatures #craftphotography #makercommunity #artanddesign #creativeprocess


Comments