
The Pebble-Kissed Cottage: A Northwest Regional Style Miniature That Glows From the Ground Up
- Sep 24, 2025
- 7 min read
Updated: Jan 20

First Impressions in Miniature
If this little cottage smiled any harder, it would sprout dimples in the siding. At 1:12 scale, our Northwest Regional–style cutie leans into everything I adore about the big-world originals: grounded forms, generous eaves, honest materials, and windows that feel like they were designed by someone who really does read paperbacks by lamplight. The hero piece here—the stone cladding wrapping the first floor—looks like it’s holding a family of warm cookies inside. Above it, clean timber lines and cedar-toned trims keep the silhouette tidy while potted greens and window boxes toss confetti across the façade.
I’ve got a complete “Make Your Own Magic” guide later in this post with steps, paint ratios, and all the greebly goodness to help you craft your own version. For now, take a breath. Hear the late-summer crickets? That’s just the model breathing.
The Tiny Tale
Welcome to Pebblecross Cottage, established “sometime after the Big Rain, before the Great Sunbreak”—that’s how the locals tell time. The locals, by the way, are an industrious guild of window-box gardeners led by Marigold Sprig, a moss-whisperer who swears she never talks to her plants (she only listens).
Legend says the foundation stones were collected from the nearby Whispering Run, where round river pebbles roll like marbles after a storm. The cottage’s first owner, August Bell, pioneered small-batch teacups sized for “second breakfasts” and was known to mutter, “there’s always room for one more pot of thyme.” (Is there an extra blue watering can hidden somewhere in the hedgerow? Maybe. Consider that your first Easter egg.)
Every builder who visits Pebblecross leaves a token. Some leave a tiny trowel. Some leave a single painted pebble. One anonymous guest left a perfect, thumbprint-sized heart fossil tucked into the stonework—if you spot it, brag in the comments.

A Guided Tour of the Build
Step onto the front stoop and the world instantly quiets. The porch roof lines feel safe and certain, with a trim echo that frames your view like a well-cut photograph. Under your feet, the stone base has that just-rained texture, cool and faintly grainy. The amber windows? They’re an evening in a glass—soft, not syrupy, casting little squares of warmth onto planters stuffed with geraniums, lavender, and ferny frizz.

Follow the rambling vine up the downspout; it’s nosy in the best way, poking its leaf-nose into every window box. The balcony makes a polite show of beams and joinery, then steps back, letting the lush pots do the talking. Around the side, two strict conifers stand guard—equal parts topiary humor and alpine devotion—while a tall cypress leans like a gossiping aunt over the roofline.

Look longer and the house reveals its rhythm: stone heft below, light and line above, and a chorus of plants tying the verses together. It’s a composition, not just a scene.
Inspirations – From the Big World to the Small
Northwest Regional style is the wood-and-weather poetry that sprouted from the Pacific Northwest mid-20th century. Think John Yeon and Pietro Belluschi, with nods to Paul Thiry—architects who favored local materials, uncomplicated massing, and a seamless handshake with the landscape. Yeon’s Watzek House and Belluschi’s modest timber churches share that “let the building belong to the site” credo. In miniature, this translates into a few big moves: a grounded base (our stone cladding), broad eaves that feel like outstretched arms, and fenestration that sells warmth before you even flip on the lights.

You can also spot a distant cousin in Alvar Aalto’s humanist modernism: natural textures, gentle curves where needed, and a shyness about ornament unless it’s earned. Here, the ornament is alive—plants, pebbles, patina—scaled down with just enough exaggeration to read clearly at 1:12.
Make Your Own Magic
You’re not here to photocopy; you’re here to riff. Treat this as your compass, not your GPS. Your cottage will have its own weather, its own pebble dialect.
A. Shopping List (with clever reuse first)
From around the house
Pea gravel / aquarium pebbles → hero stone cladding; sort by size for courses
Cardboard from cereal boxes → shingle starter strips, templates, window shutters
Coffee stirrers / popsicle sticks → timber trims, balcony slats, porch columns
Tea bags (dried) → plant mulch, textured ground cover
Aluminum foil → stone molds, embossing subtle texture, light diffusers
Old phone charger bricks & USB cords → power for micro-LED strands
Spice jars (empties) → mixing vessels for glaze/washes
Pantyhose (retired) → fine sieve for scenic materials
Paper clips & wire ties → vine armatures, downspouts, railing pins

If you’d rather buy
1:12 scale windows/doors (laser-cut kits or pre-made)
Basswood sheets & strips, 1–3mm for framing and siding
Foam board or XPS foam for walls and substructure
Acrylic paints: raw umber, burnt sienna, Payne’s gray, olive green, sap green, oxide red, buff titanium, unbleached titanium, yellow ochre, ultramarine
Matte medium, PVA glue, superglue gel, lightweight spackle
Static grass (2–4mm), fine turf, and leaf flake for plants
Micro-LED string (USB) warm white, 2700–3000K
Clear acetate or polypropylene sheet for glazing
Pigments/pastels for weathering
Satin polyurethane or matte varnish for sealing

Tools
Hobby knife (fresh #11 blades), razor saw, metal ruler
Sanding sticks, needle files
Pin vise + micro drill bits (0.6–1.5mm)
Tweezers, bulldog clips, tiny clamps
Cutting mat, small square, cheap chip brushes & one nice round brush (size 2–4)
B. Deep Dive (numbered steps)
Safety first: sharp blades cut everything—including time. Fresh blades, slow cuts, away from fingers. Ventilate when using CA glue or spray finishes. Eye protection when drilling. Hot tools are hot (ask me how I know).
1) Plan the vibe & scale: Sketch a front elevation sized to 1:12 (a standard door ~7" tall). Keep the Northwest Regional DNA: a sturdy base, clear roof geometry, wide eaves. Decide window rhythm—pairs on the lower floor, triplets above read nicely at this scale. Mark lighting points early.

2) Bones: frame and foundation: Laminate two layers of foam board for walls; add basswood corner posts and lintels to keep things square. The base “plinth” should be 1–1.5" tall to sell the stone heft. Embed a shallow channel under the floor for USB wiring; leave an access notch at the back.

3) Carve the hero: stone cladding: Sort pebbles by thickness. Mix PVA with a dash of matte medium (about 3:1—with enough body to hold a stone without slump). Butter the wall in small zones and press stones in courses, alternating sizes. Keep joint lines staggered like a tiny, geological quilt.Paint/Finish: When dry, wash with a thin mix of raw umber + Payne’s gray (about milky coffee). Dab back with a paper towel to keep individual stones readable. Drybrush buff titanium to catch edges. A final cool glaze (ultramarine + gray, just a whisper) sells damp Northwest air.

4) Walls & timber: Upper walls get a light board-and-batten look: vertical basswood strips over painted panels (mix unbleached titanium + a pea of yellow ochre for that warm fiber-cement vibe). Stain trims and beams with diluted burnt sienna + umber, then knock back shine with matte varnish.
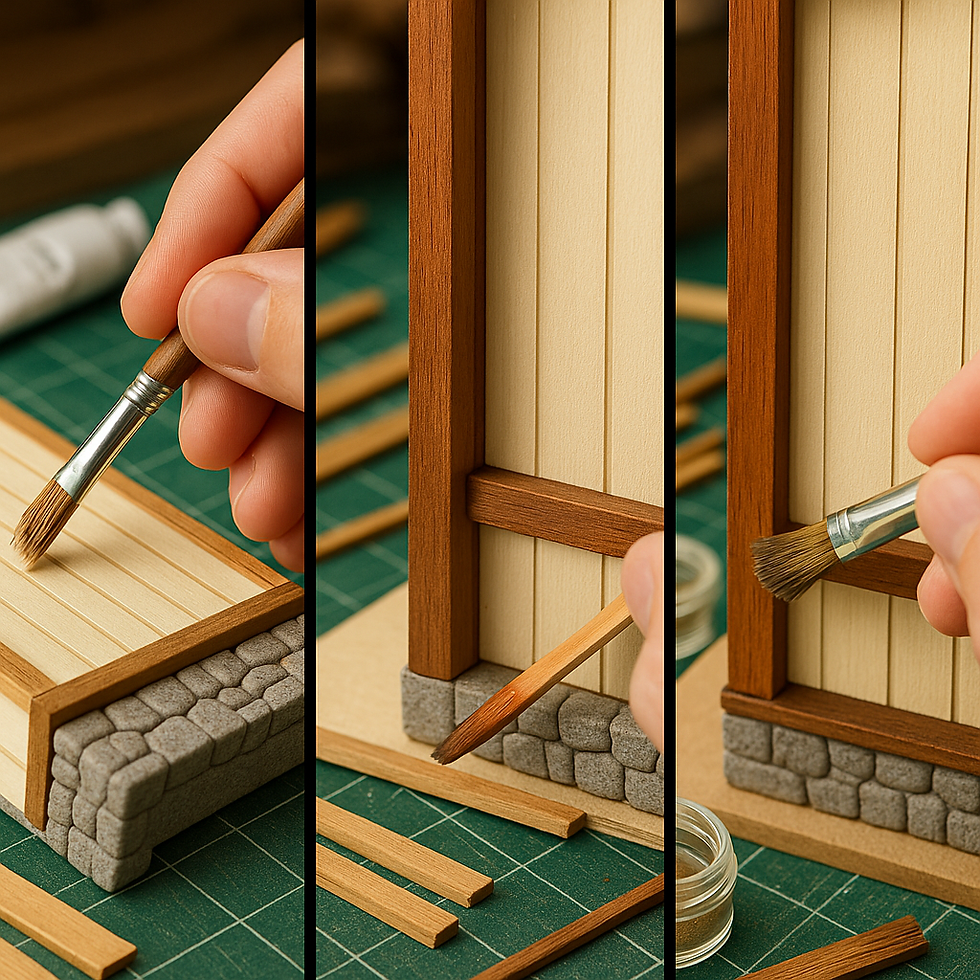
5) Windows & doors: Pre-made windows are fine; hand-cut muntins from basswood if you’re feeling spicy. Glaze with acetate. Before installing, tint the “interior” with a warm wash—think 2700K in paint: a blend of yellow ochre + a dash of red, thinned heavily. It bounces light and keeps the glow cozy.

6) Roof & eaves: Cardboard shingles (stirrer+cardboard sandwich) read beautifully at 1:12. Keep courses irregular by a hair—real roofs aren’t perfect. A light gray-brown base, a walnut wash in the gaps, then a soft drybrush with buff. Edge shingles slightly darker under eaves to imply shadow.

7) Balcony & porch: Use coffee stirrers for railings and a few chunkier basswood posts to keep it from looking spindly. Drill pilot holes and pin joints with trimmed paper clips—glue plus pins resists “clumsy-thumb Saturday.”

8) Planter party & soft goods: For soil, mix fine turf with tea-leaf mulch and a pinch of PVA. Micro tufts, chopped foam, and stalks from paintbrush bristles become stems. Flower pops from painted coarse turf: oxides for geranium reds, lilac for spirea, lemon for marigolds (Marigold Sprig insists).

9) Vines & greebles: Twist two fine wires, coat with PVA + tissue to create a barky vine. Paint dark umber, drybrush olive. Leaf with leaf flake or chopped foam. Add downspouts (painted wire), tiny terracotta pots (polymer clay or bought), and a blue watering can if you’re hunting that Easter egg.

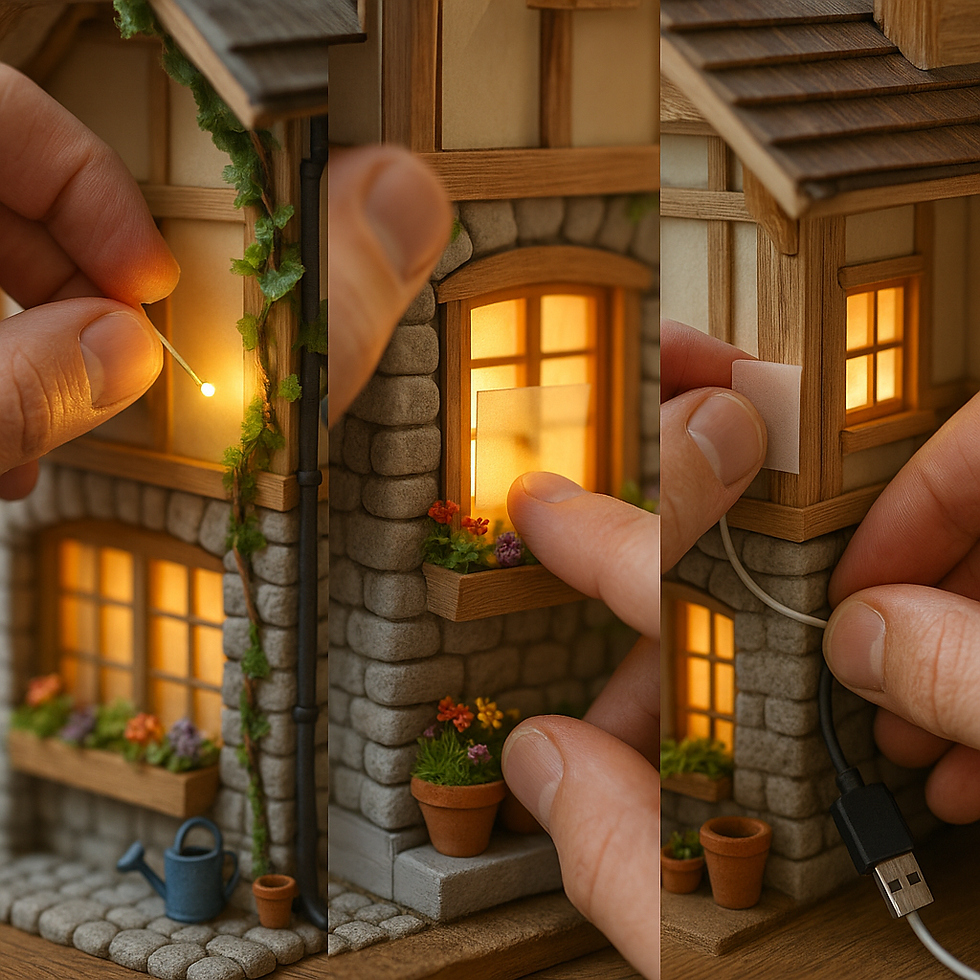
10) Lighting—keep it friendly: Feed a warm-white USB micro-LED string into the shell before the roof goes on. Diffuse hot spots by taping a strip of baking parchment or frosted acetate behind windows. Route the USB cord to the back notch; label it so Future You thanks Past You.
11) Unifying glaze/filter: Even perfect parts look unrelated until you whisper them into the same weather. Mix a transparent filter: 1 part matte medium, 8–10 parts water, tint with a smidge of Payne’s gray + raw umber. Feather it over stone lower areas and under eaves; it ties everything into one day.
12) Finish & seal: Matte varnish on walls, satin on stone (subtle sheen = damp). Touch the highest edges with buff drybrush. Deepen window frames with a thin shadow line—0.3mm liner pen—right under the lower trim.
13) Photo tips & backdrop: Backdrop ideas: a pale, fog-gray sweep; or a soft green gradient to imply a forest fringe. Place a white card opposite your key light for bounce. Shoot from sock-level (seriously, chin to table) and tilt just enough to make the roofline heroic. Try one frame at dusk with only the LEDs—instant story.

Troubleshooting: quick fixes
Stones won’t stick → Increase PVA body; work in smaller zones; roughen foam surface with sandpaper.
Pebbles look “polka-dotty” → Wash with a semi-opaque filter to harmonize color; group similar tones in small clusters for natural variation.
Light hotspots in windows → Add a second layer of parchment diffuser, or wand the LED away from the pane.
Roof waves like a potato chip → Add cardboard underlayment strips and clamp while drying.
Plants read like blobs → Increase contrast: darker soil, highlighted leaf tips, a few stems taller or trailing.
Whole build feels too clean → Targeted grime: a darker wash under sills, a mossy green in stone joints near the ground, a hint of rust on the downspout seam.
Closing – Until Next Time in the Small World
Pebblecross Cottage will keep glowing long after we click the lights off. Marigold says the plants sing lullabies after midnight; August Bell still brews second breakfast tea on foggy mornings (which, around here, is every other day). Tell me in the comments which detail made you lean in—the balcony, the stone base, or the blue watering can cameo. Then share your own builds with #smallworldminiatures so I can applaud wildly and possibly send digital cookies. Want more tiny tours, build recipes, and secret Easter eggs? Hop on the newsletter—first dibs on new prints and behind-the-scenes peeks guaranteed.
Hashtags
#miniature #miniaturehouse #dollhouse #diorama #scale1to12 #northwestregionalstyle #architecturalminiatures #stonecladding #modelmaking #miniatureart #hobbycrafts #tinyhome #miniaturephotography #dollhouseminiatures #handmade #craftdesign #architecturelovers #fantasycottage #gardendiorama #modelbuilder #miniaturelandscape #woodworkingminiatures #ledlighting #weathering #basswood #foamboard #greebles #smallworldminiatures


Comments