


Sunlit Secrets: A Spanish Colonial Miniature Cottage & Garden
- Sep 3, 2025
- 11 min read
Updated: Jan 20

Opening – First Impressions in Miniature
Friends, I’m smitten. This Spanish Colonial miniature cottage looks like it woke up from a sunbeam, stretched, and said, “Mi casa es tiny casa.” The first thing that grabs you is the front door—our certified hero—with its carved panels and dramatic arch that basically begs to be photographed from every angle. Lanterns glow like golden oranges at dusk, and the stucco walls catch light in a way that would make any photographer whisper “just one more shot.”
Tile-topped eaves tip their hats, wrought-iron railings flirt with shadows, and those terracotta pots? They’ve multiplied like rabbits with horticultural degrees. There’s texture everywhere—crisp stone pavers, delicate balcony shutters, a cheeky tapestry, and succulents so plump you can hear them quietly photosynthesizing. If you love warm architecture, little worlds, and detailed storytelling, tuck in. We’ll tour the scene, then I’ll walk you through a complete how-to later in the post—stucco, roof tiles, tiny clay pots, miniature plants, lighting, the works.
Why This Photo Needs VIP Treatment
You’re seeing a web-optimized photo here—perfect for scrolling, not quite sharp enough for your living room. If this miniature makes your heart go “¡olé!”, consider a high-resolution canvas print for your wall. I’ll add the order link and product photo here (FREE U.S. shipping in the States). The canvas version captures the stucco grain, the roof tile weathering, and the micro-greens so crisply you’ll want to water them. Your guests will either ask who the architect is or if you’ve secretly shrunk a real cottage. Both answers are acceptable. https://www.smallworldminiatures.com/product-page/spanish-colonial-miniature-cottage-diorama-canvas-print

Miniature Backstory – The Tiny Tale
Welcome to Casa Pequeña de los Vientos, founded (legend says) in 1919, when a retired tile-maker named Isidro Ventana followed a stray cat into a courtyard and decided the sunlight there was unusually well-behaved. He built the cottage in stages, bartering clay pots for cedar planks and trading stories for wrought iron. The neighbors—an accordion player named Lola “Three-Chords” Vega, a botanist who swears succulents gossip at night, and a gecko that answers only to Señor Click—spent evenings under the balcony, arguing about whether bread counts as a side dish or a lifestyle.

Isidro carved the door as a love letter to journeys that end at home. He hid small motifs across the façade: sparrows for company, a sunburst for good mornings, and one tiny lizard to guard the spice jars. Easter egg alert: somewhere on the structure, a tile with a little windmill hides in plain sight. If you spot it, you’re officially part of the neighborhood.
Keep Isidro, Lola, and Señor Click in mind—we’ll nudge them back into the build notes later.
A Guided Tour of the Build
Step onto the flagstone path. Your shoes go soft—moss breathes between pavers, and rosemary brushes your calves like an aunt who’s proud of you. The stucco walls aren’t flat; they bulge and settle like dough that rose just right. Everywhere, terracotta pots perch at jaunty angles—some etched, some smooth, all quietly hoarding sunlight. The lanterns glow at a candle-warm temperature, pooling light under the arches, and the interior hums with coppery reflections—like a café right before the dinner rush.

Look up. The roofline isn’t ruler-straight; Spanish tile rarely is. It undulates, catching shadows in the laps between barrels. The balcony’s ironwork laces shadows over a spray of geraniums, while rustic shutters hold the perfect amount of splinter.
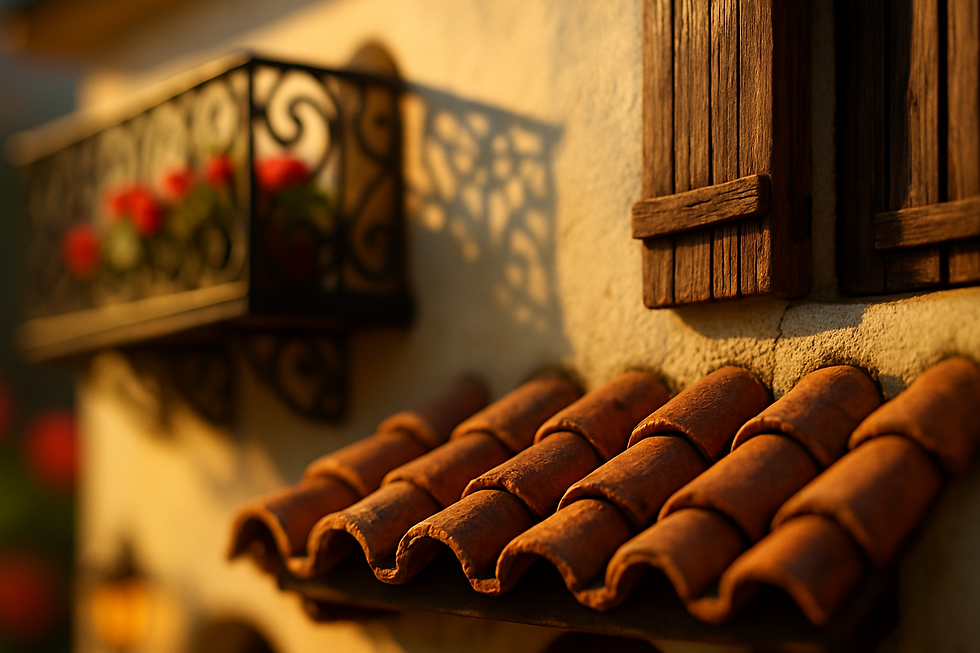
Around the side, stair-stepped garden terraces parade more pots: echeveria, jade, a brave aloe—each leaf with a little waxy sheen. A patterned hanging textile acts as a windbreak, and just beyond it, a cypress keeps watch like a green exclamation point. The hero door waits at center stage, its panels sculpted, its hardware a quiet wink. Tap it (gently); it answers with a tiny thunk—like a good book closing.

Inspirations – From the Big World to the Small
Spanish Colonial and its revival cousins are storytellers in plaster and clay. Think the Santa Barbara County Courthouse with its whitewashed walls and exuberant ornament; the domestic, human-scale grace of George Washington Smith’s Spanish Colonial Revival homes in Montecito; and the mission bones of San Juan Capistrano, where arcades, bells, and sunbaked tiles define the silhouette. Our miniature borrows that family DNA: smooth stucco, soft arches, timber accents, and roof tiles that roll like ocean swells.

In full scale, these elements moderate heat, cast deep shade, and celebrate hand-worked surfaces. In miniature, they translate into texture, rhythm, and warmth. The trick is compressing proportion without losing character—wider arches, chunkier tile overlap, and more pronounced mortar lines so the camera (and the eye) read the style immediately. The wrought iron becomes bolder, the shadows more theatrical, and the color palette leans toasted—vanilla stucco, cinnamon tile, olive greenery, a squeeze of lemon in the lantern glow.
Artist Tips – Make Your Own Magic
You’re ready to build your own sunlit sanctuary. You’ve got this—just promise to keep snacks nearby and talk nicely to your cutting tools. Here’s the full roadmap.
A) Shopping List (with clever swaps)
From around the house
XPS foam core: Reuse packaging foam or insulation offcuts for walls and terraces.
Joint compound / lightweight spackle: Your stucco in a tub. (DIY alternative: baking soda + PVA for textured paint.)
Cardboard & chipboard: Templates, sub-roofs, balcony floors.
Skewers & toothpicks: Door pins, plant stakes, balcony supports.
Coffee stirrers / popsicle sticks: Shutters, door planks, trim.
Sand, tea leaves, dried herbs: Ground texture and “mulch.”
Aluminum foil: Press for stone textures; form gentle roof tile curves for scratch builds.
Old fabric & paper towels: Tapestry textures, curtain hints, planting cloth.
Wire (26–30 gauge): Vines, handles, hooks, armatures for plants.

Purchase equivalents / upgrades
XPS insulation board (pink/blue) for a clean, consistent frame.
Pre-made Spanish roof tile sheets: Look for JTT Scenery Products or Plastruct Spanish tile pattern sheets (PVC or styrene) for multiple scales; for dollhouse 1:12, check Miniatures.com (Hobby Builders Supply) and Etsy sellers for ceramic or 3D-printed barrel tiles.
Tiny terracotta pots: Miniatures.com, The Little Dollhouse Company, Etsy, or craft-store fairy-garden sections (Michaels/Joann).
Miniature plants & foliage: Woodland Scenics, Noch, WWS Scenics, AK Interactive or GamersGrass tufts for succulents/groundcover.
LED lighting: USB-powered mini fairy-light strands or prewired 3V LEDs with a coin-cell holder.
Acrylic paints: Raw umber, burnt sienna, yellow ochre, Naples yellow, ivory black, titanium white, olive/oxide greens.
Matte Mod Podge / PVA glue, super glue gel, matte varnish, and optional pigments (weathering powders).

Deep Dive (numbered steps)
Safety first: Fresh blade, slow hands. Cut XPS with a sharp knife; never force it. Ventilate. Spackle dust is benign but messy—mask up if sanding. Heat tools: if you use a hot wire cutter, work in a ventilated area and avoid PVC near heat. Electricity: treat LEDs with respect. Tape and test before committing.
Planning & scale
Choose a scale—1:12 (dollhouse) reads best for hero details; 1:24 for smaller footprints.
Sketch elevations. Exaggerate arches and tile thickness so cameras “see” them.
Identify your hero (here: the front door) and stage the composition around it—paths leading in, lights framing it, balcony above as a crown.

Bones (base structure)
Frame with XPS foam: Walls, floors, and terraces cut from 10–25 mm foam. Dry-fit like Lego.
Add alignment tabs with toothpicks or bamboo skewers—pin walls in place.
Carve soft bevels at edges to break the “box” look; Spanish Colonial loves rounded corners.
Glue with PVA/foam-safe adhesive. Weight flat while drying to avoid warps.

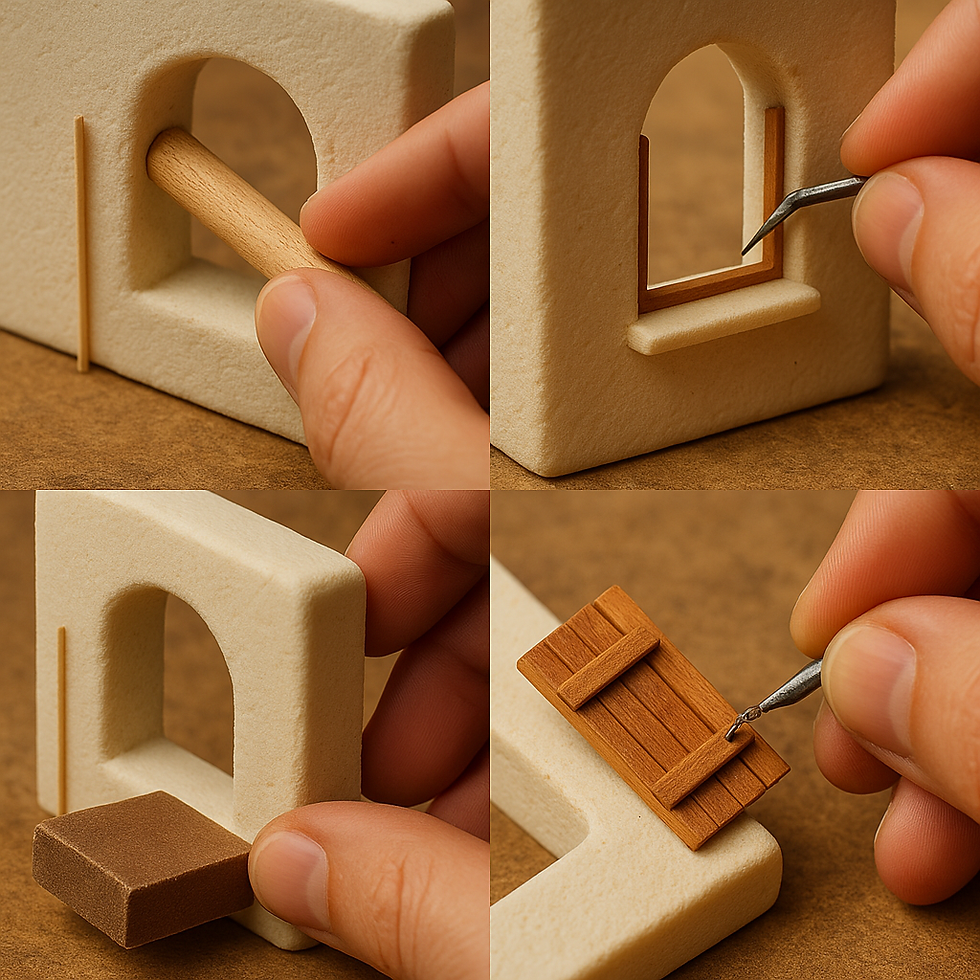
Windows & Ironwork
Window openings (cutouts)
Plan the rhythm: Lightly sketch window positions on the XPS—mix a couple of arches with smaller rectangles so the façade feels lived-in. Keep heights aligned, but let widths vary a smidge for charm.
Score, don’t shove: Use 2–3 shallow passes with a sharp blade around your pencil outline. For arched tops, trace a cardstock template; poke a starter hole with a skewer and cut toward the line.
Pop and refine: Gently push out the waste piece. Round the inner edges with a sanding stick; for arches, wrap sandpaper around a dowel to get that soft, Spanish Colonial curve.
Add jambs & sills: Line the opening with U-shaped strips of chipboard or thin basswood to create depth. Add a slightly proud sill (chipboard or stirrer) and bevel its front edge—stucco will kiss right up to it later.
Reveal the reveal: Lightly bevel the outer stucco edge so the opening looks hand-troweled, not laser-cut.
Shutters: Laminate coffee-stirrer slats onto thin frames. A slight bow is your friend —“sun-softened” beats factory-flat. Hinge with tiny wire loops or simply glue slightly ajar.
Ironwork inside the frame
Make a quick jig: Print or sketch a scroll pattern and tape wax paper over it.
Twist and place: Form 26–28 ga soft wire into S-curves and spirals following your guide. Tack joints with tiny dots of gel CA; for extra strength, brush on matte varnish to lock fibers and dull the shine.
Mount with standoffs: Superglue short wire pins to the back of the grille. Drill matching pinholes into the jamb so the grille sits a few millimeters inside the opening—shadow = drama.
Finish: Paint a deep iron brown/black, then drybrush graphite or a warm silver on the high spots. Add a bloom of “sun dust” (raw umber glaze) where iron meets stucco.
Optional box: Bend a tiny bracket from strip wire below a window for a flower box later (just the bracket now—save plants for the greenery step).

Stucco (the star texture)
Seal foam with a thin Mod Podge/PVA coat.
First pass: Smear on lightweight spackle with a silicone shaper or an old gift card. Keep it thin—like buttercream you’re proud of.
Character pass: While tacky, dab with a damp sponge for pores; drag a stiff brush upward to mimic trowel chatter; roll crumpled foil lightly for random grain.
Crack control: If your climate is dry, mist the surface; hairline cracks look authentic, big ones don’t.
Paint: Base with a warm off-white (titanium white + a whisper of yellow ochre + a touch of burnt umber). Glaze in thin tea-washes of raw umber under eaves and around fixtures. Keep mid-walls cleaner—sun bleaches them.

Roof tiles (pre-made & scratch)
Pre-made sheets: Trim PVC/styrene Spanish tile sheets to size; stagger overlaps so runs don’t look too perfect. Heat-bend gently (if styrene) over a bottle to get sag.
Where to buy: Search JTT Scenery Products “Spanish Tile”, Plastruct tile sheet, or 1:12 ceramic barrel tiles on Miniatures.com or Etsy.

Scratch-built barrels (if you’re feeling artisanal): Roll air-dry clay or polymer clay into thin strips; lay over a dowel or marker to curve; slice into half-rounds. Texture with a toothbrush; bake/cure; install like real tiles—under row first, cover row second.
Color: Prime terracotta (burnt sienna + a whisper of red). Drybrush orange-ochre highlights; glaze with mossy green/black at overlaps. Finish with a dusty chalk pastel rub for age.

Finishes, base color & materials (stone, wood, glass)
Stone pavers: Score foam or card, then stipple gray-beige. Wash dark into joints; drybrush pale tan on the edges.
Wood: Underpaint black-brown; pull a lighter brown with a nearly dry brush to reveal “grain.” Add graphite on handles for a soft metallic gleam.
Glass glow: Use clear plastic from packaging; tint with a thin amber glaze. Backlight with LEDs for that café-at-dusk vibe.

Hero piece (the front door)
Materials: 2–4 mm chipboard or basswood, coffee stirrers, thin card, PVA + gel CA, a little epoxy/air-dry clay, paints.
Door blank: Laminate chipboard to ~4–5 mm; cut the arch; lightly sand a soft round on the edge.
Stiles & rails: Glue stirrer strips (two side stiles + top/bottom + mid-rails) onto the blank; slightly round outer edges.
Raised panels (pick one):
Card method: Cut card panels a hair smaller than openings, bevel their edges with sandpaper, glue from behind so the bevel reads “raised.”
Putty method: Ring openings with a thin bead of putty and smooth toward center for a shallow dome.
Motif: Press a tiny lizard or windmill in low relief with putty (one panel only).
Hardware: Simple wire pull on a small backplate; optional knocker pinned in after paint.
Finish: Base dark umber → mid-brown grain drybrush → warm sienna/ochre glaze → raw-umber edge wash → muted ochre edge highlights; graphite rub on the handle.
Stage: Set the door slightly proud of the jamb; add warm lanterns (2700–3000 K) to rake light across the panels.

Utilities / greebles
Little clay roof vents, a mail slot, a hanging bracket for the tapestry, a rain spout (hollow coffee stirrer).
Use wire to make hooks; hang a tiny basket of herbs (dry oregano looks adorable at scale).

Furniture / soft goods
A micro console table by the door: chipboard + stirrers + a carved flourish (press with a bead cap).
Textile: Print a small pattern on fabric or paper, then crumple/drape with diluted PVA.

Lighting (simple and friendly)
Tuck USB fairy lights under eaves and inside. Diffuse with parchment scraps or a dab of hot glue domed over LEDs.
Hide wires in roof channels or behind the staircase wall; route to the back and secure with tape.

Test often; nothing humbles a miniature like a dead LED under a glued tile.
Story clutter / Easter eggs
A tiny broom by the door, a stray paver, Señor Click basking in a warm niche.
Slip the windmill tile somewhere visible but not obvious—balcony underside is my favorite.

Unifying glaze / finish
Mix a “courtyard dust” filter: water + raw umber + a dot of black. Mist the model; then brush and lift with a paper towel.
Hit highlights with a final drybrush of Naples yellow + white on stucco edges.
Seal with matte varnish; gloss just the plant leaves and lantern “glass.”
Plants & pots: buy or DIY
Buy
Tiny terracotta pots: Miniatures.com, The Little Dollhouse Company, many Etsy shops.
Mini plants: Look for succulent sets or leafy tufts from Woodland Scenics/Noch/WWS; add variety with GamersGrass “Agave” or “Kelp” repurposed as houseplants.
Make tiny clay pots
Roll air-dry clay into a bead; poke a cavity with a rounded tool.
Flare the rim with a damp brush; score faint grooves for wheel-thrown vibes.
Add a pin-prick drain hole.
Paint terracotta: burnt sienna base → orange-ochre drybrush → raw umber wash near the foot for “water line.”
Chip a rim spot and add white chalk pastel for a lime deposit.

Make miniature plants
Succulents: Tiny teardrop clay petals stacked in spirals; press with a ball stylus; paint sage-green with pink tips (mix red into white for a dusty blush).
Agave: Cut paper leaves; curl with a blade; edge with ivory; plant around a wire core.
Creeping moss: Tea leaves + PVA + a green wash.
Soil: Coffee grounds sealed with matte medium.

Photo tips (make it sing)
Backdrop: a smoky gradient or sunlit stucco color.
Light: one warm key (2700–3000K), one cool rim (5000K) to sculpt texture.
Bounce: a white card opposite the key.
Angle: get low—door height at eye level.
Phone settings: lock exposure; tap to focus on the door hardware; gently underexpose for lantern glow.

Troubleshooting (quick fixes)
Stucco cracking like the desert: Too thick or drying too fast. Mist with water; fill hairlines with diluted spackle; seal with matte medium.
Foam warping: Too much water under heavy layers. Build thin, dry flat with weight between wax paper.
Roof tiles marching in perfect formation: Break the rhythm—shim a few with card, chip a couple edges, vary color with three terracotta tones.
Paint looks chalky: You’re drybrushing too soon. Add a transparent glaze (Pledge + a drop of paint or matte medium + paint) to rehydrate the surface.
LEDs blazing like a supernova: Diffuse with a dab of hot glue or parchment; add a resistor or switch to a dimmer USB strand.
Pots topple on sloped terraces: Glue a sand “nest” first—tiny crater of PVA + sand, then set the pot.
Closing – Until Next Time in the Small World
That’s Casa Pequeña de los Vientos, where the stucco keeps secrets and the front door tells them. If you spot the windmill tile—or Señor Click sunning himself—tell me in the comments. I’d love to hear your favorite detail, or see how you adapt these techniques for your own courtyard. Share your builds with #smallworldminiatures so I can cheer you on (and so the succulents can gossip responsibly). Want more tutorials, behind-the-scenes peeks, and first dibs on print drops? Join the newsletter—I’ll send you sunshine in your inbox, minus the UV.
Hashtags
#miniature #miniatureart #miniaturediorama #dollhouse #dollhouseminiatures #spanishcolonial #spanishcolonialrevival #architectureminiature #xpsfoam #stuccotechnique #rooftiles #terracotta #miniatureplants #succulents #woodlandscenics #wargamescenery #modelbuilding #dioramabuilders #handcraftedminiatures #artistsoninstagram #miniaturephotography #scale_model #miniaturetutorial #tinyworld #tabletopterrain #crafting #makersgonnaMake #smallworldminiatures #brandonbuilds


Comments