



Where the Walls Talk: A Street-Art Courtyard Miniature
First Impressions in Miniature
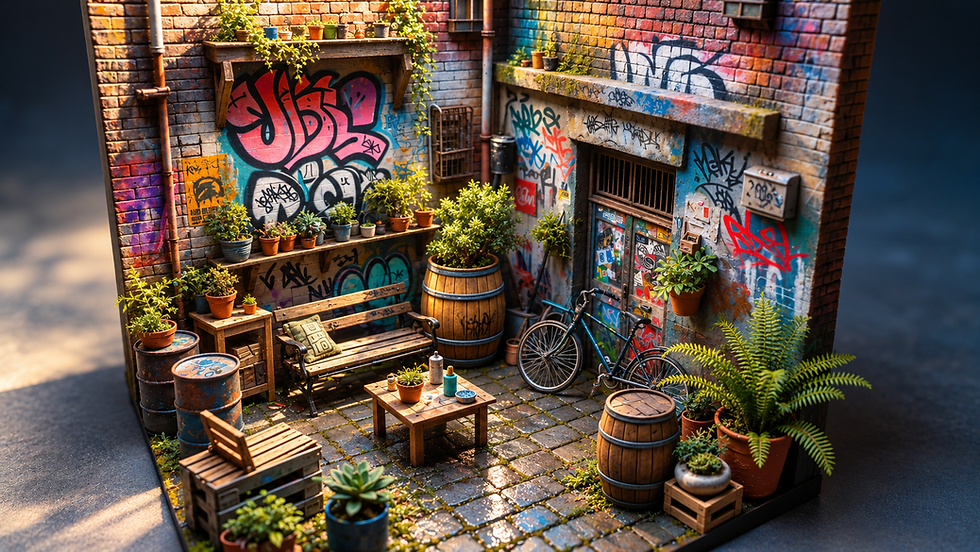
Some courtyards invite you to sit down. This one appears to have put a bench outside, covered every available wall in paint, and then quietly developed a serious houseplant problem. I’m very much in favor.
This street-art courtyard miniature packs a remarkable amount into a small corner: bright graffiti, warm brickwork, a sticker-covered doorway, a teal bicycle, and enough potted greenery to suggest that somebody keeps saying, “Just one more.” The worn furniture and little table make it feel like a shared outdoor living room.
I spent five weeks in Taipei, Taiwan, a couple of years ago, and I loved the street-art scene there. My Airbnb was right next to a street-art area in Wanhua District, and this courtyard brings that part of the trip back to mind. I’ve included some of my photographs below, alongside the miniature, so you can see the real-world color that stayed with me.

Below, we’ll look around, meet the courtyard’s entirely fictional troublemakers, and work through a practical way to make an inspired version of your own.
The purchased alternatives below use Amazon affiliate links; if you buy through them, it helps fund this tiny world. As an Amazon Associate I earn from qualifying purchases.

Miniature Backstory — The Tiny Tale
In my imagined version of this courtyard, the most influential resident is a small gray pigeon named Dot. Dot has no formal artistic training, but she does have a strong opinion about where everyone should sit.

Dot, Pip and Miso celebrate their entirely fictional courtyard exhibition.
Her preferred spot is the wooden bench. Unfortunately, the bench also belongs to Pip, a sparrow who maintains the courtyard’s plants, and Miso, a gecko who paints murals at night. The three have spent an entire week discussing whether the patterned cushion constitutes a reservation.
On Tuesday, Miso proposes a compromise: a courtyard exhibition. Everyone contributes something. Pip arranges the pots by leaf shape, Dot presents a collection of interesting bottle caps, and Miso unveils a new pink mural with a flourish of his tail.
Dot studies the painting for a long time.
“Very promising,” she announces. “Where is the bench?”
“It’s a painting about movement.”
“Then it should move closer to the bench.”
By sunset, the exhibition has attracted two moths and a beetle who insists he is only there to inspect the woodwork. Pip serves water in a tiny saucer. Miso calls the evening an important cultural success. Dot settles onto the cushion before anyone can bring up the reservation policy again.
For a small story detail in your own build, add one painted bottle cap beneath the bench. It would be an invented addition to this scene, and a discreet reminder that Dot’s collection is apparently too important to tidy away.

A Guided Tour of the Build
The walls and their layers
The large pink piece on the left wall catches the eye first. Its dark outline holds the loose shapes together, while smaller marks overlap pale areas beneath it. Above and around the paint, individual bricks remain visible. That contrast gives the art a convincing surface to live on. The ledges and plant shelves interrupt the wall rather than neatly framing everything like a gallery.

The doorway and bicycle
Across the corner, the doorway has a barred upper section and lower panels crowded with stickers. Nearby boxes, pipes, and a wall-mounted pot turn this into a believable service entrance. The bicycle leans into the scene at an angle, with its thin wheels creating a useful contrast to the heavy masonry. Its teal frame picks up colors already scattered through the graffiti.

The courtyard living room
A wooden bench faces a low table, while a pallet-like chair occupies the open foreground. Rusty painted drums and wooden barrels give the seating area some weight. Tiny pots, climbing greenery, and the large fern soften the edges. Down below, irregular gray paving catches warm highlights, with green growth appearing in selected joints. There’s still enough open floor to imagine a small resident walking through without reorganizing the furniture.

Inspirations — From the Big World to the Small
Color from my Taipei photographs
In one of my photographs, a green-hooded figure sits against sharp streaks of turquoise, lime, and pink. The dark outlines keep all that brightness readable. That is a useful approach for a miniature mural too: decide on the big shapes before adding the little marks.

Street art photographed during my Taipei trip. Photo: Brandon.
Another photograph shows a red-and-blue robot beside a glowing painted skyline. Actual doors and fixtures sit right inside the composition. I like that reminder to work with the miniature’s entrance and pipes rather than treating them as obstacles.

Street art photographed during my Taipei trip. Photo: Brandon.
The blue-faced character calling out “Beetlejuice!” wraps around a rounded wall, with greenery just beyond it. Paint, texture, and planting share the same small view. You can bring that relationship into a diorama without reproducing the original character.

Street art photographed during my Taipei trip. Photo: Brandon.
The fourth photograph follows a long wall of varied characters, including a large blue guardian-lion-like figure. Changes in size and color give each section a distinct presence. At miniature scale, a large painted focal shape and a few quieter neighbors can create a similar rhythm.

Street art photographed during my Taipei trip. Photo: Brandon.
Street art as part of everyday space
My Taipei photographs are the most personal starting point for this palette and energy. In them, bright painted characters share space with doors, railings, pipes, and plants. You can translate that relationship into a courtyard without making an exact reconstruction of a particular street. This miniature isn’t identified as a specific Taiwanese location.
For a wider architectural reference, look at Kaohsiung’s Pier-2 Art Center. The former warehouse setting brings public art into conversation with industrial architecture. In miniature, you can borrow that relationship: sturdy walls and practical fittings provide the background, while bright marks and planting make the space feel actively used.
The design lesson I’d take from both is to leave room for ordinary life. A door still needs to function visually as a door. A bench needs somewhere sensible to sit. The pipes can stay visible. Those everyday details give the painted surfaces context and help the courtyard feel inhabited.
A palette with somewhere to rest
The reference balances pink, turquoise, yellow, and red against quieter brick, gray paving, and weathered wood. You can use that balance without copying any artist’s lettering. Design an original mural from rounded shapes and a limited set of colors, then repeat one accent on a pot or bicycle. Keep several larger areas muted so the strongest painted shapes remain readable.
Artist Tips — Make Your Own Magic
The miniature and build illustrations here are AI-generated; the Taipei travel photographs are my own. This guide offers a way to make a courtyard inspired by the scene rather than a tested, exact reproduction. Your materials, scale, and patience will change the result. Mine would probably also acquire another fern somewhere along the way.

Design board inspired by Taipei street art, architecture and everyday materials.
Plan your street-art courtyard miniature
A suggested working scale is 1:24. At that scale, a 28-centimeter-square base represents roughly 6.7 meters across, and an 8.5-centimeter doorway suggests a little over two meters of real height. These are planning suggestions, not measurements taken from the image. If you already have a bicycle or bench, build around its stated scale instead.
This is an intermediate project because the composition depends on several small parts and layered finishes. You can simplify it by using printed brick paper, a purchased bicycle, and fewer pots. The essential techniques are careful card construction, thin acrylic painting, basic stripwood assembly, and patient placement.
Supplies
Structure: start with clean, flat packaging card laminated into thicker panels, plus a rigid scrap-wood base if you have one. Purchased mount board and basswood sheets offer more predictable surfaces. Use solid card or wood rather than treating all craft foams as interchangeable.
Surface and color: save thin cereal-box card for bricks, paving, door panels, and original miniature posters. Add acrylic gesso, water-based acrylic paints, a fine detail brush, a small flat brush, and optional acrylic paint markers. Keep an old brush for stippling.
Furniture and fittings: clean wooden coffee stirrers make slats and shelves. Basswood strips are a convenient equivalent. Use paper strips for barrel hoops and clean drinking straws or wooden dowels for suggested pipes. A scale-matched miniature bicycle is optional.

Supply guide for an inspired courtyard build.
Plants and pots: reuse small clean caps as pot forms and paper scraps for leaves. Purchased miniature pots, model foliage, and paper fern leaves can save time. Avoid damp garden material that may decay inside the finished model.
Assembly and finish: use a suitable PVA craft glue for porous card and wood, tweezers, scissors, a sharp craft knife, a protected cutting surface, and a square. Optional brush-on water-based clear finishes add controlled sheen; check each product’s compatibility and curing directions.
1. Map the courtyard and build a rigid shell
Draw the floor layout on scrap paper before cutting anything. Mark two meeting walls, the doorway, the bench, the table, and the bicycle. Leave a visible route between the entrance and the open front. Place temporary paper rectangles where larger objects will sit, then check the arrangement from a low viewing angle.
Cut the wall panels and door opening while the parts are flat. Use several light knife passes on a protected surface, keeping your supporting hand away from the blade path. Laminate card with a thin, even adhesive layer and dry it flat under a clean protective sheet and suitable weight. Follow the adhesive’s instructions before handling or painting.
Add hidden triangular corner braces behind the walls, then attach the shell to the rigid base. Check the corner with a square while the glue can still move. A simpler alternative is a shallow L-shaped backing with a painted door rather than a cut opening.

Build guide: map the courtyard and build a rigid shell.
2. Give the masonry and paving real depth
Cut small card rectangles for the brick faces. Make a sample strip first so you can settle on a believable brick size without committing the whole wall. Lay them in staggered rows, leaving narrow gaps for mortar. Continue the pattern around visible edges so the walls have thickness.

For paving, cut slightly irregular rectangles from thicker card and soften selected corners with fine abrasive paper. Keep them broadly level; dramatic bumps will make the furniture difficult to place. Dry-fit a patch, then glue it down in small areas. Save the strongest irregularities for the foreground.
Prime a sample and the structure with thin coats of a compatible acrylic ground, avoiding flooded joints. Let it dry according to the product label before painting. If you use Liquitex Professional Gesso, its directions specify at least 24 hours before painting. Printed brick and paving papers are an easier route when cutting individual pieces loses its charm. The tiny masonry guide explores other brick patterns if you want to vary a wall.

Build guide: give the masonry and paving real depth.
3. Build a quiet background for bright paint
Paint the brickwork with a muted reddish brown, then vary scattered bricks with warmer orange and cooler brown. Use a mortar-colored base beneath the brick faces, or work a little gray-beige paint carefully into the gaps. Keep the variation modest enough that the mural can still dominate.
Paint the paving in several related grays. Once those coats dry, brush a restrained lighter tone across raised edges. Add thin brown-gray staining below ledges, beside pipes, and near the base of the walls. Let gravity guide the marks rather than covering every surface with the same wash.

Work on a separate sample before glazing the whole model. Thin acrylic layers behave differently across absorbent card, sealed card, and painted wood. Let each layer dry before judging its color or adding another, and follow the paint manufacturer’s directions for thinning. A pale dry surface beside a darker patch will already suggest recent dampness without adding actual water.

Build guide: build a quiet background for bright paint.
4. Paint an original mural in layers
Sketch the largest mural on paper first. Try three connected rounded shapes in pink, a dark outline, and small pale highlights. Transfer only the outer silhouette to the wall. Leave patches of brick visible above and beside it, as in the reference.
Build the color in thin layers, allowing each to dry. Add the dark outline with a detail brush or a compatible acrylic marker tested on your sample. Use a slightly broken edge in a few places so the image follows the masonry rather than floating over it. Keep the strongest highlights limited to one consistent side of the shapes.
Add smaller original tags and abstract marks around the main piece, letting some disappear behind a shelf or pipe. Make your own little poster designs instead of lifting somebody else’s artwork. The easy version uses a hand-painted paper mural glued to a flatter wall panel; press it into place gently and test that the ink survives the adhesive first.

Build guide: paint an original mural in layers.
5. Fit the entrance, pipes, and small hardware
Build the door from layered card, with narrow wooden strips around its edges. Make the upper grille from evenly spaced thin strips or suitable model rod. Paint and dry these pieces separately before installing them so you can reach the recesses cleanly.
Create utility boxes from stacked card and pipes from dowel or short sections of clean straw. Paper bands suggest brackets and joints. Check your adhesive’s suitability for any plastic; if adhesion is uncertain, use the all-wood version. Secure small parts and allow the bond to set before adding weathering.
Apply miniature paper stickers sparingly to the door panels. Several larger shapes will read more clearly than a uniform carpet of tiny rectangles. Add a little muted rust-colored paint around selected brackets and pipe joints, keeping the door’s edges visible. You can leave it closed and fixed; a working hinge adds complexity without improving every scene.

Build guide: fit the entrance, pipes, and small hardware.
6. Make the seating, shelves, and barrels
Cut coffee stirrers or basswood into matching bench slats. Assemble them on a paper template over a nonstick working surface, using crosspieces underneath to maintain spacing. Let the joints set before lifting the seat. Build a simple stripwood support rather than attempting the reference’s curved metal arms on your first version.

Use the same method for a low table, plant shelves, and a crate-style chair. Test their heights together before finishing them. At the suggested 1:24 scale, a bench seat around 1.8 centimeters high is a reasonable starting point. Keep your chosen furniture proportions consistent throughout.
For barrel-like planters, wrap thin card strips around a small cylindrical form and add paper hoops. These can suggest staves without complicated curved woodworking. For more reclaimed-material ideas, browse everyday household items for miniature making. Paint wood tones before installing the parts, dry-brush selected edges, and let everything dry. Use clean caps or simple cylinders for the painted drums; painted rust is much easier to control than genuinely rusty salvage.

Build guide: make the seating, shelves, and barrels.
7. Plant the courtyard without hiding the work
Arrange empty pots first. Group different heights along the left shelf, place a taller plant beside the bench, and reserve the right foreground for the fern. Keep the doorway and a portion of the mural readable. Photograph the arrangement before committing it to glue.

Build simple leaf stems from narrow paper strips, or use purpose-made model foliage. For a fern, cut paired tapered leaves along a central paper stem, then curve the fronds gently outward. Paint both sides before assembly and allow them to dry so exposed backs don’t flash white in close-ups.
Fix the foliage into the pots with a suitable adhesive and conceal the joint with fine model soil texture. Add sparse green growth in selected paving joints, especially near pots and wall edges. Leave most of the walking route clear. If the greenery begins swallowing the bench, remove one plant before making another.

Build guide: plant the courtyard without hiding the work.
8. Add the bicycle, story clutter, and final sheen
Set a scale-matched bicycle beside the door and check that the wheels meet the paving naturally. A purchased miniature is a sensible shortcut here: thin spokes and a symmetrical frame can become a whole separate project. If you leave the bicycle out, keep its patch of floor open rather than filling it automatically.
Put a small pot and a few simple bottle-shaped details on the table. Add a folded paper or fabric cushion to the bench, and tuck Dot’s fictional bottle cap into a discreet spot if you enjoyed the tale. Use a light touch with clutter so each addition helps explain how someone uses the courtyard.

For optional wet-looking patches, test a compatible brush-on gloss finish over fully dried paint, then apply it only to selected paving areas. Follow the exact finish’s instructions for preparation, coats, and curing; acrylic medium and removable varnish serve different purposes. Keep the rest comparatively matte and let the finish cure before placing objects or handling the base.

Build guide: add the bicycle, story clutter, and final sheen.
Photograph the little corner
Set the model against a plain charcoal or muted warm backdrop. Use a broad diffused light from one side, with a white card opposite to lift the deepest shadows. This lets the brick texture and foliage catch the light while keeping the doorway readable. You don’t need to wire the model to get that warm late-afternoon feeling.
Take one slightly elevated view showing the complete courtyard and visible base, then lower the camera for the bench, doorway, and mural details. Support your phone or camera and check focus on the actual subject. Shift the light or viewpoint if the glossy paving produces a distracting white reflection. Photograph the bicycle nearly square-on for one detail image so its slender shape stays legible.

Photography setup: broad diffused light, a quiet backdrop and a white reflector.
A few fixes before the residents move in
Bowed walls: reduce wet adhesive and paint buildup, use a rigid backing, and dry laminated parts flat before assembly.
Muddy graffiti: let layers dry, restore a few clear outlines, and remove competing small marks instead of adding more color.
Floating furniture: flatten the contact points and check all legs against the paving before final gluing.
Overgrown planting: thin the front edge and reopen the route to the door; preserve a clear view of the bench.
Cloudy finish: stop adding coats, follow the product’s drying guidance, and test the next application on a spare painted sample.
Closing — Until Next Time in the Small World
What I enjoy about this courtyard is how much personality fits around a simple bench and table. The graffiti supplies the color, the plants soften the brick, and the ordinary objects make the space feel welcoming. Dot would probably add that the cushion is central to the entire composition.
Which detail would you build first: the mural, the bicycle corner, or that wonderfully excessive collection of plants? Share your own small-world creations with #smallworldminiatures. Subscribe to the Small World Miniatures newsletter using the signup form at the bottom of the page, and explore the online shop when you’re ready for another little escape.







Comments