


Clockwork Canyons: A Steampunk City Miniature of Towers and Waterfalls

First Impressions in Miniature
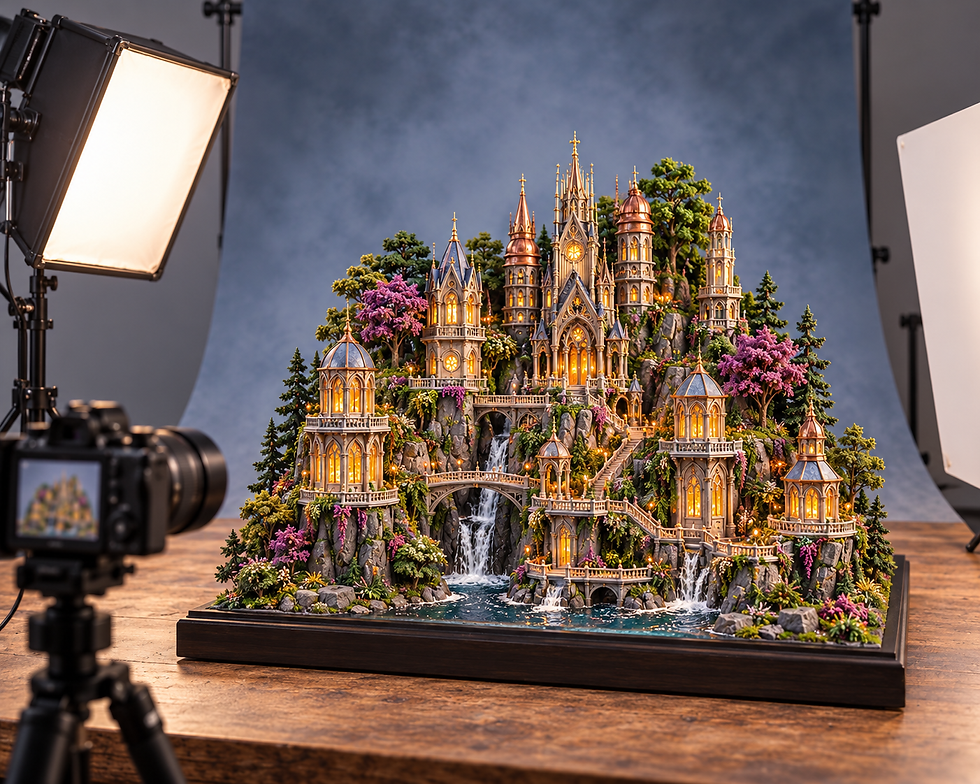
Clockwork Canyons rises from a dark rectangular base in a wonderful tangle of towers, bridges and falling water. Amber windows glow against slate-colored roofs, coppery domes and rugged gray cliffs. The pink flowering trees provide a cheerful interruption to all that engineering. This steampunk city miniature has the skyline of a grand fantasy capital and the apparent municipal ambition of a town that refuses to build anything on level ground.
I love the routes through it: stairways fold around rock faces, narrow bridges cross between buildings, and the water keeps finding another ledge to tumble over. The scene rewards a long look, but you do not need to reproduce every spire to borrow its magic. Our inspired build guide starts with one manageable canyon district, using lightweight forms, layered architectural details and a convincing illusion of water instead of a working river.
The purchased alternatives below use Amazon affiliate links; if you buy through them, it helps fund this tiny world. As an Amazon Associate I earn from qualifying purchases.
For a separate airship-centered project, the TOYQI Uncle Peter’s Warehouse Book Nook Kit offers a planned miniature setting. Its design is a companion to this mechanical fantasy, not a kit for the canyon city.

Miniature Backstory: The Tiny Tale

For an optional decorative clock surround, BigOtters 150PC Steampunk Gear Charms supplies assorted metal shapes. Compare the actual charm dimensions with your scale before using one; a decorative pendant is not a working mechanism.

A Guided Tour of the Build
Towers that share a family resemblance
The tallest central structure anchors the skyline, while smaller cylindrical towers step outward and downward. Repeated pointed openings and narrow vertical ribs connect the different buildings visually. Copper-colored domes soften the more angular slate roofs. Gold-toned trim catches the light selectively, leaving plenty of darker wall surface around it. This repetition is especially useful in a dense scene: your eye recognizes a family of buildings rather than trying to decode a different architectural language on every ledge.

The canyon becomes a street
Bridges and curving stairways make the rocky terrain feel inhabited. Some spans sit low over the water; others connect terraces higher in the composition. The railings are fine enough to keep the routes open to view, while the darker undersides separate each crossing from the cliff behind it. Small figures establish the scale of the original image. In an inspired build, the same sense of scale can come from consistent doors, landings and stair proportions without adding people.

Cool water, warm windows and flowering trees
White cascades divide the gray rock into lively vertical ribbons. Below them, blue-green water pools at the front edge of the base. The brightest windows form a warm counterpoint to those cool channels. Dense green trees sit behind the towers, while pink flowering canopies reach out at the sides. The planting leaves enough rock visible to explain the city’s structure; it does not cover every ledge with the same texture.

Inspirations: From the Big World to the Small
The pointed arches, spires and tracery recall Gothic architecture. The V&A explains how pointed openings and increasingly elaborate window frameworks contributed to that style’s soaring appearance. Here, those ideas become a fantasy skyline rather than a reconstruction of one cathedral. In miniature, you can translate the effect into repeated slender window shapes and a few taller peaks, allowing shadow and silhouette to do much of the work.
Cragside in Northumberland offers a different connection: the meeting of picturesque architecture, landscape and engineering. The National Trust records its pioneering use of hydroelectric power. That history makes it an interesting reference for a fictional water-filled city, though the pictured towers are not a model of Cragside and the image does not prove that any waterfall powers a lamp. For your version, keep the visual conversation between water and warm light while using a simple ready-made lighting system.
The CRIOLPO Huaying Floral Bookstore Kit explores a book-filled floral interior as a separate project. It is a gentler companion to the city’s planted architecture, rather than a component needed for this build.

The landscape also invites the logic of a theater set. Tall masses form a backdrop, smaller structures step toward the viewer, and open channels keep the busiest areas from becoming a solid wall. I would borrow that arrangement before copying any individual ornament. A single tower beside a fall, with a bridge in front and flowering foliage at one side, can carry the same story on a much smaller shelf. For another way to pair mechanical forms with planting, explore my steampunk-futurist forest villa.

Artist Tips: Make Your Own Magic
The illustrations are AI-generated, and this guide is a practical route toward the mood rather than an exact, tested construction plan. Results vary, particularly when your city council consists of you, a glue bottle and an increasingly ambitious pile of cardboard. Start with a small district, test each material on scraps, and let the finished composition grow from the parts you can make cleanly.
Planning your steampunk city miniature
A proposed 1:144 scale keeps a multi-building district manageable, but it is a planning choice rather than a verified scale for the supplied image. Keep one scale throughout: door height, floor spacing and bridge width should belong to the same imagined residents. This is an intermediate project because the layered terrain, delicate trim and lighting access need coordination. Essential tools are a sharp craft knife, scissors, a protected cutting surface, tweezers, fine brushes and a dependable way to hold small parts while adhesive sets.
Supplies: a small district, not a whole hardware store
Structure and terrain: start with clean packaging card, sturdy cardboard tubes and small corrugated-card offcuts. Purchasable equivalents include bookboard, thin plywood for the base and basswood strips for bridge supports. Use only sound, dry material. Keep a separate flat base under the terrain so bridges and towers are not depending on a soft decorative rock surface for support.
For restrained gold-colored accents, AMACO Rub ’n Buff Antique Gold offers an optional finish. Test compatibility on a spare piece and follow its handling and ventilation instructions before applying it near completed details.

Architectural detail: save plain paper, thin card and clean clear packaging for templates, layered trim and glazing. Purchased styrene sheet or basswood can provide sharper repeatable pieces where needed. Small gear charms are optional decorative accents, not working machinery. Their actual size must suit the chosen scale; a large charm can become an imagined clock surround rather than a supposedly realistic gear inside a tiny mechanism.
Surface and planting: gather acrylic paints, PVA or a suitable craft adhesive, fine brushes and clean torn paper for rock texture. Fine model foliage and ready-made small trees are optional purchased shortcuts. For water, a painted channel under clear acetate is the simplest option. A purpose-made model waterfall medium offers a more textured alternative; it is a different product from casting resin and must be used according to its own instructions.
Lighting and finishing: use a ready-made low-voltage miniature LED set with its matched power supply, accessible switch and manufacturer’s instructions. Dark paper helps mask light leaks; translucent paper can diffuse windows where compatible with the light set. Keep dry scrap materials for tests and a soft neutral backdrop for photographs. You do not need a pump, real flowing water or mains wiring for this scene.

1. Design the canyon before designing the buildings
Arrange empty tubes and folded card boxes on the base before cutting decorative parts. Choose one tall focal tower, two or three lower companions and a clear water route. Leave a visible gap between the rock masses so the canyon reads from the intended camera position. Take a quick reference photograph of the dry arrangement, then mark the building footprints and bridge landing points on a paper plan.
Build the terrain from stacked corrugated-card platforms with internal supports. Stagger the edges to suggest ledges, but leave stable flat seats for buildings. Test each bridge route with a strip of plain card: it should arrive at a believable landing rather than at the middle of a window. Glue the structural layers with a compatible adhesive and let them dry fully before adding the next load. A single split-level terrace is an easier alternative to multiple tall cliffs.

2. Form towers, openings and removable roofs
Use clean card tubes for cylindrical towers and folded bookboard for rectangular sections. Cut openings in flat wall pieces before assembly whenever possible. Keep the supporting hand away from the blade, work on a protected surface and make several controlled passes rather than forcing a thick cut. Add internal card tabs or ribs to hold the walls square, then let the adhesive set before fitting trim.
The Vallejo Rust 70.183 finish can weather optional metal-looking fittings. Keep it on those imagined metal parts rather than treating every wall and roof as a rusty surface.

Make one pointed-window template and repeat it in a few carefully chosen sizes. Layer a slightly smaller dark opening behind a larger decorative frame to suggest depth. Roll a paper cone for a spire or construct a faceted roof from matching card panels. Keep at least one roof removable for access to the lighting. At this stage the buildings should remain plain: the important test is whether their silhouettes and openings work together, not whether they already resemble finished palaces.

3. Give the cliffs and architecture different surfaces
Cover the terrain edges with small pieces of torn paper and compatible adhesive, pressing folds into irregular rock-like planes. Keep the building seats and water channel clear. Allow the layers to dry before painting; trapped moisture can soften card and distort a carefully aligned terrace. Paint a spare textured sample first. Use a darker gray base, then brush a lighter gray across raised edges without filling every recess.
Vallejo Gloss Varnish 70.510 can add selective shine to compatible decorative details. It is not a substitute for a purpose-made waterfall medium, and most rocky surfaces will look better matte.
Paint tower walls separately in muted stone and warm brown tones. Add narrow strips of card or wood for vertical ribs, window surrounds and ledges, letting each attachment set before handling the next side. Slate-colored roofs and restrained copper-colored accents echo the reference without requiring real metal. Check the whole group at arm’s length. If every edge shines equally, reduce the metallic finish so the windows and main tower remain the clearest points of interest.

4. Build bridges that land somewhere useful
Make bridge decks from laminated card or thin wood, with stiff supports underneath and enough overlap at each end to sit securely on the prepared landings. For an arched appearance, add shaped side profiles around a straight supported deck rather than expecting a thin decorative curve to carry the assembly. Dry-fit the span before adding rails. Keep the route clear of future tree canopies and waterfall strips.
Construct railings from repeated short strips on a paper alignment guide, then remove the guide after the joints have dried. A solid low parapet is an easier alternative at very small scales. Build stairs as a modest stack of shallow card treads, checking that the top meets its landing. Paint these pieces before final installation where access will become tight. Add only a few decorative gear shapes or metallic brackets, positioned where they support the city’s visual language rather than hiding weak joints.

5. Install warm light and an illusion of moving water
Test the complete ready-made light set before installing it. Follow its specified power source and routing guidance, and keep the switch and battery compartment reachable from the back or beneath a removable section. Mask unwanted light leaks with dark card, keeping the lighting components clear according to their instructions. Place a diffuser behind selected windows if the system permits it. Test in a dim room before closing any roof; one softly glowing tower can be more convincing than every opening at full brightness.
For the later planting stage, Woodland Scenics Light Green Foliage F51 offers fine green texture. Keep it away from lighting components and use small patches so the cliff shapes remain visible.

For the simplest river, paint the channel dark blue-green with quieter pale edges, let it dry, then fit clear acetate above it. Keep adhesive away from the central viewing area. For a textured waterfall, follow the chosen model-water product’s directions. Woodland Scenics demonstrates forming its Water Effects on a suitable nonstick surface, letting it clear, then fitting it to the scene. That method is specific to that medium: do not apply its timing or handling instructions to resin, varnish or unrelated gels.
Install falls so they visibly begin at an upper ledge and meet the pool below, with no unexplained floating ends. Use very little white paint for the brightest foam, testing first on a spare piece. Keep the water effect physically separate from electrical components. This is a dry scenic illusion, not a working water system. If the clear strip looks too opaque or heavy, replace it with a narrower, simpler fall rather than burying it under more material.

6. Plant the ledges and photograph the finished district
Place the largest trees behind or beside the architecture, leaving the main tower’s silhouette readable. Build smaller green clusters along rock shelves, then add limited pink flowering foliage for contrast. Keep bridge approaches and stair landings clear. Attach foliage in small sections with a compatible adhesive and let each section set before turning the model. Leave some bare rock between plants; those quieter areas make the lush pockets feel intentional.
Finish the base edge in a calm dark color and remove loose fibers or visible glue strings. Photograph the model on a stable table against a soft blue-gray backdrop, with a diffused light to one side and a white card reflector opposite. Lower the camera toward the imagined street level, then try a slightly higher angle that reveals the water route. Reduce surrounding light enough to see the windows without letting them become featureless orange patches. A close view of one bridge often tells the city’s story better than another crowded overview.
Small fixes before the clock strikes closing time
A crowded skyline: remove one minor spire or lower a background mass. Clear separation between the tallest forms is more useful than equal detail everywhere. A bridge that disappears: lighten its upper edge or darken the rock behind it, rather than adding more ornament. Keep these adjustments local so the scene retains its varied surfaces.
Warped card: stop adding wet layers, allow the piece to dry thoroughly, and rebuild a distorted structural panel if needed. Do not force a leaning tower upright with decorative trim. Harsh window light: test more diffusion or fewer lit openings within the light set’s instructions. Preserve access so the correction does not require dismantling the whole roof.
Warmtree Realistic Miniature Leaves Simulation Leaves Diorama Scenery provides optional leaf accents for the finished landscape. Check the leaf size against your chosen scale and use it sparingly rather than covering every bridge approach.

Milky water: check the product’s curing instructions and wait for the specified conditions before deciding it has failed. Avoid covering an uncured layer. Foliage that overwhelms the buildings: thin it around doorways and clock faces, leaving stronger clusters at the scene’s edges. Photographing the model in grayscale can help reveal whether the important forms are still distinct.
Closing: Until Next Time in the Small World
I would happily follow these bridges after dark, listening for the thirteenth chime that opens Ada’s unexpected night market. The scene’s charm comes from the relationship between practical routes and extravagant architecture: a city full of impossible-looking towers still needs routes to its workshops and hidden markets. Which detail would you build first, the glowing clock tower, a bridge over the canyon or one of those pink flowering trees?
Share your own small district with #smallworldminiatures, and visit the online shop for more miniature inspiration. You can also join the newsletter for the next small world. Start with one good tower and one convincing route through the landscape. The rest of the city can wait for the thirteenth chime.








Comments