


A Bear at the Station: A Paddington Miniature Station Diorama

First Impressions in Miniature
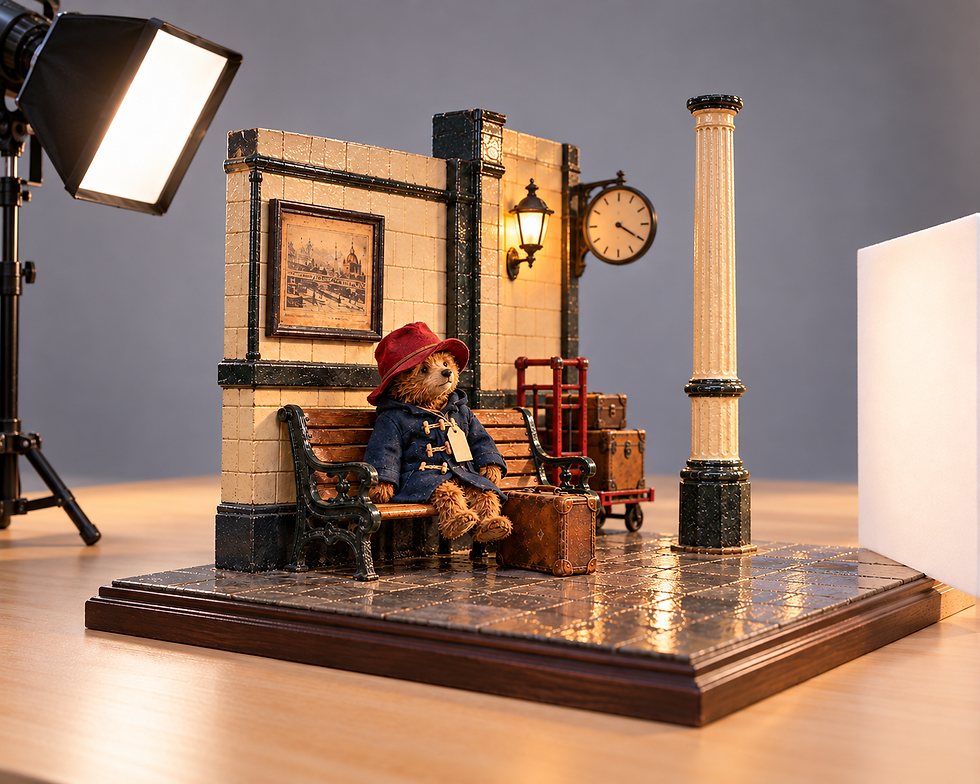
A bear can make a railway station feel surprisingly like a sitting room. This one has chosen a handsome wooden bench, brought his own battered suitcase and settled beneath the station clock in a red hat that refuses to be overlooked. The cream tiles, dark trim and warm lamplight give the scene a vintage British railway atmosphere. His luggage looks prepared for a long journey; his expression suggests he would appreciate a little company first.
I love how this Paddington miniature station keeps its attention on a quiet arrival rather than a speeding train. A navy coat and brown fur bring softness to all those hard architectural surfaces. Below, we'll look at the details that make the scene welcoming, then plan a compact station corner with a dressed bear, a slatted bench and just enough shine on the floor to catch the light.
The purchased alternatives below use Amazon affiliate links; if you buy through them, it helps fund this tiny world. As an Amazon Associate I earn from qualifying purchases.
For another bookish miniature project, the CUTEBEE Owl Bookstore DIY Book Nook Kit offers a ready-designed shop setting. It is a separate kit, not the station shown here.

The Story Behind the Scene: A Bear Meets the Browns

That encounter is the book moment behind this miniature, although the picture combines it with familiar details from Paddington's wider visual identity. In Michael Bond's first chapter, the bear sits on his suitcase rather than a bench. His blue duffle coat arrives later, during the shopping expedition in chapter four. The model's navy coat, red hat, bench and carefully composed lamplight should therefore be enjoyed as an artistic interpretation, not a literal reconstruction of the first meeting.
What I would carry from the book into a miniature is the change in the meaning of the luggage. At first, the case marks a solitary journey; after the Browns stop, it belongs to someone who has somewhere to go. A small display cannot show every person or exchange, but it can hold that moment of possibility. Keep the case and label visible, and let the bear's expression do the rest.
A Guided Tour of the Build
A hat, a coat and a patient face
The bear's face sits just above the dark coat collar, where the lighter muzzle and tiny reflected highlights in the eyes make it immediately readable. The red hat folds unevenly around its brim; the navy coat has a thick, soft-looking surface and pale toggle fastenings. A paper label hangs at the chest. I would preserve the space around that face when arranging an adaptation. The emotion lives there, and it deserves a clear view.

The bench and its well-traveled neighbor
Honey-brown slats run horizontally behind the bear, balanced by the curled dark arms and feet of the bench. Their glossy worn edges catch narrow highlights. The suitcase stands beside the dangling paws, with raised corner pieces, a small handle and pale scuffing across its brown surface. These two objects share a warm palette but different textures. One offers a place to wait; the other promises that waiting eventually leads somewhere.

Tiles, lamplight and a glimpse of the platform
Cream rectangular tiles and a dark horizontal band make a crisp backdrop. At the right, a pale column with a dark base separates the sheltered corner from the softer station beyond. A warm wall lamp, blurred clock and red luggage trolley extend the scene without competing with the bear. Across the foreground, the stone-like floor reflects small pools of light. The picture suggests polished or damp-looking surfaces, but it cannot establish their actual materials.

If the station clock is your favorite detail, the LORENOOK Magic Clock Tower Book Nook takes clockwork fantasy in a different direction. It is an optional separate build, not a Paddington kit.

Inspirations: From the Big World to the Small
Michael Bond's A Bear Called Paddington gives this project its literary foundation. The official Paddington book page identifies the suitcase and label among the objects associated with his arrival. In a small display, those objects carry much of the story before anyone reads a caption. The empty space beside the bear offers another useful design choice: it leaves visual room for a welcome.
The real London Paddington station offers a useful architectural precedent. Network Rail's history identifies Brunel's permanent station, opened in 1854, and the decorative contribution of Matthew Digby-Wyatt, including iron tracery. Those large-scale structures suggest a practical miniature lesson: repeat strong supports, then concentrate ornament where the eye can enjoy it. Our column and curled bench supports echo that combination of sturdy structure and decorative detail.
Network Rail also connects Paddington's iron-and-glass train-shed roof with Brunel's response to the Crystal Palace of the Great Exhibition. You do not need to build either enormous roof to borrow the spatial idea. Leave one edge of your model open, introduce a slim dark beam behind the column and let a pale background imply a larger hall. The visible slice can suggest architecture continuing beyond its boundaries. I would keep that suggestion quiet; the bear should remain more interesting than the engineering. For another setting to explore, visit my Japanese autumn railway station miniature.

The MiniCity Hemingway House Book Nook is another literary-inspired project to explore when you prefer a kit to planning your own setting. Its design is separate from this bear’s arrival.

Artist Tips: Make Your Own Magic
The illustrations here are AI-generated miniature concepts, and this guide offers inspiration rather than an exact, tested reproduction. Your materials and results will vary, particularly if your bear develops strong opinions about his hat. The following approach uses a small open station corner, straightforward paper-and-wood construction and a ready-made bear you can dress yourself.
Planning your Paddington miniature station
Use 1:12 as a suggested scale for the station furniture, not a measured claim about the image. Try a base around 24 by 18 centimeters, a rear wall 22 centimeters high and a bench about 12 centimeters long with its seat 4 centimeters above the floor. Fit the bear before committing: a seated height near 7 to 8 centimeters gives the character a substantial presence. This is an intermediate project because the bench, clothing and lighting need patient fitting. An unlit lamp and purchased bench simplify it.
Supplies: pack the station workshop
Structure and surfaces, essential: start with clean packaging card for templates, tile faces and suitcase panels. Reuse straight wood offcuts if available; otherwise choose sturdy bookboard for the wall, a stable thin-plywood base and craft sticks or stripwood for the bench. Add PVA suitable for paper, plus wood glue suitable for bare-wood joints.
For selected shiny floor patches, Vallejo Gloss Varnish 70.510 is one purchased finish to consider. Test compatibility first and follow its application and drying instructions; the whole station need not be glossy.
Character and clothing, essential: reuse a small bear that fits the seat, or choose a miniature bear before sizing the furniture. Clean navy fabric and fine red felt scraps become the coat and hat. Cotton thread, short cord lengths and tiny wooden pieces suggest toggles. Purchased fine felt and fabric are useful when household scraps are too bulky.
Color and luggage, essential: gather water-based acrylic paints in cream, warm brown, charcoal, muted red and navy, with a small amount of ochre for worn edges. Thin brown paper, thread and scrap card supply the suitcase. A compatible brush-on gloss varnish is optional for selected floor patches; keep a matte alternative for other surfaces.
Details and tools: reuse clean paper for the label and an original station drawing. A dowel offcut and layered card form the column. Scissors, tweezers, fine brushes, a pencil, clips and a suitable cutting surface cover most tasks. Optional additions include purchased miniature wheels, a ready-made low-voltage lamp system with its specified power supply, and a white card photography reflector. Keep small components away from children and pets; this is a display project.

1. Arrange a corner with room to wait
Cut a paper footprint and stand a card wall behind it. Place your bear on a temporary seat at the proposed bench height, then add a folded-card suitcase. Keep the case below the bear's face and leave a strip of floor visible in front. Set a paper column near the right edge rather than directly behind the head. These shapes establish the composition before you invest in details.
Check the arrangement from bear-eye level and slightly above. Let the wall occupy roughly two-thirds of the background, with an open view past the column. Mark the bench, column and lamp positions on the template. If using lighting, sketch an accessible cable route behind the wall and beneath a removable base cover. Photograph this dry arrangement for reference. There is nothing to cure yet, so take advantage of the freedom to move everything.

2. Raise the wall and frame the platform
Transfer the templates to your chosen board and base. Cut on a suitable surface using controlled shallow passes, with fingers outside the blade path; use scissors for thinner card. Glue the wall against a square support and reinforce its hidden rear edge with a strip of wood. Keep the open side open: you need no window or doorway for this particular composition. Let the adhesive reach its label's stated handling strength before moving the shell.
Build the column from a dowel offcut with layered-card collars and a broad card foot, checking that it stands upright without leaning on the bear. You can simplify the ornate profile to a straight shaft and two bands. Glue bare wood before painting it. Titebond's guidance distinguishes clamping from stressing a joint and recommends avoiding stress for at least 24 hours for most of its wood glues; follow the actual adhesive you choose rather than applying that timing to every product.

3. Give the station its tiles and soft shine
Cut cream tile faces from thin card and attach them in offset rows with narrow, consistent gaps. Test a few pieces first so the pattern does not overwhelm the bear. Add a dark horizontal trim strip behind the bench. For the floor, use larger card rectangles in a slightly irregular warm-gray arrangement. Apply glue sparingly, press the pieces flat and let them dry before painting. A printed tile sheet is an easier, flatter alternative.
For restrained aging on metal fittings, Vallejo Rust 70.183 offers an optional weathering route. Keep rust away from the bear and use a test piece before touching the finished model.

Paint the tiles cream and the column a matching pale shade. Work a little gray-brown into recesses, then soften it with a clean damp brush before it dries. Keep the wall cleaner than the floor. After the acrylic paint dries fully according to its instructions, test a compatible brush-on gloss varnish on spare painted card. Add only a few thin floor highlights, not a pooled coating. Liquitex Basics Gloss Varnish specifies fully dry paint and thin coats; its timing is product-specific. Let the finish cure before placing furniture on it.

4. Build a bench that carries the scene
Cut straight craft-stick or stripwood slats for the seat and back, checking them against your bear. Assemble the seat on two short crosspieces, then add legs and a slightly reclined back. Keep the spaces between slats even by using a scrap-card spacer. Dry-fit first, glue the bare-wood joints and support the assembly square until the adhesive is ready for handling. A purchased bench is a sensible shortcut if the tiny joinery feels like a railway apprenticeship.
AMACO Rub ’n Buff Antique Gold is an optional accent for a decorative clock surround or small metal-looking detail. Follow the product’s ventilation and handling guidance, and keep it away from textiles.

Suggest the decorative sides with layered-card silhouettes glued beside the strong wooden legs. Let the wood carry the weight; the ornamental curls need not do structural work. Paint those silhouettes near-black, then add a restrained warm highlight along their upper edges. Give the slats a medium-brown base and a few darker grain strokes. Once dry, lightly brush ochre-brown over the most exposed edges. Test the seated bear after all coatings cure, and adjust the bench position before fixing it to the floor.

5. Dress the bear without burying his face
Make a paper coat pattern directly around the bear, leaving the front open and the arms free. Transfer it to fine navy fabric, allowing only small seams. Stitch or use a fabric adhesive approved for the materials, following its curing instructions before fitting. A sleeveless wrap with separate short sleeves gives the impression of a coat without complicated tailoring. Keep the collar low enough to reveal the muzzle, and avoid bulky folds behind the bear that push him off the seat.
Make the hat from a red felt oval with a head opening, a short crown band and an oval top. Fit each paper component before cutting felt, then stitch or glue the pieces and allow the joins to set. Add short cord loops and tiny rounded wooden toggles to the coat. Attach a small cream label on thread without tightening it around the bear. Leave the miniature label blank or add your own brief greeting. Keep fur clear of adhesive, and use an existing dressed bear if you prefer to concentrate on architecture.

6. Pack the suitcase and switch on the welcome
Fold a small card box about 5 centimeters wide, 4 centimeters high and 2 centimeters deep, adjusting it to the bear. Wrap it in thin brown paper, then add narrow paper straps, rounded card corner patches and a folded-paper handle. Paint tiny scuffs after the seams dry, keeping most wear near edges. Set it beside the bench with its broad face visible. For a simple background trolley, combine a card deck, sturdy stripwood upright and fixed decorative wheels; paint it muted red after assembly cures.
Add a small original railway sketch in a layered-card frame and a plain clock disc with simple tick marks. Keep both subordinate to the bear. An unlit cream bead or purpose-made miniature shade can suggest a lamp. If you choose working light, use a complete low-voltage model system, follow its instructions and test it before enclosing cables. Leave the power unit accessible, secure loose wiring and keep fabric away from components as directed. Hide connections behind the wall, let adhesives cure, and place the bear last.

7. Photograph a quiet arrival
Place the finished model before a curved, matte neutral backdrop, leaving enough space behind the open side to suggest a distant platform. Use a cool-neutral background with a warm lamp inside the scene. Aim a soft, diffused light from the front-left and place a white card opposite to lift the dark coat. Keep paper diffusers away from hot lamps; a suitable photographic diffuser with cool-running equipment is the simpler choice. Move the light rather than increasing shine on the model.
Lower your phone or camera toward the bear's eyes and support it securely. Focus on the face, then check that the label and nearest suitcase corner remain readable. Move the light sideways if the floor produces a distracting white patch. Take one wider photograph that includes the model's edges, followed by closeups of the coat, bench and tilework. Keep some background softness, but avoid blurring away the details you worked to make. Photograph only after adhesives and coatings have fully dried or cured, so props cannot stick or shift.
Small delays and how to clear them
Curling tiles: use less adhesive, keep water out of the card and press fresh pieces flat while they set. Replace badly curled faces before painting; a heavy paint layer rarely persuades them to behave.
A top-heavy bear: test the seated posture before fixing the bench. Thin bulky fabric behind the back and widen the hidden support under the seat, rather than relying on a blob of glue in the fur.
If you later extend the station into a tea-room scene, the Odoria Blue Lotus Porcelain Tea Set offers small ceramic details. Check each piece’s dimensions; the set is optional and is not needed for the illustrated platform.

A coat that hides the expression: lower the collar, shorten the front overlap and move the label down slightly. Check the face from the actual photograph's angle, where a tiny fold can become a large obstruction.
Cloudy floor varnish: stop adding coats and follow the product's drying instructions. Test thinner applications on spare card; never trap damp paint beneath more varnish. You can keep the floor matte if the glossy test remains disappointing.
A lamp that washes out the bear: move or shade it with a compatible miniature fitting, or use it unlit. Strengthen the soft external light instead of placing a brighter electrical component inside a cramped space.
For a separate station-café corner, Boutigem Miniature Resin Coffee Tools (MixedColor-l) can suggest the counter’s smaller props. These are decorative accessories, not working equipment, and should be checked against your chosen scale.

Closing: Until Next Time in the Small World
I keep coming back to the space beside the bear. In the book, the decisive event is someone stopping long enough to notice him. In this miniature, the bench, label and well-traveled suitcase make that welcome feel close. A small station corner can carry a surprisingly generous story.
Which detail would you make first: the red felt hat, the curled bench supports or the weathered suitcase? Tell me in the comments, and share your own small arrivals with #smallworldminiatures. You can join the newsletter for more miniature inspiration and browse the online shop when your next project needs a useful starting point. Leave a little room on the bench. Someone else may need a welcome.








Comments