



The Wedding That Waited: A Miss Havisham Miniature Pavilion

First Impressions in Miniature
Some fictional rooms remain with you long after you close a book. I did not read Great Expectations in grade school; I came to it as a young adult during college, and I loved it. The image of Miss Havisham fixed forever in the past of a wedding that never happened stayed with me. Here, that emotional memory has wandered outdoors, put on an extraordinarily elaborate roof, and allowed the garden to take over the seating plan.
This Miss Havisham miniature pavilion is an imaginative interpretation, rather than a location claimed from Dickens's novel. Dark columns support a weathered blue-green roof, ivory drapery hangs between open arches, and a wedding table glows beneath the canopy. Pink flowers still cling to the structure. The chairs seem optimistic, considering how long they have been waiting.
The purchased alternatives below use Amazon affiliate links; if you buy through them, it helps fund this tiny world. As an Amazon Associate I earn from qualifying purchases.

What draws me in is the balance between ceremony and neglect. You can still read the entrance, table and places to sit, even as weeds soften the stone-like paving. The build guide follows those clear shapes first, then adds the lacework, fabric and small encroachments that make the scene feel quietly haunted.
Miniature Backstory — The Tiny Tale
Mabel the moth had been appointed acting wedding coordinator because she was the only resident willing to inspect the curtains. Every evening, she circled the pavilion, checked the flowers, and informed Oswin the garden snail that the reception would begin shortly. Oswin, who had crossed precisely one paving stone since spring, considered this a demanding timetable.
Tonight presented a difficulty. A leaf had landed on the best table, and Mabel regarded it as an uninvited guest. Oswin examined the leaf from several angles, mostly because each angle took him a while to reach. He concluded that it had excellent manners and should be offered a place at dinner.

Mabel agreed, provided the leaf did not request a speech. Together they arranged a fallen petal beside it, then admired the waiting table as the last light slipped through the swags. Nothing began. Nothing needed to. For one evening, keeping the place beautiful was sufficient.
Oswin eventually reached the front steps and announced that he was ready to dance. Mabel suggested a waltz. He asked whether it could be scheduled over several seasons. The overturned chair in the foreground, plainly visible in the miniature, became their unofficial dance-floor boundary; even an ambitious snail should know where to stop.

The little story gives the abandonment a gentler companion. You could add the moth and snail to your own version, or let an empty chair and a single petal carry the entire conversation. The optional tableware and trim banners include 1:12 products, which suit a larger-scale interpretation rather than the proposed 1:24 guide. Match all purchased pieces to your chosen scale.
A Guided Tour of the Build
Roof lace and weathered color
Start with the roofline. The long pitched canopy is interrupted by projecting gables, circular tracery, slender finials and a crest of delicate ornament. Cool blue-green panels sit inside dark framing, with patches that suggest age rather than a uniform new finish. I like how the tiny perforations let the background remain part of the design. The elaborate outline is still readable because the roof beneath it forms a comparatively broad, quiet surface.

Curtains around an unfinished celebration
Move closer to the open front. Fluted columns frame low-hanging ivory swags and longer tied curtains, their folds catching warm light beneath the dark arches. A clothed table, flowers and candle-like points of light occupy the center-right of the platform; a chair sits farther back. The drapery draws the eye inward without closing the pavilion. Those clear openings are essential. Fill every gap with flowers, and the small, waiting room disappears behind its decorations.

The garden remembers the guests
The broad front steps descend toward irregular paving and garden tables. Slender café-style chairs repeat the looping ornament overhead, while dry grasses and trailing greenery blur the edges. Near the foreground, a low round planter gathers its own patch of growth. That mixture of deliberate arrangement and softened boundaries connects nicely with the woodland chapel's interplay of filigree and foliage, although this pavilion leaves much more open air around the architecture.

Inspirations — From the Big World to the Small
Dickens supplies the emotional starting point. In Great Expectations, Miss Havisham's decaying bridal surroundings and wedding cake turn an interrupted celebration into a sustained physical presence. The pavilion translates that idea through fabric, table setting and abandoned hospitality. It does not reproduce Satis House, and the warm garden light gives this interpretation its own atmosphere.
Strawberry Hill House offers a useful architectural parallel. Its theatrical Gothic interiors include surfaces that appear to be carved stone but are painted paper. That delight in convincing illusion feels very close to miniature making. Here, layered card can suggest carved framing, and simple fretwork can give a roof an elaborate silhouette without requiring masonry or metalwork.

Witley Court's history provides another visual conversation: the relationship between an imposing ruined building and formal gardens. I would borrow the contrast between clear architectural order and a landscape that continues living around it, rather than copy its particular façade.

For your own concept board, place a dark arch sketch beside a cream fabric scrap, a blue-green paint sample, dried-rose colors and a small stone-like texture. Keep the drawing sheets separate and the materials tangible. The most useful question is whether those few ingredients already suggest a ceremony that time has gently overtaken.
Artist Tips — Make Your Own Magic
The following illustrations are AI-generated, and this guide offers an inspired route rather than an exact, tested reproduction of the pictured miniature. Results vary; even a very small curtain can have strong opinions. You can simplify the ornament while keeping the pavilion's open structure, projecting gables, central table and garden approach.
Supplies
• Structure, essential: clean cereal-box card for templates, thicker reclaimed packaging for laminations, or chipboard sheets and basswood strips. Use thin wooden dowels or suitable dollhouse porch posts for columns. Choose all purchased parts to match your planned scale.
• Surface and color, essential: torn paper for subtle stone texture, leftover water-based craft colors, or acrylic paints. Keep charcoal, warm gray, muted blue-green, cream, rose and olive in your palette. Optional matte varnish protects a tested compatible finish; it is not an adhesive.
• Fabric and flowers, essential: a clean fine cotton scrap for drapery and saved tissue for petals, or fine cotton gauze and miniature paper flowers. Fine thread makes discreet ties. Reject fabric with a weave that looks oversized beside a chair.
• Assembly and tools, essential: suitable PVA craft glue, wood glue for wood joints, a sharp craft knife, scissors, tweezers and small brushes. Use fabric glue only where the chosen textile needs a flexible bond. A stable cutting surface belongs on your bench.

• Ornament and furnishings, optional: saved card cutouts, bead-shaped finials and paper railings, or laser-cut miniature fretwork and matching-scale garden furniture. Thin paper strips can form chair backs without sharp wire ends.
• Ground and light, optional: clean clipped thread for dry grasses, paper leaves and fine model turf. A ready-made low-voltage miniature light can provide the glow; painted candles are the simplest alternative. No real flame belongs in the model.
Planning a Miss Havisham miniature pavilion
For a manageable display, consider 1:24 as a proposed scale, not a measurement of the reference. A base around 35 by 28 centimeters gives room for a roughly 23-centimeter-wide pavilion and a garden foreground; adjust everything around the furniture you choose. Difficulty is intermediate because repeated posts, intersecting roof planes and light drapery need patient alignment. The core techniques are card lamination, simple wood framing, painted patina and miniature landscaping.
1. Map the pavilion and leave room for the garden
Draw the footprint on scrap paper. Mark the raised rectangular platform, a broad central stair, the open front and side bays, and the main table slightly to the right inside. Arrange paper circles for garden tables and small strips for chairs. Keep a readable route from the foreground to the steps instead of filling every available inch.
Make a front-elevation template with tall columns, shallow arches and a projecting pointed gable. Add a side view before cutting any roof pieces: the pavilion has a long pitched canopy with gabled projections, not a circular gazebo roof. Check a paper chair under the proposed arch. If the chair looks like nursery furniture beside the posts, correct the proportions now. Dry-fit the paper plan without glue; nothing needs curing at this stage.

2. Build a level platform and aligned columns
Laminate several layers of firm packaging card, or use a suitable wood base, for the raised platform. Cut separate strips for the stair treads and dry-stack them so each level remains visibly distinct. Glue the platform layers evenly, weight them flat with a protective sheet between model and weight, and let the adhesive dry as its label directs before adding posts.
Use equal-length dowels or porch posts, standing them on small square card plinths. Glue narrow strips along plain dowels if you want a fluted appearance. Connect the tops with a rectangular frame and add discreet internal corner braces. Test every column against the elevation template, then let the joints set fully before loading them. Cut away from your body on a stable cutting surface; make repeated light passes instead of forcing a blade through a thick stack.

The platform edge and column bases establish most of the building's strength. An elaborate crest can wait. If you are simplifying the project, retain the repeated posts and open bays, then reduce the number of decorative curls rather than changing the whole silhouette.
3. Add the pitched roof, gables and open lacework
Build the roof as a removable shell on the bench. Fold a paper mockup over a ridge, fit the projecting gables, and transfer the successful shapes to thin card. Small tabs beneath the joins help keep the roof planes aligned. Add narrow raised strips to suggest panel seams, leaving space around the circular gable ornament.
For the ornamental edge, attach suitable precut fretwork or small repeating card shapes to a sturdier straight backing strip. Keep the openings genuinely open; a solid black band makes the roof feel heavy. Build finials from short card or wood shapes with rounded bead details, keeping sharp points subdued. Let the shell dry square before test-fitting it on the column frame. A simpler first build can use fewer crest repeats while preserving the ridge, gables and projecting eaves.

4. Paint age into the architecture and paving
Work on the removable roof and base separately. Start with a dark charcoal-brown undercoat on posts and ornament, then lightly brush a warmer gray across raised edges. On the roof, stipple muted blue-green over a dark base, leaving irregular dark seams visible. Add a few restrained brown marks below joints, rather than distributing identical stains everywhere.
Create paving from torn thin card shapes fixed to the platform and path, leaving narrow joints. Alternate warm gray, pale stone and dusty brown so the ground has quiet variation. Test your paint and optional varnish on scrap first, and let each layer dry before the next. Keep watery washes away from unsealed card edges. The patina is a painted suggestion, not proof that the reference uses copper, iron or stone. Avoid loose dust or mystery powders for the weathering.

Let the painted surfaces settle before you add fabric. A miniature weathering set is an optional way to introduce restrained brown aging tones; test the actual product on spare painted card and follow its instructions rather than treating every wash as interchangeable.

5. Drape the ivory swags and dress the table
Cut a narrow strip of fine cotton for each shallow swag, with separate longer lengths for the tied curtains. Hold a strip temporarily across an opening and let it hang in a natural curve. Pinch a few folds before applying tiny adhesive spots at the attachment points; a sparing amount keeps the cloth lighter than soaking it. Test the glue on a scrap because some fabrics darken or stiffen.
Build a small card table with a reinforced underside, and drape a second fabric piece over it. Keep the table low enough that you can see its top through the arch. Fold the cloth in several unequal falls, then let the fabric adhesive dry undisturbed. Leave the center and at least one side opening clear. Tissue paper shaped gently over a form offers a simpler alternative when a thick fabric refuses to behave at scale.
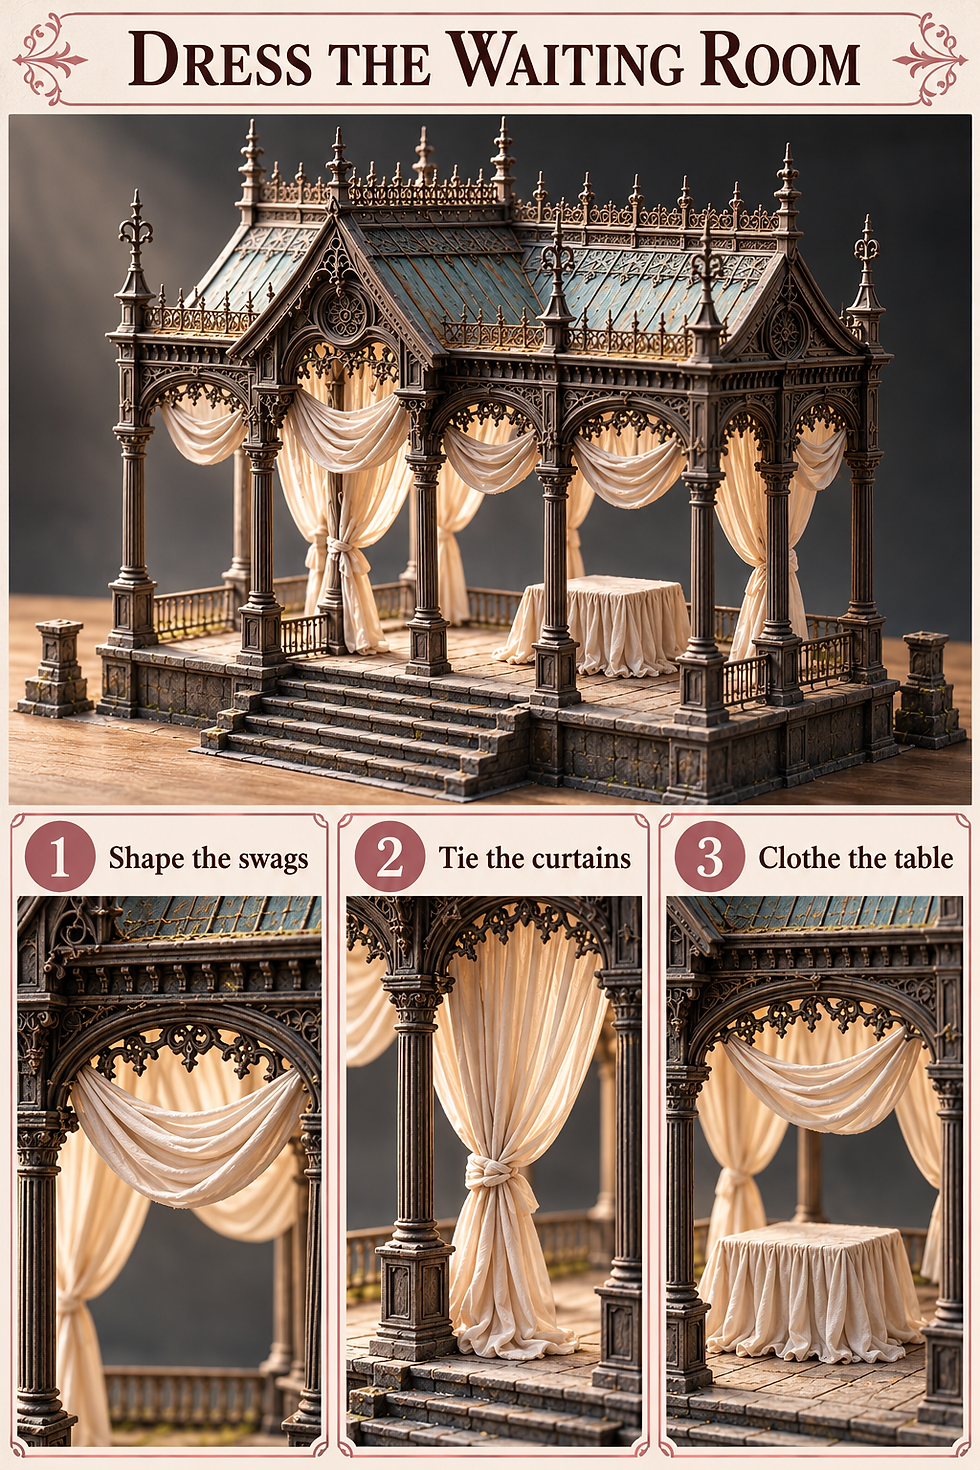
Cream against charcoal carries much of the scene's atmosphere. A little translucent gauze can soften the background, but use fewer layers than you think you need. The table should remain a place you notice through the architecture, not a pale lump that blocks the whole room.

6. Arrange the waiting furniture and a gentle glow
Make simple café tables from card circles and crossed stripwood supports. For chairs, a purchased matching-scale set is the easier route; a scratch-built suggestion uses a card seat, straight legs and a loop of laminated paper for the back. Place chairs loosely around the outdoor tables, with one tipped chair near the foreground as in the reference. Leave their feet on the ground rather than balanced on large grass clumps.
Make candle shapes from small painted wood pieces. If you add illumination, use an intact ready-made low-voltage miniature lighting set, routing its lead discreetly behind a rear post and keeping its battery compartment accessible. Follow the maker's instructions; do not cut or improvise wiring. Secure button-cell compartments and keep batteries and tiny pieces away from children and pets. Fit the lights only after nearby glue is dry, then test before settling the removable roof into place.

7. Let roses and weeds cross the formal boundaries
Place the largest flower clusters at selected upper corners, where trailing stems can follow the arches. Roll tiny tissue petals loosely around a fine thread core, or use miniature paper flowers, combining dusty pink with a little faded cream. Keep foliage fine enough that the flowers remain legible. Attach small groups at a time and let each anchor hold before extending a trailing strand.
Below, add short grass or thread tufts beside the paving, at stair corners and around the low front planter. Concentrate growth at protected edges, leaving the central approach readable. A few paper leaves on the seating and path suggest abandonment without burying the composition. Use clean, dry materials rather than damp garden soil or unknown outdoor moss. Allow the landscape adhesive to dry before brushing away loose fibers with a soft brush.

This is where selective restraint pays off. Leave several crisp architectural edges and quiet patches of paving visible. The contrast tells you that the garden is encroaching on a formal place; an evenly green blanket loses that small narrative.

8. Finish the wedding details and check every sightline
Gather the smallest pieces on a tray before attaching them: a compact bouquet, tiny dishes, a few fallen petals and understated decorations for the table. Use folded paper and clean card offcuts where possible. If you choose air-dry clay for a little cake or planter, shape it separately and let it dry thoroughly before painting, following that product's directions. Do not confuse air-dry material with oven-cured polymer clay.
Look through the front arch at chair height. Move any bouquet hiding the table, trim grasses covering the stairs, and check that the pale curtains do not disguise the column spacing. Glue the final details only after this rehearsal. Let those bonds dry before moving the base; carry the finished scene underneath, never by a finial, column or roof edge. Keep the roof removable if you need access to lighting or interior repairs.

Photograph the quiet drama
Set the model on a stable tabletop in front of a curved dark-gray backdrop, leaving enough distance that the background stays unobtrusive. Put a diffused light above and to the left to echo the reference, with a white card opposite to lift the shadows beneath the swags. Avoid harsh direct light, which can turn the cream cloth into a featureless bright patch.
Photograph from just above the platform height, then try a slightly higher three-quarter view that shows the roof and garden together. Leave breathing room around the finials and keep the whole base in one establishing shot. For close-ups, choose the roof tracery, draped table and foreground seating as separate subjects. Check shine on paint and fabric before adjusting the light; do not rely on heavy blur to hide unfinished joints.

Small troubles, practical fixes
• Columns lean: check the platform is flat, then use a temporary square card spacer between posts while the joints dry.
• Roof corners lift: repair the paper mockup first, reduce uneven glue, and dry the lightweight shell with its shape gently supported.
• Curtains look oversized: switch to a finer weave, narrow the strip and reduce the number of folds.
• Weathering becomes muddy: let it dry, restore a few clean raised edges, and reserve the darkest marks for joints and recesses.
• Flowers hide the pavilion: remove or relocate one cluster so an entire arch and its drapery remain readable.
Closing — Until Next Time in the Small World
I keep returning to the way this scene holds on to beauty without requiring the party to begin. The book's image of a life caught in an unfinished wedding stayed with me from college, and this pavilion gives that memory another visual form: open air, worn ornament, flowers and a table that still seems to be waiting.
Which detail would you keep in your version: the blue-green roof, the ivory swags or Oswin's extremely unhurried dance floor? Share your own miniature interpretation with #smallworldminiatures. You can also find more small-world inspiration through the newsletter on the Small World Miniatures homepage and browse the online shop. Mabel will be inspecting the curtains until further notice.








Comments