
Petals & Ziggurats: A 1940s Art Deco Floral Shop in Miniature
- Nov 25, 2023
- 11 min read
Updated: Jan 21

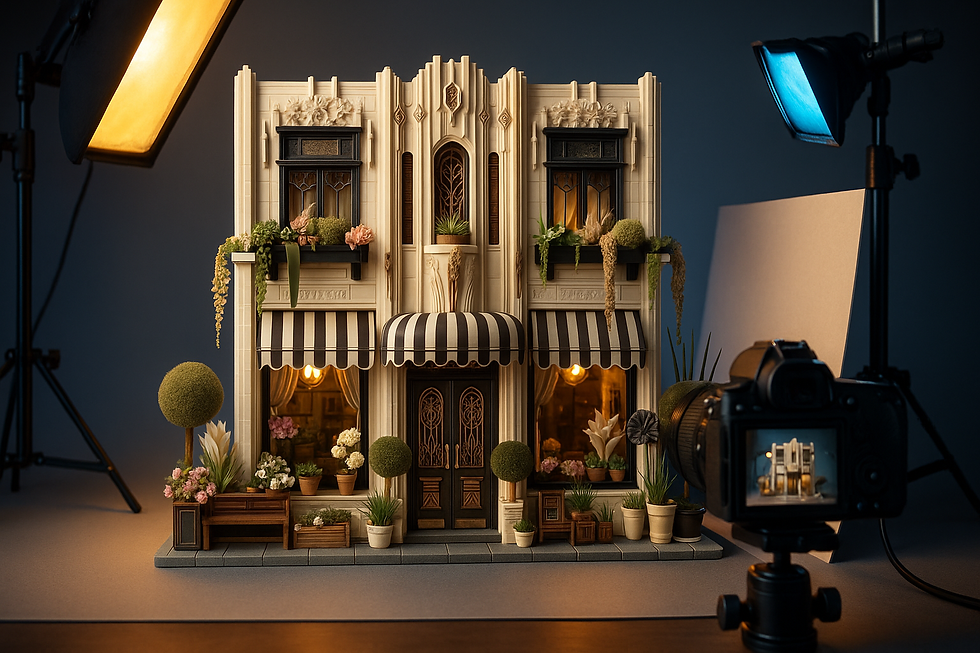
Hello from the tiny side of town! I’m Brandon from Small World Miniatures, and today we’re rolling up the striped awnings on a brand-new build: a miniature 1940s Los Angeles Art Deco floral shop with all the glam you’d expect—fluted pilasters, ziggurat crown, stained-glass grillework, and planters bursting like a chorus line. If you’ve been hunting for long-tail inspo like a “miniature Art Deco storefront with striped awnings” or a “miniature stained-glass transom window,” this little façade has your name written in chrome script. The facade is predominantly warm ivory with bronze accents; inside, golden lamps glow over buckets of peonies, ranunculus, and a succulent corner that refuses to behave. It’s a slice of 1940s fantasy Los Angeles Art Deco—exactly the city that happens when movie set designers borrow blueprints from the gods.
Why This Photo Gets VIP Treatment
A quick note before we dive in—this hero image is web-optimized. That means it’s crisp for screens but not as razor-sharp as a dedicated print file. If you’d like a high-resolution canvas print of this piece (which looks spectacular over a studio workbench or in a reading nook), I’ve got you: I offer pro lab canvases with FREE U.S. shipping. The print retains the tiny geometry and the creamy highlights on the cornices so you can admire it without squinting or zooming. Treat your wall to a little Deco, and your eyes to fewer pixels.

The Tiny Tale: “Marigold & Monroe, Florists to the Stars”
Every miniature deserves a passport stamp and a little gossip. Meet Marigold & Monroe, established in 1941 on a side street off the (equally miniature) Miracle Mile. Dottie Marigold, a botanist with a dangerous fondness for artful topiary, partnered with Ray Monroe, a prop buyer who knew every studio guard by name. During the war years, they kept morale up by sneaking bouquets into dressing rooms and wedging posies into script binders. Legend says the tiny stone face over the center niche is a stylized portrait of Edda the delivery girl, who could balance three hatboxes of camellias on a bicycle while whistling “Paper Moon.”

Regulars included a magician who always paid in silk scarves (we never figured out the exchange rate), two chorus boys who argued about peonies vs. gardenias, and an anonymous “Mr. B.” who insisted on white carnations every Thursday. Easter Egg for eagle-eyed readers: there’s a miniature seed packet in the right window labeled “Bogart Beans.” If you spot it in the photos, you’ve earned a phantom studio pass.
Marigold & Monroe’s lore influenced several design choices—the black-and-white awnings mimic a film clapper, the bronze grille on the door suggests a stylized bouquet, and the window boxes overflow the way Dottie’s stories did.
Composition & Materials: A Stroll from Left to Right
Starting at the far left, a low bench—carved with Deco lines—anchors a vignette of soft pink hydrangeas, baby’s breath, and a ball topiary (foam sphere + flocking) in a ribbed pot. The corner pilaster runs all the way up in crisp fluting, capped with a relief frieze of foliage—think papyrus meets peony. Above the bench, the first window carries a stained-glass transom in smoked gray with lead lines that form nested diamonds. A window box spills trailing “string-of-pearls,” made from beaded wire and seed beads tinted with a drop of sap green.

Moving to center-left, you hit the striped awning. The scalloped edge is trimmed with a micro braid (actually 1 mm ribbon). Beneath it, the display window glows: buckets of dusty rose peonies, a cameo of white anthuriums, and stacked kraft-paper parcels tied with twine. Inside, a brass chandelier reads as 1940s warm tungsten.
Front and center: the double door—a black enamel base with bronze geometric inlay reminiscent of fan palms. Two clipped shrubs flank the entry; their planters repeat the vertical ribs of the façade to keep rhythm in the composition. Over the doors, a shallower awning punctuates the ziggurat push upward, and a niche hosts three squat succulents and Edda’s serene face.

On the right side, the second display window mirrors the first but arranges the blooms in zigzag tiers like rooftop setbacks. Below, a scatter of potted cacti, echeveria, and one exuberant dark dahlia leads your eye to the final spherical topiary—a callback to the left side so the scene closes like a parenthesis. Up top, both upper windows repeat the transom motif, while wisteria-ish vines drape from the boxes as if the building itself couldn’t resist playing dress-up.

Materials snapshot: XPS foam for walls; basswood for trim; laser-cut cardstock for the lattice; styrene for windows; epoxy putty for reliefs; fabric and paper for awnings; foam balls + flock for topiaries; LEDs, vellum, and a tea-stain filter for lighting.
Artist Tips – Make Your Own Magic
You’re about to build a shopfront so charming that your mail carrier will start leaving tiny coupons under it. Think geometric, glamorous, and glow-from-within.
Quick Wins
Tape-as-Moldings: Layer two strips of 3 mm washi tape to fake a stepped Deco cornice. Prime, paint, boom—dimension.
Vellum Diffusers: A square of tracing paper behind each window turns harsh LED dots into buttery studio light.
Seed Bead Succulents: Thread 3–4 mm seed beads on thin wire, coil, and hit with a 1:8 olive wash for instant string-of-pearls.
Awnings Without Tears: Score cardstock every 5 mm before bending; the creases keep stripes straight and drama high.
Chrome-ish Trim: Mix 2 parts silver : 1 part black and drybrush—less toy-shiny, more movie-prop chic.

Deep Dive: Step-by-Step Build
Planning & ScaleI built Marigold & Monroe at approximately 1:24 scale. Real LA shop doors hover around 7 ft (213 cm), so my door stands ~8.9 cm tall. The awnings project 2.5 cm from the façade, and each display window opening is 7 cm wide by 6 cm high. Sketch elevations first; use graph paper so your fluting and diamonds stay true.

Bones (Base Structure)
Use 6 mm XPS foam laminated to 2 mm chipboard for rigidity. Scribe tile lines on a 2.5 cm–deep sidewalk. Pin in the pilasters before gluing the cornice; Deco loves straight lines—give it a backbone.
“Put the Jewelry On”: Building the Deco Moldings
Goal: Clean, repeatable flutes and stepped profiles that echo LA’s 1940s Deco—crisp verticals, a ziggurat cornice, and a heroic door surround.
Scale notes (built at ~1:24):
Pilaster width: 10–12 mm
Flute width: 2 mm with 1.5 mm flats between flutes
Cornice projection: ~6 mm off the façade, made from three steps (2 mm + 2 mm + 2 mm)
Door surround reveal: 1.5 mm proud of the wall

A) Pilasters (crisp flutes without a CNC)
Blank & Backer – Rip 10–12 mm-wide XPS strips for pilasters. Laminate to 2 mm chipboard so they stay arrow-straight.
Flute Spacers Jig (60 seconds, worth it) – On scrap card, stick down two 3 mm washi strips with a 2 mm gap between them (the flute). Make a second lane next to it, separated by 1.5 mm of bare card (the flat). You’ve built a sliding stencil.
Scribe the Channels – Place the jig on the pilaster face and run a round-tip embossing tool or dull pencil down the 2 mm gap—three light passes instead of one deep one. Slide the jig to add more flutes, keeping 1.5 mm flats between each.

Define & Clean – Deepen lightly with a chisel tip (or a sharpened coffee stir stick). Knock down fuzz with 600-grit wrapped around a credit card.
Base Blocks & Caps – Add a 6 × 6 × 2 mm base block and a 1 × 10 mm header cut from XPS. These small “bookends” make the fluting look intentional.
B) Stepped Cornice (the ziggurat crown)
Laminate the Steps – Cut three styrene strips per cornice run:
Back step: 1 × 3 mm
Middle: 1 × 2 mm
Face: 0.5 × 2 mmStack them flush on the wall so the profile projects ~6 mm total. Where fast and flexible is better, substitute two layers of 3 mm washi for the middle + face steps—burnish hard; it primes beautifully.

Returns & Miters – At corners, miter the styrene at 45°. For washi-built steps, overlap long and trim once burnished to avoid lifting seams.
Door Surround “Hero” – Frame the door opening with a picture-frame stack: 0.5 × 2 mm inner reveal → 1 × 3 mm band → washi double-step as a skinny outer crown. The sequence thin → thick → thin reads very Deco.
Hero Piece (Focal Point) – The hero is the double door. Cut an inner frame from 0.5 mm styrene, overlay laser-cut cardstock in a palm-frond motif, then flood with transparent brown ink to simulate varnished wood under bronze. Final highlight: a 3:1 mix of burnt umber : metallic bronze on the raised edges.

C) Prime, Paint, and Bronze Accents
Seal & Prime – Brush a thin coat of PVA diluted 1:1 with water over foam edges; let dry. Light rattle-can grey primer from 30 cm away. Two dust coats beat one wet one.
Ivory Body Coat – Mix 3 parts Titanium White : 1 part Unbleached Titanium + a tip of Yellow Ochre. Airbrush or brush in two thin coats. While damp, glaze shadows into flutes with Payne’s Grey 1:10—only in the channels.

Bronze Pick-outs: For the sharp lines on step edges and door inlay, mix 2 parts Antique Bronze : 1 part Burnt Umber. Feather with a damp brush so it reads aged metal, not toy chrome. For cooler “chrome-ish” bands, drybrush 2 parts silver : 1 part black.
Unify & Pop: Very light drybrush of the ivory mix + a touch of white just on the outermost step and flute ridges. Optional satin varnish on moldings; matte on wall planes.
Utilities & Greebles: Hinges are U-shaped staples trimmed short. Door pulls are sequin pins nipped and CA-glued. The tiny mail slot? A cutout from a tea-tin lid. Window boxes are basswood 6 × 6 mm channels capped with 1 mm card.

Furniture & Soft Goods: Awnings: stripe black and ivory acrylic on 160 gsm cardstock. Curtains are bias-cut cotton with a coffee-and-vanilla tea stain (1 bag black tea : 1 tsp instant coffee in 250 ml water)—two dips for an aged Hollywood hue. The bench: basswood with 1 mm styrene inlays for Deco lines.

Base Colors & Materials: Wall color is a warm ivory: 3 parts Titanium White : 1 part Unbleached Titanium + a tip of Yellow Ochre. Fluting shadows: thin Payne’s Grey glaze. Bronze accents: 2 parts Antique Bronze : 1 part Burnt Umber; keep the mix semi-matte for that studio-prop finish.
Weathering Stack (10 steps)
Primer: Grey rattle-can primer; light passes.
Pre-shade: Airbrush a faint Payne’s Grey along flutes and corners.
Basecoat: The ivory mix above.
Panel Modulation: Feather a 1:1 ivory:white on sun-facing edges.
Oil Dot Filter: Tiny dots of raw umber, yellow ochre, and white, blended with odorless thinner to even the tone.
Pin Wash: Burnt umber + black 1:6 into panel lines/recesses.
Streaking: Vertical streaks with raw umber, soft-blend downward.
Drybrush: Near-white on cornice edges for crisp pop.
Dust Pass: Pastel powder (warm grey) across the sidewalk and lower pilasters.
Varnish: Satin over walls, matte over plants, gloss just on window glass and door inlays.
Lighting (Simple & Safe)Use pre-wired 3V warm-white LEDs (~2200–2700K) for interior glow; hide them in the ceiling valance. Diffuse with vellum or tracing paper behind the windows. If you add a “streetlight” effect, use a neutral 4000K micro LED above the sign for subtle contrast. Always pair LEDs with the correct resistors, heat-shrink joints, and route wires through a rear service panel. Keep wiring tidy and test before sealing the façade.

Story Clutter & Easter Eggs: Toss in paper flower wraps, ledger slips (aged with that coffee/tea mix), and a mini bouquet tag that reads “To Edda—break a pedal.” Hide the “Bogart Beans” seed packet in the right window. A postage label dated 1941 tucked under a pot rewards nosy visitors.

Unifying Glaze/Filter & Finish: Mist a 1:15 mix of clear medium and a whisper of Yellow Ochre through an airbrush (or brush on lightly) to bathe everything in a shared SoCal warmth. Final touch: a micro graphite rub on bronze edges for believable metal wear.
Roofline Ornaments
Stack the crown: Laminate 1×3 mm → 1×2 mm → 0.5×2 mm styrene (or two 3 mm washi layers + thin card) for a 3-step profile projecting ~6 mm.
Tile accents fast: Punch diamonds/chevrons from 0.5–1 mm card; space ~2 mm apart for inlaid plaques.
Floral reliefs: Press epoxy putty into a tiny jewelry/cake mold; keep relief ≤1.5 mm proud.
Crisp ribs: Map with 3 mm washi, then glue 1×1.5 mm styrene on every other stripe; peel tape—instant channels.
Finials on the cheap: Stack sequin + seed bead + pin head on 1 mm rod; cap with a micro triangle.
Mini niche: Warm spoon press into 6 mm XPS for the arch; line with 0.5 mm card ribs.

Photo Tips: Shoot at f/8–f/11 for sharpness, light with a key at 45° and a white card bounce. For that Hollywood look, gel your key slightly amber and your fill slightly blue. Pull the camera low so the façade towers like a real building.
Troubleshooting (Problem → Fix)
Awnings sagging → Add a hidden styrene spar (2 × 2 mm) along the front edge; score folds every 5 mm to lock the curve.
Bronze reads too toy-shiny → Glaze with Burnt Umber + Matte Medium (1:3), then buff edges with a soft pencil.
Plants look flat → Hit tips with a 1:10 sap-green highlight and low-lights with Payne’s Grey at the base.
Fluting fills with paint → Pre-seal with diluted Mod Podge (1:1 with water); apply two thin coats rather than one thick.
LED hotspots → Back the window with two layers of vellum and pull LEDs 1 cm away from the glass.
Mini Shopping List (smart reuse first)
6 mm XPS foam + 2 mm chipboard → walls/façade blocks & rigid backer (or: 6 mm modeling foam + cereal-box chipboard)
3 mm washi tape OR strip styrene (0.5×2, 1×2, 1×3 mm) → stepped moldings/cornice & crisp reveals
Tea tin lid → mail slot & tiny plaques (or: K&S brass sheet)
Staples & sequin pins → hinges/handles (or: photo-etch hardware)
Cardstock folder + narrow ribbon (1 mm) → awnings & trim (or: 160–200 gsm art card + model-ship rigging thread)
Tracing paper + pre-wired 3V LEDs → window diffusers & warm interior lamps (or: vellum + 12V dollhouse lights with resistors)
Seed beads + thin wire → string-of-pearls succulents (or: microbeads)
Foam packing sheet → topiary cores (or: 20–30 mm foam balls)
Coffee + black tea → curtain aging bath (or: Distress Ink)
Adhesives set → tacky PVA/contact for foam; thin CA for styrene; baking soda on hand for fast fills
Lightweight spackle OR baking-soda + thin CA → micro-fills & miter fixes
Tools & finishing → fresh #11 blades, metal straightedge, sanding sticks (320/600/1000), grey primer, ivory/bronze paints, plus pastel sticks for dusting (or: weathering pigments)
Safety first: Work in good ventilation, wear nitrile gloves when using CA glue and oils, eye protection when cutting or sanding, and always use the correct resistors with your LEDs to avoid toast-scented electronics.
Inspirations – From the Big World to the Small
This miniature lives in the same design family as LA’s grand Deco darlings. The Eastern Columbia Building (Claud Beelman) flaunts those stacked setbacks and intricate metalwork; I borrowed the stepped crown and toned it to ivory rather than turquoise. Bullocks Wilshire whispers refined luxury—my bronze grillework and tailored awnings nod to that retail glamour. The Oviatt Building, with its René Lalique glass, inspired the stained-glass transoms; I translated Lalique’s translucency into smoky gray panes with delicate lead lines.

In miniature, Deco’s drama can swamp a small façade, so I kept the verticals crisp, pushed the door as hero, and let foliage soften edges. Strong geometry + lush botanicals = that LA contradiction we love: a city built on angles and daydreams.
Closing – Until Next Time in the Small World
And that’s Marigold & Monroe—where the peonies never wilt, and the gossip smells faintly of gardenias. If you spot our Bogart Beans packet, give a wink to Edda on your way out. I’d love to hear your favorite detail—the bronze door, the fluting, the dahlia who thinks she’s a movie star? Drop a comment, share your builds with #smallworldminiatures, and if you want behind-the-scenes process shots, sign up for the newsletter. Next time we might sneak across town to a Streamline diner that serves milkshakes the size of acorn caps.
Hashtags
#smallworldminiatures #miniature #miniatureart #miniaturearchitecture #artdeco #losangeles #diorama #1to24scale #dollhouse #modelmaking #kitbashing #foamcraft #styrene #ledlighting #miniatureflowers #scaleplants #miniaturetutorial #handpainted #tabletopterrain #creativehobbies #miniaturephotography #craftblog #makercommunity #architecturelovers #fantasyart #gallerywrap #canvasprint #historicalstyle #propshop #tinybuilds
Thanks for visiting the shop—don’t brush the petals off your shoes on the way out.


Comments