



A Bouquet Beyond Midnight: A Gothic Bride Miniature Build Guide

First Impressions in Miniature
This gothic bride miniature has arrived with a lavish bouquet, a lace veil and absolutely no intention of letting a little thing like mortality spoil the evening. I love the quiet expression, the wonderful weight of the skirt, and those warmly lit windows behind her. Somebody in that village has remembered to put the kettle on.
Look closely and the drama becomes surprisingly gentle. Bone-colored ribs frame a dark bodice. Dusty roses soften the sharp silhouette. The long veil catches the blue night, while pumpkins and crooked branches keep the scene firmly in Halloween territory. Below, you can explore the details and build an inspired figure of your own, concentrating on the face, dress and flowers rather than constructing an entire village before you are allowed a bride.
The purchased alternatives below use Amazon affiliate links; if you buy through them, it helps fund this tiny world. As an Amazon Associate I earn from qualifying purchases.
A magnifying work light can help with the little facial details; keep the work area well lit even when the finished scene is meant to feel nocturnal.

Miniature Backstory — The Tiny Tale
Every Halloween, Vesper Bellweather walked down Lantern Lane wearing the gown she had spent three autumns repairing. The neighbors assumed she was waiting for a groom. They were wrong. She was waiting for the florist to admit that brown roses were a deliberate color choice.
Mr. Bramble, the florist, had sent her increasingly apologetic replacement bouquets. Pink roses. White roses. One memorable arrangement consisting entirely of cheerful yellow daisies. Vesper returned each with a courteous note. “Lovely,” she wrote, “but insufficiently haunted.”
This year she took matters into her own bony hands. She gathered dusky petals, curled stems and seed heads from the garden, tied them with a trailing ribbon, and set off to show him what she meant. Her veil snagged on the crooked tree outside the bakery. A passing moth freed it, then remained on the crown as an unofficial bridesmaid.
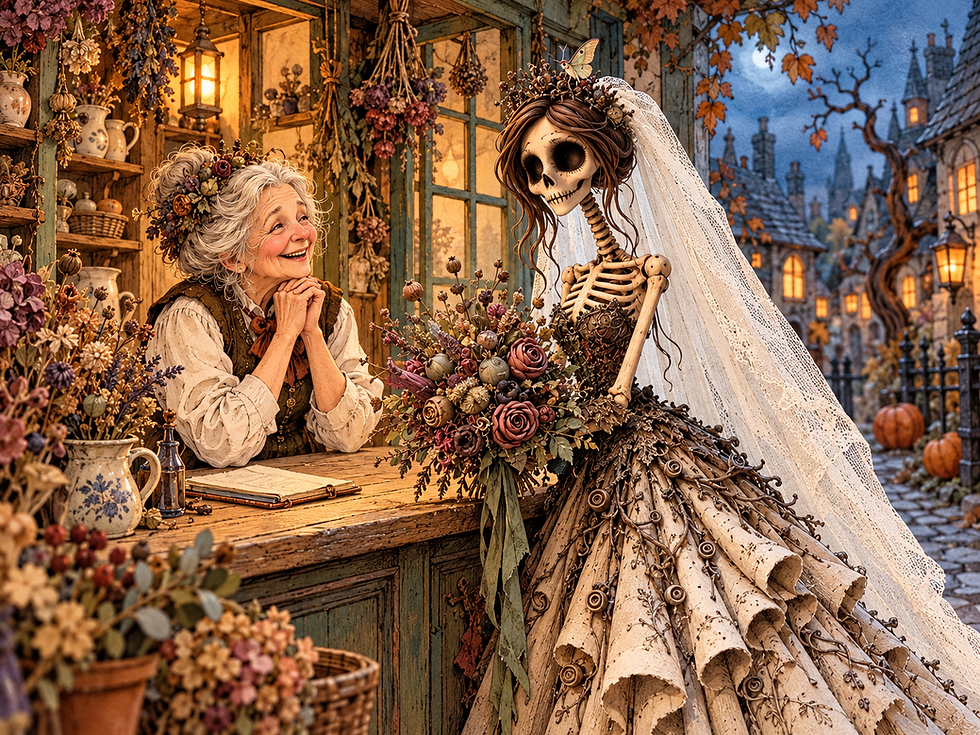
By the time Vesper reached the shop, Mr. Bramble had extinguished every lamp except the little one above his worktable. He took one look at the bouquet and reached for his notebook.
“Finally,” he said. “A customer who understands brown.”
They spent the evening discussing wilt, silhouette and the distinction between romantic decay and simply forgetting to water something. Vesper booked him for next Halloween. No groom was mentioned. The bouquet, she felt, deserved a celebration of its own.
Look at the rose-colored flowers nestled among the seed heads in the scene. They are the detail that gave me Vesper's very particular taste. For your own version, you could tuck an imaginary moth into the crown, but that is an optional story addition, not a hidden object in the photograph.
The palette is mostly ivory, charcoal and dusty rose. A wet palette is an optional way to organize small acrylic mixtures while you work, not a required purchase.

A Guided Tour of the Build
A face framed by moonlight
The oversized head gives the figure its storybook character. Deep eye sockets sit above a small triangular nose and a neat line of teeth. Brown hair falls in narrow strands beside the face, leaving enough open space to read the expression. The crown is dark and twig-like, while the veil makes a bright outline behind it. That contrast keeps the skull from disappearing into the night.

A dress with a long memory
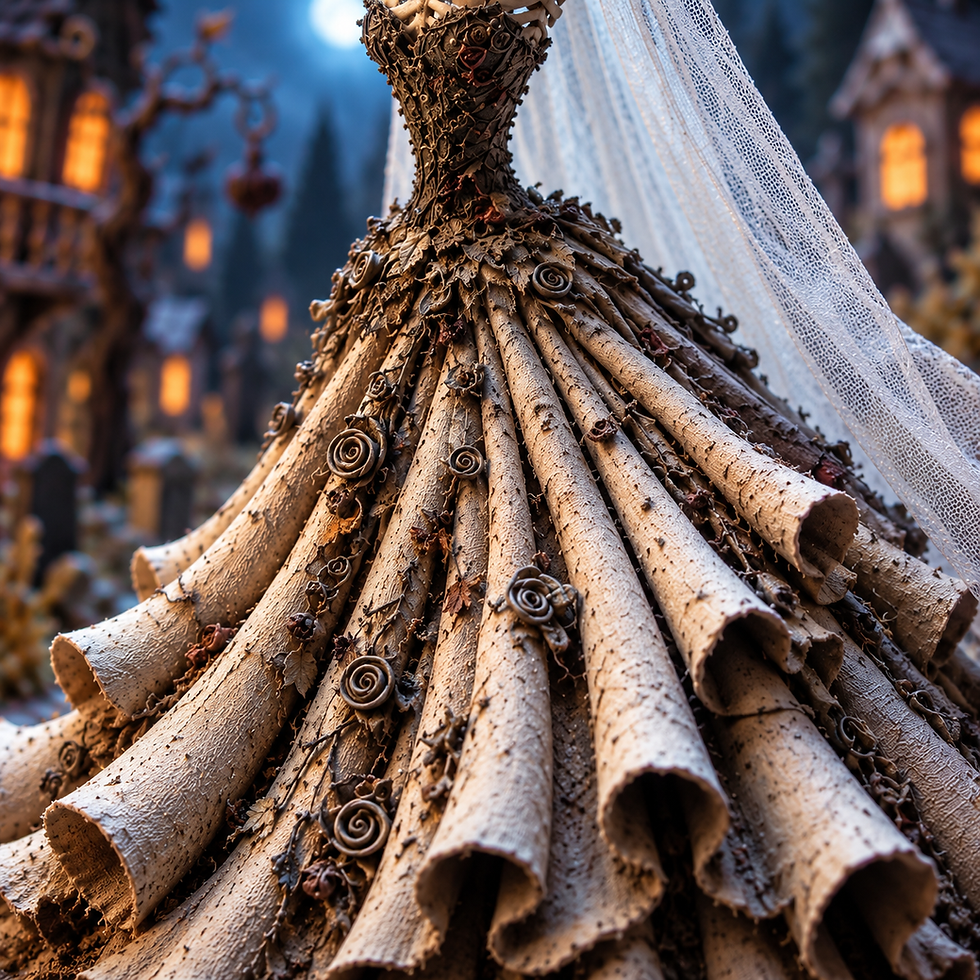
The skirt opens into broad, sculptural folds with curled edges. Dark ornament follows the aged ivory surface, and the bodice narrows sharply above it. I would describe the finish as fabric-like, with a paper-and-clay quality to its exaggerated drape; the image alone cannot establish how it was made. The useful lesson is the silhouette: a narrow waist above a generous, stable sweep.
Flowers against old stone
The bouquet brings together rounded roses, pale pods, wiry stems and trailing material. Its dusty wine color creates a small warm island against the bone-colored arms. Behind it, warm windows and orange pumpkins punctuate the blue-gray street. The village supports the bride instead of competing with her. A short stretch of cobbles and one simplified façade could carry the same mood in a smaller project.

Inspirations — From the Big World to the Small
The dress suggests romantic historical fashion without belonging to one precise period. The V&A's account of Victorian bridal dress includes elaborate lace, narrow bodices and draped skirts, useful references for deciding where folds gather and where trim belongs. Here those ideas are stretched into fantasy. You can borrow the contrast between a fitted upper body and abundant fabric without claiming an accurate Victorian costume.
Arthur Rackham's early twentieth-century fairy-tale illustrations offer another useful comparison. His watercolor-and-ink illustration for “The Travelling Companion,” held by the Metropolitan Museum of Art, fills an enchanted gathering with wiry creatures and swirling movement. That balance of eerie and playful feels appropriate to Vesper. The Tiny Tale illustration uses the broader British fairy-tale ink-and-watercolor tradition as inspiration, rather than reproducing an existing illustration.

For the setting, I think of the bare trees and Gothic atmosphere surrounding Caspar David Friedrich's The Abbey in the Oakwood. The Berlin Nationalgalerie identifies it as a work of German Romanticism. Our little village is much busier and more theatrical, but a quiet branch against a cool background can still give a figure breathing room. Treat these as design parallels, not evidence that the supplied scene was made by, or directly modeled on, any of those artists.
Artist Tips — Make Your Own Magic
The illustrations here are AI-generated, and this guide offers an inspired approach rather than an exact, tested reconstruction. Results vary, especially when a tiny veil develops opinions. Start with a manageable figure and let the setting grow only if you want it to.
Planning a gothic bride miniature
Try a stylized figure roughly 12–15 cm tall as a planning choice, not a measurement of the reference. A palm-sized base with room for the skirt gives you a practical starting point. This is an intermediate mixed-media project because the figure needs support and the clothing needs careful layering. A simplified skull, closed mitten-shaped hands hidden by the bouquet, and fewer folds make it more approachable.
A model-weathering paint set is an optional shortcut for the rusty fence and aged base. Use only the colors you need; ordinary acrylic mixtures can also suggest those tones.

Supplies
• Structure: reuse clean aluminum foil for the body core and sturdy packaging card for the base mock-up. For the finished support, choose a small wooden base and suitable armature wire. Keep a separate pin vise or appropriate hand drill available if the base needs pilot holes.
• Sculpting: use oven-bake polymer clay for the skull, chest details and limbs. A clean smooth tile protects the work surface. Rounded modeling tools are useful; a blunt wooden tool can handle simple grooves. Air-dry clay is a different material and needs its own construction and drying approach.
• Clothing: begin with clean, fine-weave fabric scraps, old ribbon and a small piece of lace. Fine tulle or lightweight cotton are purchasable alternatives. Avoid bulky seams that would overwhelm the figure.
• Flowers and hair: reuse narrow paper strips and fine thread. Add thin craft wire, paper petals, or small polymer-clay roses where needed. Keep the bouquet light so it does not pull the arms forward.
• Color and joining: use acrylic paints, fine detail brushes and a compatible matte finish. Choose adhesive specifically suited to each cured-clay, fabric or wood joint, following its label. PVA craft glue+white+craft+glue&search-alias=aps&tag=smallworldmin-20&linkCode=osi) is useful for paper and many textile details, but it is not a universal structural adhesive.
• Optional setting: clean card, thin wood offcuts and paper can form cobbles, a fence or a shallow façade. A ready-made low-voltage light may illuminate a window if its instructions permit your enclosure; external photography light is simpler.

Keep wire cutters, pliers, scissors and sharp tools suited to their actual materials. Cut away from yourself on a protected surface, collect wire offcuts immediately, and keep small parts away from children and pets. This is a display project, not a toy. Make a scrap test of any paint, glue or finish combination before applying it to the figure.
1. Plan the pose and a stable base
Sketch the figure from the front and side. Place the head above the center of the skirt, with the bouquet held close to the body rather than extended at arm's length. Cut a paper silhouette and stand it against your proposed base. Check that the gown can spread without projecting precariously over the edge.
Make a wire support with a continuous central spine and secure lower anchors. Turn sharp ends inward with pliers. Trial-fit the support into the base, but keep the wooden base separate from any oven-curing stage. The lower dress can hide a support post, which is much easier than relying on two delicate ankles. Test the bare structure with a temporary lightweight head before adding clay. If it rocks, widen or improve the base attachment now.

2. Build the supported body
Compact clean foil around the upper armature to establish the torso, then add a thin, even covering of conditioned polymer clay. Keep the neck supported by the wire rather than forming a long unsupported clay stalk. Shape a narrow waist, simple shoulder masses and a smooth area where the bodice will sit.
Suggest the rib cage with shallow raised strips or carved grooves. You do not need a medical model; a few clearly arranged ribs will read at this scale. Keep projecting parts substantial enough to survive handling. Check the pose from both sides before curing. Follow the exact clay manufacturer's temperature, time and support instructions, use an oven thermometer, and never microwave polymer clay. Do not put fabric, glue, painted scenery or the wooden display base into this curing stage.
The illustration isolates foil compaction, even clay coverage and a texture practice tile. Rehearse those materials separately before applying them to the supported figure.

3. Give the skull its expression
Form the head around a small compact foil core, leaving a connection for the supported neck. Press two rounded sockets into the front without thinning the back excessively. Add a small nose opening and a shallow curved mouth. Score a few short tooth divisions rather than building a fragile row of individual teeth.
The eye sockets, not a mass of wrinkles, carry the expression. Tip the head slightly and compare it with your paper silhouette. Cure according to the clay's instructions, then let it cool completely before testing its fit. Paint with a warm ivory base and use a restrained brown-gray shadow around the sockets and jaw. Keep the forehead lighter. Check paint compatibility on a spare cured piece first; a thick wash can turn a delicate face into a muddy pebble surprisingly quickly.

4. Shape the gown in separate layers
Wrap a paper pattern around the waist to decide the bodice shape. Cut the actual bodice from fine fabric or thin decorative paper, keeping the join at the back. Make the skirt from several tapered fabric panels over a lightweight card underskirt, fitted only after all oven work is finished. The underskirt creates the sweep and protects the lower support.
Pinch or pleat each panel at the waist, then arrange broad folds before gluing. Work from the back toward the front so the most visible seams receive the neatest overlaps. Let each join dry before adjusting the next panel. For curled lower edges, shape a narrow paper-backed fabric strip over a smooth temporary former and remove it only when the adhesive has dried. Keep aging subtle: a little brown-gray at the hem and recessed folds, with cleaner raised ridges.

Use a scrap swatch to test the dress treatment before committing. A fine cloth can darken dramatically when wet with adhesive, and lace may lose its open texture under too much paint. The finished skirt needs a readable rhythm of large folds before it needs tiny ornament.
For an optional metal-like crown accent or base ornament, a tiny antique-gold highlight can separate it from the dark surroundings. Test a metallic wax on a compatible scrap, follow its ventilation directions, and keep it off the delicate fabric.

5. Fit the arms, hair and veil
Build short supported arms that meet near the bouquet. For a first figure, simplify the hands into small closed forms around the stems; paint restrained finger divisions rather than attempting ten separate brittle fingers. Cure these clay parts before attaching them with a material-compatible adhesive, and support them while the joint sets.
Add hair with thin clay strands cured separately where practical, or use fine thread for a cooler assembly route. Keep the face clear and avoid a dense curtain of strands. Cut the veil from fine tulle, gather it at the crown and let it fall down the back. Use the smallest workable glue dots. Try the veil without glue first: its edge should frame the shoulders without covering the bouquet. A simple looped-wire crown can hide the gathering point; turn every wire end inward.
Prepare thread hair and the gathered veil as separate components before fitting them to the figure. The illustration shows those small accessories on the worktable, including how the crown conceals the gathering point.

6. Assemble a wonderfully wilted bouquet
Choose a few larger roses and surround them with smaller buds, pods and thin stems. For paper roses, roll a small central curl and overlap several separate rounded petals around it. For clay roses, make the flowers separately and cure them according to the clay instructions before combining them with paper or thread. Keep the different material processes separate.
Paint the roses dusty mauve or wine, leaving the centers slightly deeper. Make pods from small rounded pieces rather than real seed heads that may shed or bring pests indoors. Bundle the lightweight stems, secure them, and wrap the handle with a narrow strip of paper or thread. Trial-fit the bouquet before the final attachment. It should hide the simplified hands and leave a glimpse of both forearms. Let the joint set while the bouquet rests on a temporary support.

A well-placed flower can do more than a dozen extra details. Keep a few gaps around the stems so the bouquet has an airy edge; otherwise every carefully made rose merges into one large brown cabbage. Vesper would have a complaint form ready.
If you want a tiny dewdrop effect on a rigid bouquet petal, a compatible gloss varnish can provide a restrained shine. Test it first and avoid coating the veil or whole gown.
7. Give her a small stretch of Lantern Lane
Cover the base with individually cut card cobbles, leaving narrow joints. Seal and paint the card with compatible water-based products, testing first to avoid warping. Build up color with thin coats and let them dry before adding the figure. A short fence can use blunt-ended wire fixed into a supported rail; simplify the scrollwork if it becomes fragile.
Add one crooked tree or shallow windowed façade only if there is room. Use a wire-and-paper tree with turned-in ends, and keep it behind the veil rather than directly across the face. Paint a warm window glow if you prefer to avoid wiring. Small solid clay pumpkins, cured separately, can sit beside the path. Keep their orange muted enough that the bouquet remains important. Dry-fit the complete arrangement and leave a clear lifting point on the base.

8. Finish the surfaces and secure the scene
Inspect every joint before adding the final weathering. Make sure the base supports the figure independently of the veil, flowers or scenery. Strengthen an uncertain connection with an appropriate mechanical support or compatible adhesive rather than covering it with moss. Let all adhesives reach their labeled cure state before moving the finished piece.
Add restrained highlights to the skull, raised dress folds and rose petals. Use a compatible matte finish only where needed and test it first; textile areas may be better left uncoated. Keep the dress softer than the painted bones, and reserve any slight sheen for selected petals or tiny metal-like ornaments. Remove loose fibers and stray glue with care. Check from the planned viewing angle that the crown, bouquet and hem all remain visible.

Photograph the quiet drama
Place the miniature on a plain dark backdrop and bring a soft light from the side, angled to reveal the dress folds. A pale card opposite the light can lift the skull's shadows without flattening them. Try a cool background and a small warm light directed toward the scenery, keeping electrical equipment clear of fabric and paper. Do not use real candles.
Lower the viewpoint toward the figure's chest rather than looking down from standing height. Focus on the face for the main portrait, then take separate closeups of the bouquet and gown. Move the backdrop farther away if its texture becomes distracting. Check the veil against the background before each shot: fine netting needs contrast, and a bright patch behind it can erase its edge.

When the tiny wedding needs alterations
• Leaning figure: remove the bouquet temporarily and check the support and base attachment. Correct the structure before adding decorative weight.
• Heavy-looking dress: reduce overlapping seams and use finer fabric. Keep fewer, broader folds instead of adding more material.
• Stiff veil: replace glue-soaked netting with a fresh piece and use tiny attachment points at the crown.
• Muddy skull: let the paint dry, restore the ivory planes, then add shadows only where they help define the features.
• Unreadable bouquet: separate a few flower heads and vary their sizes. Keep the brightest rose away from the deepest shadow.
A few small grass tufts can soften the edge of the cobbled base. Leave the central path clear so the figure and bouquet remain the story.

Closing — Until Next Time in the Small World
I would happily spend an evening choosing exactly how haunted Vesper's bouquet should be. The real pleasure of a figure like this is how a small decision changes her character: a tilted head, a softer veil, or one stubbornly pink rose among the browns.
Which detail would you make first, the skeletal face, the extravagant gown or the flowers? Share your own tiny residents with #smallworldminiatures. You can find more ideas in the Small World Miniatures shop, and join the newsletter through the website for the next visit. Mr. Bramble is apparently expanding his autumn palette. He has discovered beige.








Comments