



The House That Curled Its Roof: A Gaudí-Inspired Miniature Halloween House

First Impressions in Miniature
I would like to meet the person who looked at a perfectly serviceable roof and decided it needed to curl at the ends. This Gaudí-inspired miniature Halloween house carries that thought through almost every surface: turquoise waves, purple scales, amber windows and a great curling gateway that seems to have grown beside the front steps. Even the pumpkins look pleased with the arrangement.
The strongest surprise is the warmth. Black bats circle the outline, and two little white ghosts stand near the entrance, but the glowing windows make this a house you might approach for excellent sweets. I especially like the cool mint edging against orange light. Below, you can translate that extravagant silhouette into layered card, paper mosaic, simple glazing and a manageable collection of seasonal details.
The purchased alternatives below use Amazon affiliate links; if you buy through them, it helps fund this tiny world. As an Amazon Associate I earn from qualifying purchases.

A cottage kit is a separate option if your favorite part is decorating a tiny building rather than constructing its shell. The guide here follows a scratch-built display façade, with a shallow interior for lighting. Neither approach requires you to reproduce every curl. Choose the feature that makes you grin and give it room.
Miniature Backstory — The Tiny Tale
In the lane of Carrer de la Carabassa, the house belonged to two ghosts, Pip and Alba, who had inherited a pumpkin lantern rental business. Alba kept the accounts. Pip kept forgetting that ghosts could pass through walls and spent every morning searching for the front-door key.
Their busiest evening arrived with a problem: the enormous lantern beside the curling arch refused to glow. Pip proposed a stern conversation. Alba suggested checking whether the resident bat, Clove, had once again fallen asleep inside it. Clove had. He maintained that the lantern was clearly a studio apartment with unusually good ventilation.

Alba offered him the chimney for the evening. Clove inspected the accommodation, complained about the view, and accepted a pumpkin seed as compensation. The lantern brightened, the windows shone, and Pip announced that the house was ready for customers. Then he asked where they kept the key.
If you look at the two white ghosts in the finished scene, you can decide which one handles complaints. I vote for the little one by the door. That is the posture of someone who has already explained the lantern policy several times.
A Guided Tour of the Build
The curling gateway
Begin on the left, where a tall turquoise sweep folds inward like a wave. Its outer face reads as broad rectangular tile, while warm little accents brighten the inner edge. Thin dark lantern arms supply a delicate counterpoint to that substantial curve. The open center matters as much as the decorated surface: it leaves breathing room beside the densely ornamented house.

The doorway repeats that invitation on a smaller scale. Oval glass-like panels sit in dark double doors beneath an amber arch, with shallow steps leading up from the patterned base. For a simpler companion project, a ready-made fairy doorway gives the same welcoming story cue; compare its size with your planned façade before adding it.

Roof scales and a flower of light
The upper roof ripples through blue, violet and orange. Rounded mint-green edging makes each fold readable even where the colors mingle. Below it, the great circular window divides into petal-like amber sections around a turquoise center. That bright circle gives your eye a destination, so the roof can wander without losing the composition.

The neighborhood at ground level
At the foot of the house, pumpkins vary in size rather than standing in a tidy row. The larger ghost sits near a cluster of orange forms; slender purple flowers lift the scene around the gateway. Mosaic-like curls travel across the flat display base. Notice how the gray steps provide a quiet pause between all those patterns. A miniature can be exuberant and still leave somewhere for your eyes to rest.

That combination of warm windows, playful proportions and Halloween gardening also appears in the tiny pumpkin pie shop. Its shopfront is a useful comparison for deciding how much storytelling belongs at a doorway before the entrance becomes difficult to see.
Inspirations — From the Big World to the Small
The clearest architectural parallel is Casa Batlló’s façade. Its official account describes the animal-like scales of the roof and the changing colors of the rounded pieces along its crown. Here, the roof’s overlapping colors and curved rim suggest a related vocabulary.
At Park Güell’s Dragon Stairway, the famous dragon or salamander wears trencadís mosaic. That fragmented ceramic language offers a useful way to think about the house’s patterned base and curling gateway. For a miniature interpretation, cut colored paper into irregular pieces. You can evoke the lively surface without bringing sharp broken pottery to a small workbench.

A third reference is Casa Milà’s sculptural rooftop, where chimneys and stairwells become expressive forms. The lesson for this project is modest: give the chimney an intentional silhouette, rather than treating it as the last square box left over. These references guide the curves, surfaces and rhythm; the pumpkins and friendly ghosts belong to our October imagination.
Artist Tips — Make Your Own Magic
The illustrations in this guide are AI-generated, and the methods offer an inspired version rather than an exact, tested reproduction of the pictured house. Results vary with materials, patience and how strongly your roof feels about symmetry. Use the process images as visual teaching aids, then let your own small building develop its personality.
Plan your miniature Halloween house
A suggested 1:24 scale keeps the façade approachable, though the reference has no confirmed scale. Try a base around 32 by 24 centimeters and a doorway roughly 8 centimeters high as planning dimensions, not measured plans. A shallow shell is enough to hold backlighting. This is an intermediate project because repeated roof tiles and curved laminations need care; simplifying the number of windows makes a sensible first version.
Supplies
• Structure: reuse clean cereal-box card and sturdy packaging board. Choose craft chipboard for more consistent thickness, with basswood strips for hidden braces. Keep enough card for a removable back and several test samples.
• Curves and surfaces: use paper scraps, plain tissue and clean foil for lightweight forms. Add cardstock for roof scales and air-dry clay for pumpkins, ghosts and small trim pieces. Clay is optional where layered paper will do.
• Windows: save clean transparent packaging with smooth edges, or choose clear acetate sheets. Translucent amber paper, black paper strips and canopy glazing glue make a simple faux-glass treatment without glass cutting.

• Color and adhesive: use a clean reusable mixing lid, PVA craft glue and acrylic paints in turquoise, mint, violet, orange, charcoal and cream. Fine detail brushes and a suitable clear gloss varnish are useful for selected tile surfaces; test the combination first.
• Details: repurpose paper offcuts for bats and flowers, then add craft wire for optional lantern brackets, small clay pots and a few dried-looking foliage accents. Ready-made miniature pots are an alternative if sculpting them is more work than you want.
• Tools and optional light: gather scissors, tweezers, a pencil, a protected cutting surface and a sharp hobby knife. A ready-made low-voltage miniature LED kit can light the windows. Follow its instructions and keep its battery compartment accessible; unlit amber glazing also works.
1. Find the silhouette before the details
Draw the façade at your proposed model size on scrap paper. Mark the door, the big rosette and the main roof waves first. Add the tall curling gateway on a separate sheet so you can move it around. Use the doorway as your visual scale reference; a pumpkin beside it should feel like an object a resident could pass, rather than a roadblock.
Cut plain paper shapes and stand them on the base with temporary folded tabs. View the arrangement from low down and from both front corners. Leave visible space inside the gateway curl and an uninterrupted route to the steps. Trace the chosen outlines onto structural card only after the composition reads clearly. Nothing needs glue yet. If the layout feels crowded, remove a secondary window before shrinking every feature.

2. Build a shallow, accessible shell
Cut the main front and side walls from craft chipboard, then add triangular or rectangular braces behind them with basswood strips or doubled card. Cut the openings while the pieces are flat, using several controlled knife passes away from your supporting hand. Protect the work surface. Rounded window corners can be simplified into wider arches if tiny cuts become frustrating.
Glue the walls squarely to the base, leaving the back removable. Add a small inner ledge to support that panel later. Test-fit the roof pieces without closing the shell, and keep the interior open for glazing and optional lights. Allow the adhesive to set according to its instructions before lifting or loading the structure. For an easier build, make a flat-backed façade with short side returns instead of a complete house.

The rosette and narrow window borders are much easier to handle under good work lighting. A magnifying desk lamp can help you see tiny joins, but it stays on the workbench; it is not the light source installed inside the model. Keep scraps organized so a window frame does not disappear beneath a respectable-looking pile of paper.

3. Laminate the roof waves and gateway
Build each curl from several thin card layers rather than forcing one thick sheet into a tight bend. Test the grain direction with offcuts, pre-curve the pieces around a smooth unmarked jar, then glue matching layers together. Hold them with temporary clips or paper bands that do not crush the edge. Make the gateway as a broad laminated profile with a hidden triangular foot secured to the base.
Cover bulky transitions with small foil shapes and narrow paper strips, using only enough adhesive to seat the paper. Keep the pointed roof ends light. Leave the rosette opening unobstructed, and check that the removable back still fits. Let everything dry thoroughly before adding surface decoration. If a freestanding curl feels unstable, shorten it or connect its lower section to a discreet rear brace.

4. Lay paper scales and mosaic
Paint a few separate cardstock sheets in your turquoise, violet and orange palette, then let them dry flat. Cut small rounded scales for the roofs and irregular pieces for the gateway and base. Work upward from each roof’s low edge so the next row slightly overlaps the previous one. Use a pencil guideline sparingly beneath the tiles to keep the overlap moving with the curve.
Apply mosaic pieces with tiny gaps over a dark undercoat. Avoid plaster grout for this paper method; the dark gaps supply the separation. Alternate large and small shapes, while keeping a dominant cool color so the amber windows will stand out later. Form the rounded eave trim from layered paper ovals or small clay pieces dried separately before attachment. Let the adhesive dry fully before handling the surface.

Keep a few painted offcuts beside the model as color references. A wet palette is an optional aid for organizing acrylic mixtures during a session; your reusable mixing lid remains a perfectly useful choice. Repeated colors across the roof, gateway and base will pull the different patterns into one house.

5. Paint depth, then choose the shine
Shade the lower edges of trim and the recesses between layers with a thin, controlled darker color. Wipe most paint off the brush before lightly catching raised edges in mint or pale turquoise. Keep the doors darker than their frames. Paint the steps gray with subtle variation, giving the entrance a quieter landing between the roof mosaic and the patterned ground.
Choose where light should catch: a few roof scales, the rounded eave pieces and selected mosaic fragments. Test clear gloss on a spare painted tile, following the varnish maker’s compatibility and drying directions. Apply thin coats only after the paint has dried, leaving the wall recesses and steps matte. Allow the coating to cure as directed before fitting delicate details. A simpler all-matte finish still works; the color and silhouette carry the design.

A restrained glossy finish can suggest glazed ceramic without covering every surface in reflections. The varnish option below is relevant to that finishing choice. Keep it away from your glazing until a separate compatibility test shows a clean result.
6. Fit the rosette and warm windows
Lay a paper window template under clear acetate. Attach fine black paper strips to suggest the divisions, then place translucent amber paper behind the clear layer. Add a small turquoise center to the rosette. Keep each assembly flat while its compatible glazing adhesive dries, and trim the backing so it stays hidden behind the opening. Test one window before preparing the entire set.
Attach the glazing from inside the shell. For optional light, fit a ready-made low-voltage LED kit exactly as its maker directs, with the light source set back from the paper to avoid a bright pinpoint. Keep connections unmodified and the switch reachable. Check the light before closing the removable back, then test again after closure. Never use candles, hot bulbs or mains wiring. If unlit, choose lighter amber paper so daylight can still reveal the pattern.

7. Give October a place to stand
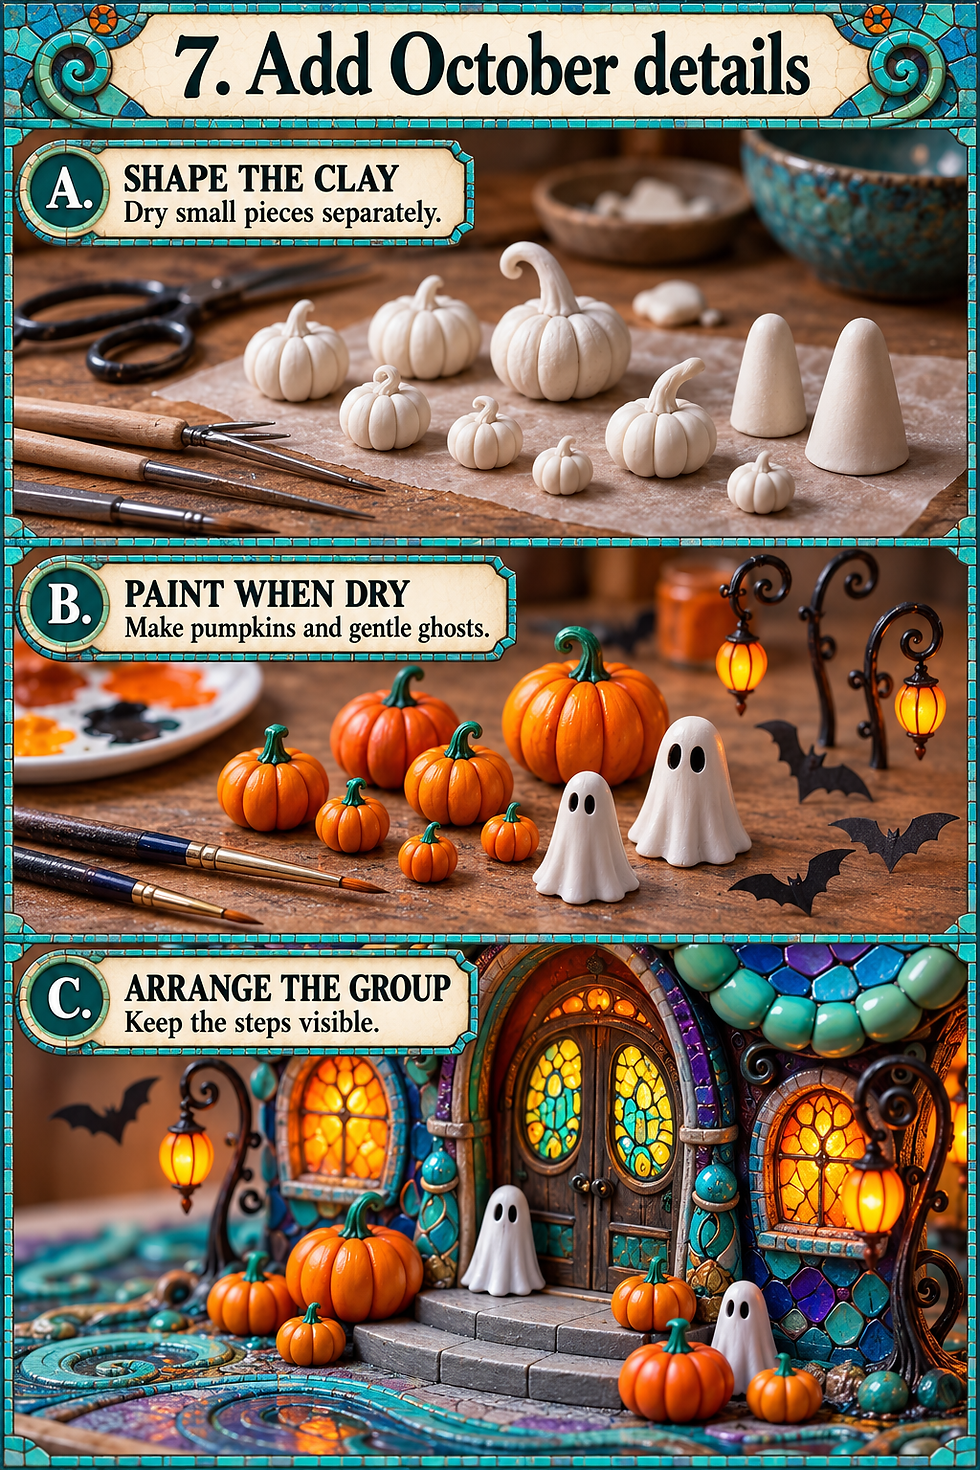
Shape small pumpkins from air-dry clay, pressing shallow grooves with a blunt tool and adding short curled stems. Make the ghosts as simple rounded cones with gently flared bases. Dry these pieces separately according to the clay manufacturer’s directions before painting; touch-dry is not the same as ready for paint. Crayola’s guidance, for example, specifies thoroughly dry clay before acrylic decoration.
Cut bats from black paper and curl non-electrical craft wire into lantern brackets with suitable pliers. Protect your eyes when clipping wire and fold sharp ends inward. Small amber paper lanterns can remain unlit. Arrange pumpkins in unequal groups, with one ghost near the door and another off to the side. Dry-fit everything first, keeping the steps readable, then glue the chosen grouping and let those small joints set undisturbed.
8. Plant the threshold and finish the base
Roll tiny paper flower heads and attach them to slim stems, or use suitable ready-made scenic foliage. Place the tallest purple flowers near the gateway, then a lower cluster beside the windows. Small pots give those plants a believable place to grow. Use only a little ground texture; enough exposed patterned base should remain to carry the curling lines from the gateway toward the front edge.
Check the model from its intended viewing angle before fixing the final details. Move one pumpkin if it hides the ghost, straighten a lantern bracket, and touch up exposed card edges with their matching paint. Clean stray adhesive from visible surfaces while the product permits, without soaking the paper. Allow all repairs and coatings to dry or cure as directed before moving the model. Lift it by the base, never by a charming but vulnerable curl.

Purchased miniature terracotta pots can replace hand-shaped ones if you want to concentrate on flowers. Check their actual dimensions against the doorway and planting space. A pot that looks small in a listing can still dominate a shallow model; a few paper cones painted terracotta are a lighter alternative.
Photograph the curves and glow
Set the model against a plain gray or muted brown background with enough distance to soften the backdrop. Bring your viewpoint down toward the doorway, then angle slightly toward the side that shows both the rosette and the curling gateway. Use a large diffused light to one side and a white card opposite it to lift the shadows. Keep the lamps and reflector outside the finished framing.
If the windows are lit, reduce the room light gradually rather than plunging the whole scene into darkness. Expose so the window pattern remains visible; a featureless white glow loses the miniature’s best detail. Shift the side light if glossy tiles reflect a distracting rectangle. Take a full view with the base edge visible, then close-ups of the curl, rosette and ghost grouping. A steady support helps you keep these small details crisp.

Small fixes that save a large sigh
• Curl flattening: rebuild it from thinner pre-curved layers and add a hidden brace; more wet adhesive usually adds weight without solving the shape.
• Paper tiles lifting: use less glue, seat each piece gently and let it dry before the next coat.
• Rosette looking muddy: simplify the divisions and increase the contrast between the amber petals and turquoise center.
• Light leaking at seams: add an opaque inner card strip, keeping it clear of the lighting kit and its access points.
• Too much visual noise: remove a few loose decorations and leave the steps and gateway opening clear.
Closing — Until Next Time in the Small World
I like a Halloween house that welcomes visitors with bright windows and a roof that appears to have enjoyed itself. Pip may still be looking for his key, but Alba has the lantern business under control. Which detail would you borrow for your own miniature: the curling gateway, the flower-like window or the pumpkin crowd?
Share your version with #smallworldminiatures. For more tiny-world ideas, you can find the newsletter signup on Small World Miniatures and browse the online shop. Leave Clove a suitably ventilated lantern, and the neighborhood should be ready for company.








Comments