


The Inventing Room Bench: A Charlie and the Chocolate Factory miniature

First Impressions in Miniature
The first thing I want to do in this room is inspect the sweets. The second is find out whether anyone has remembered which handle does what. A thick wooden workbench fills the foreground, while copper-colored vessels, curling tubes and jewel-bright globes rise behind it. The arched window admits a cool wash of daylight; almost everything else seems dipped in warm caramel.
This Charlie and the Chocolate Factory miniature imagines an Inventing Room bench where confectionery and curious machinery share the same crowded address. I especially like the ordinary towel hanging beneath all that extraordinary equipment. Even a wildly ambitious sweet inventor apparently has washing-up. Come closer for the small details, then we'll plan a manageable display version with dry decorative sweets, convincing metal finishes and absolutely no functioning laboratory apparatus.
The purchased alternatives below use Amazon affiliate links; if you buy through them, it helps fund this tiny world. As an Amazon Associate I earn from qualifying purchases.
If you enjoy the rhythm of pipes and machinery, the ROKR Moving Dream Coffee Factory Kit offers a separate mechanical-fantasy build. It is not a model of Dahl’s Inventing Room.

The Moment in the Book: Inside the Inventing Room

That moment of discovery is the point of connection for this miniature. Its particular lollipops, striped towel, notebook and jewel-colored glassware belong to the illustration's interpretation, rather than a claim that Dahl placed those exact objects on this bench. The scene preserves the pleasure of looking closely at a confectioner's work in progress while giving the room its own decorative design.
A Guided Tour of the Build
The workbench and its everyday details
The workbench has a satisfying weight: broad legs, shallow drawers, little curved pulls and a lower shelf crowded with vessels and a wooden crate. Above, a pale slab gives the colorful jelly shapes their own stage. The open notebook sits at an angle, with drawn diagrams rather than a neat block of text. That diagonal breaks up the bench's strong horizontal lines. The striped towel adds a soft, slightly untidy note beside the more polished objects.

Ruby globes and spiraling lines
The apparatus makes a rising rhythm across the back of the bench. A red globe stands high on the left, green sits lower near the middle, and purple catches the light beside the large copper-colored vessel. Amber and blue coils curl between them. I enjoy how those looping shapes soften the upright pipes. Highlights suggest reflective metal and glass, although the illustration cannot tell us the materials or working methods of a physical build.

The lollipop stand and its colorful neighbors
At the left, tall spiral lollipops lift red, orange and green above the work surface. A pedestal dish nearby holds a mound of crystalline-looking sweets. Behind them, rows of filled jars create smaller, repeated dots of color. Those orderly shelves make the busier bench easier to read. The restrained brown and cream setting does plenty of quiet work here: without it, every bright sweet would be competing for the same small patch of attention.

The CUTEBEE Bread Factory Bakery Model Kit is another ready-designed food-themed project. Choose it as a separate bakery build rather than expecting it to reproduce this confectioner’s bench.

Inspirations: From the Big World to the Small
Roald Dahl's Inventing Room provides the literary starting point: a place where creating improbable sweets becomes an occupation. The Roald Dahl Story Company's teaching resources even invite readers to apply for a sweet-inventor job. The brass fittings, stone-like walls and elaborate copper-colored machinery shown here are an imaginative visual interpretation. They should not be treated as a measured reconstruction of the book or a replica of a particular film set.
For a real design comparison, look at Michael Faraday's magnetic laboratory at the Royal Institution. The institution explains that its present arrangement draws on Harriet Moore's paintings of the room from the 1850s. The useful parallel is the feeling of work gathered around a bench, with equipment and storage belonging to the same practical space. You can translate that into a miniature by placing the most important apparatus within reach and reserving the high shelves for repeated containers.
The Science Museum Group's glass condenser, catalogued as three connected glass bulbs, offers a second reference for the expressive shapes of scientific equipment. Our colored globes and coils freely exaggerate that visual vocabulary. Borrow rounded silhouettes and slender supports, rather than trying to reproduce a real process. A convincing decorative connection can lead behind the bench and stop there; it does not need to carry anything. For another setting to explore, visit my Victorian fantasy candy shop miniature.

For the confectioner's side, York Castle Museum's Kirkgate is especially useful. Its shops represent businesses operating in York between 1870 and 1901, and its old timber-framed building houses Barton's sweet shop. That layered shop-interior character echoes the mixture of sturdy wood, jars and small goods here. I'd gather warm wood, creamy stone, copper and a few candy colors on a board before choosing every tiny bottle.
For a different elaborate architectural project, the LORENOOK Magic Clock Tower Book Nook combines a clock-tower setting with decorative detail. It is an optional kit alternative, not part of the scene described in the book.

Artist Tips: Make Your Own Magic
The illustrations in this feature are AI-generated concepts, and this guide offers an inspired route rather than an exact, tested reproduction. Your glue may have its own opinions about the timetable. Results vary with materials and technique, so make small samples and follow each product's instructions. Keep the entire laboratory decorative: no flames, hot plates, heated vessels, chemicals, pressure systems or edible experiments.
Planning your Charlie and the Chocolate Factory miniature
A proposed 1:12 scale gives the sweets and notebook enough room to be readable. It is a planning choice, not a confirmed scale for the illustration. Begin with an approximately 30 by 25 centimeter base and a bench around 16 by 8 centimeters, roughly 7.5 centimeters high; adjust the footprint to your shelf. This is an intermediate project because the small supports and crowded arrangement need patience. A purchased miniature bench and fewer globes provide an easier route. Essential tools are scissors, a craft knife, a protective cutting surface, brushes, tweezers and small clamps.
Supplies: stock the inventor’s cupboard
Structure, essential: reuse clean, dry packaging card for templates and clean wooden offcuts for the base. Purchase bookboard or suitable thin plywood if the scraps flex. Save straight wooden coffee stirrers for decorative boards and shelving; stripwood is the predictable alternative. Use PVA craft glue where its label lists paper or wood, and a different material-compatible adhesive only where required.
AMACO Rub ’n Buff Antique Gold is an optional way to pick out a few brass-like edges. Follow its safety, ventilation and substrate guidance; copper-colored acrylic paint remains a separate choice for the large tank.

Surfaces, essential: use thin box card for the stone-like floor and wall details. Gather water-based acrylic paints in cream, brown, charcoal, copper, brass and candy colors, plus brushes. Purchased modeling card replaces uneven packaging. Compatible matte and gloss finishes are optional and remain separate products: matte suits walls; gloss belongs on selected sweets or vessels.
Apparatus, essential: sort clean spare beads, smooth plastic caps and card tubes for globes, pots and cylinders. Purpose-made miniature plastic bottles and acrylic beads offer alternatives. Use short lengths of soft craft wire for decorative coils, or flexible cord for an easier version. Clear packaging may supply flat glazing if its edges can be made smooth. Do not use broken glass or containers that held medicines or chemicals.
Sweets and story details, essential: save colored paper, fine cotton, thread and small wooden sticks. Purchased air-dry clay can supply rounded jellies and lollipop discs; it is not polymer clay and requires no baking. Tiny dry painted paper balls can fill jars. Optional extras include ready-made miniature hardware and a complete low-voltage LED kit with its own compatible power supply. Keep all small parts and imitation sweets away from children and pets.

1. Rehearse the bench before building the room
Draw the base, bench and back wall on scrap paper. Cut simple paper footprints for the pale slab, notebook and apparatus. Arrange them with a clear front edge and a little breathing space around the tallest globe. View the layout from the angle you expect to photograph. Move the pieces now, while a grand redesign involves paper rather than a difficult conversation with dried glue.
Make a folded-card bench mock-up at your chosen scale and compare the jar height against it. Keep ordinary jars noticeably shorter than the tabletop depth. Mark where the arched window, shelves and any lighting lead will go. Nothing needs drying at this stage. For a smaller project, omit the side wall and staircase entirely; a bench against one shallow backdrop captures the scene's essential character without filling a whole room.

2. Assemble the base and shallow architectural backdrop
Cut your stable base and a back wall, then add a short return wall if you want the arched window. Work on a protective cutting surface, keep your supporting fingers clear of the blade and make controlled light passes. Join the pieces with an adhesive suitable for the actual materials, adding hidden card or wood braces at the rear. Keep the shell square and supported until the joints cure according to the adhesive label.
For the window, cut an arched opening in layered card before assembly and add thin card strips as mullions. Attach smooth-edged clear packaging behind it, testing the adhesive on a scrap first. A simpler option is a pale blue painted recess with a card frame and no opening. Add card rectangles as broad floor tiles and a few wall blocks, leaving narrow gaps. Keep their texture shallow so the bench sits level. Let these bonds dry fully before painting or loading the base.

3. Build a bench that can carry the composition
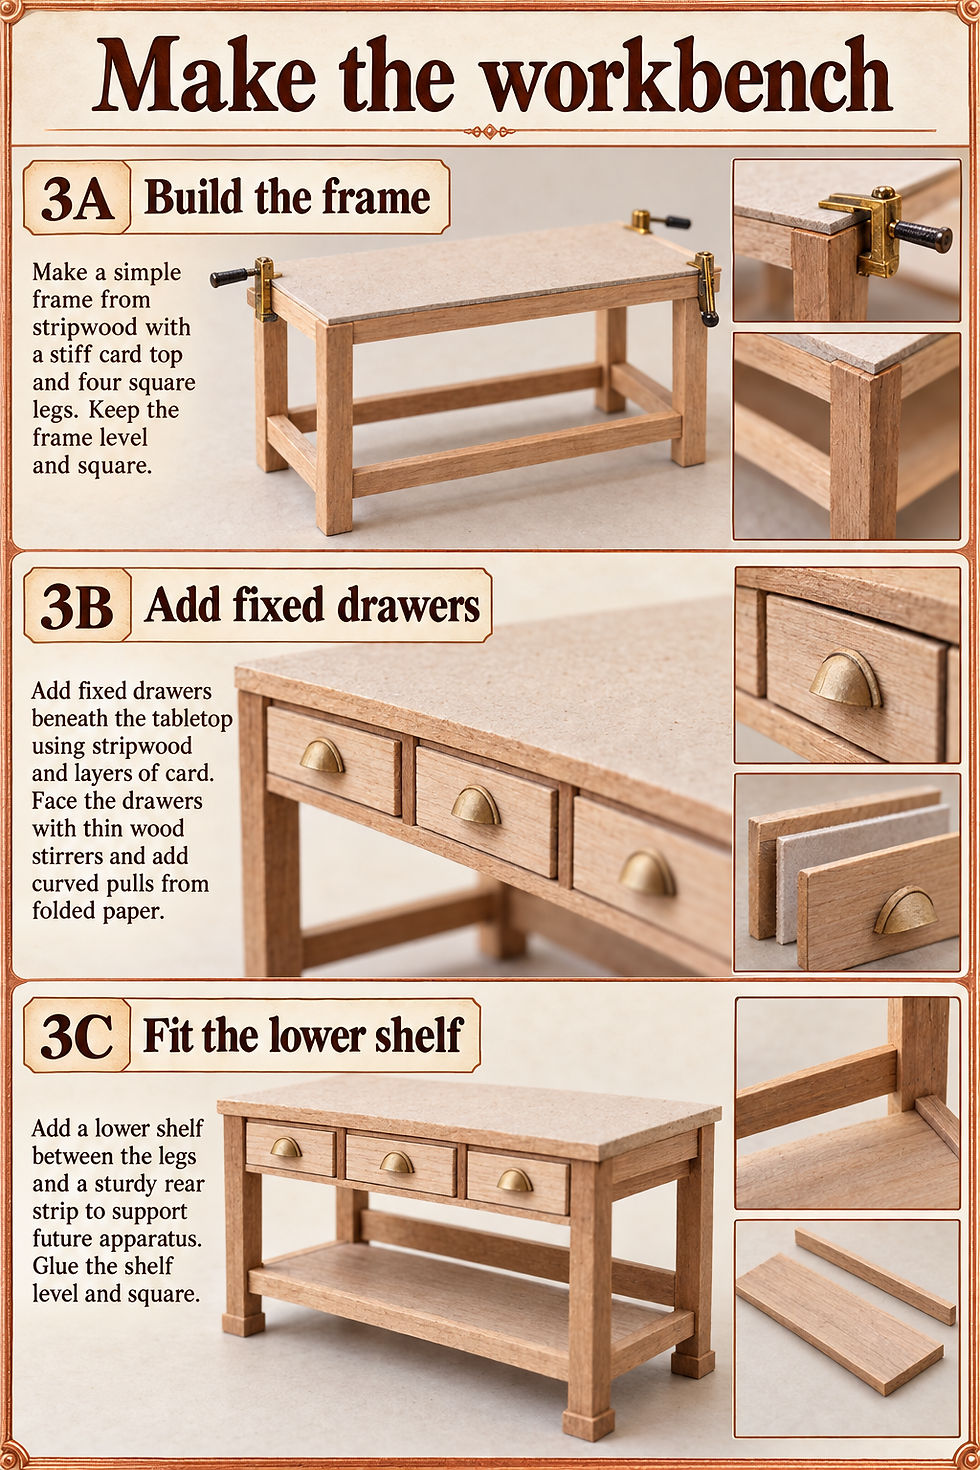
Use a stiff card tabletop over a stripwood frame, then face its upper surface with clean stirrers or thin wood strips. Fit four legs and crosspieces, keeping every foot on the same flat surface while the adhesive cures. Add a lower shelf for the crate and spare molds. Check the table with the planned lightweight props before attaching it to the base. If it rocks, correct the leg lengths rather than hoping the floor paint will help.
For a separate baking corner, SAMCAMI Baking Accessories supplies small kitchen props. Check the stated scale and piece dimensions against the bench, and use only accessories that suit your own design.

Create shallow drawer fronts from layered card and curved pulls from small folded paper tabs. Keep them fixed; working drawers add complication without improving this particular view. A narrow strip along the back can support the apparatus, reducing the load on individual bottle stems. Make shelves from the same wood family, and try a small scrap-cotton towel over a smooth decorative rail. Leave the cloth unglued until you are happy with its fall. Let the structural joints cure before applying wet finishes.
4. Separate worn wood, pale stone and warm metal
Paint a scrap of every material first. Give the wall a warm cream base, then stipple a little muted brown near joints; paint the floor a quieter earthy tone. Build the bench color in thin brown coats, allowing each to dry, and draw a few fine grain lines in the direction of the boards. Avoid thick black outlines around every plank. You want age and variation, with enough calm surface left for the sweets to stand out.
Vallejo Rust 70.183 is an optional weathering set for subdued wear on the decorative machinery. Try it on a spare painted piece and keep the effect restrained around the bright sweets.

Make the slab from layered card, seal it with a compatible coating if needed and paint it off-white. Add only a few delicate gray veins. For metal-looking parts, apply a dark base and lightly brush copper or brass paint over raised areas once dry. Use warmer copper for pots and slightly yellower brass for fittings. Wait for each paint layer to dry before handling; apply any compatible protective finish under its own instructions. Leave most wall surfaces matte so the later glossy objects earn their sparkle.

5. Assemble convincing, completely nonworking apparatus
Build the large tank from a short card tube with layered card ends, then paint it copper. Small paper strips become bands; tiny glued card circles suggest rivets. Use lightweight translucent beads as the globes, seating them in sturdy little ring-shaped supports instead of balancing them on thin stems. Choose colored beads or place colored paper behind clear plastic bottles. Keep every container dry and decorative. Solid props are easier to move and photograph than miniature vessels filled with liquid.
Vallejo Gloss Varnish 70.510 can provide a selective shine on compatible decorative sweets or vessels. Test first, follow the drying instructions and keep the matte wall and wood finishes visually distinct.
Wrap soft craft wire around a smooth cylindrical tool to make a loose coil, slide it off and flatten the sharp ends inward with suitable pliers. Wear eye protection when cutting wire and collect the offcuts. Paint the coil only with a coating intended for its surface. For the simpler version, curve flexible cord over a paper template and fix it to a backing. Attach coils and short pipe sections to the bench support, not delicate globe necks. Let all connections cure before moving the assembly. A blank dial face and fixed handles suggest machinery without requiring readable numbers or a mechanism.

6. Add the sweets, the interrupted work and a gentle glow
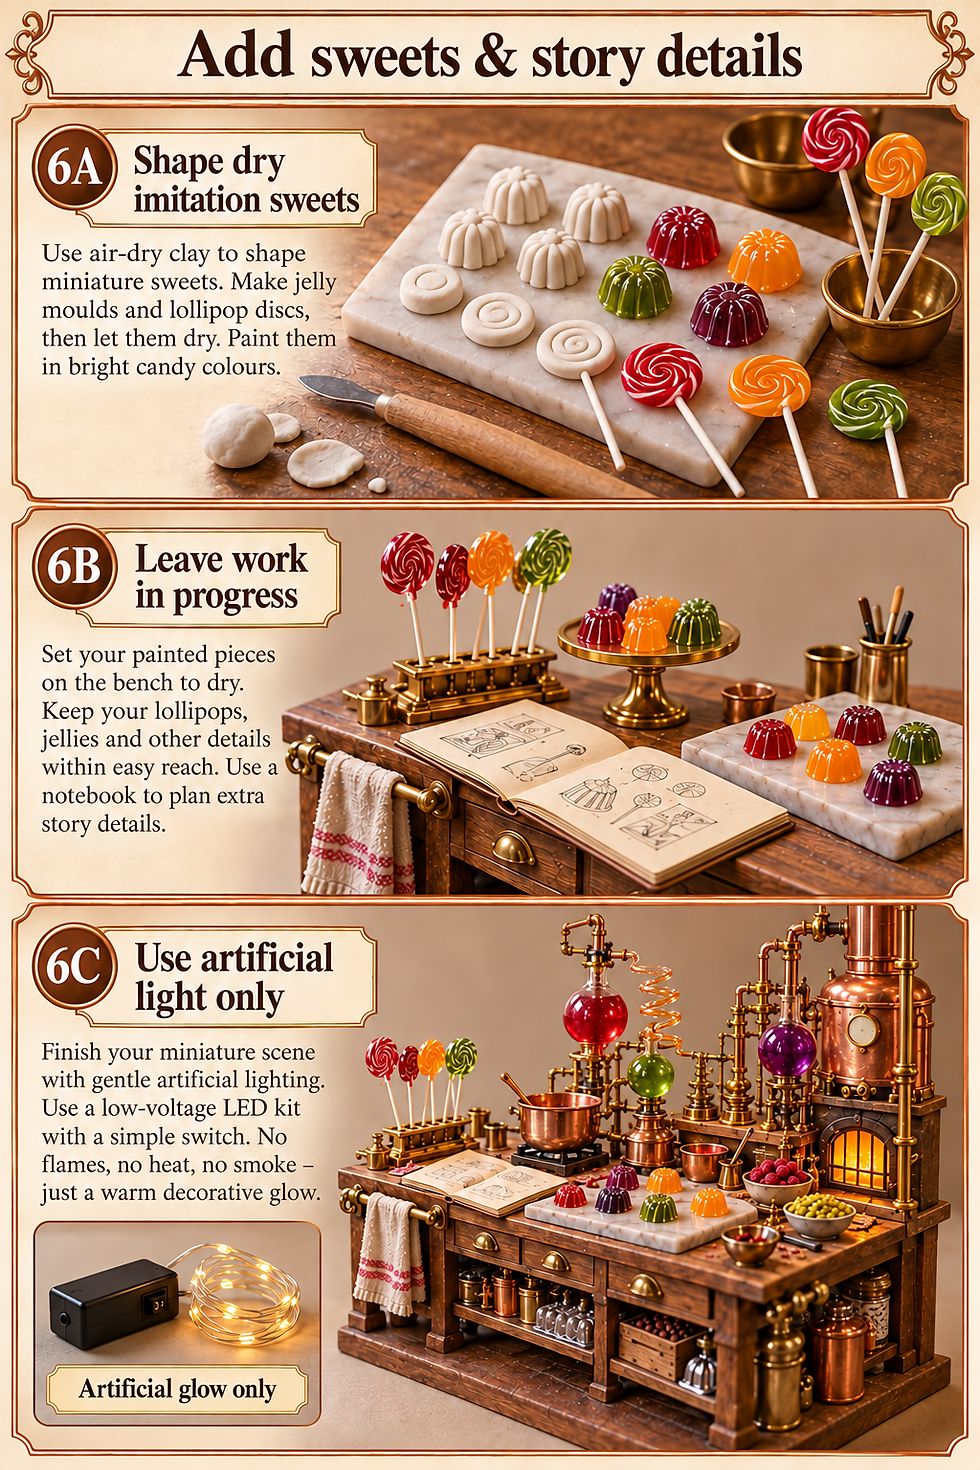
Form small jelly shapes and lollipop discs from air-dry clay, following its instructions for thickness and drying. Press shallow flutes into the jellies with a blunt tool. Make lollipop swirls with paint once the clay is dry, then attach short smooth sticks to a card stand. Keep the pieces deliberately inedible and avoid real sugar, food, loose glitter or sticky syrup. Paint tiny paper balls for jar contents and glue them in place. A few carefully grouped colors convey abundance more effectively than dozens of unrelated sweets.
Fold thin paper into an open notebook, adding your own simple sketches, and arrange it beside the pale slab. Set the striped cotton towel on its rail and place the larger stored vessels underneath. Leave a little clear work surface. If you use lighting, choose a complete low-voltage miniature kit, retain access to its switch and power supply, and follow its installation and ventilation instructions without modifying wiring. Represent the pictured hearth with painted warm color or an appropriate artificial LED effect only. Never add flame or heat. Let the props' adhesive cure before handling the finished display; an unlit scene beside a warm external lamp also works beautifully.
7. Photograph the scene without losing its little edges
Set the finished miniature on a stable tabletop against a plain warm-gray or cream backdrop. Place a large diffused light to one side and a white card opposite it to open the shadows under the bench. Keep lighting equipment clear of paper and fabric, following its operating instructions. Use a supported phone or camera near bench height for the immersive view, then step back for a second image that includes the base and reveals the display's miniature scale.
Shift the light or viewing angle until the globes retain their color instead of reflecting one bright white patch. Focus on the front sweets for one close-up, the apparatus for another and the lollipop stand for a third. A timer helps avoid movement during the exposure. Keep the frame level and check the towel, notebook and pipe silhouettes at full size before finishing. Photograph only after paint, adhesives and finishes reach the handling or full-cure state specified for them.

When the invention needs a small adjustment
A bowed slab: use a stiffer laminated core and thin paint coats. Let each coat dry before the next, and make a fresh sample if your coating repeatedly warps the card.
Apparatus that leans: shorten the tallest piece or broaden its hidden base. Add a support behind it; extra adhesive alone will not fix an unstable arrangement.
Candy colors that overwhelm: repeat a few colors in small groups and remove competing pieces. Keep the slab pale and leave some bench visible.
Boutigem Miniature Resin Coffee Tools (MixedColor-l) is a useful optional direction for a companion café display. The miniature accessories are decorative, not real food or working apparatus; check their dimensions before combining them with this build.

Foggy-looking clear pieces: stop and test the adhesive or finish on spare material. Replace the affected part if needed rather than applying another unverified coating.
A towel that looks like a duvet: switch to finer cotton or painted tissue, reduce the folds and shorten the overhang. Let any shaping medium dry off the model before positioning it.
Closing: Until Next Time in the Small World
The Inventing Room Bench feels most inviting where the magnificent machinery meets the ordinary workday: a notebook left open, jars put back on their shelves and a towel waiting on its rail. Charlie peering into the saucepan is a useful reminder of how much wonder a change of viewpoint can create. I'd give the bench's smallest details just as much care as its tallest globe.
Which detail would you make first: the spiral lollipops, the colored apparatus or the bench with its busy lower shelf? Tell me in the comments, and share your own creations with #smallworldminiatures. Visit the shop for more small-world inspiration, and join the newsletter for future scenes and practical ideas. Your display can invite a closer look while keeping every invention safely make-believe.








Comments